Publish a Mac Catalyst app for distribution outside the Mac App Store
An alternative to distributing Mac Catalyst apps through the Mac App Store is to distribute them outside the Mac App Store. With this approach, your Mac Catalyst app can be hosted at a location of your choosing for download. Members of the Apple Developer Program and the Apple Developer Enterprise Program can use this distribution approach.
Distributing a Mac Catalyst app requires that the app is provisioned using a provisioning profile. Provisioning profiles are files that contain code signing information, as well as the identity of the app and its intended distribution mechanism.
To distribute a .NET Multi-platform App UI (.NET MAUI) Mac Catalyst app outside the Mac App Store, you'll need to build a distribution provisioning profile specific to it. This profile enables the app to be digitally signed for release so that it can be installed on Macs. A distribution provisioning profile contains an App ID and a developer ID application certificate. You'll need to create a developer ID application certificate to identify yourself or your organization, if you don't already have one. In addition, you'll need to create a developer ID installer certificate to sign your app's installer package.
The process for provisioning a .NET MAUI Mac Catalyst app for distribution outside the Mac App Store is as follows:
- Create two certificate signing requests. For more information, see Create a certificate signing request.
- Create a developer ID application certificate. For more information, see Create a developer ID application certificate.
- Create a developer ID installer certificate. For more information, see Create a developer ID installer certificate.
- Create an App ID. For more information, see Create an App ID.
- Create a provisioning profile. For more information, see Create a provisioning profile.
- Download your provisioning profile. For more information, see Download your provisioning profile in Xcode.
Important
This article shows provisioning for distribution outside the Mac App Store using an Apple Developer Account that's part of the Apple Developer Program. It can also be used for an Apple Developer Account that's part of the Apple Developer Enterprise Program, as the steps required are largely identical.
Then, once provisioning is complete you should prepare your app for publishing, publish it, and notarize it with the following process:
- Optionally add entitlements to your app. For more information, see Add entitlements.
- Update the app's Info.plist file. For more information, see Update Info.plist.
- Disable code signature verification for your app. For more information, see Disable code signature verification.
- Publish your app using the command line. For more information, see Publish using the command line.
- Notarize your app. For more information, see Notarize your app.
Create a certificate signing request
Before you create a distribution certificate, you'll first need to create a certificate signing request (CSR) in Keychain Access on a Mac:
On your Mac, launch Keychain Access.
In Keychain Access, select the Keychain Access > Certificate Assistant > Request a Certificate from a Certificate Authority... menu item.
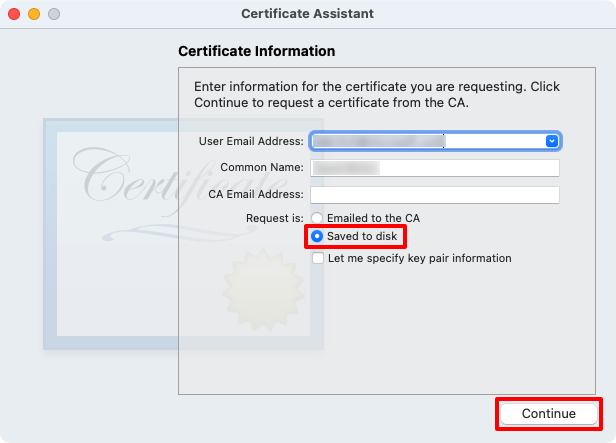
In the Certificate Assistant dialog, enter an email address in the User Email Address field.
In the Certificate Assistant dialog, enter a name for the key in the Common Name field.
In the Certificate Assistant dialog, leave the CA Email Address field empty.
In the Certificate Assistant dialog, choose the Saved to disk radio button and select Continue:
Save the certificate signing request to a known location.
In the Certificate Assistant dialog, select the Done button.
Close Keychain Access.
Repeat this process to create a second certificate signing request. The first CSR will be used to create a developer ID application certificate. The second will be used to create a developer ID installer certificate.
Important
You can't use the same certificate signing request to create a developer ID application certificate and a developer ID installer certificate.
Create a developer ID application certificate
The CSR allows you to generate a developer ID certificate, which confirms your identity. The developer ID certificate must be created using the Apple ID for your Apple Developer Account:
In a web browser, login to your Apple Developer Account.
In your Apple Developer Account, select the Certificates, IDs & Profiles tab.
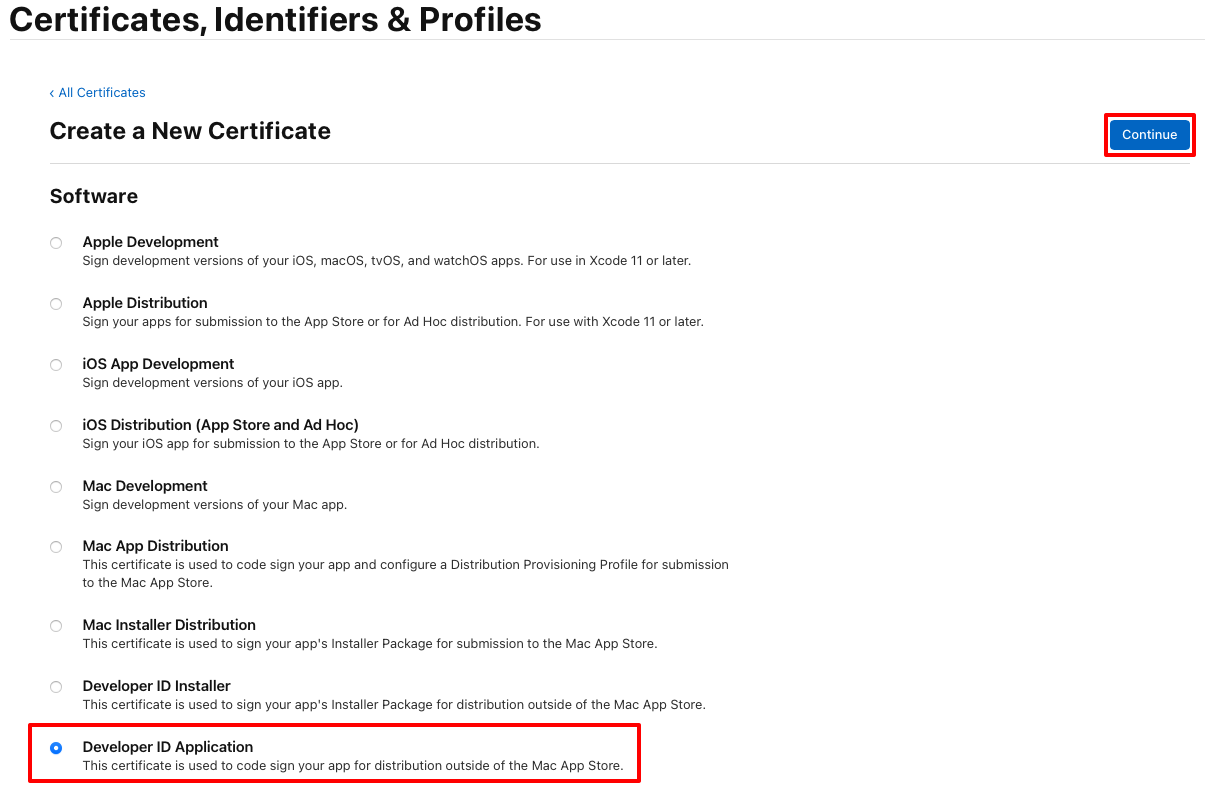
On the Certificates, Identifiers & Profiles page, select the + button to create a new certificate.
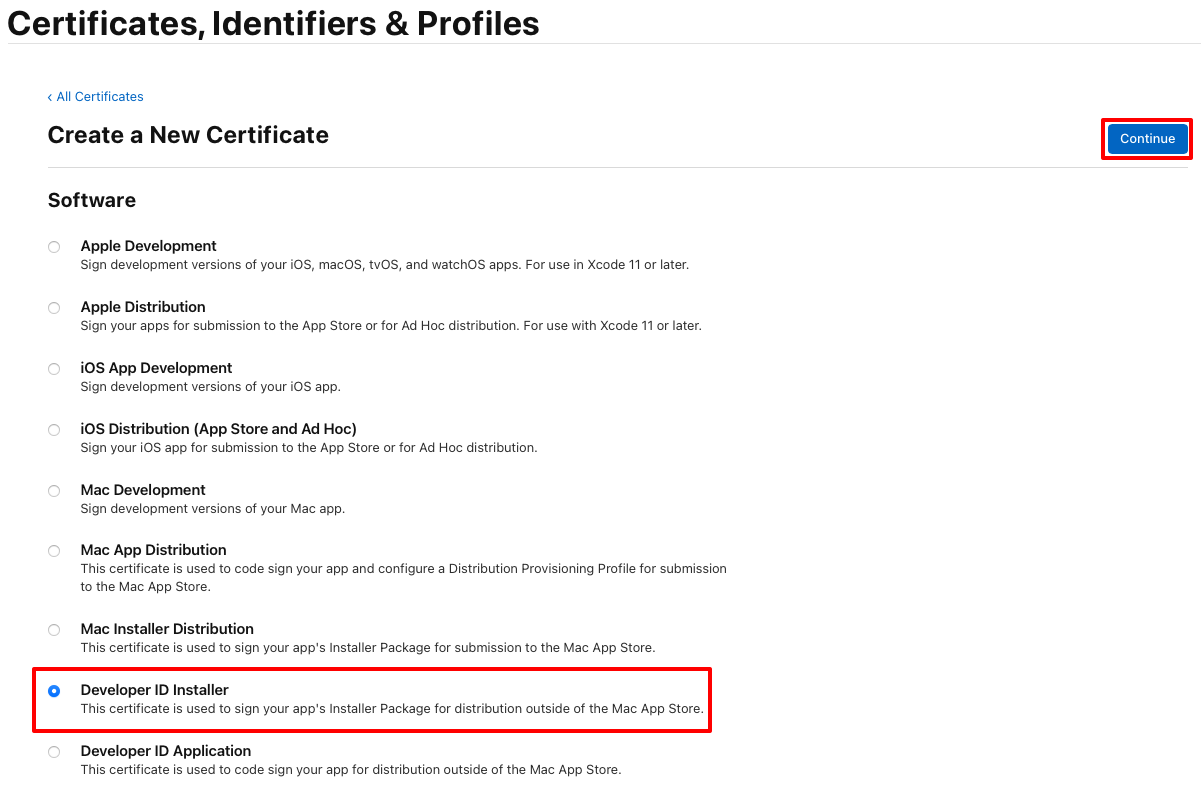
On the Create a New Certificate page, select the Developer ID Application radio button before selecting the Continue button:
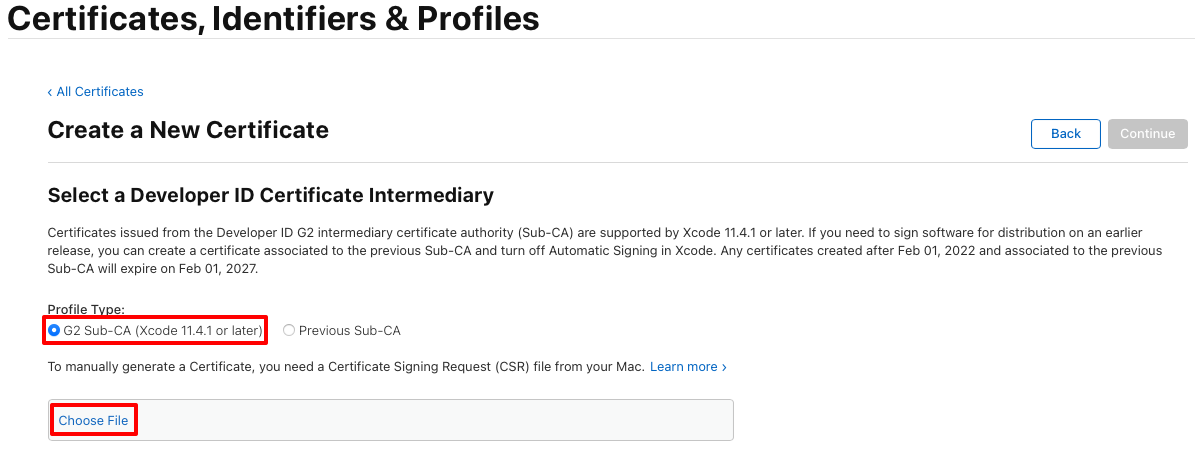
On the Create a New Certificate page, select the G2 Sub-CA radio button, and then select Choose File:
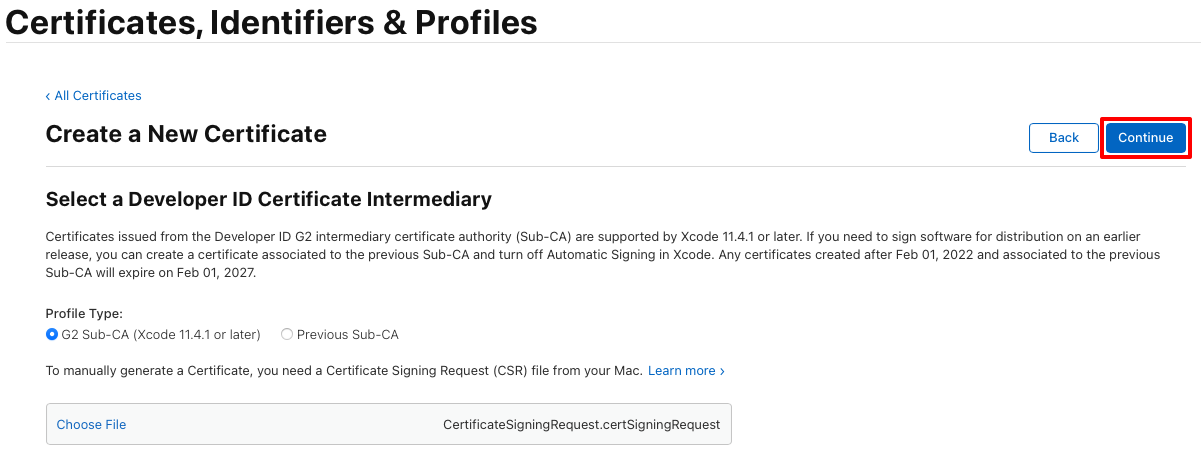
In the Choose Files to Upload dialog, select the first certificate request file you previously created (a file with a
.certSigningRequestfile extension) and then select Upload.On the Create a New Certificate page, select the Continue button:
On the Download Your Certificate page, select the Download button:
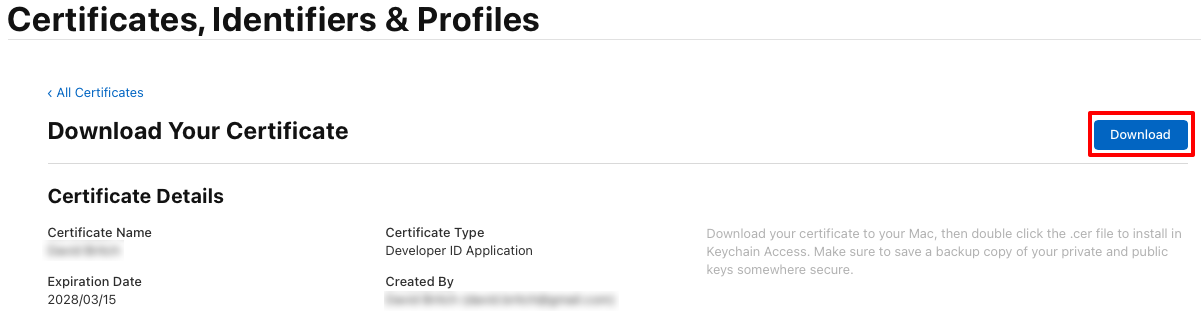
The certificate file (a file with a
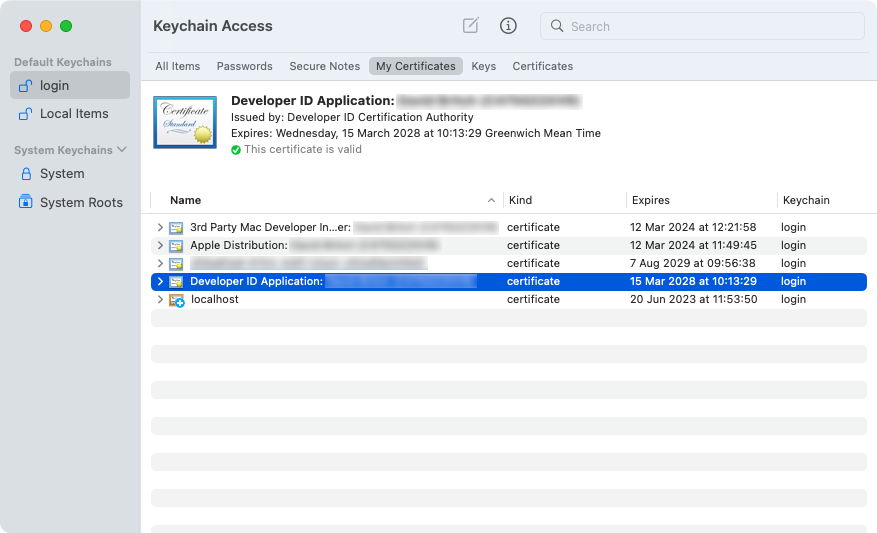
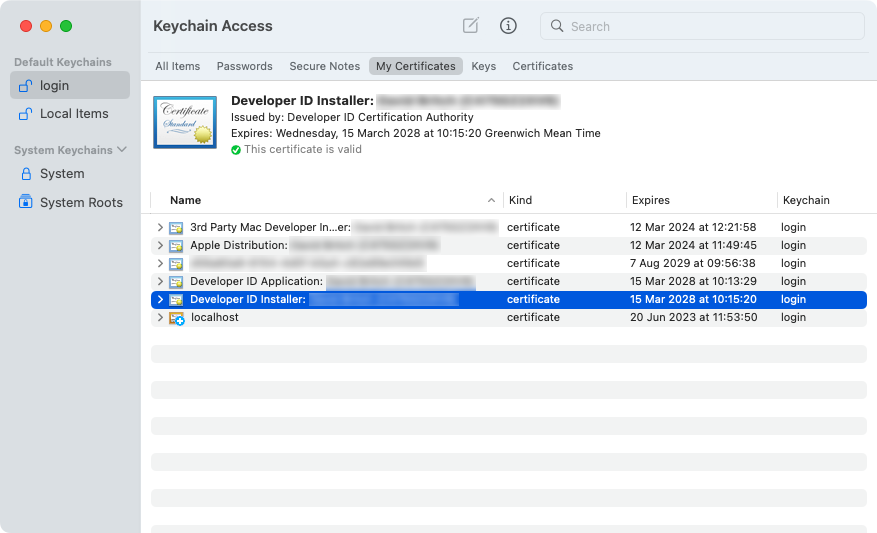
.cerextension) will be downloaded to your chosen location.On your Mac, double-click the downloaded certificate file to install the certificate to your keychain. The certificate appears in the My Certificates category in Keychain Access, and begins with Developer ID Application:
Note
Make a note of the full certificate name in Keychain Access. It will be required when signing your app.
Create a developer ID installer certificate
The CSR allows you to generate a developer ID installer certificate, which is required to sign your app's installer package. The installer certificate must be created using the Apple ID for your Apple Developer Account:
In your Apple Developer Account, select the Certificates, IDs & Profiles tab.
On the Certificates, Identifiers & Profiles page, select the + button to create a new certificate.
On the Create a New Certificate page, select the Developer ID Installer radio button before selecting the Continue button:
On the Create a New Certificate page, select the G2 Sub-CA radio button, and then select Choose File:
In the Choose Files to Upload dialog, select the second certificate request file you previously created (a file with a
.certSigningRequestfile extension) and then select Upload.On the Create a New Certificate page, select the Continue button:
On the Download Your Certificate page, select the Download button:
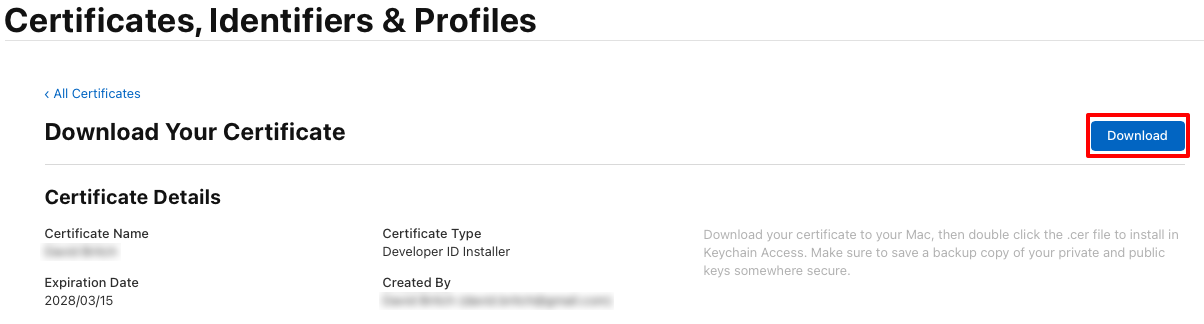
The certificate file (a file with a
.cerextension) will be downloaded to your chosen location.On your Mac, double-click the downloaded certificate file to install the certificate to your keychain. The certificate appears in the My Certificates category in Keychain Access, and begins with Developer ID Installer:
Note
Make a note of the full certificate name in Keychain Access. It will be required when signing your app.
Create a distribution profile
A distribution provisioning profile enables your .NET MAUI Mac Catalyst app to be digitally signed for release, so that it can be installed on another Mac. A provisioning profile for distribution outside the Mac App Store contains an App ID and a developer ID application certificate.
Create an App ID
An App ID is required to identify the app that you are distributing. An App ID is similar to a reverse-DNS string, that uniquely identifies an app, and should be identical to the bundle identifier for your app. You can use the same App ID that you used when deploying your app to a device for testing.
There are two types of App ID:
- Wildcard. A wildcard App ID allows you to use a single App ID to match multiple apps, and typically takes the form
com.domainname.*. A wildcard App ID can be used to distribute multiple apps, and should be used for apps that do not enable app-specific capabilities. - Explicit. An explicit App ID is unique to a single app, and typically takes the form
com.domainname.myid. An explicit App ID allows the distribution of one app, with a matching bundle identifier. Explicit App IDs are typically used for apps that enable app-specific capabilities such as Apple Pay, or Game Center. For more information about capabilities, see Capabilities.
To create a new App ID:
In your Apple Developer Account, navigate to Certificates, IDs & Profiles.
On the Certificates, Identifiers & Profiles page, select the Identifiers tab.
On the Identifiers page, select the + button to create a new App ID.
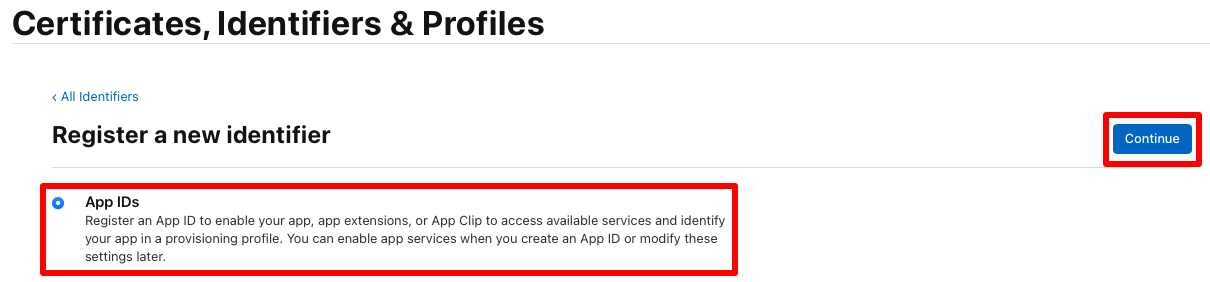
On the Register a new identifier page, select the App IDs radio button before selecting the Continue button:
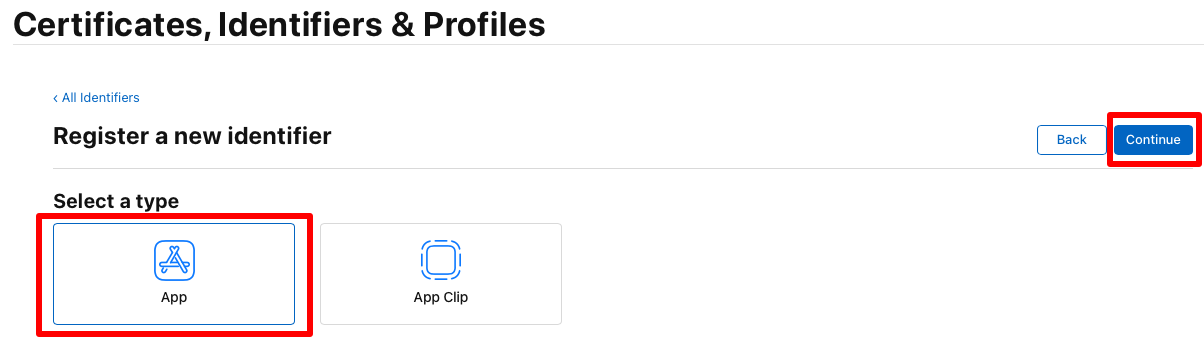
On the Register a new identifier page, select App before selecting the Continue button:
On the Register an App ID page, enter a description, and select either the Explicit or Wildcard Bundle ID radio button. Then, enter the Bundle ID for your app in reverse DS format:
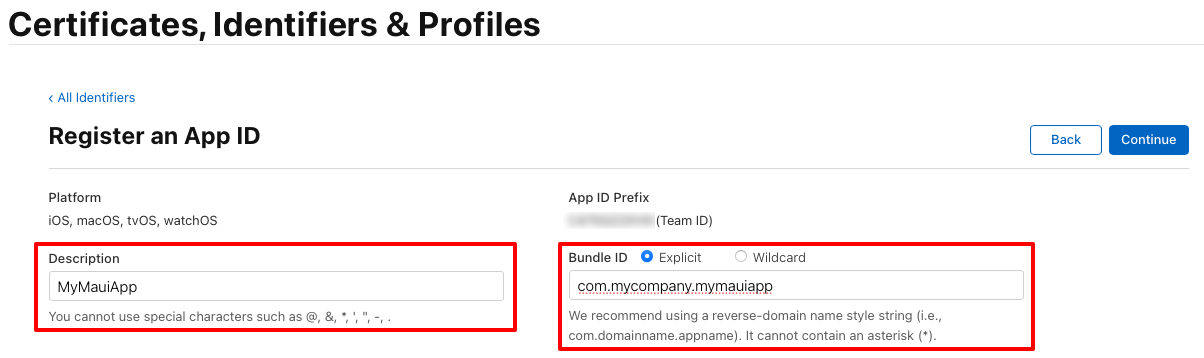
Important
The Bundle ID you enter must correspond to the Bundle identifier in the Info.plist file in your app project.
The bundle identifier for a .NET MAUI app is stored in the project file as the Application ID property:
- In Visual Studio, in Solution Explorer right-click on your .NET MAUI app project and select Properties. Then, navigate to the MAUI Shared > General tab. The Application ID field lists the bundle identifier.
- In Visual Studio for Mac, in the Solution Window, right-click on your .NET MAUI app project and select Properties. Then, in the Project Properties window, select the Build > App Info tab. The Application ID field lists the bundle identifier.
When the value of the Application ID field is updated, the value of the Bundle identifier in the Info.plist will be automatically updated.
On the Register an App ID page, select any capabilities that the app uses. Any capabilities must be configured both on this page and in the Entitlements.plist file in your app project. For more information see Capabilities and Entitlements.
On the Register an App ID page, select the Continue button.
On the Confirm your App ID page, select the Register button.
Create a provisioning profile
Once the App ID has been created, you should create a distribution provisioning profile. This profile enables the app to be digitally signed for release so that it can be installed on Macs.
To create a provisioning profile for distribution outside the Mac App Store:
In the Certificates, Identifiers & Profiles page of your Apple Developer Account, select the Profiles tab.
In the Profiles tab, click the + button to create a new profile.
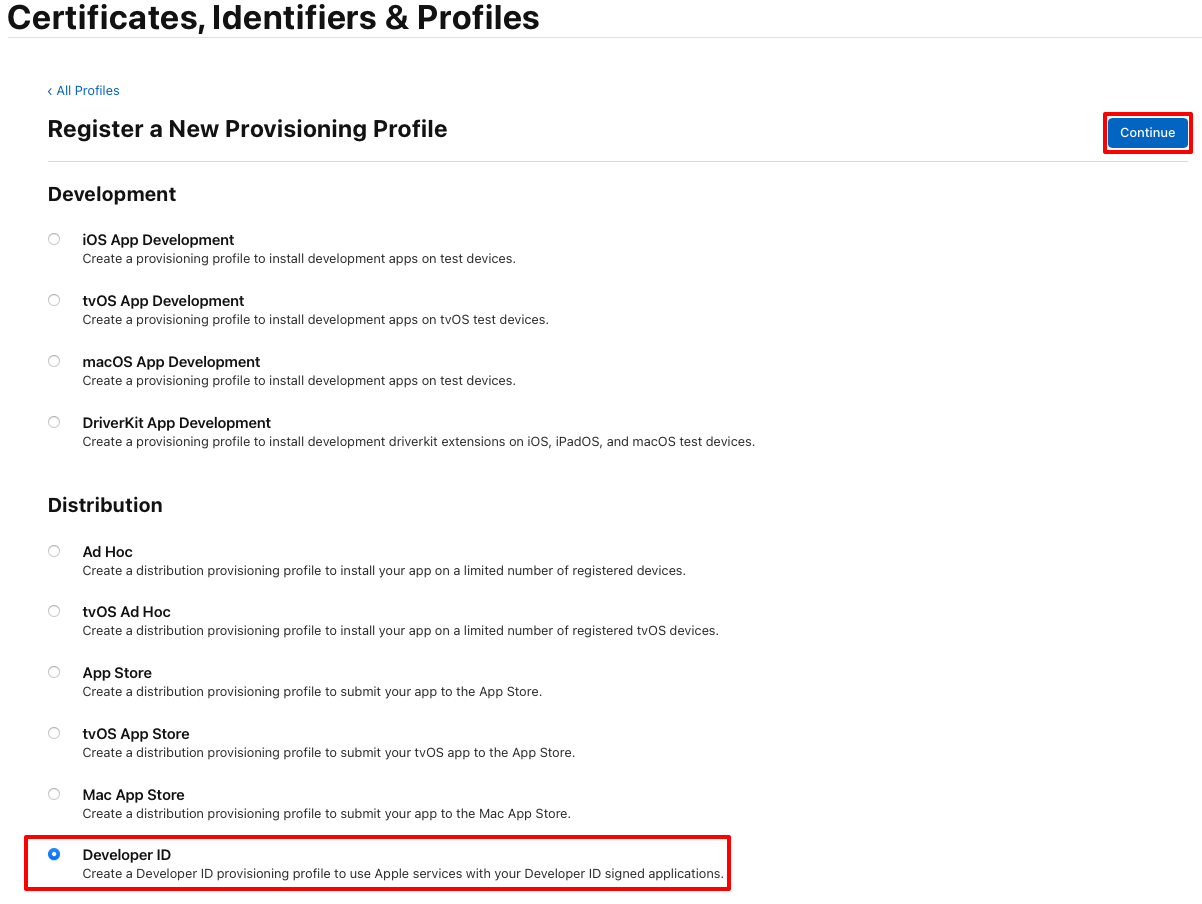
In the Register a New Provisioning Profile page, select the Developer ID radio button before clicking the Continue button:
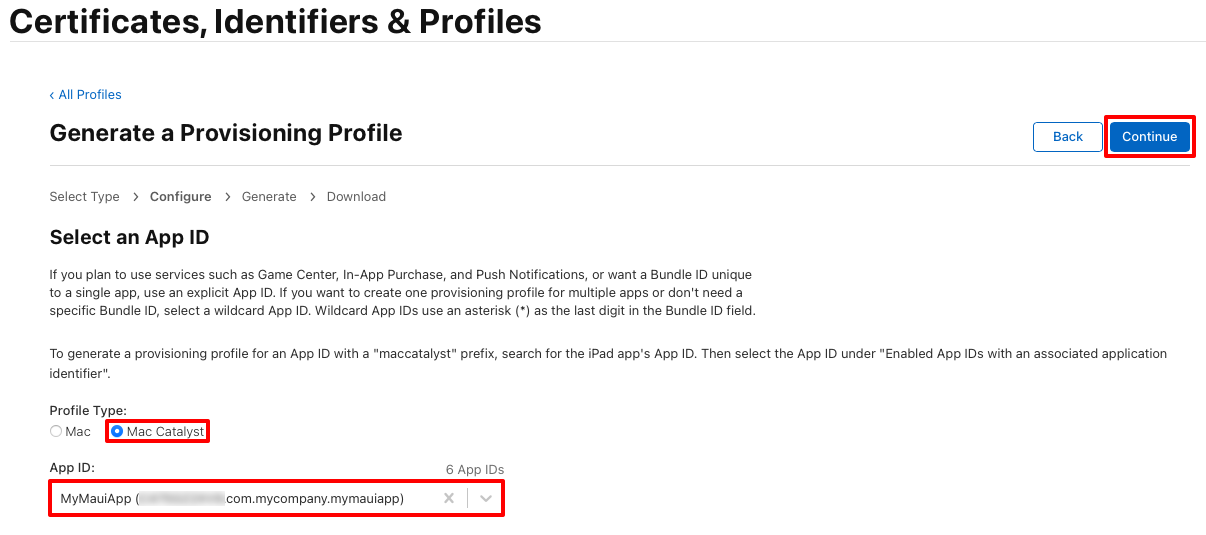
In the Generate a Provisioning Profile page, select the Mac Catalyst radio button. Then, in the App ID drop-down, select the App ID that you previously created before clicking the Continue button:
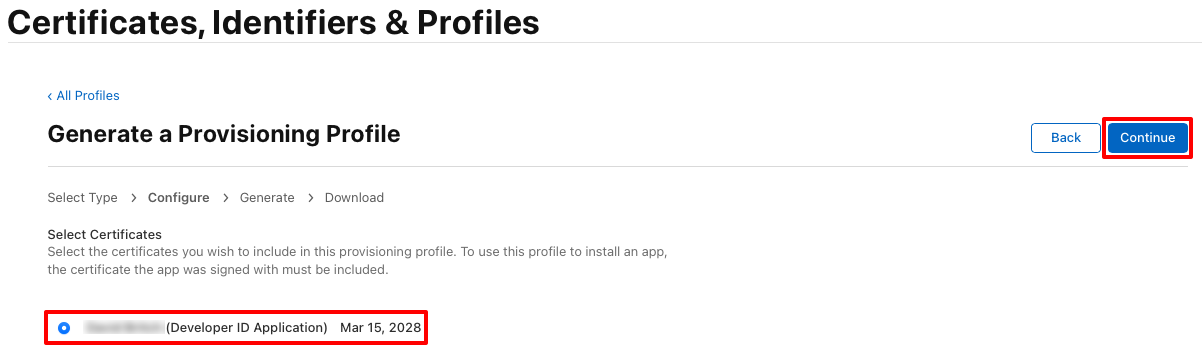
In the Generate a Provisioning Profile page, select the radio button that corresponds to your distribution certificate before clicking the Continue button:
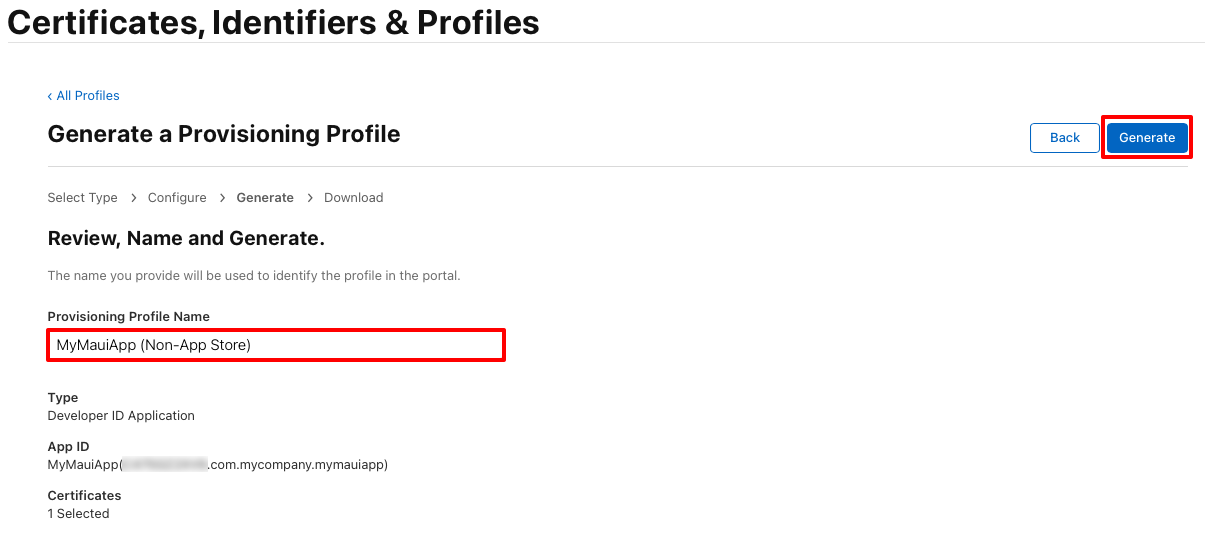
In the Generate a Provisioning Profile page, enter a name for the provisioning profile before clicking the Generate button:
Note
Make a note of the provisioning profile name, as it will be required when signing your app.
In the Generate a Provisioning Profile page, optionally click the Download button to download your provisioning profile.
Note
It's not necessary to download your provisioning profile now. Instead, you will do this in Xcode.
Download your provisioning profile in Xcode
After creating a provisioning profile in your Apple Developer Account, Xcode can download it so that it's available for signing your app:
On your Mac, launch Xcode.
In Xcode, select the Xcode > Preferences... menu item.
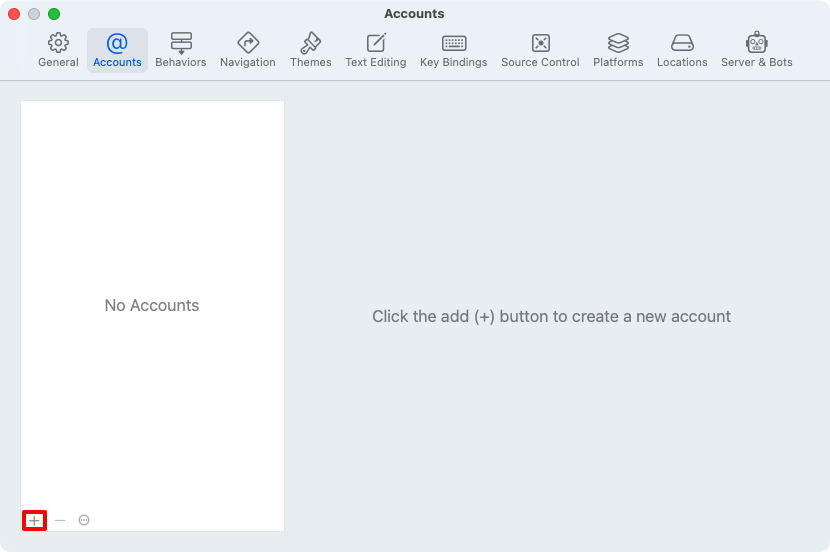
In the Preferences dialog, select the Accounts tab.
In the Accounts tab, click the + button to add your Apple Developer Account to Xcode:
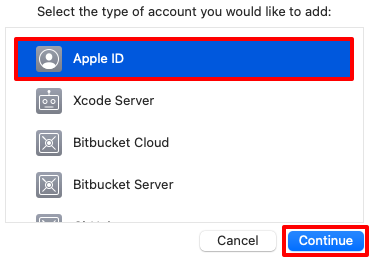
In the account type popup, select Apple ID and then click the Continue button:
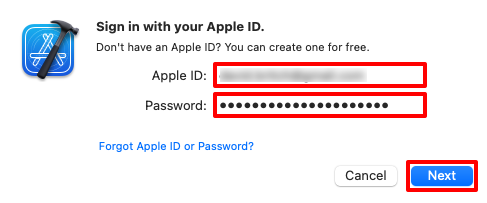
In the sign in popup, enter your Apple ID and click the Next button.
In the sign in popup, enter your Apple ID password and click the Next button:
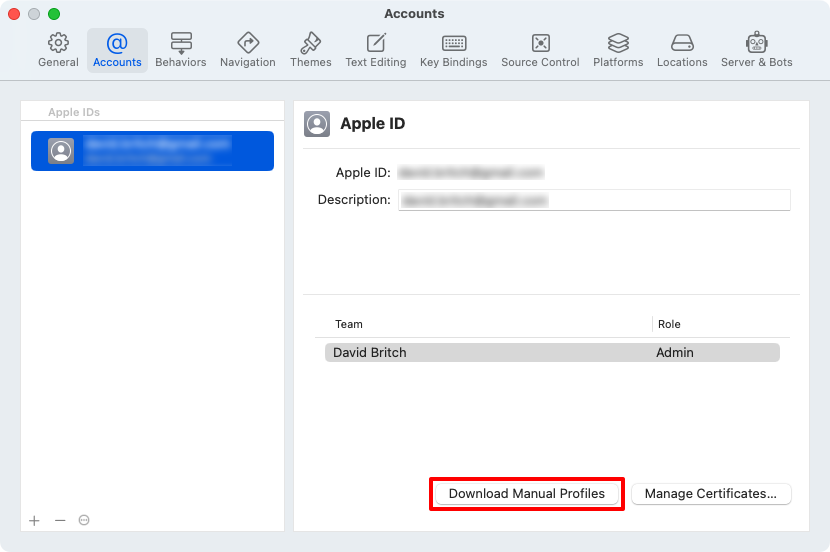
In the Accounts tab, click the Manage Certificates... button to ensure that your distribution certificate has been downloaded.
In the Accounts tab, click the Download Manual Profiles button to download your provisioning profiles:
Wait for the download to complete and then close Xcode.
Add entitlements
Apple's App Sandbox restricts access to system resources and user data in Mac apps, to contain damage if an app becomes compromised. It can optionally be enabled for Mac Catalyst apps that are distributed outside the Mac App Store.
This can be accomplished by adding an Entitlements.plist file to the Platforms/MacCatalyst folder of your .NET MAUI app project:
<?xml version="1.0" encoding="UTF-8"?>
<!DOCTYPE plist PUBLIC "-//Apple//DTD PLIST 1.0//EN" "http://www.apple.com/DTDs/PropertyList-1.0.dtd">
<plist version="1.0">
  <dict>
    <key>com.apple.security.app-sandbox</key>
    <true/>
  </dict>
</plist>
The App Sandbox entitlement is defined using the com.apple.security.app-sandbox key, of type boolean. For information about App Sandbox, see Protecting user data with App Sandbox on developer.apple.com. For information about the App Sandbox entitlement, see App Sandbox Entitlement.
If your app opens outgoing network connections, you'll also need to add the com.apple.security.network.client key, of type boolean, to your Entitlements.plist file:
<?xml version="1.0" encoding="UTF-8"?>
<!DOCTYPE plist PUBLIC "-//Apple//DTD PLIST 1.0//EN" "http://www.apple.com/DTDs/PropertyList-1.0.dtd">
<plist version="1.0">
  <dict>
    <key>com.apple.security.app-sandbox</key>
    <true/>
    <key>com.apple.security.network.client</key>
    <true/>
  </dict>
</plist>
For information about the outgoing network connections entitlement, see com.apple.security.network.client on developer.apple.com.
Update Info.plist
Before publishing your app, you should update its Info.plist file with additional information.
Specify the user interface idiom
A Mac Catalyst app can run in the iPad or Mac user interface idiom:
- The iPad user interface idiom tells macOS to scale the app's user interface to match the Mac display environment while preserving iPad-like appearance.
- The Mac user interface idiom doesn't scale the app's user interface to match the Mac display environment. Some controls change their size and appearance, and interacting with them feels identical to interacting with
AppKitcontrols.
By default, .NET MAUI Mac Catalyst apps use the iPad user interface idiom. If this is your desired behavior, ensure that the app's Info.plist file only specifies 2 as the value of the UIDeviceFamily key:
<key>UIDeviceFamily</key>
<array>
  <integer>2</integer>
</array>
To adopt the Mac user interface idiom, update the app's Info.plist file to specify 6 as the value of the UIDeviceFamily key:
<key>UIDeviceFamily</key>
<array>
  <integer>6</integer>
</array>
For more information about Mac Catalyst user interface idioms, see Specify the UI idiom for your Mac Catalyst app.
Set the default language and region for the app
Set the CFBundleDevelopmentRegion key in your app's Info.plist to a string that represents the localization native development region:
<key>CFBundleDevelopmentRegion</key>
<string>en</string>
The value of the key should be a language designator, with an optional region designator. For more information, see CFBundleDevelopmentRegion on developer.apple.com.
Set the copyright key
Set the NSHumanReadableCopyright key in your app's Info.plist to a string that represents the human-readable copyright notice for your app:
<key>NSHumanReadableCopyright</key>
<string>MyMauiApp © 2023</string>
For more information, see NSHumanReadableCopyright on developer.apple.com.
Declare your app's use of encryption
If your app uses encryption, and you plan to distribute it outside the United States or Canada, it's subject to US export compliance requirements. You can provide information about you app's use of encryption in its Info.plist file.
This is accomplished by adding the ITSAppUsesNonExemptEncryption key to your app's Info.plist with a boolean value that indicates whether your app uses encryption:
<key>ITSAppUsesNonExemptEncryption</key>
<false/>
For more information, see Complying with Encryption Export Regulations on developer.apple.com.
Disable code signature verification
Currently, when you attempt to publish a .NET MAUI Mac Catalyst app for distribution outside the Mac App Store, provided you've met the provisioning requirements, you'll receive an error about codesign exiting with code 3:
/usr/local/share/dotnet/packs/Microsoft.MacCatalyst.Sdk/16.2.1040/tools/msbuild/iOS/Xamarin.Shared.targets(1930,3): error MSB6006: "codesign" exited with code 3. [/Users/davidbritch/Projects/MyMauiApp/MyMauiApp/MyMauiApp.csproj::TargetFramework=net8.0-maccatalyst]
While codesign succeeds in signing your app, the _CodesignVerify target fails to verify the code signature:
test-requirement: code failed to satisfy specified code requirement(s)
Because of this failure, a .pkg file isn't produced.
Therefore, it's currently necessary to add the following build target to the end of your project file to disable verification of the code signature:
<Project Sdk="Microsoft.NET.Sdk">
  ...
  <Target Name="_SkipCodesignVerify" BeforeTargets="_CodesignVerify" AfterTargets="_CodesignAppBundle">
    <PropertyGroup>
      <_RequireCodeSigning>false</_RequireCodeSigning>
    </PropertyGroup>
  </Target>
</Project>
Publish using the command line
To publish your Mac Catalyst app from the command line on a Mac, open a terminal and navigate to the folder for your .NET MAUI app project. Run the dotnet publish command, providing the following parameters:
| Parameter | Value |
|---|---|
-f or --framework |
The target framework, which is net8.0-maccatalyst. |
-c or --configuration |
The build configuration, which is Release. |
-p:MtouchLink |
The link mode for the project, which can be None, SdkOnly, or Full. |
-p:CreatePackage |
Set to true so that a package (.pkg) is created for the app at the end of the build. |
-p:EnableCodeSigning |
Set to true so that code signing is enabled. |
-p:EnablePackageSigning |
Set to true so that the package that's created gets signed. |
-p:CodesignKey |
The name of the code signing key. Set to the name of your distribution certificate, as displayed in Keychain Access. |
-p:CodesignProvision |
The provisioning profile to use when signing the app bundle. |
-p:CodesignEntitlements |
The path to the entitlements file that specifies the entitlements the app requires. Set to Platforms\MacCatalyst\Entitlements.plist. |
-p:PackageSigningKey |
The package signing key to use when signing the package. Set to the name of your installer certificate, as displayed in Keychain Access. |
-p:RuntimeIdentifier |
The runtime identifier (RID) for the project. Release builds of .NET MAUI Mac Catalyst apps default to using maccatalyst-x64 and maccatalyst-arm64 as runtime identifiers, to support universal apps. To support only a single architecture, specify maccatalyst-x64 or maccatalyst-arm64. |
-p:UseHardenedRuntime |
Set to true to enable the hardened runtime, which is required for Mac Catalyst apps that are distributed outside of the Mac App Store. |
Warning
Attempting to publish a .NET MAUI solution will result in the dotnet publish command attempting to publish each project in the solution individually, which can cause issues when you've added other project types to your solution. Therefore, the dotnet publish command should be scoped to your .NET MAUI app project.
Additional build parameters can be specified on the command line, if they aren't provided in a <PropertyGroup> in your project file. The following table lists some of the common parameters:
| Parameter | Value |
|---|---|
-p:ApplicationTitle |
The user-visible name for the app. |
-p:ApplicationId |
The unique identifier for the app, such as com.companyname.mymauiapp. |
-p:ApplicationVersion |
The version of the build that identifies an iteration of the app. |
-p:ApplicationDisplayVersion |
The version number of the app. |
-p:RuntimeIdentifier |
The runtime identifier (RID) for the project. Release builds of .NET MAUI Mac Catalyst apps default to using maccatalyst-x64 and maccatalyst-arm64 as runtime identifiers, to support universal apps. To support only a single architecture, specify maccatalyst-x64 or maccatalyst-arm64. |
For a full list of build properties, see Project file properties.
Important
Values for all of these parameters don't have to be provided on the command line. They can also be provided in the project file. When a parameter is provided on the command line and in the project file, the command line parameter takes precedence. For more information about providing build properties in your project file, see Define build properties in your project file.
For example, use the following command to build and sign a .pkg on a Mac, for distribution outside the Mac App Store:
dotnet publish -f net8.0-maccatalyst -c Release -p:MtouchLink=SdkOnly -p:CreatePackage=true -p:EnableCodeSigning=true -p:EnablePackageSigning=true -p:CodesignKey="Developer ID Application: John Smith (AY2GDE9QM7)" -p:CodesignProvision="MyMauiApp (Non-App Store)" -p:CodesignEntitlements="Platforms\MacCatalyst\Entitlements.plist" -p:PackageSigningKey="Developer ID Installer: John Smith (AY2GDE9QM7)" -p:UseHardenedRuntime=true
Note
In .NET 8, the dotnet publish command defaults to the Release configuration. Therefore, the build configuration can be omitted from the command line.
Publishing builds, signs, and packages the app, and then copies the .pkg to the bin/Release/net8.0-maccatalyst/publish/ folder. If you publish the app using only a single architecture, it will be published to the bin/Release/net8.0-maccatalyst/{architecture}/publish/ folder.
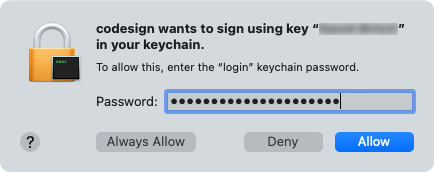
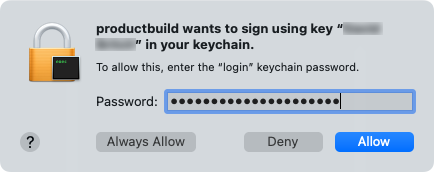
During the signing process it maybe necessary to enter your login password and allow codesign and productbuild to run:
For more information about the dotnet publish command, see dotnet publish.
Define build properties in your project file
An alternative to specifying build parameters on the command line is to specify them in your project file in a <PropertyGroup>. The following table lists some of the common build properties:
| Property | Value |
|---|---|
<ApplicationTitle> |
The user-visible name for the app. |
<ApplicationId> |
The unique identifier for the app, such as com.companyname.mymauiapp. |
<ApplicationVersion> |
The version of the build that identifies an iteration of the app. |
<ApplicationDisplayVersion> |
The version number of the app. |
<CodesignKey> |
The name of the code signing key. Set to the name of your distribution certificate, as displayed in Keychain Access. |
<CodesignEntitlements> |
The path to the entitlements file that specifies the entitlements the app requires. Set to Platforms\MacCatalyst\Entitlements.plist. |
<CodesignProvision> |
The provisioning profile to use when signing the app bundle. |
<CreatePackage> |
Set to true so that a package (.pkg) is created for the app at the end of the build. |
<EnableCodeSigning> |
Set to true so that code signing is enabled. |
<EnablePackageSigning> |
Set to true so that the package that's created gets signed. |
<MtouchLink> |
The link mode for the project, which can be None, SdkOnly, or Full. |
<PackageSigningKey> |
The package signing key to use when signing the package. Set to the name of your installer certificate, as displayed in Keychain Access. |
<RuntimeIdentifier> |
The runtime identifier (RID) for the project. Release builds of .NET MAUI Mac Catalyst apps default to using maccatalyst-x64 and maccatalyst-arm64 as runtime identifiers, to support universal apps. To support only a single architecture, specify maccatalyst-x64 or maccatalyst-arm64. |
<UseHardenedRuntime> |
Set to true to enable the hardened runtime, which is required for Mac Catalyst apps that are distributed outside of the Mac App Store. |
For a full list of build properties, see Project file properties.
Important
Values for these build properties don't have to be provided in the project file. They can also be provided on the command line when you publish the app. This enables you to omit specific values from your project file.
The following example shows a typical property group for building and signing your Mac Catalyst app for distribution outside the Mac App Store:
<PropertyGroup Condition="'$(Configuration)|$(TargetFramework)|$(Platform)'=='Release|net8.0-maccatalyst|AnyCPU'">
  <MtouchLink>SdkOnly</MtouchLink>
  <EnableCodeSigning>True</EnableCodeSigning>
  <EnablePackageSigning>true</EnablePackageSigning>
  <CreatePackage>true</CreatePackage>
  <CodesignKey>Developer ID Application: John Smith (AY2GDE9QM7)</CodesignKey>
  <CodesignProvision>MyMauiApp (Non-App Store)</CodesignProvision>
  <CodesignEntitlements>Platforms\MacCatalyst\Entitlements.plist</CodesignEntitlements>
  <PackageSigningKey>Developer ID Installer: John Smith (AY2GDE9QM7)</PackageSigningKey>
  <UseHardenedRuntime>true</UseHardenedRuntime>
</PropertyGroup>
This example <PropertyGroup> adds a condition check, preventing the settings from being processed unless the condition check passes. The condition check looks for two items:
- The build configuration is set to
Release. - The target framework is set to something containing the text
net8.0-maccatalyst. - The platform is set to
AnyCPU.
If any of these conditions fail, the settings aren't processed. More importantly, the <CodesignKey>, <CodesignProvision>, and <PackageSigningKey> settings aren't set, preventing the app from being signed.
After adding the above property group, the app can be published from the command line on a Mac by opening a terminal and navigating to the folder for your .NET MAUI app project. Then, run the following command:
dotnet build -f net8.0-maccatalyst -c Release
Note
In .NET 8, the dotnet publish command defaults to the Release configuration. Therefore, the build configuration can be omitted from the command line.
Publishing builds, signs, and packages the app, and then copies the .pkg to the bin/Release/net8.0-maccatalyst/publish/ folder.
Notarize your app
macOS includes a technology called Gatekeeper, which helps to ensure that only trusted software runs on a Mac. When a user downloads and opens an installer package, or an app, Gatekeeper verifies that the software is from an identified developer. It does this by checking for a Developer ID certificate, and checking that the software is notarized by Apple to be free of known malicious content and hasn't been altered. Therefore, after provisioning and publishing your app you should submit it to Apple to be notarized. Apple's notary service automatically scans your developer ID-signed app and performs security checks. When notarization succeeds, your software is assigned a ticket to let Gatekeeper know that it's been notarized.
Apps can be submitted to Apple's notary service with the notarytool command line tool:
xcrun notarytool submit {my_package_filename} --wait --apple-id {my_apple_id} --password {my_app_specific_password} --team-id {my_team_id}
An example of using the notarytool tool to sign a .NET MAUI Mac Catalyst .pkg file is shown below:
xcrun notarytool submit MyMauiApp-1.0.pkg --wait --apple-id johm.smith@provider.com --password fqtk-cprr-gqdt-bvyo --team-id AY2GDE9QM7
The wait flag tells notarytool to exit only after the notary service finishes processing the submission, therefore removing the need to poll the service for its status. The apple-id, password, and team-id arguments are used to supply your App Store Connect credentials. Because App Store Connect requires two-factor authentication, you must create an app-specific password for notarytool. For information about creating an app-specific password, see Sign in to apps with your Apple ID using app-specific passwords on developer.apple.com.
After you submit your app to Apple, the notarization process typically takes less than an hour.
Note
Notarization completes for most apps within 5 minutes. For information about avoiding long response times from the notary service, see Avoid long notarization response times and size limits on developer.apple.com.
Provided that notarization succeeds, the notary service generates a ticket for the signed installer package and the app bundle inside it.
For more information about notarization, see Notarizing macOS software before distribution. For other approaches to submitting your app to Apple's notary service, see Upload your app to the notarization service on developer.apple.com. For information about resolving common notarization issues, see Resolving common notarization issues.
Staple the ticket to your app
Notarization produces a ticket for the signed installer package and the app bundle inside it, that tell Gatekeeper that your app is notarized. Once notarization completes, when users attempt to run your app on macOS 10.14 or later, Gatekeeper locates the ticket online.
After notarization has succeeded, you should attach the ticket to your app using the stapler tool. This ensures that Gatekeeper can find the ticket even when a network connection isn't available. Run the following command to attach the ticket to your .pkg:
xcrun stapler staple {filename}.pkg
The stapler tool retrieves the ticket and attaches it to the installer package. You'll receive a message telling you that the staple and validate action worked, provided that stapling succeeds.
Validate notarization
If you want to validate notarization, you can do so with the following command:
xcrun stapler validate mypackage.pkg
Distribute your app
The signed and notarized .pkg can be safely distributed outside the Mac App Store at a location of your choosing, such as a web server.
For information about safely opening apps on a Mac, see Open apps safely on your Mac on support.apple.com.
See also
- Preparing your app for distribution on developer.apple.com
- Hardened Runtime on developer.apple.com
- Customizing the notarization workflow on developer.apple.com
Feedback
Coming soon: Throughout 2024 we will be phasing out GitHub Issues as the feedback mechanism for content and replacing it with a new feedback system. For more information see: https://aka.ms/ContentUserFeedback.
Submit and view feedback for