Call options and visual engagement in live chat
Applies to: Dynamics 365 Contact Center—embedded, Dynamics 365 Contact Center—standalone, and Dynamics 365 Customer Service
With calling options in a live chat conversation, you can start a voice or video call while you're communicating with the customer over chat.
As a customer service representative (service representative or representative), you exchange much information when you communicate with a customer via chat. The customer might prefer to show you their problem and explain the issue by using a physical product. In these scenarios, you can start a voice or video call during the chat conversation to resolve the issue quickly. The call options in the communication panel help you to easily make these calls.
Advantages of voice and video call in live chat
With call options in live chat, you can:
- Resolve customer issues quickly.
- Reduce your average handling time (AHT) and improve your productivity.
- Improve customer satisfaction.
- Develop a positive relationship with customers.
Prerequisites
Network connectivity and a web browser as mentioned in System requirements for Dynamics 365 Contact Center or System requirements for Customer Service.
Initiate voice and video call
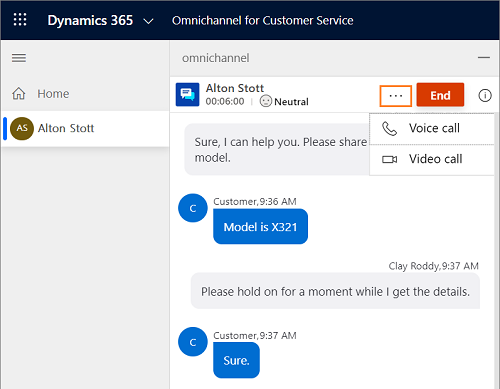
When you're chatting with the customer, you can start a voice or video call. In the communication panel, beside the End button, select More commands  . The Voice Call and Video Call options are displayed. (Depending on your system configuration, you might see Voice Call and Video Call, or just Voice call.)

When you start a voice call, you can view the flyout call control, which includes the following buttons.
| Button | Name | Description |
|---|---|---|
 |
Turn on video/Turn off video | Use this button to turn on or off the video while in a call with the customer. |
 |
Mute / Unmute | Use this button to mute or unmute the call while in a call with the customer. |
 |
End call | Use this button to end the call. |

Note
If your organization is in the Government Community Cloud (GCC) region, the audio and video calls will be transmitted via a North American data center.
Capacity of the service representative
When you start a voice or video call, your capacity is consumed, and you can't take any conversation requests until you hang up. However, your supervisor can still assign conversations to you.
Site permissions
As a service representative, you need to enable camera and microphone access in the browser to make a video and audio call, respectively.
Customer experience
When a customer on the portal receives a call, they can accept the voice call with audio, accept the voice call with video, or reject the call.

After accepting the call, the customers can view and use the following options.
| Button | Name |
|---|---|
 |
Turn on video / Turn off video |
 |
Mute / Unmute |
 |
End call |
After the customer accepts the call, they can turn on or turn off the video, mute, unmute, or end the call.

Site permissions
Customers need to provide the camera and microphone access in the browser.
Cobrowse and screen share in live chat
The cobrowsing and screen sharing features help to quickly and easily understand the customer's issue when you communicate via the chat channel. The service representatives can interact with customers within their browsers for a precise and effective support experience.
Important
Non-Microsoft providers of cobrowse or screen share capabilities might have separate pricing and licensing requirements. Before enabling and using these features through non-Microsoft applications, ensure you understand the terms of using these applications.
Prerequisite
To use the cobrowsing and screen sharing features, your administrator must have selected a third party screen sharing and or cobrowse provider. More information: Configure a chat widget
Initiate a cobrowsing or screen sharing session
When you're chatting with a customer, you can start a cobrowsing or screen-sharing session as follows:
Select the computer icon (cobrowse or screen share) next to the End button in the communication panel.
An app tab opens, providing a way to sign in to the third-party provider and create a new session.
Note
The sign-in experience will vary depending upon the cobrowse or screen share provider selected by your administrator. For more information about cobrowsing or screen sharing sessions, see the third-party provider's documentation.
In the communication panel, share the password or PIN with the customer that you received from the provider.
Ask the customer to enter the password or PIN, if applicable, and accept the invitation to cobrowse or share their screen.

After the customer accepts your invitation, you can see the customer screen and more accurately diagnose the issue.
When you enter a cobrowse session, you can:
- View the customer screen.
- Use a laser pointer to call attention to important items.
- Navigate and make changes within the customer's browser.
When you enter a screen sharing session, you can:
- See the customer's screen.
- Use a laser pointer to call attention to important items.
The customer experience varies depending upon the cobrowse or screen share provider selected by your administrator.