Note
Access to this page requires authorization. You can try signing in or changing directories.
Access to this page requires authorization. You can try changing directories.
Set up the registration your fleet runtime uses to create agent identities and request tokens for them. You'll assign an owner and sponsor, configure the runtime credential, and expose an inbound scope if users or client applications call the fleet.
This procedure is for a platform that hosts separately managed agents. For a cloud agent or an agent installed on an end-user device, use Create an identity for your agent instead.
Create the fleet's blueprint by using either approach:
- Microsoft Entra admin center — Use the wizard for a quick setup that creates the blueprint and its principal.
- Microsoft Graph API or PowerShell — Create and fully configure the blueprint programmatically, including credentials, identifier URIs, scopes, and the blueprint principal in a single workflow.
Prerequisites
To create an agent identity blueprint, you need:
- Privileged Role Administrator role is the least privileged role required to grant Microsoft Graph Application permissions.
- Cloud Application Administrator or Application Administrator is required to grant Microsoft Graph delegated permissions.
- If the organization-wide setting Users can create agent blueprints is set to Yes, any user within the tenant can create an agent identity blueprint and its agent identity blueprint principal. Otherwise, both Agent ID Developer and Agent ID Administrator roles can create agent identity blueprints and agent identity blueprint principals.
- Agent ID Developer can configure federated identity credentials on an agent identity blueprint.
- Agent ID Administrator can configure federated identity credentials on an agent identity blueprint and is required to add a secret or certificate credential.
- If using PowerShell, version 7 is required.
Note
Owners of an agent identity blueprint or agent identity blueprint principal can create agent identities for that blueprint without a Microsoft Entra Agent ID role. Managed fleet creation experiences assign the creator as an owner of the blueprint and its associated principal. For programmatic creation, follow the procedure's owner assignments explicitly. Single-instance blueprints don't have a blueprint principal.
Prepare your environment
Before you create the blueprint, authorize the client that will call Microsoft Graph.
Identify the operator who creates objects and the administrator who approves the management client's permissions. Runtime API access is a separate grant: completing blueprint setup doesn't authorize an agent to call Microsoft Graph or your downstream API.
Authorize a client to create agent identity blueprints
In this article, you use Microsoft Graph PowerShell or another client to create your agent identity blueprint. You must authorize this client to create and configure an agent identity blueprint and create an agent identity blueprint principal. The client requires the following Microsoft Graph permissions:
- AgentIdentityBlueprint.Create delegated permission
- AgentIdentityBlueprint.AddRemoveCreds.All delegated permission
- AgentIdentityBlueprint.UpdateAuthProperties.All delegated permission
- AgentIdentityBlueprintPrincipal.Create delegated permission
The steps in this guide use all delegated permissions, but you can use application permissions for those scenarios that require them.
Use a separate public management app registered in your tenant, not the agent's runtime client ID. Follow Set up the management client, but request the four delegated permissions above and User.Read for this procedure. The linked section explains the public-client redirect URI, administrator consent, and Windows browser sign-in fallback; its single-instance preview enablement requirement doesn't apply to this fleet procedure.
Install Microsoft.Graph.Authentication and Microsoft.Graph.Users to use Connect-MgGraph, Invoke-MgGraphRequest, and Get-MgUser. Install Microsoft.Graph.Applications before using the application cmdlets in later sections.
To connect to all of the required scopes for Microsoft Graph PowerShell, run the following command:
Connect-MgGraph -ClientId "<management-app-client-id>" -Scopes "AgentIdentityBlueprint.Create", "AgentIdentityBlueprint.AddRemoveCreds.All", "AgentIdentityBlueprint.UpdateAuthProperties.All", "AgentIdentityBlueprintPrincipal.Create", "User.Read" -TenantId "<your-tenant-id>" -ContextScope Process
Check Get-MgContext before proceeding. Its account, tenant, client ID, and scopes must match this management setup. If context is empty or a scope is missing, stop and resolve sign-in or consent rather than retrying object creation. Retain the same -ClientId and tenant in later connections.
Use the identifier worksheet to keep object IDs separate from client IDs.
Create an agent identity blueprint
Agent identity blueprints must have a sponsor, which is the user or supported group that's accountable for the agent. An owner is recommended, which is the user or service principal that can make changes to the agent identity blueprint. For information, see Administrative relationships in Microsoft Entra Agent ID.
Use the Microsoft Entra admin center
You can create an agent identity blueprint directly in the Microsoft Entra admin center. The admin center wizard creates both the agent identity blueprint and its blueprint principal automatically.
Note
The admin center wizard sets the blueprint name and assigns owners and sponsors. To configure credentials, identifier URIs, scopes, or permissions, use the Microsoft Graph API or PowerShell, or configure them after creation through the blueprint's detail pages in the admin center.
Sign in to the Microsoft Entra admin center.
Browse to Entra ID > Agents > Agent blueprints.
Select New agent blueprint (Preview).
On the Basics tab, enter a name in the Agent blueprint name field and select Next.
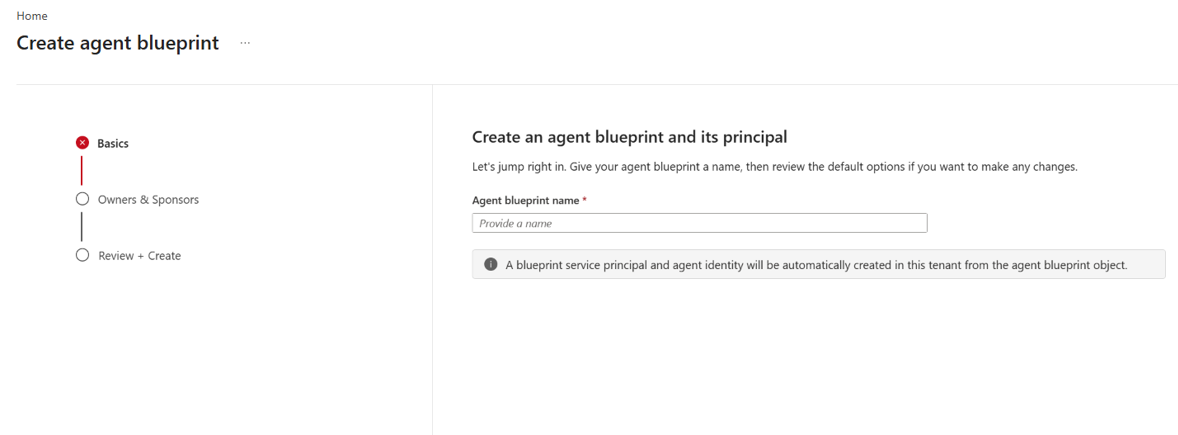
On the Owners & Sponsors tab, optionally change or add owners and sponsors for the blueprint:
- Select the pencil icon next to the Owners field to change or add users who can manage the blueprint.
- Select the pencil icon next to the Sponsors field to change or add users who can sponsor the blueprint.
Note
Sponsors can be users, dynamic membership groups, or Microsoft 365 groups. Security groups and role-assignable groups are not supported as sponsors.
Select Next.
Review your settings, and then select Create.
Select Done to exit the wizard or Go to agent blueprint to view the blueprint's detail page or configure more settings.
For more information on managing agent identity blueprints, see Manage agent identity blueprints.
Create programmatically
To create an agent identity blueprint using code, use the Microsoft Graph API or PowerShell.
The following Microsoft Graph v1.0 requests use the default multi-instance setting required by the fleet tutorials. Keep that default; the instance mode can't be changed after creation.
This step creates the agent identity blueprint, assigns an owner and sponsor, and requires the following details:
- The
AgentIdentityBlueprint.Createpermission. - The OData-Version header must be set to 4.0.
- A user ID for the owner and sponsor fields in the example request body. A sponsor is required, but an owner is optional.
POST https://graph.microsoft.com/v1.0/applications/
OData-Version: 4.0
Content-Type: application/json
Authorization: Bearer <token>

{
  "@odata.type": "Microsoft.Graph.AgentIdentityBlueprint",
  "displayName": "My Agent Identity Blueprint",
  "sponsors@odata.bind": [
    "https://graph.microsoft.com/v1.0/users/<id>"
  ],
  "owners@odata.bind": [
    "https://graph.microsoft.com/v1.0/users/<id>"
  ]
}
From the 201 Created response, record both id (the blueprint object ID for application updates) and appId (the client ID for authentication and principal creation).
Configure credentials for the agent identity blueprint
For a confidential-client blueprint, add a client credential to request access tokens. We recommend using a managed identity as a federated identity credential (FIC) for production deployments. Managed identities allow you to obtain Microsoft Entra tokens without having to manage any credentials. For more information, see Managed identities for Azure resources.
Don't distribute a blueprint credential with an agent installed on an end-user device. For that scenario, follow the public-client setup in Authenticate a local agent with Microsoft Entra ID.
Other kinds of app credentials including keyCredentials and passwordCredentials are supported, but not recommended for production. They can be convenient for local development and testing or where managed identities won't work, but these options don't align with security best practices. For more information, see Security best practices for application properties.
Keep in mind that to use a managed identity you must run your code on an Azure service, such as a virtual machine or Azure App Service. For local development and testing, use a client secret or certificate.
To send this request:
- You need the
AgentIdentityBlueprint.AddRemoveCreds.Allpermission. - Replace the
<agent-blueprint-id>placeholder with the blueprint application's objectid, not its application (client)appId. - Replace the
<managed-identity-principal-id>placeholder with the ID of your managed identity.
Add a managed identity as a credential using the following request:
POST https://graph.microsoft.com/v1.0/applications/<agent-blueprint-id>/federatedIdentityCredentials
OData-Version: 4.0
Content-Type: application/json
Authorization: Bearer <token>

{
    "name": "my-managed-identity",
    "issuer": "https://login.microsoftonline.com/<your-tenant-id>/v2.0",
    "subject": "<managed-identity-principal-id>",
    "audiences": [
        "api://AzureADTokenExchange"
    ]
}
Other app credentials
For scenarios where managed identities won't work or if you're creating a blueprint locally for testing, use the following steps to add the credentials.
To send this request, first obtain an access token with the delegated permission AgentIdentityBlueprint.AddRemoveCreds.All. Replace <future-expiration-in-UTC> with a future UTC time in ISO 8601 format that complies with your tenant's credential lifetime policy.
POST https://graph.microsoft.com/v1.0/applications/<agent-blueprint-id>/addPassword
Content-Type: application/json
Authorization: Bearer <token>

{
  "passwordCredential": {
    "displayName": "My Secret",
    "endDateTime": "<future-expiration-in-UTC>"
  }
}
Note
Your tenant might have credential lifecycle policies that restrict the maximum lifetime for client secrets. If you receive an error about credential lifetime, reduce the endDateTime value to align with your organization's policy.
Be sure to securely store the passwordCredential values generated. It can't be viewed after initial creation. You can also use client certificates as credentials; see Add a certificate credential.
If the agents created with the blueprint will support interactive agents, where the agent acts on behalf of a user, your blueprint must expose a scope so that the agent front end can pass an access token to the agent backend. This token can then be used by the agent backend to get an access token to act on behalf of the user.
Configure identifier URI and scope
Expose an identifier URI and delegated scope so clients can request access tokens for your agent API. Use the blueprint's object ID to address the application and its client ID in the api:// URI.
To send this request:
- You need the permission
AgentIdentityBlueprint.UpdateAuthProperties.All. - Replace
<agent-blueprint-object-id>with the blueprint application's objectidfor the/applications/path. - Replace
<agent-blueprint-app-id>with the blueprint's application (client)appIdin theapi://URI. - You need a Globally Unique Identifier (GUID). In PowerShell, run
[guid]::NewGuid()or use an online GUID generator. Copy the generated GUID and use it to replace the<generate-a-guid>placeholder.
The examples below configure a new blueprint with no existing scopes. For an existing blueprint, read identifierUris and api.oauth2PermissionScopes first and retain their existing entries in the update. These collections are replaced, not appended. If you arrived here from the cloud-agent walkthrough, use its management client to send the HTTP request; its consented AgentIdentityBlueprint.ReadWrite.All permission also permits the update.
PATCH https://graph.microsoft.com/v1.0/applications/<agent-blueprint-object-id>
OData-Version: 4.0
Content-Type: application/json
Authorization: Bearer <token>

{
    "identifierUris": ["api://<agent-blueprint-app-id>"],
    "api": {
      "requestedAccessTokenVersion": 2,
      "oauth2PermissionScopes": [
        {
          "adminConsentDescription": "Allow the application to access the agent on behalf of the signed-in user.",
          "adminConsentDisplayName": "Access agent",
          "id": "<generate-a-guid>",
          "isEnabled": true,
          "type": "User",
          "value": "access_agent"
        }
      ]
  }
}
A successful call generates a 204 response.
Create an agent blueprint principal
In this step, you create a principal for the agent identity blueprint. For more information, see Agent identities, service principals, and applications.
Important
Complete this section only for a multi-instance blueprint. A single-instance blueprint doesn't create an agent identity blueprint principal.
Replace the <agent-blueprint-app-id> placeholder with the appId you copied from the results of the previous step.
POST https://graph.microsoft.com/v1.0/serviceprincipals/microsoft.graph.agentIdentityBlueprintPrincipal
OData-Version: 4.0
Content-Type: application/json
Authorization: Bearer <token>

{
  "appId": "<agent-blueprint-app-id>"
}
Save the returned principal's id separately from the blueprint's id and appId. Check that its appId matches the blueprint's client ID before creating child identities. If you used the admin center wizard, it already created this principal; don't create another one.
Your blueprint and principal are now provisioned. The next step is to create agent identities. Token acquisition and an authorized call to the target API are later verification steps; visibility in the admin center alone doesn't prove runtime access.
Register agents in the Agent 365 registry
After you create an agent identity blueprint, register it in the Agent 365 registry so administrators can discover, govern, and manage the agent from the Microsoft 365 admin center. This section also provides instructions to add existing agent identity blueprints that might not currently appear in the Agent 365 registry.
Use the Microsoft 365 Agents SDK (Recommended)
The Microsoft 365 Agents SDK is now generally available and is the recommended way to build and provision agents. The SDK handles agent identity creation and registration in the Agent 365 registry, so your agent identities appear without separate registration code. If you're starting a new agent project or can migrate existing code, use the SDK to avoid coordinating these API calls yourself.
Use the Agent 365 CLI
The Agent 365 CLI is another option that handles setup for you, including agent registration. Follow the setup instructions using the recommended execution order. Use the following command:
a365 setup all
If registration fails, you can rerun just the registration step without having to go through the entire process. Use the following command:
a365 setup all --agent-registration-only
Call the Agent Registry API directly
If you must create agent identity blueprints programmatically with the Microsoft Graph API, for example because you have existing identity-issuance workflows you can't change immediately, you need to add an explicit call to the Agent Registry API after creating the agent identity blueprint to post the corresponding agent card. This step registers the agent card in the Agent 365 registry so it appears for administrators.
- Create the agent identity blueprint using the Microsoft Graph API (as shown in the previous sections).
- Immediately follow with a call to the Agent Registry API to post the corresponding agent card, including the metadata your administrators need to govern it.
- Handle the two-call pattern in a retry-safe way so that a transient failure on either call leaves your environment in a recoverable state.
For request and response schemas, required permissions, and code samples, see the Agent Registry API reference.
Tip
If you have existing agent identity blueprints that don't appear in the Agent 365 registry, register them using the Agent Registry API. For agent identity blueprints in bulk, use the batch endpoint. For more information, see Agent Registry convergence with Microsoft Agent 365.
Existing agent identity blueprints that aren't in the Agent 365 registry
For agent identity blueprints that were previously created using the Microsoft Entra Agent ID Graph API but are not currently visible in the Agent 365 registry, you can register them using the Agent Registry API. This step ensures they appear in the Agent 365 registry.
Delete an agent identity blueprint
When an agent is decommissioned, delete the associated agent identity blueprint. Deleting the blueprint triggers automatic cleanup of all child agent identities and agents' user accounts. For step-by-step deletion and restore instructions, see Delete and restore agent identity objects.