Note
Access to this page requires authorization. You can try signing in or changing directories.
Access to this page requires authorization. You can try changing directories.
Applies to:  Workforce tenants
  External tenants (learn more)
This article outlines the pricing structure for Microsoft Entra External ID and describes how to link your tenant to an Azure subscription to ensure correct billing and feature access.
Monthly active users (MAU) billing model
The Microsoft Entra External ID billing model applies to all external users, specifically:
B2B collaboration external guests in Microsoft Entra workforce tenants. These are users who sign in with external credentials and whose UserType property is set to Guest.
Note
If you own and operate multiple tenants, your member users can authenticate across your tenants without being counted in the MAU total. For B2B collaboration, the MAU billing model applies only to external users with a UserType of Guest. It doesn’t apply to users originating from within the organization with a UserType of Member.
External users in Microsoft Entra external tenants, which includes consumers and business guests (users without directory roles), and admins (users with directory roles). MAU billing applies to all users in an external tenant regardless of their UserType setting.
Billing is based on monthly active users (MAU), which is the count of unique external users who authenticate to your tenants within a calendar month. To determine the total number of MAUs, we combine MAUs from all workforce and external tenants that are linked to a subscription.
MAU billing helps you reduce costs by offering a free tier and flexible, predictable pricing. You can get started for free and only pay for what you use as your business grows.
External ID pricing
External ID consists of a core offer and premium add-ons. The Microsoft Entra External ID core offering is free for the first 50,000 MAU.
For the latest information about usage billing and pricing, see External ID pricing.
Note
- Existing subscriptions to B2B collaboration under an Azure AD External Identities P1/P2 SKU remain valid and no migration is necessary. We'll communicate upgrade options once they're available.
Link a workforce tenant to a subscription
Microsoft Entra workforce tenants must be linked to an Azure subscription for proper billing and access to features. To link your tenant to a subscription, follow these steps.
Sign in to the Microsoft Entra admin center with an account that has at least the Contributor role within the subscription or a resource group within the subscription.
Select the directory you want to link: In the Microsoft Entra admin center toolbar, select the Settings icon in the portal toolbar. Then on the Portal settings | Directories + subscriptions page, find your workforce tenant in the Directory name list, and then select Switch.
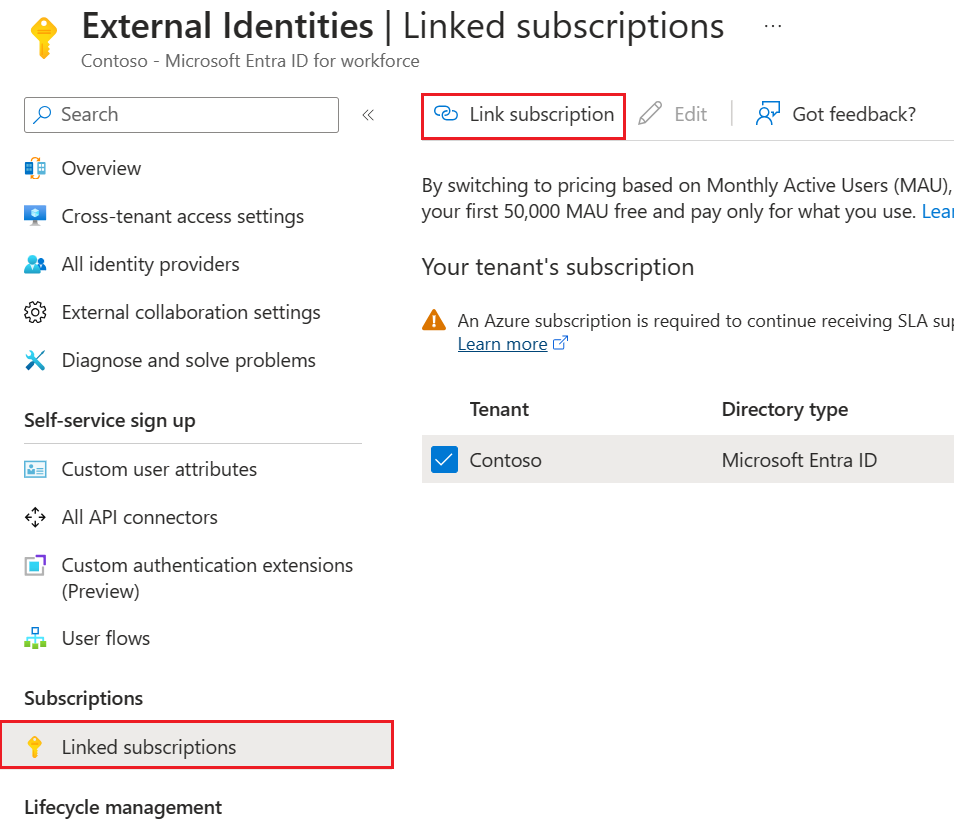
Browse to Entra ID > External Identities > Overview.
Under Subscriptions, select Linked subscriptions.
In the tenant list, select the checkbox next to the tenant, and then select Link subscription.

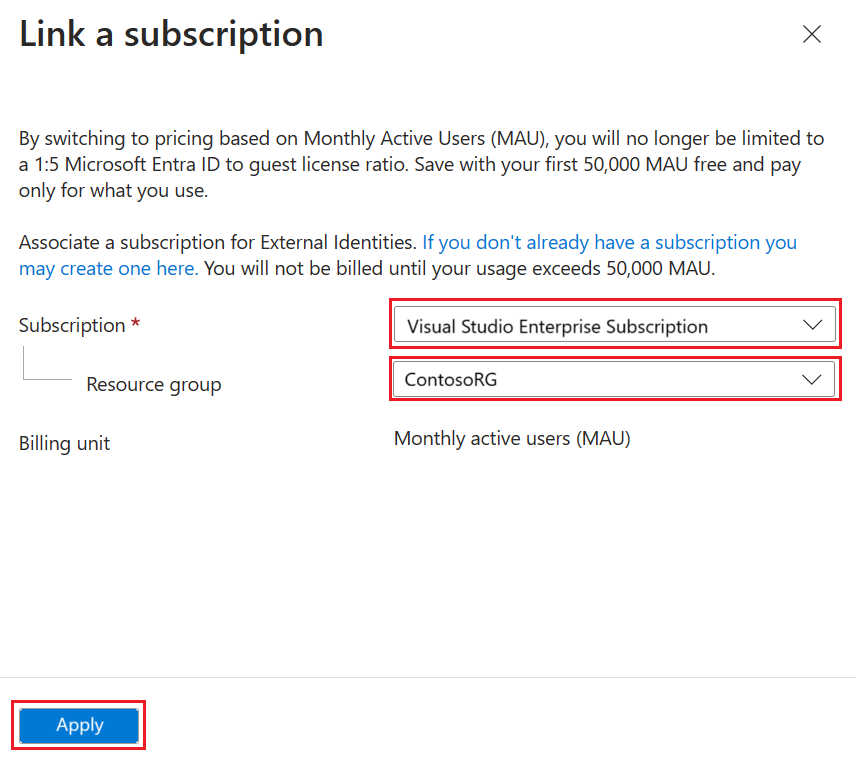
In the Link a subscription pane, select a Subscription and a Resource group. Then select Apply. (If there are no subscriptions listed, see the next section, What if I can't find a subscription?.)

After you complete these steps, your Azure subscription is billed based on your Azure Direct or Enterprise Agreement details, if applicable.
What if I can't find a subscription?
If no subscriptions are available in the Link a subscription pane, here are some possible reasons:
You’re trying link a workforce tenant to a subscription, but you’re currently signed in to an external tenant. Switch to the workforce tenant: Select the Settings icon in the portal toolbar, find your workforce tenant in the list on the Portal settings | Directories + subscriptions page, and select Switch.
You don't have the appropriate permissions. Be sure to sign in with an Azure account that has at least the Contributor role within the subscription or a resource group within the subscription.
A subscription exists, but it isn't associated with your directory yet. You can associate an existing subscription to your tenant and then repeat the steps for linking it to your tenant.
No subscription exists. In the Link a subscription pane, you can create a subscription by selecting the link if you don't already have a subscription you may create one here. After you create a new subscription, you'll need to create a resource group in the new subscription, and then repeat the steps for linking it to your tenant.
Link an external tenant to a subscription
Depending on how you created your external tenant, it might already be linked to a subscription. To find out, follow these steps:
Sign in to the Microsoft Entra admin center.
Make sure your external tenant is selected: In the Microsoft Entra admin center toolbar, select the Settings icon in the portal toolbar. On the Portal settings | Directories + subscriptions page, find your external tenant in the Directory name list, and then select Switch.
Select Home and find the Billing section:
If your tenant is linked to a subscription, the subscription ID appears in this section. You can select the ID to view subscription details.

If your tenant isn't yet linked to a subscription, in the Billing section, select the Click here to upgrade link, and then select the Add Subscription button. Follow the steps in Upgrade your free trial by adding an Azure subscription.

Change the subscription your external tenant is linked to
You can move an external tenant to another subscription, as long as the subscription you want to use is in the same Microsoft Entra workforce tenant as the current subscription. Moving to a subscription in a different Microsoft Entra workforce tenant is not currently supported.
To move your external tenant resources to the new subscription, use Azure Resource Manager as described in Move Azure resources to a new resource group or subscription. Before you start, read the article to fully understand the limitations and requirements. The article also contains other critical information, such as a pre-move checklist and steps for validating the move operation.
Can I change ownership of a subscription?
You can’t change ownership of a subscription to a Microsoft Entra external tenant. External tenants don't have subscription management capabilities, and therefore, external tenants must be linked to subscriptions, which are owned by Microsoft Entra workforce tenants.
Next steps
- See Frequently asked questions about external tenants.
- For the latest pricing information, see Microsoft Entra External ID pricing.