Quickstart: Sign in users and call Microsoft Graph from an Android app
In this quickstart, you download and run a code sample that demonstrates how an Android application can sign in users and get an access token to call the Microsoft Graph API.
Applications must be represented by an app object in Microsoft Entra ID so that the Microsoft identity platform can provide tokens to your application.
Prerequisites
- An Azure account with an active subscription. Create an account for free.
- Android Studio
- Android 16+
How the sample works

The code is organized into fragments that show how to write a single and multiple accounts MSAL app. The code files are organized as follows:
| File | Demonstrates |
|---|---|
| MainActivity | Manages the UI |
| MSGraphRequestWrapper | Calls the Microsoft Graph API using the token provided by MSAL |
| MultipleAccountModeFragment | Initializes a multi-account application, loads a user account, and gets a token to call the Microsoft Graph API |
| SingleAccountModeFragment | Initializes a single-account application, loads a user account, and gets a token to call the Microsoft Graph API |
| res/auth_config_multiple_account.json | The multiple account configuration file |
| res/auth_config_single_account.json | The single account configuration file |
| Gradle Scripts/build.grade (Module:app) | The MSAL library dependencies are added here |
We'll now look at these files in more detail and call out the MSAL-specific code in each.
Get the sample app
- Java: Download the code.
- Kotlin: Download the code.
Register the sample app
Tip
Steps in this article might vary slightly based on the portal you start from.
Sign in to the Microsoft Entra admin center as at least an Application Developer.
If you have access to multiple tenants, use the Settings icon
 in the top menu to switch to the tenant in which you want to register the application from the Directories + subscriptions menu.
Browse to Identity > Applications > App registrations.
Select New registration.
Enter a Name for your application. Users of your app might see this name, and you can change it later.
For Supported account types, select Accounts in any organizational directory (Any Microsoft Entra directory - Multitenant) and personal Microsoft accounts (e.g. Skype, Xbox). For information on different account types, select the Help me choose option.
Select Register.
Under Manage, select Authentication > Add a platform > Android.
Enter your project's Package Name based on the sample type you downloaded above.
- Java sample -
com.azuresamples.msalandroidapp - Kotlin sample -
com.azuresamples.msalandroidkotlinapp
- Java sample -
In the Signature hash section of the Configure your Android app pane, select Generating a development Signature Hash. and copy the KeyTool command to your command line.
- KeyTool.exe is installed as part of the Java Development Kit (JDK). You must also install the OpenSSL tool to execute the KeyTool command. For more information, see Android documentation on generating a key for more information.
Enter the Signature hash generated by KeyTool.
Select Configure and save the MSAL Configuration that appears in the Android configuration pane so you can enter it when you configure your app later.
Select Done.
Configure the sample app
In Android Studio's project pane, navigate to app\src\main\res.
Right-click res and choose New > Directory. Enter
rawas the new directory name and select OK.In app > src > main > res > raw, go to JSON file called
auth_config_single_account.jsonand paste the MSAL Configuration that you saved earlier.Below the redirect URI, paste:
"account_mode" : "SINGLE",Your config file should resemble this example:
{
  "client_id": "00001111-aaaa-bbbb-3333-cccc4444",
  "authorization_user_agent": "WEBVIEW",
  "redirect_uri": "msauth://com.azuresamples.msalandroidapp/00001111%cccc4444%3D",
  "broker_redirect_uri_registered": true,
  "account_mode": "SINGLE",
  "authorities": [
    {
      "type": "AAD",
      "audience": {
        "type": "AzureADandPersonalMicrosoftAccount",
        "tenant_id": "common"
      }
    }
  ]
}
As this tutorial only demonstrates how to configure an app in Single Account mode, see single vs. multiple account mode and configuring your app for more information
Run the sample app
Select your emulator, or physical device, from Android Studio's available devices dropdown and run the app.
The sample app starts on the Single Account Mode screen. A default scope, user.read, is provided by default, which is used when reading your own profile data during the Microsoft Graph API call. The URL for the Microsoft Graph API call is provided by default. You can change both of these if you wish.
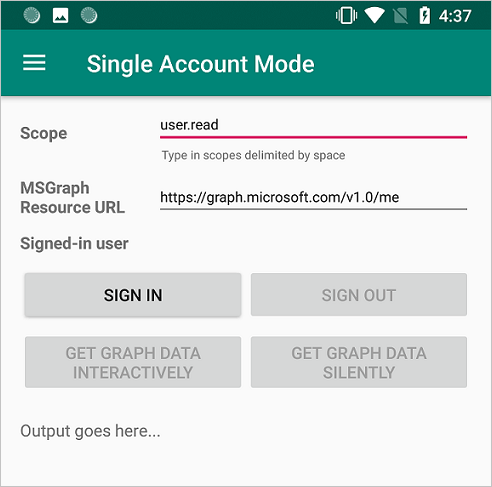
Use the app menu to change between single and multiple account modes.
In single account mode, sign in using a work or home account:
- Select Get graph data interactively to prompt the user for their credentials. You'll see the output from the call to the Microsoft Graph API in the bottom of the screen.
- Once signed in, select Get graph data silently to make a call to the Microsoft Graph API without prompting the user for credentials again. You'll see the output from the call to the Microsoft Graph API in the bottom of the screen.
In multiple account mode, you can repeat the same steps. Additionally, you can remove the signed-in account, which also removes the cached tokens for that account.
More Information
Read these sections to learn more about this quickstart.
Adding MSAL to the app
MSAL (com.microsoft.identity.client) is the library used to sign in users and request tokens used to access an API protected by Microsoft identity platform. Gradle 3.0+ installs the library when you add the following to Gradle Scripts > build.gradle (Module: app) under Dependencies:
dependencies {
    ...
    implementation 'com.microsoft.identity.client:msal:5.1.0'
    implementation 'com.android.volley:volley:1.2.1'
    ...
}
This instructs Gradle to download and build MSAL from maven central.
You must also add references to maven to the allprojects > repositories portion of the settings.gradle (Module: app) under dependencyResolutionManagement:
dependencyResolutionManagement {
...
maven
{
 url 'https://pkgs.dev.azure.com/MicrosoftDeviceSDK/DuoSDK-Public/_packaging/Duo-SDK-Feed/maven/v1'
}
...
}
MSAL imports
The imports that are relevant to the MSAL library are com.microsoft.identity.client.*. For example, you'll see import com.microsoft.identity.client.PublicClientApplication; which is the namespace for the PublicClientApplication class, which represents your public client application.
SingleAccountModeFragment.java
This file demonstrates how to create a single account MSAL app and call a Microsoft Graph API.
Single account apps are only used by a single user. For example, you might just have one account that you sign into your mapping app with.
Single account MSAL initialization
In SingleAccountModeFragment.java, in onCreateView() method, a single account PublicClientApplication is created using the config information stored in the auth_config_single_account.json file. This is how you initialize the MSAL library for use in a single-account MSAL app:
...
// Creates a PublicClientApplication object with res/raw/auth_config_single_account.json
PublicClientApplication.createSingleAccountPublicClientApplication(getContext(),
        R.raw.auth_config_single_account,
        new IPublicClientApplication.ISingleAccountApplicationCreatedListener() {
            @Override
            public void onCreated(ISingleAccountPublicClientApplication application) {
                /**
                 * This test app assumes that the app is only going to support one account.
                 * This requires "account_mode" : "SINGLE" in the config json file.
                 **/
                mSingleAccountApp = application;
                loadAccount();
            }

            @Override
            public void onError(MsalException exception) {
                displayError(exception);
            }
        });
Sign in a user
In SingleAccountModeFragment.java, the code to sign in a user is in initializeUI(), in the signInButton click handler.
Call signIn() before trying to acquire tokens. signIn() behaves as though acquireToken() is called, resulting in an interactive prompt for the user to sign in.
Signing in a user is an asynchronous operation. A callback is passed that calls the Microsoft Graph API and update the UI once the user signs in:
mSingleAccountApp.signIn(getActivity(), null, getScopes(), getAuthInteractiveCallback());
Sign out a user
In SingleAccountModeFragment.java, the code to sign out a user is in initializeUI(), in the signOutButton click handler. Signing a user out is an asynchronous operation. Signing the user out also clears the token cache for that account. A callback is created to update the UI once the user account is signed out:
mSingleAccountApp.signOut(new ISingleAccountPublicClientApplication.SignOutCallback() {
    @Override
    public void onSignOut() {
        updateUI(null);
        performOperationOnSignOut();
    }

    @Override
    public void onError(@NonNull MsalException exception) {
        displayError(exception);
    }
});
Get a token interactively or silently
To present the fewest number of prompts to the user, you'll typically get a token silently. Then, if there's an error, attempt to get a token interactively. The first time the app calls signIn(), it effectively acts as a call to acquireToken(), which will prompt the user for credentials.
Some situations when the user may be prompted to select their account, enter their credentials, or consent to the permissions your app has requested are:
- The first time the user signs in to the application
- If a user resets their password, they'll need to enter their credentials
- If consent is revoked
- If your app explicitly requires consent
- When your application is requesting access to a resource for the first time
- When MFA or other Conditional Access policies are required
The code to get a token interactively, that is with UI that will involve the user, is in SingleAccountModeFragment.java, in initializeUI(), in the callGraphApiInteractiveButton click handler:
/**
 * If acquireTokenSilent() returns an error that requires an interaction (MsalUiRequiredException),
 * invoke acquireToken() to have the user resolve the interrupt interactively.
 *
 * Some example scenarios are
 *  - password change
 *  - the resource you're acquiring a token for has a stricter set of requirement than your Single Sign-On refresh token.
 *  - you're introducing a new scope which the user has never consented for.
 **/
mSingleAccountApp.acquireToken(getActivity(), getScopes(), getAuthInteractiveCallback());
If the user has already signed in, acquireTokenSilentAsync() allows apps to request tokens silently as shown in initializeUI(), in the callGraphApiSilentButton click handler:
/**
 * Once you've signed the user in,
 * you can perform acquireTokenSilent to obtain resources without interrupting the user.
 **/
  mSingleAccountApp.acquireTokenSilentAsync(getScopes(), AUTHORITY, getAuthSilentCallback());
Load an account
The code to load an account is in SingleAccountModeFragment.java in loadAccount(). Loading the user's account is an asynchronous operation, so callbacks to handle when the account loads, changes, or an error occurs is passed to MSAL. The following code also handles onAccountChanged(), which occurs when an account is removed, the user changes to another account, and so on.
private void loadAccount() {
    ...

    mSingleAccountApp.getCurrentAccountAsync(new ISingleAccountPublicClientApplication.CurrentAccountCallback() {
        @Override
        public void onAccountLoaded(@Nullable IAccount activeAccount) {
            // You can use the account data to update your UI or your app database.
            updateUI(activeAccount);
        }

        @Override
        public void onAccountChanged(@Nullable IAccount priorAccount, @Nullable IAccount currentAccount) {
            if (currentAccount == null) {
                // Perform a cleanup task as the signed-in account changed.
                performOperationOnSignOut();
            }
        }

        @Override
        public void onError(@NonNull MsalException exception) {
            displayError(exception);
        }
    });
Call Microsoft Graph
When a user is signed in, the call to Microsoft Graph is made via an HTTP request by callGraphAPI() which is defined in SingleAccountModeFragment.java. This function is a wrapper that simplifies the sample by doing some tasks such as getting the access token from the authenticationResult and packaging the call to the MSGraphRequestWrapper, and displaying the results of the call.
private void callGraphAPI(final IAuthenticationResult authenticationResult) {
    MSGraphRequestWrapper.callGraphAPIUsingVolley(
            getContext(),
            graphResourceTextView.getText().toString(),
            authenticationResult.getAccessToken(),
            new Response.Listener<JSONObject>() {
                @Override
                public void onResponse(JSONObject response) {
                    /* Successfully called graph, process data and send to UI */
                    ...
                }
            },
            new Response.ErrorListener() {
                @Override
                public void onErrorResponse(VolleyError error) {
                    ...
                }
            });
}
auth_config_single_account.json
This is the configuration file for a MSAL app that uses a single account.
See Understand the Android MSAL configuration file for an explanation of these fields.
Note the presence of "account_mode" : "SINGLE", which configures this app to use a single account.
"client_id" is preconfigured to use an app object registration that Microsoft maintains.
"redirect_uri"is preconfigured to use the signing key provided with the code sample.
{
  "client_id": "00001111-aaaa-2222-bbbb-3333cccc4444",
  "authorization_user_agent": "WEBVIEW",
  "redirect_uri": "msauth://com.azuresamples.msalandroidapp/1wIqXSqBj7w%2Bh11ZifsnqwgyKrY%3D",
  "account_mode": "SINGLE",
  "broker_redirect_uri_registered": true,
  "authorities": [
    {
      "type": "AAD",
      "audience": {
        "type": "AzureADandPersonalMicrosoftAccount",
        "tenant_id": "common"
      }
    }
  ]
}
MultipleAccountModeFragment.java
This file demonstrates how to create a multiple account MSAL app and call a Microsoft Graph API.
An example of a multiple account app is a mail app that allows you to work with multiple user accounts such as a work account and a personal account.
Multiple account MSAL initialization
In the MultipleAccountModeFragment.java file, in onCreateView(), a multiple account app object (IMultipleAccountPublicClientApplication) is created using the config information stored in the auth_config_multiple_account.json file:
// Creates a PublicClientApplication object with res/raw/auth_config_multiple_account.json
PublicClientApplication.createMultipleAccountPublicClientApplication(getContext(),
        R.raw.auth_config_multiple_account,
        new IPublicClientApplication.IMultipleAccountApplicationCreatedListener() {
            @Override
            public void onCreated(IMultipleAccountPublicClientApplication application) {
                mMultipleAccountApp = application;
                loadAccounts();
            }

            @Override
            public void onError(MsalException exception) {
                ...
            }
        });
The created MultipleAccountPublicClientApplication object is stored in a class member variable so that it can be used to interact with the MSAL library to acquire tokens and load and remove the user account.
Load an account
Multiple account apps usually call getAccounts() to select the account to use for MSAL operations. The code to load an account is in the MultipleAccountModeFragment.java file, in loadAccounts(). Loading the user's account is an asynchronous operation. So a callback handles the situations when the account is loaded, changes, or an error occurs.
/**
 * Load currently signed-in accounts, if there's any.
 **/
private void loadAccounts() {
    if (mMultipleAccountApp == null) {
        return;
    }

    mMultipleAccountApp.getAccounts(new IPublicClientApplication.LoadAccountsCallback() {
        @Override
        public void onTaskCompleted(final List<IAccount> result) {
            // You can use the account data to update your UI or your app database.
            accountList = result;
            updateUI(accountList);
        }

        @Override
        public void onError(MsalException exception) {
            displayError(exception);
        }
    });
}
Get a token interactively or silently
Some situations when the user may be prompted to select their account, enter their credentials, or consent to the permissions your app has requested are:
- The first time users sign in to the application
- If a user resets their password, they'll need to enter their credentials
- If consent is revoked
- If your app explicitly requires consent
- When your application is requesting access to a resource for the first time
- When MFA or other Conditional Access policies are required
Multiple account apps should typically acquire tokens interactively, that is with UI that involves the user, with a call to acquireToken(). The code to get a token interactively is in the MultipleAccountModeFragment.java file in initializeUI(), in the callGraphApiInteractiveButton click handler:
/**
 * Acquire token interactively. It will also create an account object for the silent call as a result (to be obtained by getAccount()).
 *
 * If acquireTokenSilent() returns an error that requires an interaction,
 * invoke acquireToken() to have the user resolve the interrupt interactively.
 *
 * Some example scenarios are
 *  - password change
 *  - the resource you're acquiring a token for has a stricter set of requirement than your SSO refresh token.
 *  - you're introducing a new scope which the user has never consented for.
 **/
mMultipleAccountApp.acquireToken(getActivity(), getScopes(), getAuthInteractiveCallback());
Apps shouldn't require the user to sign in every time they request a token. If the user has already signed in, acquireTokenSilentAsync() allows apps to request tokens without prompting the user, as shown in the MultipleAccountModeFragment.java file, ininitializeUI() in the callGraphApiSilentButton click handler:
/**
 * Performs acquireToken without interrupting the user.
 *
 * This requires an account object of the account you're obtaining a token for.
 * (can be obtained via getAccount()).
 */
mMultipleAccountApp.acquireTokenSilentAsync(getScopes(),
    accountList.get(accountListSpinner.getSelectedItemPosition()),
    AUTHORITY,
    getAuthSilentCallback());
Remove an account
The code to remove an account, and any cached tokens for the account, is in the MultipleAccountModeFragment.java file in initializeUI() in the handler for the remove account button. Before you can remove an account, you need an account object, which you obtain from MSAL methods like getAccounts() and acquireToken(). Because removing an account is an asynchronous operation, the onRemoved callback is supplied to update the UI.
/**
 * Removes the selected account and cached tokens from this app (or device, if the device is in shared mode).
 **/
mMultipleAccountApp.removeAccount(accountList.get(accountListSpinner.getSelectedItemPosition()),
        new IMultipleAccountPublicClientApplication.RemoveAccountCallback() {
            @Override
            public void onRemoved() {
                ...
                /* Reload account asynchronously to get the up-to-date list. */
                loadAccounts();
            }

            @Override
            public void onError(@NonNull MsalException exception) {
                displayError(exception);
            }
        });
auth_config_multiple_account.json
This is the configuration file for a MSAL app that uses multiple accounts.
See Understand the Android MSAL configuration file for an explanation of the various fields.
Unlike the auth_config_single_account.json configuration file, this config file has "account_mode" : "MULTIPLE" instead of "account_mode" : "SINGLE" because this is a multiple account app.
"client_id" is preconfigured to use an app object registration that Microsoft maintains.
"redirect_uri"is preconfigured to use the signing key provided with the code sample.
{
  "client_id": "00001111-aaaa-2222-bbbb-3333cccc4444",
  "authorization_user_agent": "WEBVIEW",
  "redirect_uri": "msauth://com.azuresamples.msalandroidapp/1wIqXSqBj7w%2Bh11ZifsnqwgyKrY%3D",
  "account_mode": "MULTIPLE",
  "broker_redirect_uri_registered": true,
  "authorities": [
    {
      "type": "AAD",
      "audience": {
        "type": "AzureADandPersonalMicrosoftAccount",
        "tenant_id": "common"
      }
    }
  ]
}
Help and support
If you need help, want to report an issue, or want to learn about your support options, see Help and support for developers.
Next steps
Move on to the Android tutorial in which you build an Android app that gets an access token from the Microsoft identity platform and uses it to call the Microsoft Graph API.