Note
Access to this page requires authorization. You can try signing in or changing directories.
Access to this page requires authorization. You can try changing directories.
This article explains how to use Git integration and deployment pipelines with notebooks in Microsoft Fabric. You learn how to connect a repository, manage notebook source code, and deploy notebooks across environments.
Before you start
- Connect your workspace to Git before you complete notebook source-control steps. For setup instructions, see Get started with Git integration.
- Create notebook deployment rules on the target stage (for example, Test or Production), not on Development.
- To create deployment rules, you must be the owner of the item.
Notebook Git integration
Fabric notebooks support Git integration with Azure DevOps for source control. You can version notebook changes, collaborate by using branches, and manage notebook lifecycle updates directly in Fabric.
When you commit a notebook together with its attached dependencies (for example, environments), syncing to another workspace preserves these bindings. Fabric automatically binds the notebook to the corresponding resources in the new workspace.
To support this behavior, Fabric stores logical identifiers for attached resources in notebook metadata. As a result, Git diffs can show metadata updates from physical IDs to logical IDs.
Note
Metadata updates related to logical IDs and auto-binding can appear in Git diff views even when notebook code doesn't change.
Set up a connection
From workspace settings, set up a connection to your repository to commit and sync changes. For setup instructions, see Get started with Git integration. After you connect, your items, including notebooks, appear in the Source control panel.

After you commit notebook instances to the Git repository, you can see the notebook folder structure in the repository.
You can now perform Git operations, such as Create pull request.
Notebook representation in Git
The following text shows the file structure for a notebook item in the Git repository:
.
├── Notebook_1.Notebook/
│   ├── Resources/ (Optional)
│   │   └── builtin/
│   │       ├── large_dataset.parquet
│   │       └── model_output.parquet
│   ├── .platform
│   ├── fs-settings.json (Optional)
│   ├── notebook-content.py
│   └── notebook-settings.json (Optional)
└── Readme.md
.
├── Notebook_2.Notebook/
│   ├── Resources/ (Optional)
│   │   └── builtin/
│   │       ├── large_dataset.parquet
│   │       └── model_output.parquet
│   ├── .platform
│   ├── fs-settings.json (Optional)
│   ├── notebook-content.sql
│   └── notebook-settings.json (Optional)
└── Readme.md
When you commit a notebook item, Fabric stores it as source files instead of a standard .ipynb file. For example, a PySpark notebook is stored as notebook-content.py. This format is easier to review in Git diffs.
The source file keeps notebook metadata (including the default lakehouse and attached environment), markdown cells, and code cells as separate sections. Fabric uses this structure to reconstruct the notebook when you sync back to a workspace.
Notebook cell output isn't included when syncing to Git.
The following screenshot shows the source format in the Git repository:

Note
Keep notebooks and their dependent environments in the same workspace, and version both notebook and environment items in Git. Fabric maps these relationships when you sync to new workspaces.
The default lakehouse ID stays in notebook metadata when you sync from the repository to a Fabric workspace. If needed, manually bind the notebook to the new lakehouse item. For more information, see Lakehouse Git integration.
Notebook Git settings
The Git settings panel lets you control how notebooks interact with source control, including options for Git binding and managing which Resources folder files are included in commits.
Note
Don't edit notebook-settings.json in the Git repository to control Git auto-binding or resources. Manage these settings through the notebook settings page instead.
Lakehouse Auto-Binding in Git
Lakehouse Auto-Binding lets Fabric resolve the correct default lakehouse for each Git-connected workspace. This reduces manual rebinding when you move notebooks across development, test, and production workspaces.
Enable this feature from Notebook settings. After you enable it, Fabric creates notebook-settings.json in the repository and manages this file automatically. Don't edit this file manually.

Note
Notebook Git integration supports persisting the binding relationship between notebooks and their attached lakehouses when syncing across workspaces. When syncing a notebook to another workspace, you can choose whether it binds to the lakehouse in the source workspace or the lakehouse in the new workspace. For notebooks already versioned in Git, the physical ID of the attached lakehouse in the notebook metadata is replaced with a logical ID. This change may appear in the Git diff view.
Notebooks Resources Folder Support in Git
Note
The Environment Resources folder and integration with deployment pipelines and public APIs are not currently supported.
The built-in Resources folder can be committed to Git so scripts and configuration files are versioned with the notebook.
This feature is optional and off by default. Enable it from Notebook settings in the Git settings section. After you enable it, files in the Resources folder are included in commits. Because commits have a 50 MB limit, use .gitignore file or Git rules to exclude large or temporary files or folders.

Note
Only the .gitignore in the built-in resource root folder takes effect.
After you configure Git rules and commit changes, Fabric saves the rules in fs-settings.json in the repository. Fabric generates and manages this file to keep repository configuration consistent. We also don't recommend editing this file directly in the Git repository.

Notebook in deployment pipelines
Use deployment pipelines to promote notebook changes across stages such as Development, Test, and Production. Validate updates in earlier stages before you promote them to production.
Notebook deployment supports auto-binding for the default lakehouse and attached environment when dependent items are in the same workspace. During deployment, Fabric can rebind these dependencies to corresponding items in the target workspace. Metadata changes can appear in the diff view.
If you need a specific target-stage default lakehouse, configure a deployment rule to override auto-binding.
The new deployment pipeline UI is currently used in this article. You can switch to the old UI by turning off New Deployment pipeline.
Note
Known issue: frozen cell status in notebooks isn't preserved during deployment.
Use the following steps to deploy notebooks through a deployment pipeline.
Create a deployment pipeline, or open an existing one. For more information, see Get started with deployment pipelines.
Assign workspaces to different stages according to your deployment goals.
Select, view, and compare items, including notebooks, between stages. The highlighted badge shows the number of changed items between the previous stage and the current stage.
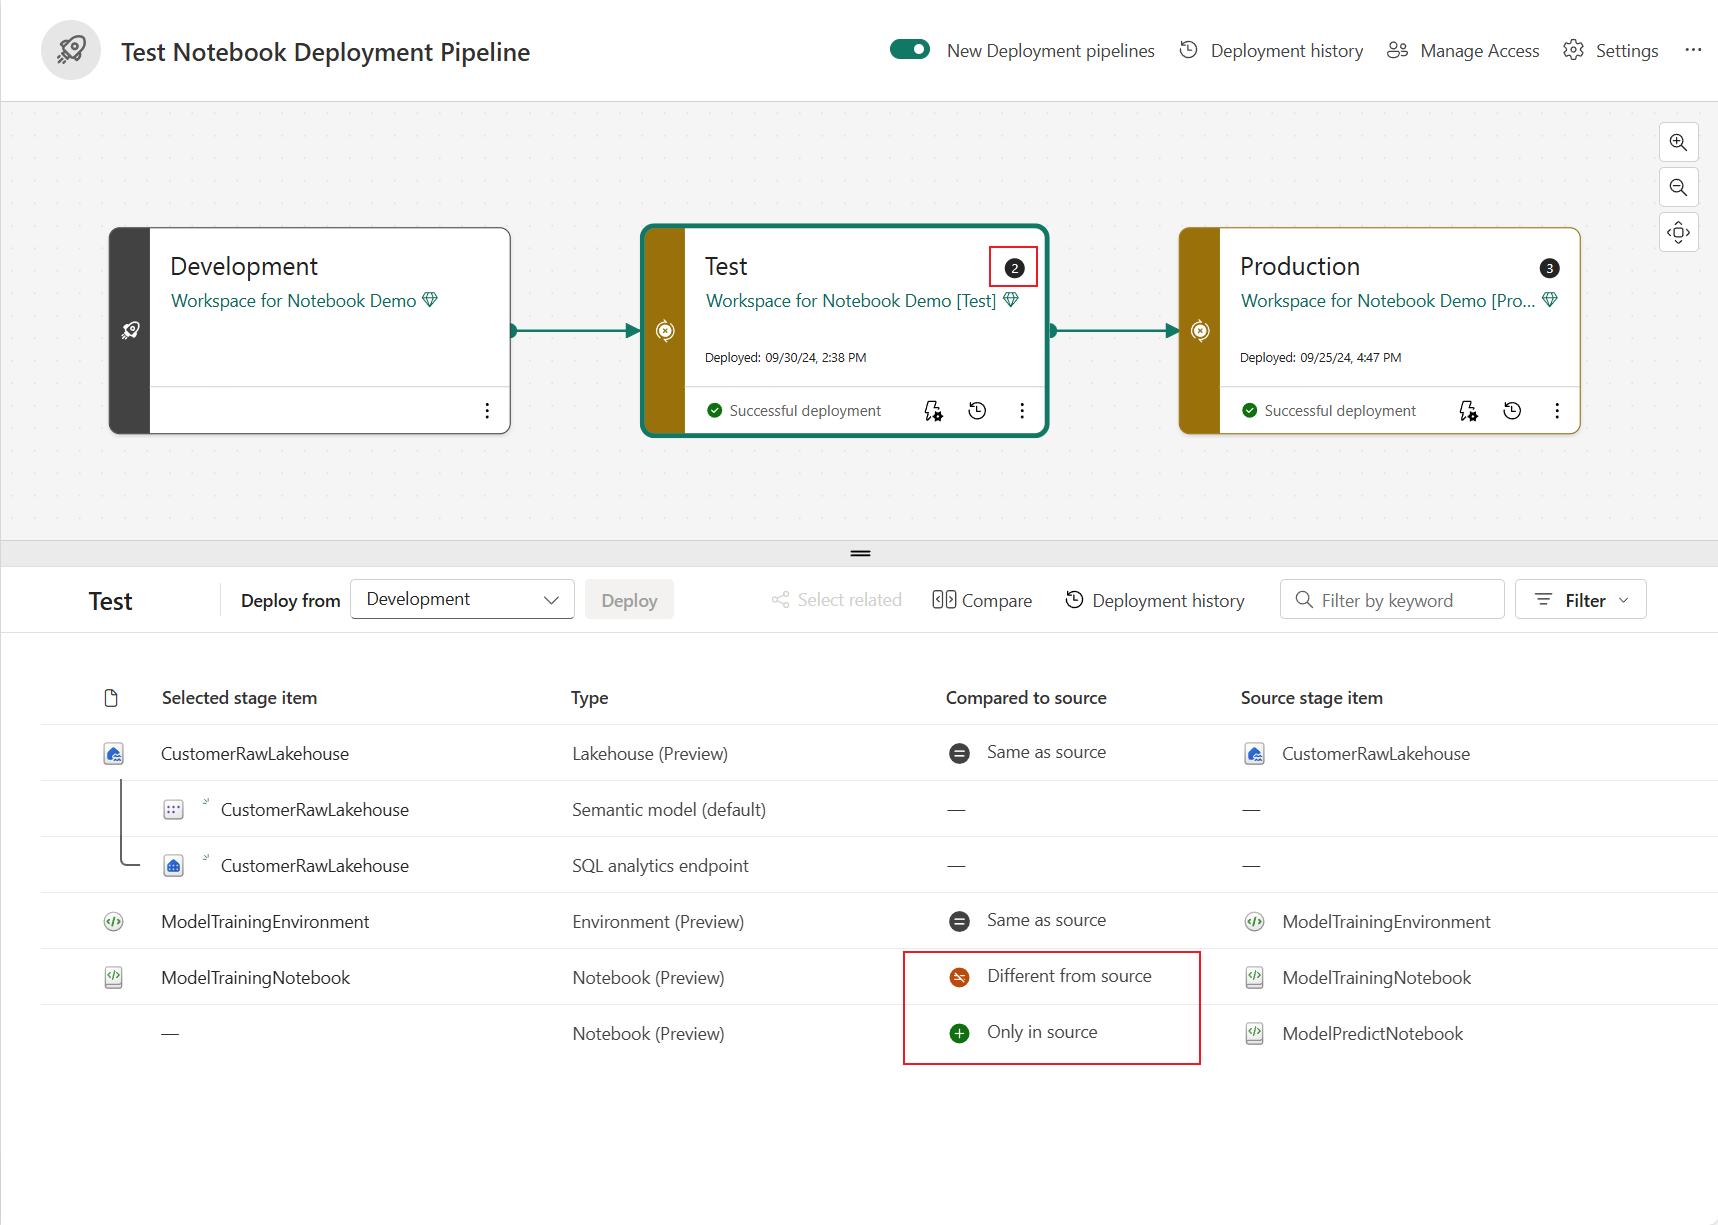
Select Deploy to promote notebooks across the Development, Test, and Production stages.
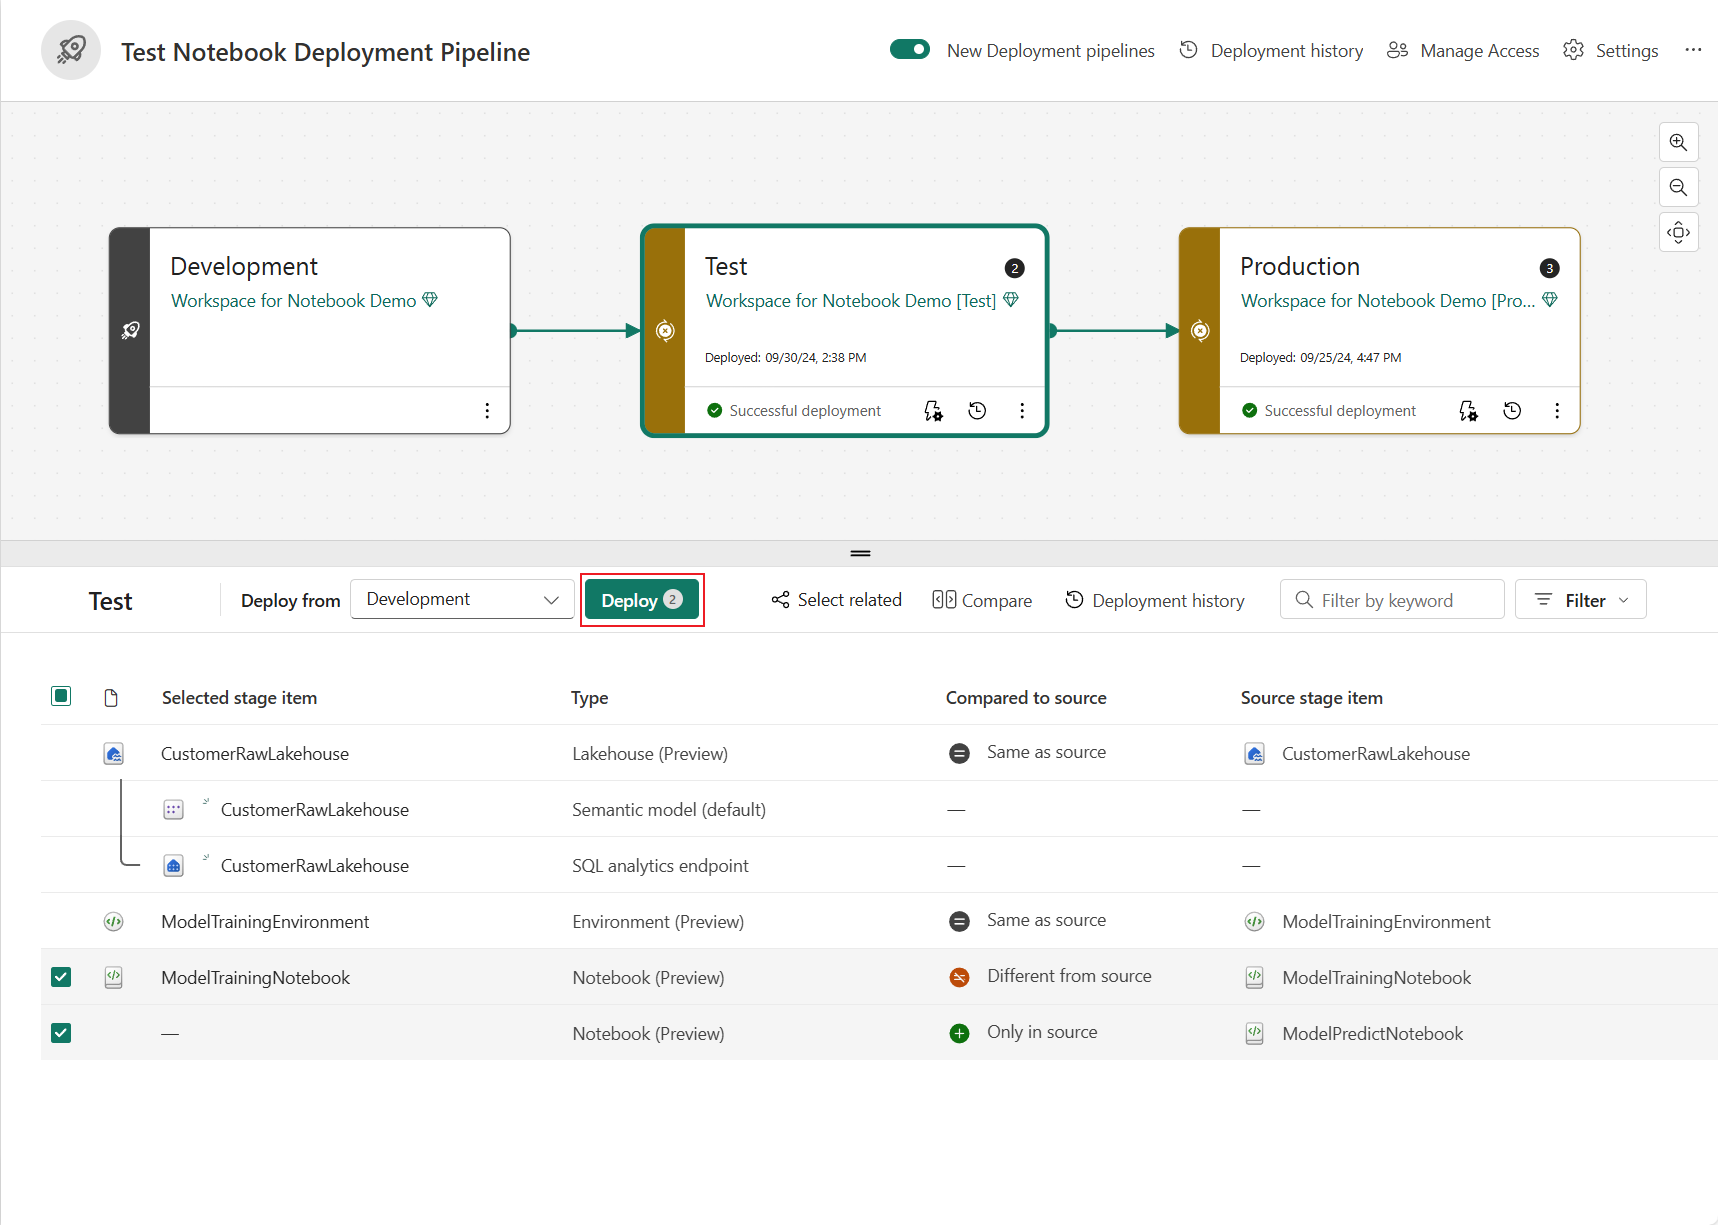
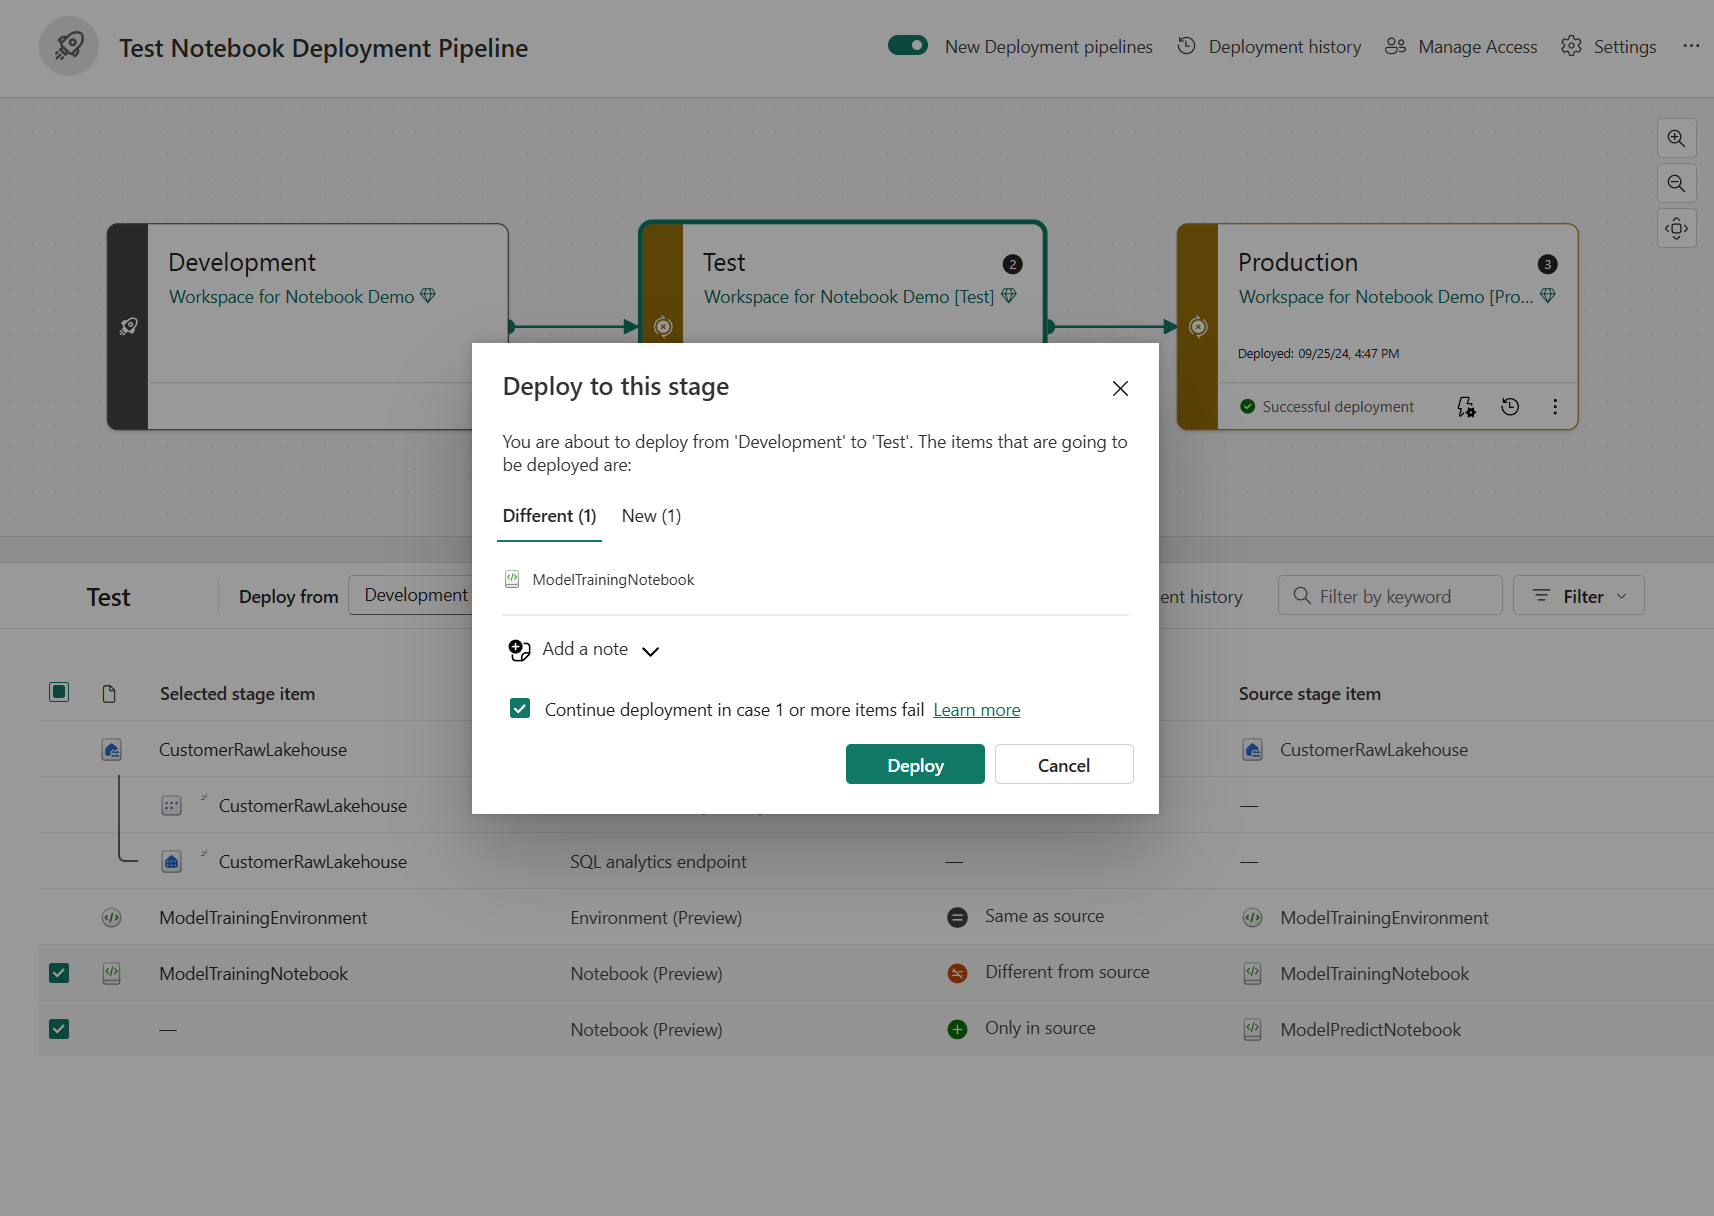
In the Deploy to this stage window, review the new and changed items. To continue deployment even if one or more items fail, select Continue deployment if one or more items fail.
After you review and confirm the selection, select Deploy.
(Optional.) To create deployment rules, select Deployment rules on the target stage item in the pipeline (for example, Test or Production).
For general rule behavior and limitations, see Create deployment rules.
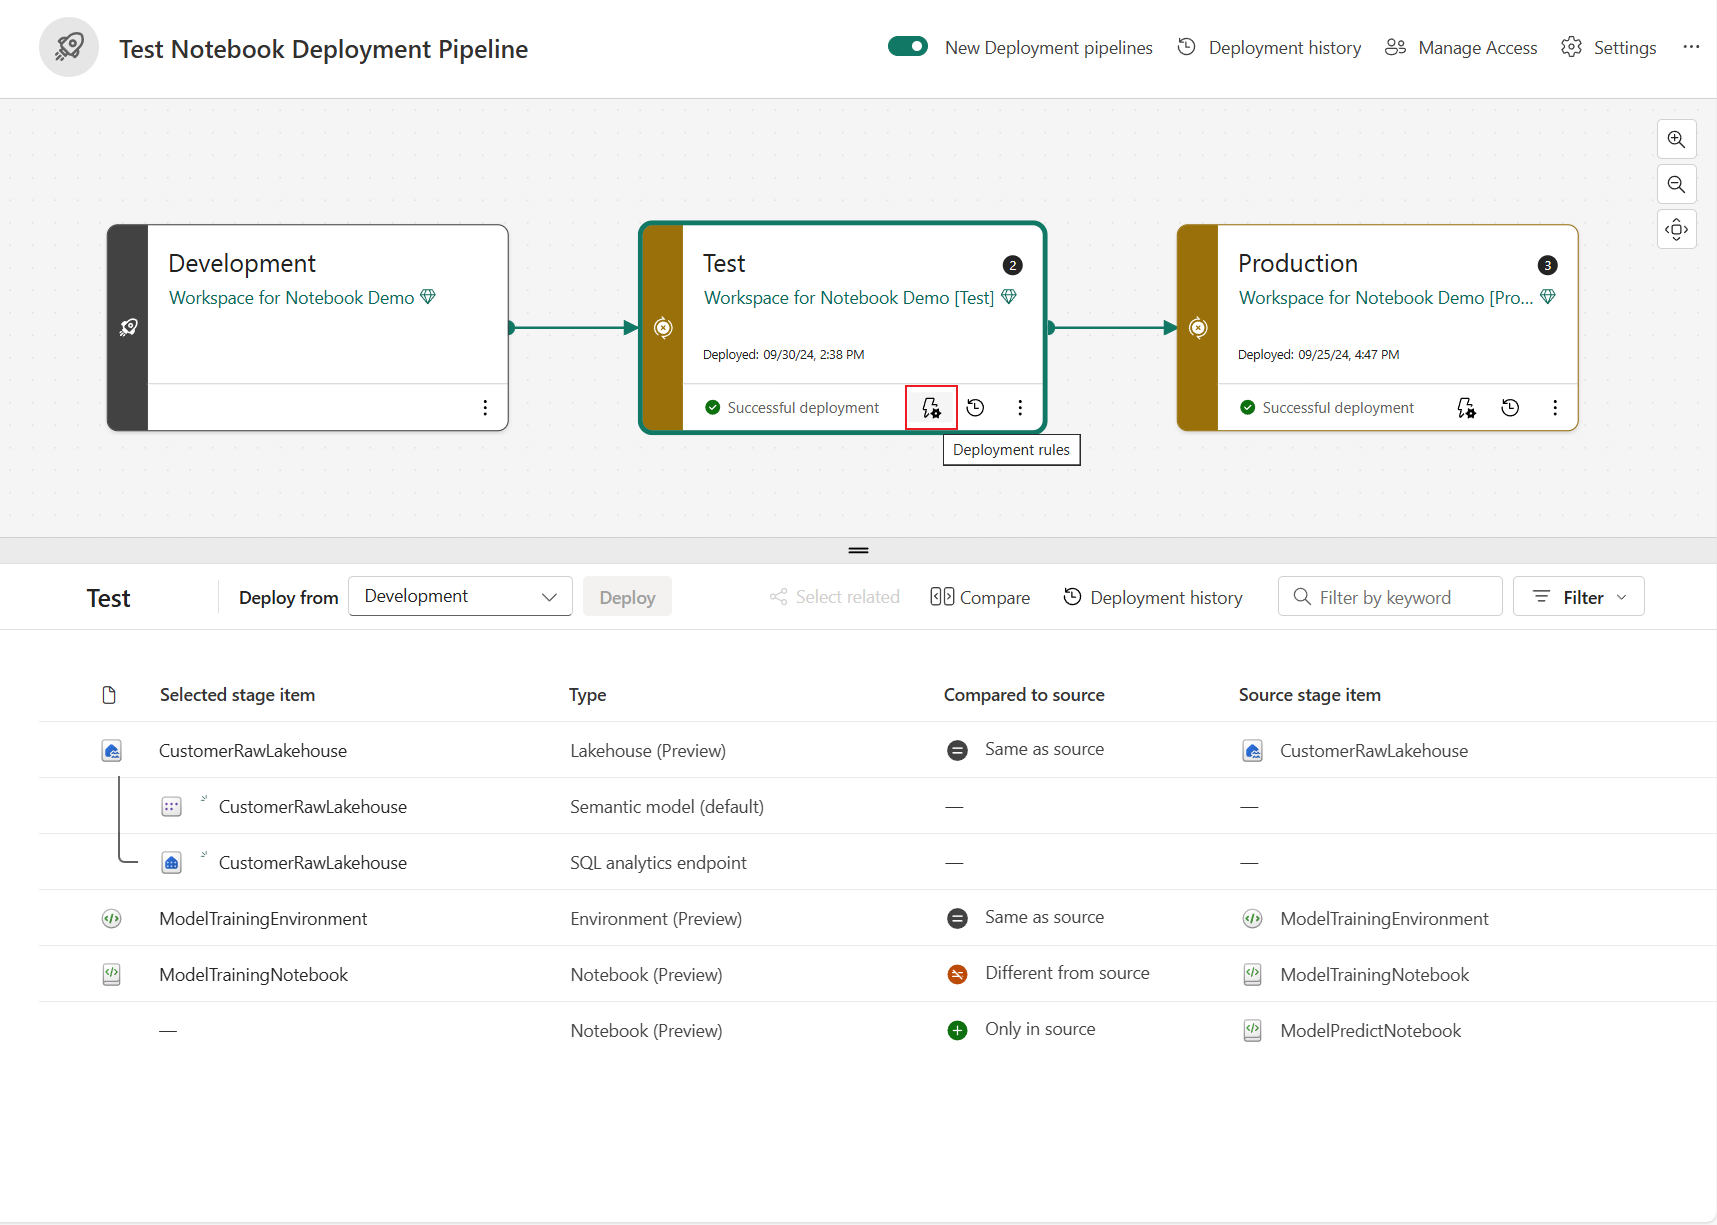
Configure a default lakehouse rule for each notebook deployment.
This rule controls which lakehouse the notebook connects to in the target stage after deployment.
In the Set deployment rules pane, select the Default lakehouse tile.
Use the From and To dropdowns to map the source-stage default lakehouse to the target-stage default lakehouse:
- Same with source lakehouse: Keep the same default lakehouse setting as the source stage.
- N/A (no default lakehouse): Remove the default lakehouse setting in the target stage.
- Other: Replace the source-stage default lakehouse with a different lakehouse in the target stage.
If you select Other in the To dropdown, provide the target lakehouse details:
- Lakehouse ID
- Lakehouse name
- Lakehouse workspace ID
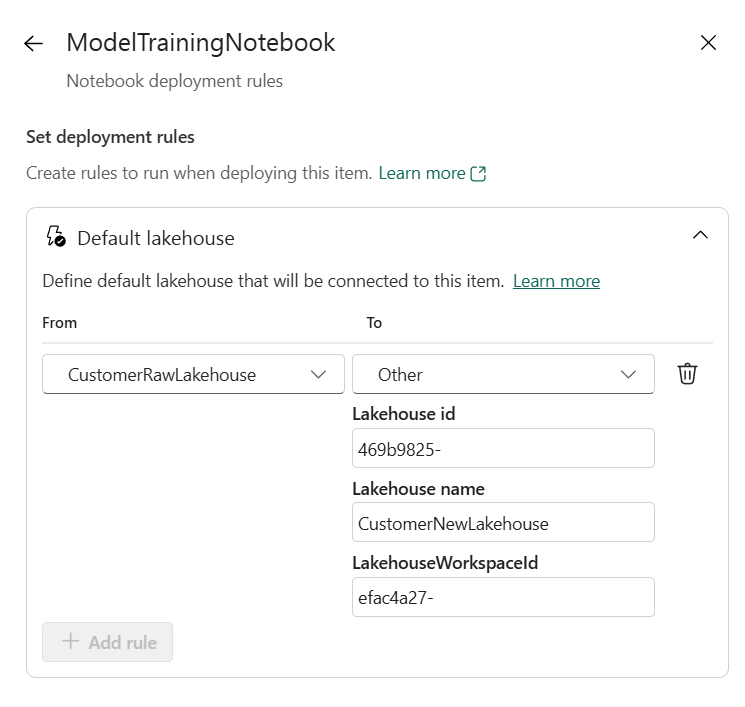
Note
Lakehouse ID is required when you configure this rule. You can get the lakehouse ID from the item URL. Deployment rules take priority over auto-binding. If a deployment rule is configured, it overrides the auto-bound lakehouse.
Monitor the deployment status from Deployment history.


