Note
Access to this page requires authorization. You can try signing in or changing directories.
Access to this page requires authorization. You can try changing directories.
The Change Event Streaming (CES) feature is a new, advanced data integration capability introduced in SQL Server 2025 (17.x) and Azure SQL Database. It allows you to send real-time data change events from SQL Server directly to Azure Event Hubs. The Fabric eventstreams feature is associated with Azure Event Hubs, which is a fully managed, cloud-based service. When you create an eventstream, an event hub namespace is automatically provisioned and an event hub is assigned to the default stream. This means CES can also deliver change events straight to Fabric Eventstream.
This tutorial shows you how to stream the SQL change events from Azure SQL Database to a custom endpoint in Fabric Eventstream using the Change Event Streaming (CES) feature. And then extract the SQL table data from change events through Eventstream’s SQL operator.
In this tutorial, you learn how to:
- Create an eventstream and add a custom endpoint source
- Get connection information from a custom endpoint source
- Configure change event streaming in Azure SQL database
- Extract table data from change events using Eventstream SQL operator
Prerequisites
- Get access to a workspace with Contributor or higher permissions where your eventstream is located. If using Microsoft Entra authentication, Member or higher permissions are required to grant Entra ID Contributor or higher access.
- A sign-in in the db_owner role or that has CONTROL DATABASE permission for the Azure SQL database where you intend to enable CES.
- For Azure SQL Database configured to use outbound firewall rules or a Network Security Perimeter, allow access to the Eventstream’s source custom endpoint through Firewall ports to open
Create an eventstream
Navigate to the Fabric portal.
Select My workspace on the left navigation bar.
On the My workspace page, select + New item on the command bar.
On the New item page, search for Eventstream, and then select Eventstream.

In the New Eventstream window, enter a name for the eventstream, and then select Create.
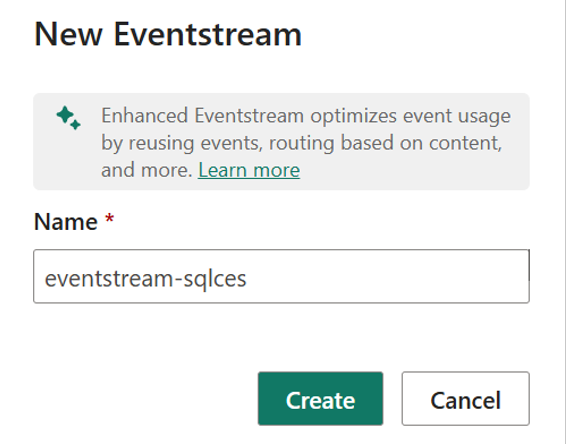
Creation of the new eventstream in your workspace can take a few seconds. After the eventstream is created, you're directed to the main editor where you can start with adding sources to the eventstream.


Get connection information from an added custom endpoint source
To get the connection endpoint information from an eventstream, add a custom endpoint source to your eventstream. The connection endpoint is then readily available and exposed within the custom endpoint source
To add a custom endpoint source, on the get-started page, select Use custom endpoint
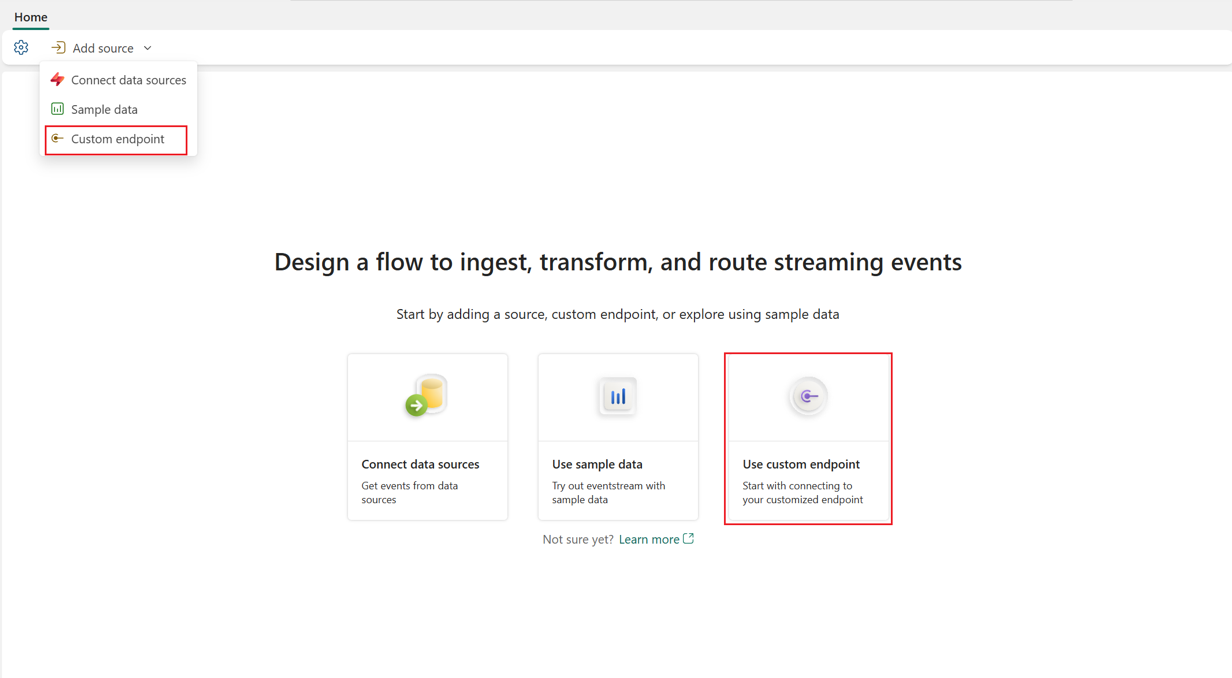
In the Custom endpoint dialog, enter a name for the custom source under Source name, and then select Add.

After you create the custom endpoint source, it's added to your eventstream on the canvas in edit mode. To implement the newly added data from the custom app source, select Publish
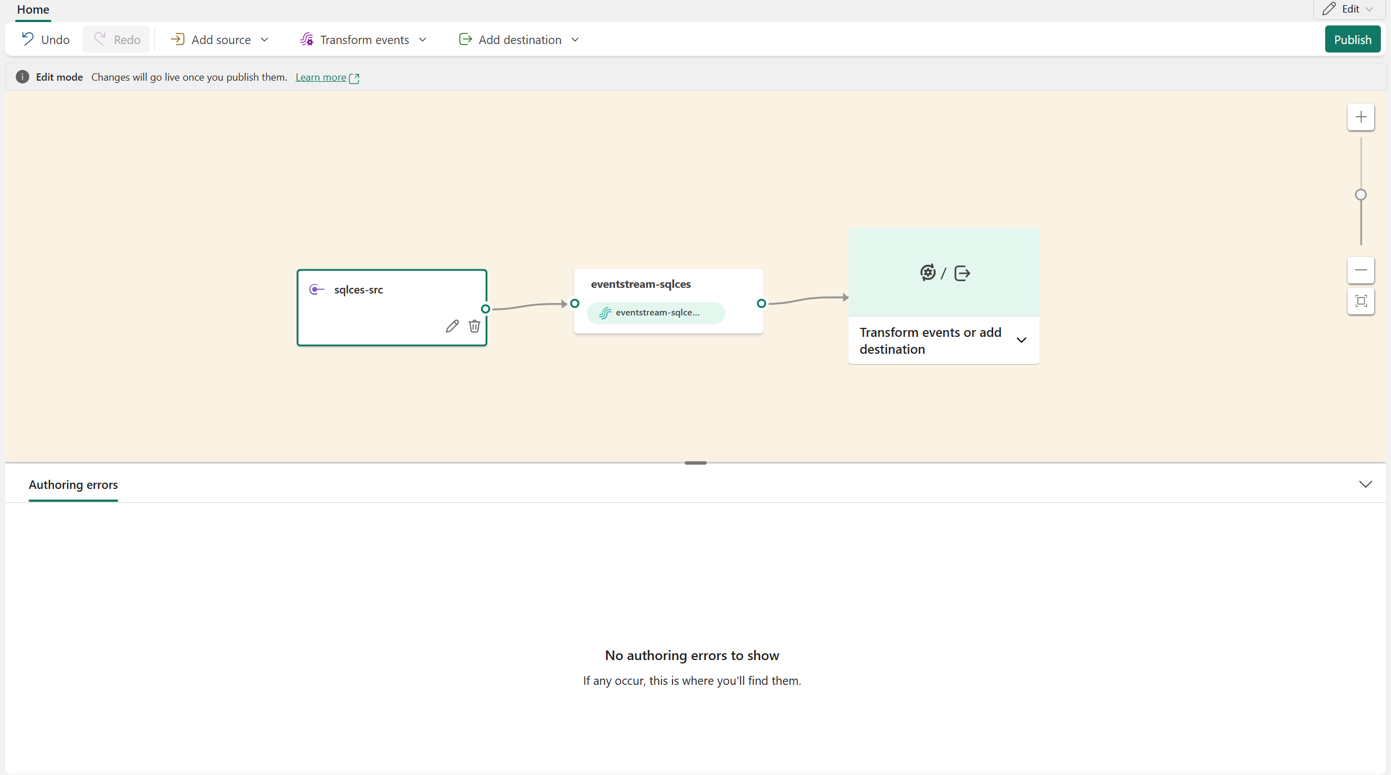
Once the eventstream is published, select the custom endpoint source tile on the canvas to view its details. The bottom pane provides the endpoint information needed to configure the CES feature in your Azure SQL database.


Enable and configure change event streaming in Azure SQL Database
This section guides you through enabling and setting up change event streaming for your Azure SQL database. Start by choosing and logging into the specific database where you want to activate this feature, then follow these steps:
- Set the database to full recovery model if it is not already configured.
- Create a master key and a database scoped credential.
- Enable event streaming.
- Create the event stream group.
- Add one or more tables to the event stream group.
There are two protocols that the change event streaming supports to stream the change events to Eventstream:
- AMQP protocol
- Kafka protocol
Both approaches require completing these steps, but with different parameters. And both ways support three authentication types: Microsoft Entra, SAS token, and SAS key. You can select whichever protocol and authentication type best suits your needs. In the following example, we use AMQP protocol and Microsoft Entra and SAS token authentication to walk through these steps. For other protocol and the authentication method, refer to Configure Change Event Streaming
1. Set the database to full recovery model if it isn't already configured:
This step is required only when using SQL Server 2025. For Azure SQL Database or Azure SQL Managed Instance, the setting is always FULL, so this step can be skipped.
-- set the recovery mode as FULL
USE <database name>;
GO
ALTER DATABASE <database name>
SET RECOVERY FULL;
GO
-- Check the recovery mode
SELECT name, recovery_model_desc
FROM sys.databases
WHERE name = '<database name>';
GO
2. Create a master key and a database scoped credential:
-- Create the Master Key with a password.
CREATE MASTER KEY ENCRYPTION BY PASSWORD = '<Password>';
3. Enable event streaming:
-- Enable change event streaming for the selected database.
EXEC sys.sp_enable_event_stream;
4. Create the event streaming group:
To create the event streaming group, you need to decide which authentication is used. There are two recommended authentication types: Microsoft Entra and SAS token. To create the change event stream group in SQL database using the AMQP protocol, use the key information from Eventstream’s source custom endpoint for setup and configuration.
<EventHubNamespaceEndpoint>and<EventHubName>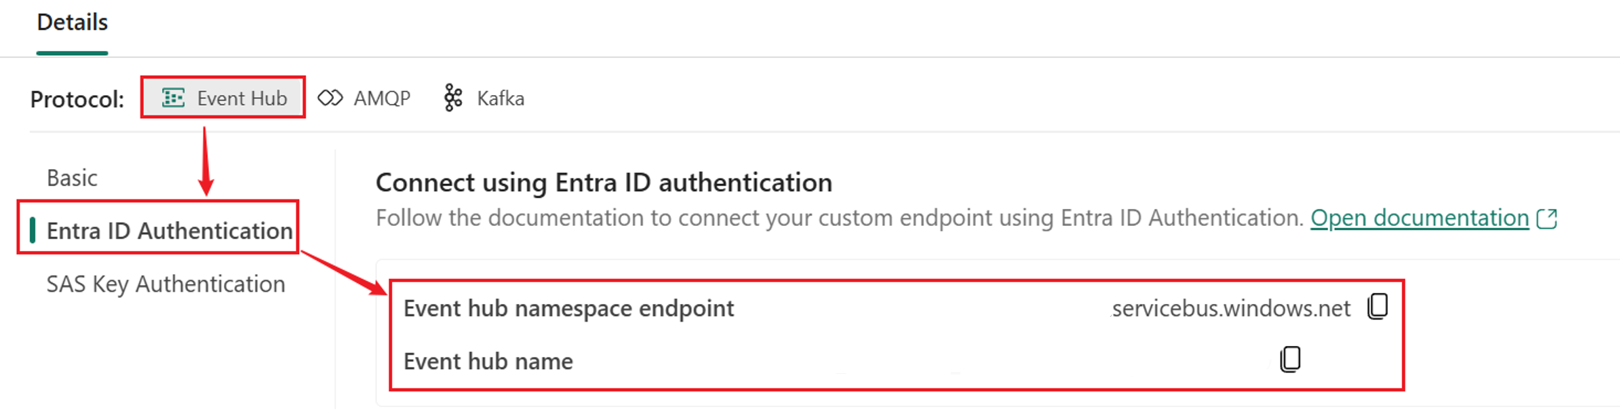
<SharedAccessKeyName>and<PrimaryOrSecondaryKey>

Microsoft Entra
This is the most secure authentication and is highly recommended. Follow these steps to configure CES with it:
Enable the system managed identity for your Azure SQL database in Azure portal: Security > Identity > System assigned managed identity:

Grant Contributor or higher permission to your Azure SQL database’s system assigned managed identity in your Fabric workspace where your eventstream is in: Workspace > Manage access > Add people or groups, type your Azure SQL instance name to search:
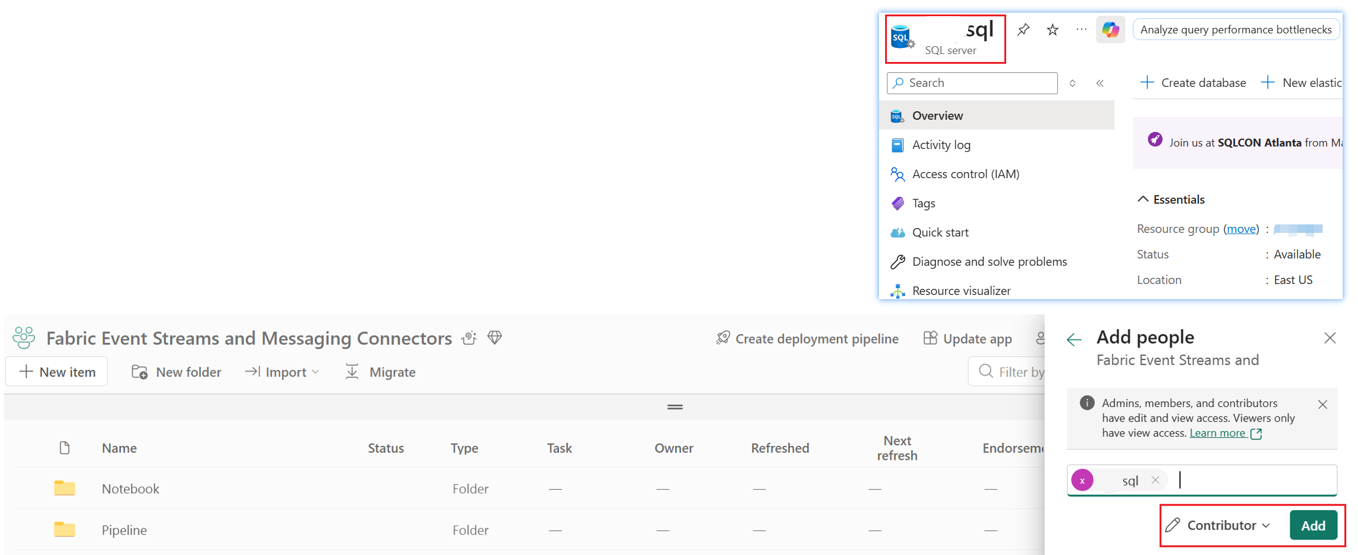
Sign in to your Azure SQL database and run the following SQL commands. Replace any values in <> with those specific to your eventstream and SQL environment.
CREATE DATABASE SCOPED CREDENTIAL <CredentialName>
WITH IDENTITY = 'Managed Identity'

EXEC sys.sp_create_event_stream_group
    @stream_group_name = N'<ChangeEventStreamGroupName>',
    @destination_type = N'AzureEventHubsAmqp',
    @destination_location = N'<EventHubNamespaceEndpoint>/<EventHubName>', -- Event hub namespace endpoint should NOT contain the port number: 9093
    @destination_credential = <CredentialName>,
    @max_message_size_kb = <MaxMessageSize>, -- 128, 256, 1024
    @partition_key_scheme = N'<PartitionKeyScheme>', -- Possible options: N'None' (partition is chosen in “round robin”, N'StreamGroup', N'Table' (partitioning by     table), N'Column'. If nothing is supplied, the default is None
    @encoding = N'JSON'

SAS token
If Microsoft Entra authentication isn't available, use SAS token authentication. Follow these steps to configure CES with this authentication:
Generate SAS token with your eventstream’s endpoint information with script. Below is the example with PowerShell. If you’d like to use script in other languages, refer to Generate a Shared Access Signature token. Replace the values in <> with the values provided by your eventstream’s endpoint.
[Reflection.Assembly]::LoadWithPartialName("System.Web") | out-null
$URI="<EventHubNamespaceEndpoint>/<EventHubName>/"
$Access_Policy_Name="<SharedAccessKeyName>"
$Access_Policy_Key="<PrimaryOrSecondaryKey>"
#Token expires now+ 86400(1 day)
$Expires=([DateTimeOffset]::Now.ToUnixTimeSeconds())+86400
$SignatureString=[System.Web.HttpUtility]::UrlEncode($URI)+ "`n" +   [string]  $Expires
$HMAC = New-Object System.Security.Cryptography.HMACSHA256
$HMAC.key = [Text.Encoding]::ASCII.GetBytes($Access_Policy_Key)
$Signature = $HMAC.ComputeHash([Text.Encoding]::ASCII.GetBytes    ($SignatureString))
$Signature = [Convert]::ToBase64String($Signature)
$SASToken = "SharedAccessSignature sr=" + [System.Web.HttpUtility]    ::UrlEncode($URI) + "&sig=" + [System.Web.HttpUtility]::UrlEncode    ($Signature) + "&se=" + $Expires + "&skn=" + $Access_Policy_Name
$SASToken
Sign in to your Azure SQL database and run the following SQL commands. Replace any values in <> with those specific to your eventstream and SQL environment
CREATE DATABASE SCOPED CREDENTIAL <CredentialName>
WITH IDENTITY = 'SHARED ACCESS SIGNATURE',
SECRET = '<Generated SAS Token>' -- Be sure to copy the entire token   from   previous step. The SAS token starts with "SharedAccessSignature   sr="

EXEC sys.sp_create_event_stream_group
    @stream_group_name = N'<ChangeEventStreamGroupName>',
    @destination_type = N'AzureEventHubsAmqp',
    @destination_location = N'<EventHubNamespaceEndpoint>/  <EventHubName>',   -- Event hub namespace endpoint should NOT   contain the port number:   9093
    @destination_credential = <CredentialName>,
    @max_message_size_kb = <MaxMessageSize>, -- 128, 256, 1024
    @partition_key_scheme = N'<PartitionKeyScheme>', -- Possible   options:   N'None' (partition is chosen in “round robin”,   N'StreamGroup',   N'Table' (partitioning by table), N'Column'. If   nothing is supplied,   the default is None
    @encoding = N'JSON'
5. Add one or more tables to the event streaming group
-- add table into the stream group created above
EXEC sys.sp_add_object_to_event_stream_group
@stream_group_name = N'<ChangeEventStreamGroupName>',
@object_name = N'<SchemaName>.<TableName>'
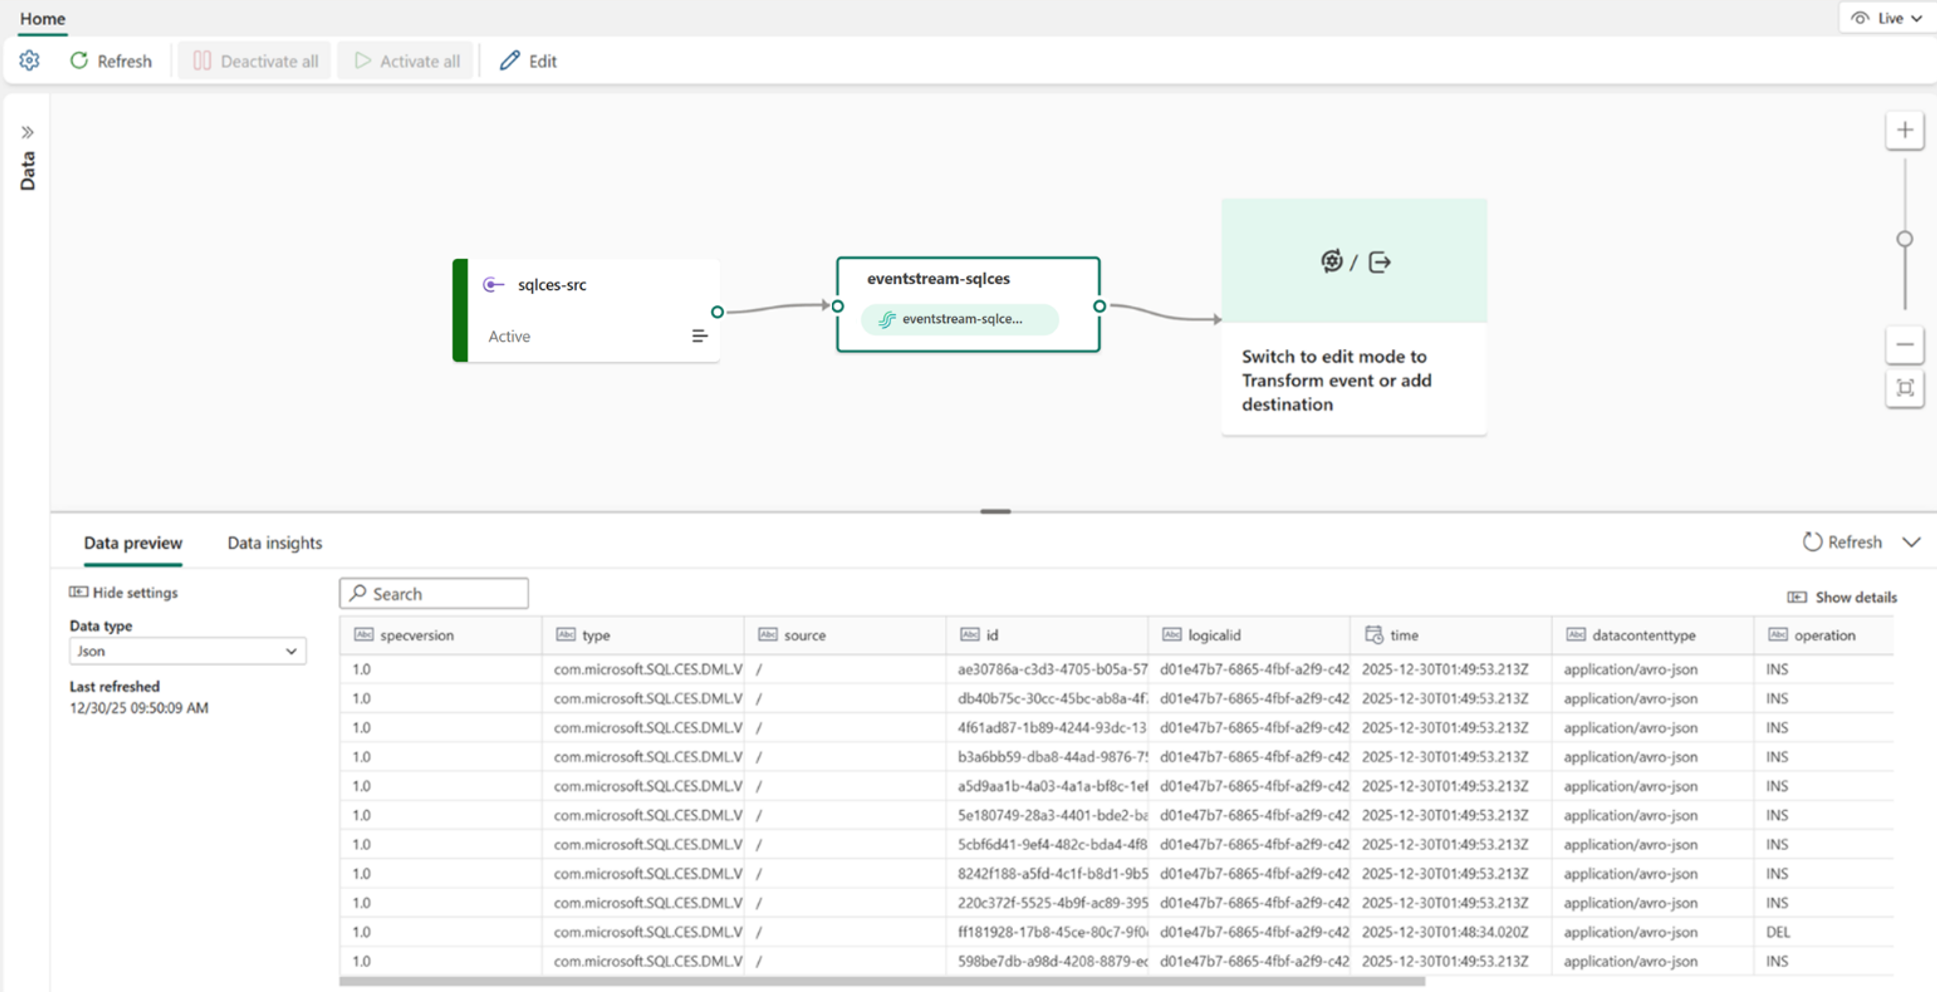
After getting the change event streaming configured in your Azure SQL database with these steps above, you can proceed to make modifications to your database. To confirm these changes flow into Eventstream, navigate to Eventstream and select the default stream node (the middle node). For example, new records were added to the table, or existing records were deleted, as demonstrated below:
Extract table data from change events with SQL operator
To extract SQL table data from change events, it's important to understand both the event format and the data types for each column. SQL change events adhere to the CloudEvents specification. The actual table data is contained in the 'data' column, while the 'operation' column specifies whether the record has been inserted, updated, or deleted. For more information, see JSON Message format.
The following example demonstrates how to extract purchase order data from the SQL table 'Purchases' by processing change events within Eventstream. This extracted data can then be used to analyze new order information.
EXEC sp_help 'dbo.Purchases';

According to the change event format described in JSON Message format, the table data in change event is under “eventrow” node in the column of ‘data’, and its type is ‘string’ following JSON format, that is, JSON string, which can be parsed as JSON. SQL operator in Eventstream has a built-in function: json_parse(string) which can parse the JSON string into JSON object. See the screenshot of the data column example below.
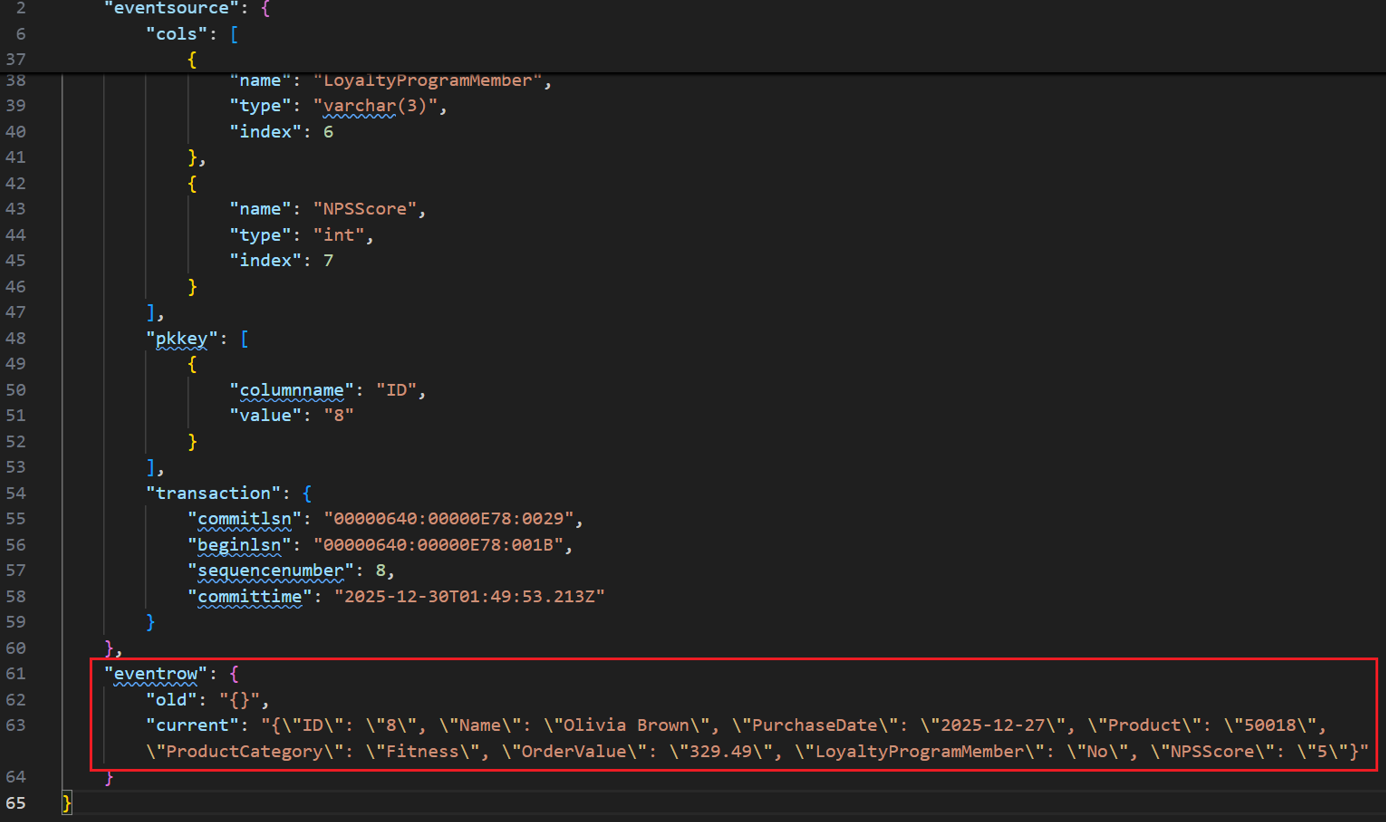
Since only the data of new orders is needed, only the change events with ‘Insert’ operation should be included, that is, the ‘operation’ column with ‘INS’: ‘operation’ = ‘INS’.
In your eventstream’s edit mode, add a ‘SQL operator’ to extract the data and a derived stream to receive the extracted data.

Open SQL editor in SQL operator, and type the SQL language as below:
WITH PurchaseOrders AS
(
    SELECT json_parse(data).eventrow.[current] AS neworders
    FROM [eventstream-sqlces-stream]
    WHERE operation = 'INS'
)
SELECT
    json_parse(neworders).ID AS ID,
    json_parse(neworders).Name AS Name,
    json_parse(neworders).PurchaseDate AS PurchaseDate,
    json_parse(neworders).Product AS Product,
    json_parse(neworders).ProductCategory AS ProductCategory,
    json_parse(neworders).OrderValue AS OrderValue,
    json_parse(neworders).LoyaltyProgramMember AS LoyaltyProgramMember,
    json_parse(neworders).NPSScore AS NPSScore
INTO [DerivedStream]
FROM [PurchaseOrders]
Use query test to preview this SQL query's output as below.

Once you finish configuring and publish the eventstream, you can view the latest incoming order data by choosing the derived stream in the eventstream's live view.

Related content
This tutorial showed you how to stream SQL change events to your eventstream via Eventstream’s source custom endpoint with the newly introduced Change Event Streaming feature in Azure SQL database. It also shows you how to extract the table data from the change events with SQL operator. Once the data reaches eventstream and extracted, you can route it to different destinations for analysis, alerts, and reports. Below are some helpful resources for further reference: