Configure Customer Application and ATS Integration
You can embed a LinkedIn widget in your platform that allows customers to log-in, select the Premium Job Posting contract, and enable the Premium Job Posting within the partner’s platform.
Once enabled, the partner platform will be able to post premium jobs on behalf of the customer.
You can integrate the onboarding widget to let LinkedIn's Recruiter customers post paid jobs directly into their contract, without leaving the partner site.
Note
- A customer who has either the Dashboard Manager Admin or Recruiter Admin seat in LinkedIn Recruiter can opt into the premium job posting from this widget
- This widget can be either live on your Job Board Settings page (preferable) or LinkedIn Global Settings page (where the RSC customer onboarding widget is also hosted)
- Refer this link for more information about job promotion at LinkedIn
Steps to Onboard PJP Widget
Follow the below steps to for OnBoarding Widget implementation:
- Create and Configure a Customer App
- Display the Customer Onboarding Widget Plugin
- Update Customer Integrations
- Widget Enablement Stages
Step 1 - Create and Configure a Customer App
The Provisioning API allows you to create API keys for each of your customers. Please note that you will need to store a unique API key for each of your customers. Once your app is configured, you may begin making API requests and testing the integration. All API requests require authorization.
Note
For existing CSA customers, you will be using their existing API keys. Please contact your Partner Engineering representative to coordinate migrating these API keys.
Step 2 - Display the Customer Onboarding Widget Plugin
The Onboarding Widget allows the API partners to integrate and let the LinkedIn Recruiter customers post paid jobs directly into their contract, without leaving the partner site.
Widget Script
Once a new customer application is created, it may take up to five minutes for the widget to load. You can host this widget by leveraging the below lines of Javascript code:
<script type="text/javascript" src="https://platform.linkedin.com/xdoor/scripts/in.js">
api_key: {customer app API key goes here}
extensions: UJPWidget@https://platform.linkedin.com/rsc/extensions/ujp-onboarding-widget
</script>

<script type="IN/UJPWidget" data-onconfirmjobposter="confirmJobPoster"
data-width="{width}">
</script>

<script>
/**
* This callback should:
*Store the customer's integration details like contractID in your ATS. These values will be used to promote jobs on LinkedIn on behalf of customer
* @param {Object[]} integrations
* @param {string} integrations[].tenantType
* @param {string} integrations[].onboardingStatus
* @param {string} integrations[].integrationType
* @param {string} integrations[].integrationContext
*
*/
function confirmJobPoster(integrations) {
//Your code here
console.log("integrations:", integrations);
}
</script>
Note
- Use the Customer's Application Client ID obtained as a value for api_key in above plugin to display the New Customer Onboarding Widget Plugin
- In order to reload the widget on a single page application, use in.parse()
- Verify Content Security Policy includes "platform.linkedin.com" and "www.linkedin.com" and ensure these domains are allowed in your platform
- Please add the host domain of widget under application settings on https://developer.linkedin.com
Widget Load
The plugin loads based on the api_key and data-width attributes you specify. Use the latter attribute to declare the width of the widget.
Widget Callback
The callback specified for the data-onconfirmjobposter script attribute will be fired when the customer selects the default job poster and clicks the Save button. You need to store the values you retrieve per customer for contractID as it will be used for posting premium job on behalf of this customer.
Widget will return 4 values
{
tenantType: JOBS
onboardingStatus: REQUESTED
integrationType: PREMIUM_JOB_POSTING
integrationContext: urn:li:contract:<contract_id>
}
Customer Enablement Flow
To enable premium job posting, a LinkedIn contract seatholder with admin privileges has to perform a few steps in your platform when the javascript widget is loaded:
Note
These steps are for the customers of the partners.
Click Sign in
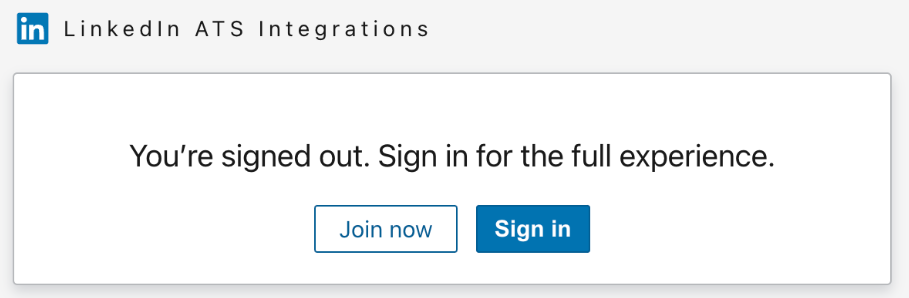
Enter your LinkedIn credential

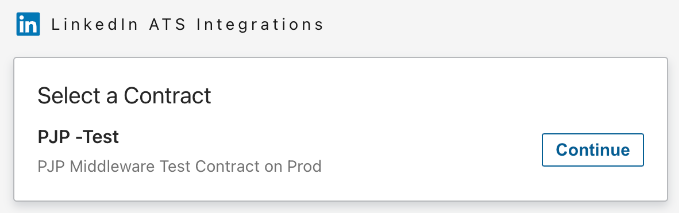
If you have a seat on multiple LinkedIn contracts, select one you would like to connect to your ATS
Note
- If you only have a seat on one LinkedIn contract, you will bypass this page
- The widget also provide an option to the customer to change the contract if they wish to enable premium job posting for more than one contracts. This will be one time enablement step per contract. Once enabled, partner platform can promote all jobs using API on behalf of the customer. There is only one client_id per customer
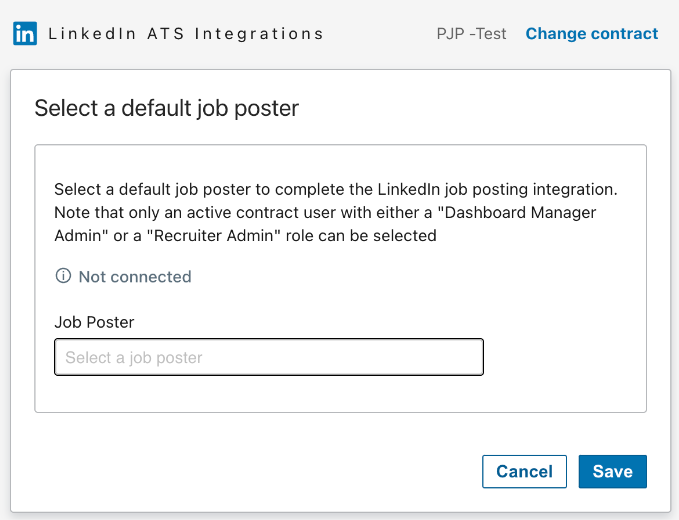
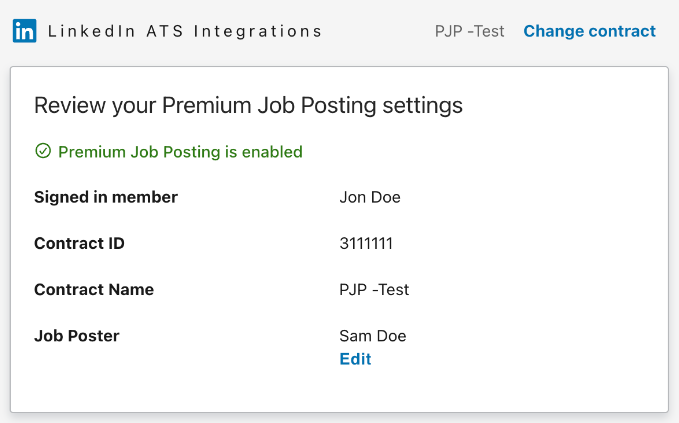
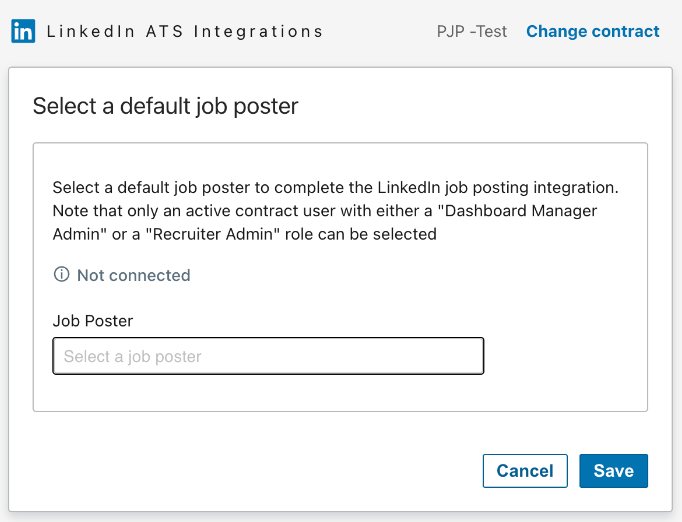
The admin seat holder of the LinkedIn contract will be prompted to select the default Job Poster to display alongside their jobs. At this point, the customer can select one of the seat holders of their Recruiter Contract.
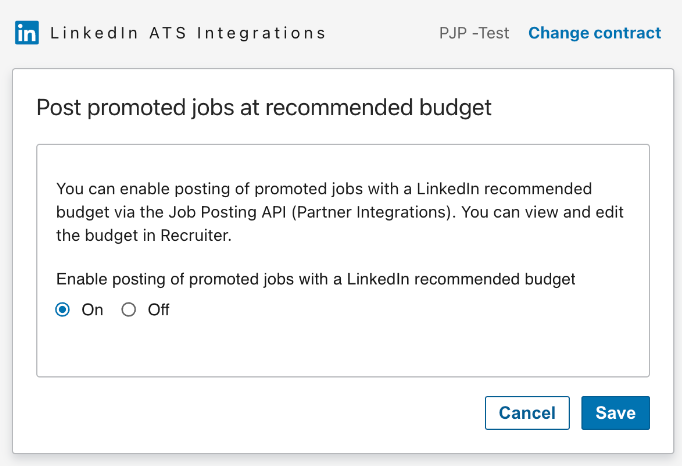
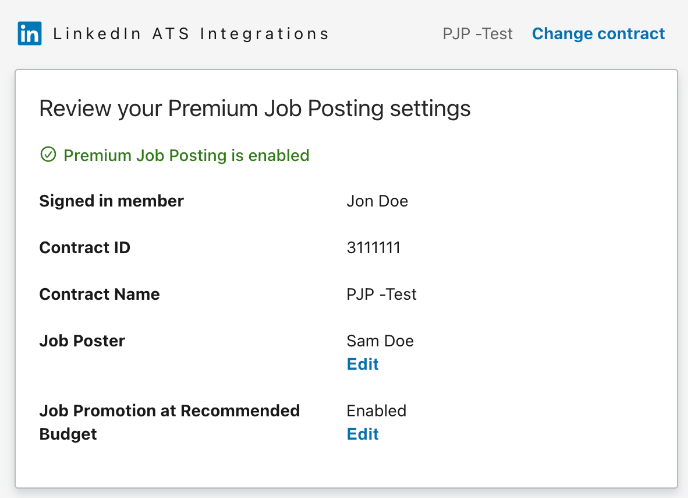
In case the contract falls under the recommended budget type, you are given the choice to activate the posting of promoted jobs with a budget recommended by LinkedIn. Please note that this page does not display for contracts based on job slots.
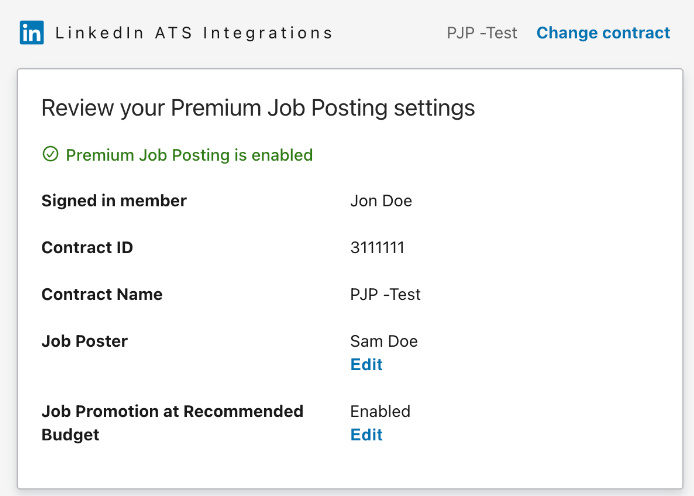
Once the default job poster is selected, customers are directed to this following landing page after partner approves their integration request with update customer integration call.
If the contract selected is for the recommended budget on LinkedIn, clients are directed to the subsequent landing page.
Note
- The widget allows the customer to update the default job poster value anytime in future. It is necessary for partners to execute the following API request every time there is a modification in the default job poster
- If the default job poster is removed from the contract or restricted please update the default job poster via widget to re-enable job postings
Step 3 - Update Customer Integrations
Once the customer clicks the Save button, the widget invokes the callback method configured in partner platform and provides below parameters:
tenantType:JOBSonboardingStatus:REQUESTEDintegrationType:PREMIUM_JOB_POSTINGintegrationContext:urn:li:contract:<contract-id>
Enable Customer Integrations
POST https://api.linkedin.com/v2/atsIntegrations?ids[0].integrationContext=urn:li:contract:(ContractID returned by widget) &ids[0].integrationType=PREMIUM_JOB_POSTING&ids[0].tenantType=JOBS&ids[0].dataProvider=ATS
Note
Create access token using the customer application client Id used in background for widget to make this API call. Creating integrations must be done server-side and in real-time.
For each id part specified in the request:
- Use the customer's integration context obtained in step 2 as the value of
id[i].integrationContext. The format will be eitherurn:li:organization:{id}orurn:li:contract:{id} - Use the integration type obtained in step 2 as the value of
id[i].integrationType - Use the tenant type obtained in step 2 as the value of
id[i].tenantType - Use "ATS" as the value of
id[i].dataProvider
The partner should:
- Persist contractID detail
- Immediately invoke LinkedIn’s ATSIntegrations endpoint to enable customers’ premium job posting integration.
The API call will be as below:
Provide Customer Integration Name
API URL
POST https://api.linkedin.com/v2/atsIntegrations?ids[0].integrationContext=urn:li:contract:(ContractID returned by widget) &ids[0].integrationType=PREMIUM_JOB_POSTING&ids[0].tenantType=JOBS&ids[0].dataProvider=ATS
Request Headers:
Authorization: Bearer {token}
x-restli-method: batch_partial_update
Sample Request Body
{
  "entities": {
    "integrationContext=urn:li:contract:<ID>&integrationType=PREMIUM_JOB_POSTING&tenantType=JOBS&dataProvider=ATS": {
      "patch": {
        "$set": {
          "integrationName": "<PartnerName>-<CustomerName> LinkedIn Premium Job Posting Integration"
        }
      }
    }
  }
}
Sample Response Body
{
    "errors": {},
    "results": {  "integrationType=PREMIUM_JOB_POSTING&tenantType=JOBS&dataProvider=ATS&integrationContext=urn:li:contract:<ID>": {
            "status": 204
        }
    }
}
The above step will successfully enable premium job posting integration for your customer. You can also pull the status of the integration by making a GET call
Note
Be sure to check the response for error statuses corresponding to individual entities you submit.
Step 4 - Widget Enablement States
The PJP Widget has three distinct states which are determined by the actions of our customers.
If the following text displays at the widget, the customers can utilize their paired customer application API key and contract for the specified organization_id to post premium jobs.

- Once the customer logs into the widget for the first time and no default job-poster is selected yet, the widget displays “Not Connected”.
- After you select the default job poster and click the Save button, the widget displays “Premium Job Posting is requested”. Every time a customer changes or removes default job poster from their contract via this widget, integration reverts to “Requested” state. Partner ATS must run an Update Customer Integration API call to re-enable customers for job posting.

- After the default job poster is associated with this integration, the widget state will be displayed as “Premium Job Posting is enabled”. Depending on whether the customer has chosen a contract that falls under the recommended budget type or not, they will be presented with one of two widget states.
Widget Errors
Customers can see following errors while configuring with widget:
| Error Message | Description | Resolution |
|---|---|---|
| You don't have permission to view this page. Log in as a Recruiter Admin to view this page | When the widget is loaded with API key which does not have correct permission to access the widget | Log in as a Recruiter Admin to view this page |
| Something went wrong. There was an issue with our servers. Please try again | When widget is unable to fetch permission for the API key provided | Try reloading the widget |
| Something went wrong. There was an issue with our servers. Please try again | When widget is unable to fetch integration configuration for the API key provided | Try reloading the widget |
| Something went wrong. There was an issue with our servers. Please try again | If the fetching of the profile of the job-poster fails for an already saved job-poster | Try reloading the widget |
| An error occurred when fetching data. Please try again | While searching for a particular job poster, fetching of profiles fail on entering search key into input field | Retry with the key again, by deleting and reentering the key |
| Saving the default poster failed due to a network error. Please try again or contact LinkedIn Support | If the saving of default job poster fails | Try again, as this is a server error |
| Please select a job poster from the drop down | If the user clicks the Save button without selecting a valid job poster | Always try to choose user from suggeted drop down |
| No data found | If the user enters a default job poster and relevant results as suggestions are not present within LinkedIn users | Please recheck if the entered job poster is spelled correctly to match the details of the profile |
| Saving the recommended budget setting failed due to a network error. Please try again or contact LinkedIn Support | If the saving of recommended budget setting fails | Try again, as this is a server error |
| Something went wrong. There was an issue with our servers. Please try again | Fetching the recommended budget setting fails while loading the widget | Try reloading the widget |