ServiceNow Integration with Microsoft Intune
Remote Help, an add-on to Microsoft Intune, provides a secure cloud based remote assistance solution for Windows commercial users. The integration between Intune and ServiceNow makes it possible for helpdesk agents to use Intune to troubleshoot endpoint related issues.
Support organizations need all the tools at their disposal to resolve workers' technology issues quickly and efficiently. With ServiceNow integration, helpdesk agents licensed to use Remote Help and who use ServiceNow can view incidents to see the details of the tech issue that an employee is facing. This integration allows helpdesk agents to view ServiceNow incidents directly from the Troubleshooting pane in the Microsoft Intune admin center.
About ServiceNow connector Integration
ServiceNow is a third party platform for IT Service Management and helps to automate IT Business Management. For more information on ServiceNow, go to:
The Intune ServiceNow Connector Integration focuses on creating a basic ticketing flow to enable IT admins to view the history of ServiceNow incidents in the MEM portal, device inventory, MEM insights enhanced ticket flows, and software licensing and reclamation.
Prerequisites
To get started, review the following steps:
ServiceNow integration is now Generally Available. An active Intune Suite or Remote Help trial or add-on license is required. Go to Remote Help trial or add-on license.
You must have the Microsoft Entra Global Admin Role or Microsoft Entra Intune Admin role to make updates to the connector. To view the incidents, you must have the Microsoft Entra Global Admin Role or Microsoft Entra Intune Admin role or have an Intune Role with the Organization | Read permission. Admins that aren't assigned the Microsoft Entra roles, need one of these two permissions to either modify the connector or view incidents respectively; Update Connector and View Incidents. These permissions are part of the ServiceNow permission category. For information on roles, see Role-based administration control with Intune
You must have ServiceNow permissions to view incidents when using the Test connection action. You can assign the itil role to grant appropriate permissions to view incidents. A ServiceNow license needs to be assigned to admins who view incidents.
You must have the Troubleshooting Preview enabled. To enable the Troubleshooting Preview, select Preview upcoming changes to Troubleshooting and provide feedback in the Troubleshooting pane. After reviewing the Troubleshooting preview information, select Try it now to enable the preview.
To configure the ServiceNow connector to establish a connection between Intune and your ServiceNow instance. See the steps outlined in Configure the ServiceNow integration with Microsoft Intune.
Configure the ServiceNow integration with Microsoft Intune
Sign into Microsoft Intune admin center and go to Tenant Administration > Connectors and Tokens > ServiceNow connector.
You can see the Connection Status and the Last Connection date time stamp.
Use the toggle to either turn on or off the ability to Exchange data with the ServiceNow instance.
Next, define the following properties for how you're going to connect with ServiceNow.
Field Description ServiceNow Instance Host A URL that points to your organization's ServiceNow instance. For example, 'https://contoso.service-now.com' ServiceNow Incident API URL The table in the ServiceNow database that contains incidents. Incidents are retrieved from this table. For example, /api/now/table/incident ServiceNow Client appID The unique identifier assigned in ServiceNow to the application used to represent Intune. Provide the client ID of the app. You need to have a client app created in ServiceNow to copy over the appID and use it here to establish the connection. Go to How to create a ServiceNow app. Select Test connection to verify if your settings are correct. You see a verification message to connect to your ServiceNow account. Select Allow.
The Connection Status field is updated and now displays Verified.
Select Save to save your connection settings.
The ServiceNow connector is configured successfully. Let's see how to use it in the ServiceNow incident view in Microsoft Intune.
How to create a ServiceNow app
In your ServiceNow developer instance you need to:
- create a new OAuth application
- create a new CORS Rule
To create a new OAuth application,
In the developer instance, select All and navigate to System OAuth > Application Registry.
Set up a new OAuth application.
Choose 'OAuth API endpoint for external clients'
Complete the following OAuth client application details and select Save.
Field Description Client ID The ServiceNow OAuth server automatically generates the ClientID. This value is used as an input in the ServiceNow client appID field for the ServiceNow connector configuration. Client Secret Client Secret for the OAuth generation. Leave it empty for auto-generation. Redirect URL The authorization server redirects to this URL. They must be an absolute URL and comma separated. For example, you can set the URL to 'https://intune.microsoft.com/TokenAuthorize/ExtensionName/Microsoft_Intune_DeviceSettings,https://intune.microsoft.com/TokenAuthorize/ExtensionName/Microsoft_Intune_Workflows' Logo URL Provide the URL to the publicly hosted company logo, which is displayed when authenticating with ServiceNow. For example, you can set it to: 'https://photos.smugmug.com/photos/i-SJfnMq3/0/XL/i-SJfnMq3-XL.png' Application By default, set to Global and isn't editable when creating the OAuth app. Accessible from By default, set to All application scopes. Active Select the checkbox. Refresh Token Lifespan Enter the max time for which the refresh token remains valid in seconds. Access Token Lifespan Enter the max time for which the access token remains valid in seconds. The recommend setting is 15 minutes. A warning message appears If configured higher than 15 minutes.
To create a new CORS rule,
In the developer instance, select All and navigate to System Web Services > Rest> CORS Rules.
Create a new CORS rule. Configure CORS rules to allow cross-domain requests to REST APIs from a browser-based application in a different domain.
Complete the following CORS rule details and select Save.
Field Description Application By default, Application is set to Global and isn't editable. REST API Set to Table API. Domain Set the domain. For example, 'https://*.portal.azure.net' HTTP Methods Select GET and POST.
Note
CORS rules can take up to 30 minutes to propagate.
ServiceNow incident view in Microsoft Intune
With the ServiceNow connector verified and enabled, you are able to view a real time list of ServiceNow incidents for a worker from the Troubleshooting pane. The incident view with details helps you understand if there are other issues previously submitted by employees that may be related or have recurred.
- Sign in to Microsoft Intune admin center.
- Select Troubleshooting + support > Troubleshoot. The Troubleshooting pane provides specific details for each Intune end-user.
- Find and select a User by entering a display name or email.
- In the Summary tab, scroll down and select Authenticate ServiceNow. Enter the credentials to authenticate you as a help-desk operator with ServiceNow.
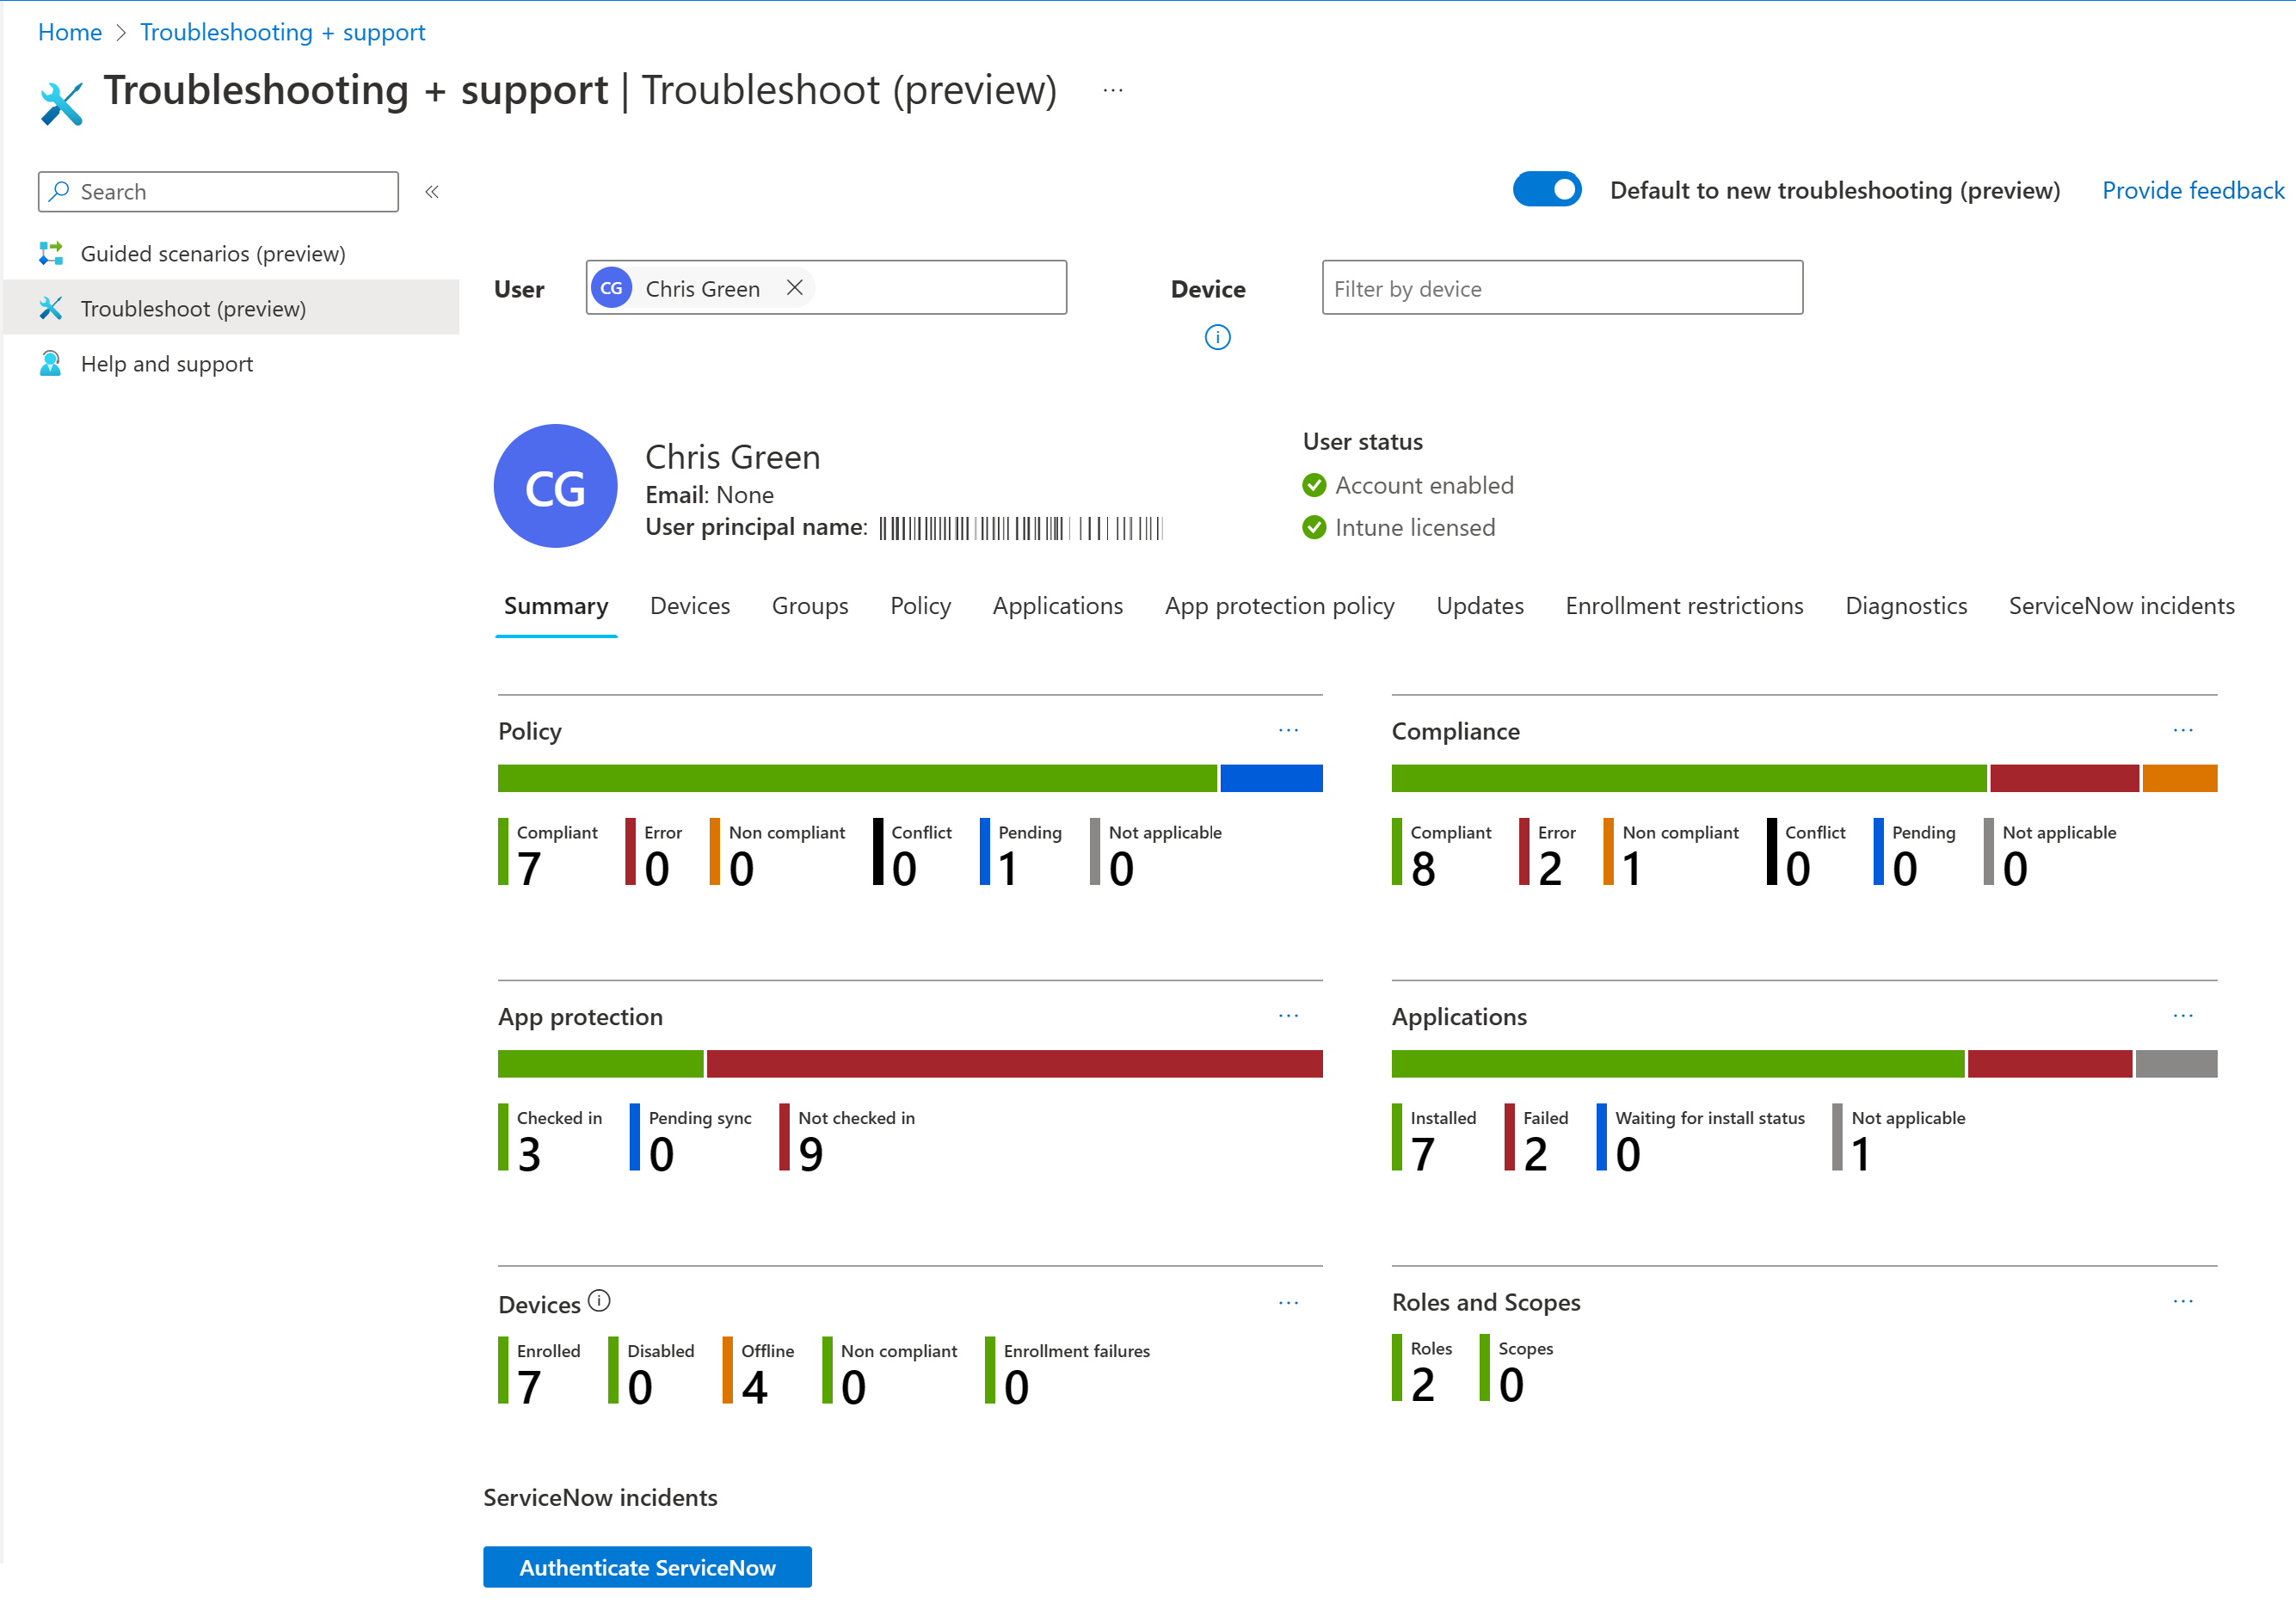
- Choose Allow. You can now see the number of incidents associated with the user you selected.
- Alongside the Summary tab, find and select the ServiceNow Incidents tab. Selecting the tab brings up a list of associated incidents for the selected user. The incident view helps you understand if there are other issues previously submitted by employees that may be related or have recurred.
- The columns visible in the list view can be modified by selecting or deselecting the ones to show in the Column field.
- You can also add some filters for the incidents that you need to be displayed. For example, you may only want new incidents to appear in the list. To add a filter, select Add Filters, set Status to New and select Apply.
- The Incident column list in the ServiceNow Incidents tab includes a link to the source incident in ServiceNow.
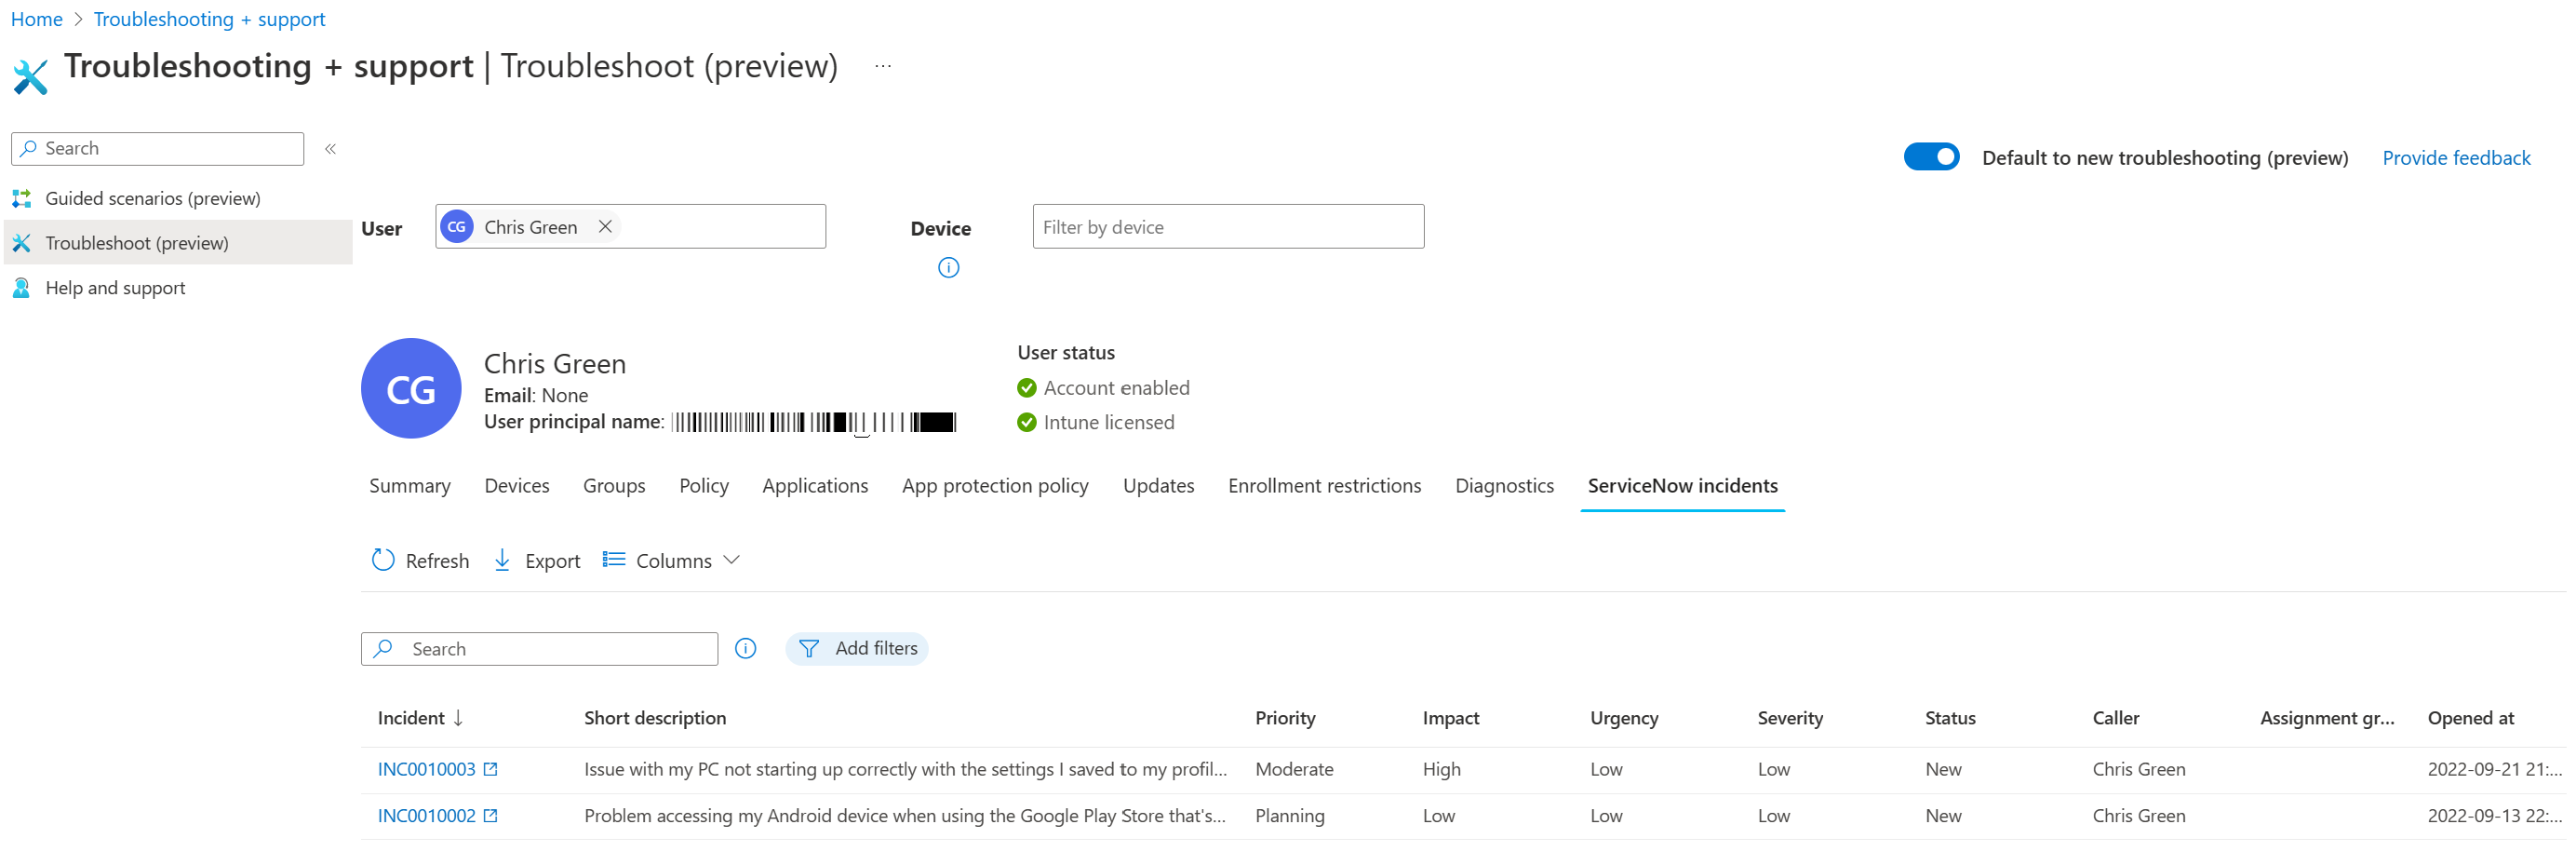
- Select the Incident link to launch the incident view in ServiceNow. Help-desk agents must be given the appropriate permissions in ServiceNow, to launch the incident view in ServiceNow and view the full incident details.
- Review the provided information to help troubleshoot end-user issues.
Data Exchange
Intune exchanges the following information with ServiceNow: CALLERID, NAME, NUMBER, UNIVERSAL PRINCIPAL NAME, URGENCY, IMPACT, SEVERITY, ASSIGNMENT_GROUP, OPENEDAT, STATE, PRIORITY, SHORT DESCRIPTION, SYSID.
Next steps
Feedback
Coming soon: Throughout 2024 we will be phasing out GitHub Issues as the feedback mechanism for content and replacing it with a new feedback system. For more information see: https://aka.ms/ContentUserFeedback.
Submit and view feedback for