Trial user guide: Microsoft Defender Vulnerability Management
This user guide is a simple tool to help you setup and make the most of your free Microsoft Defender Vulnerability Management trial. Using the suggested steps in this guide from the Microsoft Security team, you'll learn how vulnerability management can help you protect your users and data.
Note
The trial offering for Microsoft Defender Vulnerability Management isn't currently available to:
- US Government customers using GCC High, and DoD
- Microsoft Defender for Business customers
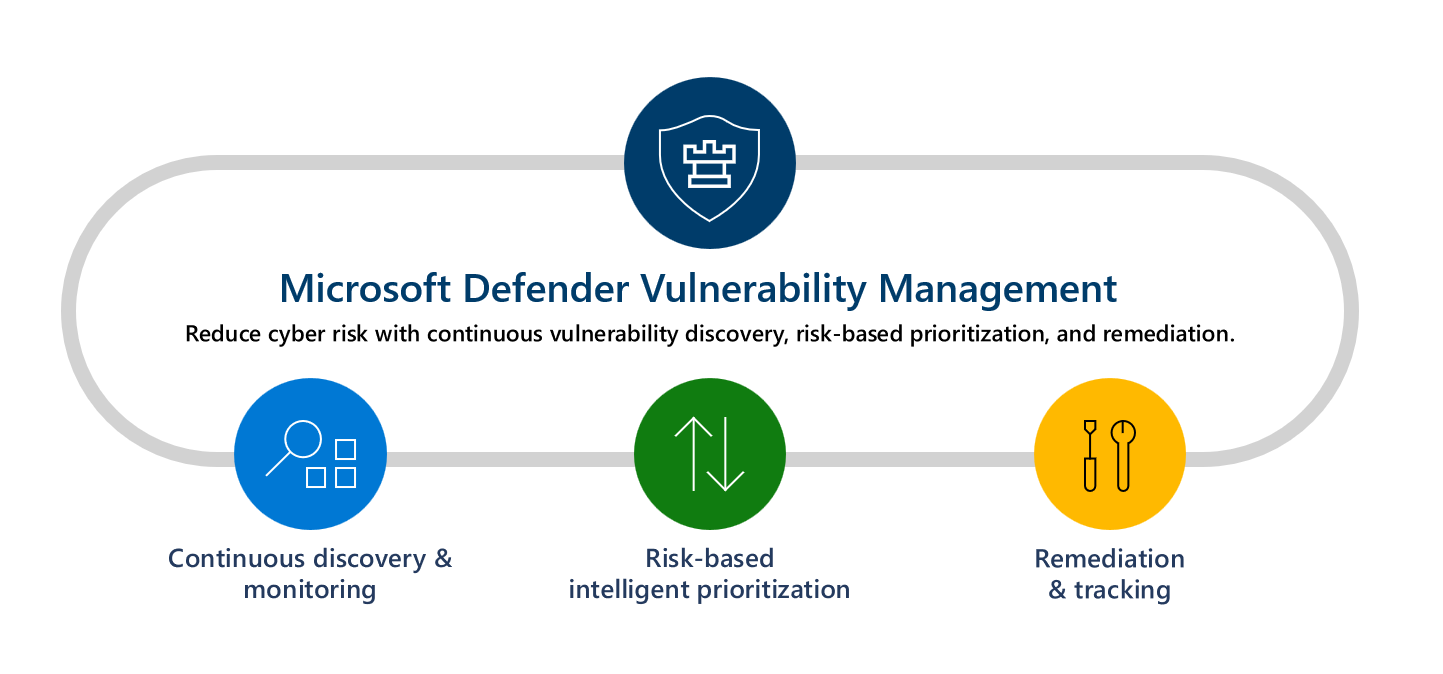
What is Microsoft Defender Vulnerability Management?
Reducing cyber risk requires a comprehensive risk-based vulnerability management program to identify, assess, remediate, and track important vulnerabilities across your most critical assets.
Microsoft Defender Vulnerability Management delivers asset visibility, continuous real-time discovery and assessment of vulnerabilities, context-aware threat & business prioritization, and built-in remediation processes. It includes capabilities so your teams can intelligently assess, prioritize, and seamlessly remediate the biggest risks to your organization.
Watch the following video to learn more about Defender Vulnerability Management:
Let's get started
Step 1: Set-up
Note
Users need to have the global admin role defined in Microsoft Entra ID to onboard the trial. For more information, see Required roles for starting the trial.
The Microsoft Defender Vulnerability Management trial can be accessed in several ways:
If you have access to the Microsoft Defender 365 portal, go to Trials in the left navigation pane bar. Once you've reached the Microsoft 365 trials hub:
- If you have Defender for Endpoint Plan 2, find the Defender Vulnerability Management add-on card and select Try now.
- If you're a new customer or an existing Defender for Endpoint P1 or Microsoft 365 E3 customer, choose the Defender Vulnerability Management card and select Try now.
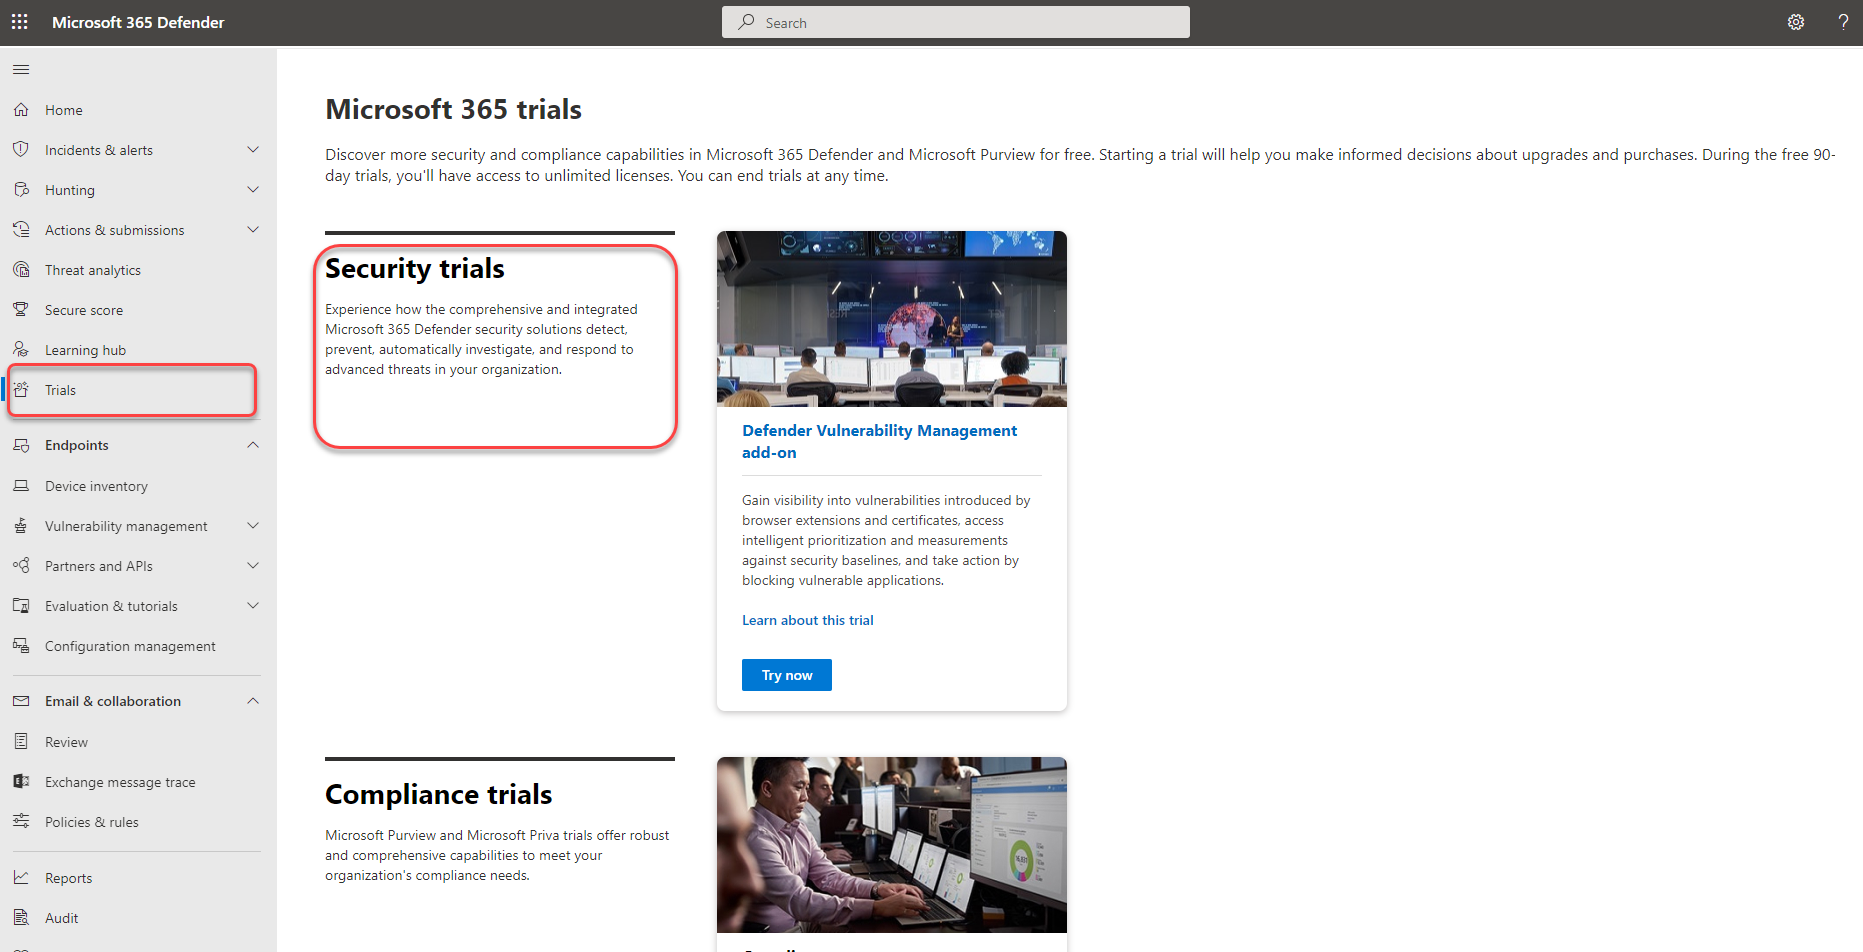
- Sign up through the Microsoft Admin Center (global admins only).
Note
For more options on how to sign up to the trial, see Sign up for Microsoft Defender Vulnerability Management.
Review the information about what's included in the trial, then select Begin trial. Once you activate the trial it can take up to 6 hours for the new features to become available in the portal.
- The Defender Vulnerability Management add-on trial lasts for 90 days.
- The Defender Vulnerability Management Standalone trial lasts for 90 days.
When you're ready to get started, visit the Microsoft Defender portal and select Vulnerability management in the left navigation bar to start using the Defender Vulnerability Management trial.
Note
If you're a Microsoft Defender for Cloud customers, see Vulnerability Management capabilities for servers to learn more about the Defender Vulnerabilities Management capabilities available to your organization.
Try out Defender Vulnerability Management
Step 1: Know what to protect in a single view
Built-in and agentless scanners continuously monitor and detect risk even when devices aren't connected to the corporate network. Expanded asset coverage consolidates software applications, digital certificates, browser extensions, and hardware and firmware into a single inventory view.
Device inventory - The device inventory shows a list of the devices in your network. By default, the list displays devices seen in the last 30 days. At a glance, you'll see information such as domains, risk levels, OS platform, associated CVEs, and other details for easy identification of devices most at risk.
Discover and assess your organization's software in a single, consolidated inventory view:
- Software application inventory - the software inventory in Defender Vulnerability Management is a list of known applications in your organization. The view includes vulnerability and misconfiguration insights across installed software with prioritized impact scores and details such as OS platforms, vendors, number of weaknesses, threats, and an entity-level view of exposed devices.
- Browser extension assessments - the browser extensions page displays a list of the extensions installed across different browsers in your organization. Extensions usually need different permissions to run properly. Defender Vulnerability Management provides detailed information on the permissions requested by each extension and identifies those with the highest associated risk levels, the devices with the extension turned on, installed versions, and more.
- Certificate inventory - the certificate inventory allows you to discover, assess, and manage digital certificates installed across your organization in a single view. This can help you:
- Identify certificates that are about to expire so you can update them and prevent service disruption.
- Detect potential vulnerabilities due to the use of weak signature algorithm (for example, SHA-1-RSA), short key size (for example, RSA 512 bit), or weak signature hash algorithm (for example, MD5).
- Ensure compliance with regulatory guidelines and organizational policy.
- Hardware and firmware - the hardware and firmware inventory provides a list of known hardware and firmware in your organization. It provides individual inventories for system models, processors, and BIOS. Each view includes details such as the name of the vendor, number of weaknesses, threats insights, and the number of exposed devices.
Authenticated scan for Windows - with Authenticated scan for Windows you can remotely target by IP ranges or hostnames and scan Windows services by providing Defender Vulnerability Management with credentials to remotely access the devices. Once configured the targeted unmanaged devices will be scanned regularly for software vulnerabilities.
Assign device value - defining a device's value helps you differentiate between asset priorities. The device value is used to incorporate the risk appetite of an individual asset into the Defender Vulnerability Management exposure score calculation. Devices assigned as "high value" will receive more weight. Device value options:
- Low
- Normal (Default)
- High
You can also use the set device value API.
Step 2: Track and mitigate remediation activities
Request remediation - vulnerability management capabilities bridge the gap between Security and IT administrators through the remediation request workflow. Security admins like you can request for the IT Administrator to remediate a vulnerability from the Recommendation pages to Intune.
View your remediation activities - when you submit a remediation request from the Security recommendations page, it kicks-off a remediation activity. A security task is created that can be tracked on a Remediation page, and a remediation ticket is created in Microsoft Intune.
Block vulnerable applications - Remediating vulnerabilities takes time and can be dependent on the responsibilities and resources of the IT team. Security admins can temporarily reduce the risk of a vulnerability by taking immediate action to block all currently known vulnerable versions of an application or warn users with customizable messages before opening vulnerable app versions until the remediation request is completed. The block option gives IT teams time to patch the application without security admins worrying that the vulnerabilities will be exploited in the meantime.
Note
When the trial ends blocked applications will be immediately unblocked whereas baseline profiles may be stored for a short additional time before being deleted.
Use enhanced assessment capabilities such as Network shares analysis to protect vulnerable network shares. As network shares can be easily accessed by network users, small common weaknesses can make them vulnerable. These types of misconfigurations are commonly used in the wild by attackers for lateral movement, reconnaissance, data exfiltration, and more. That's why we built a new category of configuration assessments in Defender Vulnerability Management that identify the common weaknesses that expose your endpoints to attack vectors in Windows network shares. This helps you:
- Disallow offline access to shares
- Remove shares from the root folder
- Remove share write permission set to 'Everyone'
- Set folder enumeration for shares
View and monitor your organization's devices using a Vulnerable devices report that shows graphs and bar charts with vulnerable device trends and current statistics. The goal is for you to understand the breath and scope of your device exposure.
Step 3: Set up security baseline assessments
Instead of running point-in-time compliance scans, security baselines assessment helps you to continuously and proactively monitor your organization's compliance against industry security benchmarks in real time. A security baseline profile is a customized profile that you can create to assess and monitor endpoints in your organization against industry security benchmarks (CIS, NIST, MS). When you create a security baseline profile, you're creating a template that consists of multiple device configuration settings and a base benchmark to compare against.
Security baselines provide support for Center for Internet Security (CIS) benchmarks for Windows 10, Windows 11, and Windows Server 2008 R2 and above, as well as Security Technical Implementation Guides (STIG) benchmarks for Windows 10 and Windows Server 2019.
- Get started with security baselines assessment
- Review security baseline profile assessment results
- Use advanced hunting
Note
When the trial ends security baseline profiles may be stored for a short additional time before being deleted.
Step 4: Create meaningful reports to get in-depth insights using APIs and Advanced Hunting
Defender Vulnerability Management APIs can help drive clarity in your organization with customized views into your security posture and automation of vulnerability management workflows. Alleviate your security team's workload with data collection, risk score analysis, and integrations with your other organizational processes and solutions. For more information, see:
Advanced hunting enables flexible access to Defender Vulnerability Management raw data, which allows you to proactively inspect entities for known and potential threats. For more information, see Hunt for exposed devices.
Licensing and trial information
As part of the trial setup, the new Defender Vulnerability Management trial licenses will be applied to users automatically. Therefore, no assignment is needed (The trial can automatically apply up to 1,000,000 licenses). The licenses are active for the duration of the trial.
Getting started with the trial
You can start using Defender Vulnerability Management features as soon as you see them in the Microsoft Defender portal. Nothing is created automatically and users won't be affected. When you navigate to each solution, you may be guided to make extra setup configurations to start using features.
Extending the trial
You can extend the trial within the last 15 days of the trial period. You're limited to a maximum of two trial periods. If you don't extend by the time your trial period ends, you'll need to wait at least 30 days before signing up for a second trial.
Ending the trial
Admins can disable the trial anytime by selecting Trials on the left navigation, going to the Defender Vulnerability Management trial card and selecting End trial.
Unless stated otherwise for the solution your trial data will be maintained for time, usually 180 days, before being permanently deleted. You may continue to access the data gathered during the trial until that time.
Additional resources
- Terms and conditions: See the terms and conditions for Microsoft 365 trials.
- Compare offerings: Microsoft Defender Vulnerability Management
- Defender Vulnerability Management documentation
- Datasheet: Microsoft Defender Vulnerability Management: Reduce cyber risk with continuous vulnerability discovery and assessment, risk-based prioritization, and remediation
Feedback
Coming soon: Throughout 2024 we will be phasing out GitHub Issues as the feedback mechanism for content and replacing it with a new feedback system. For more information see: https://aka.ms/ContentUserFeedback.
Submit and view feedback for