CSS features reference
Discover new workflows in the following comprehensive reference of Microsoft Edge DevTools features related to viewing and changing CSS.
To learn the basics, see Get started viewing and changing CSS.
Select an element
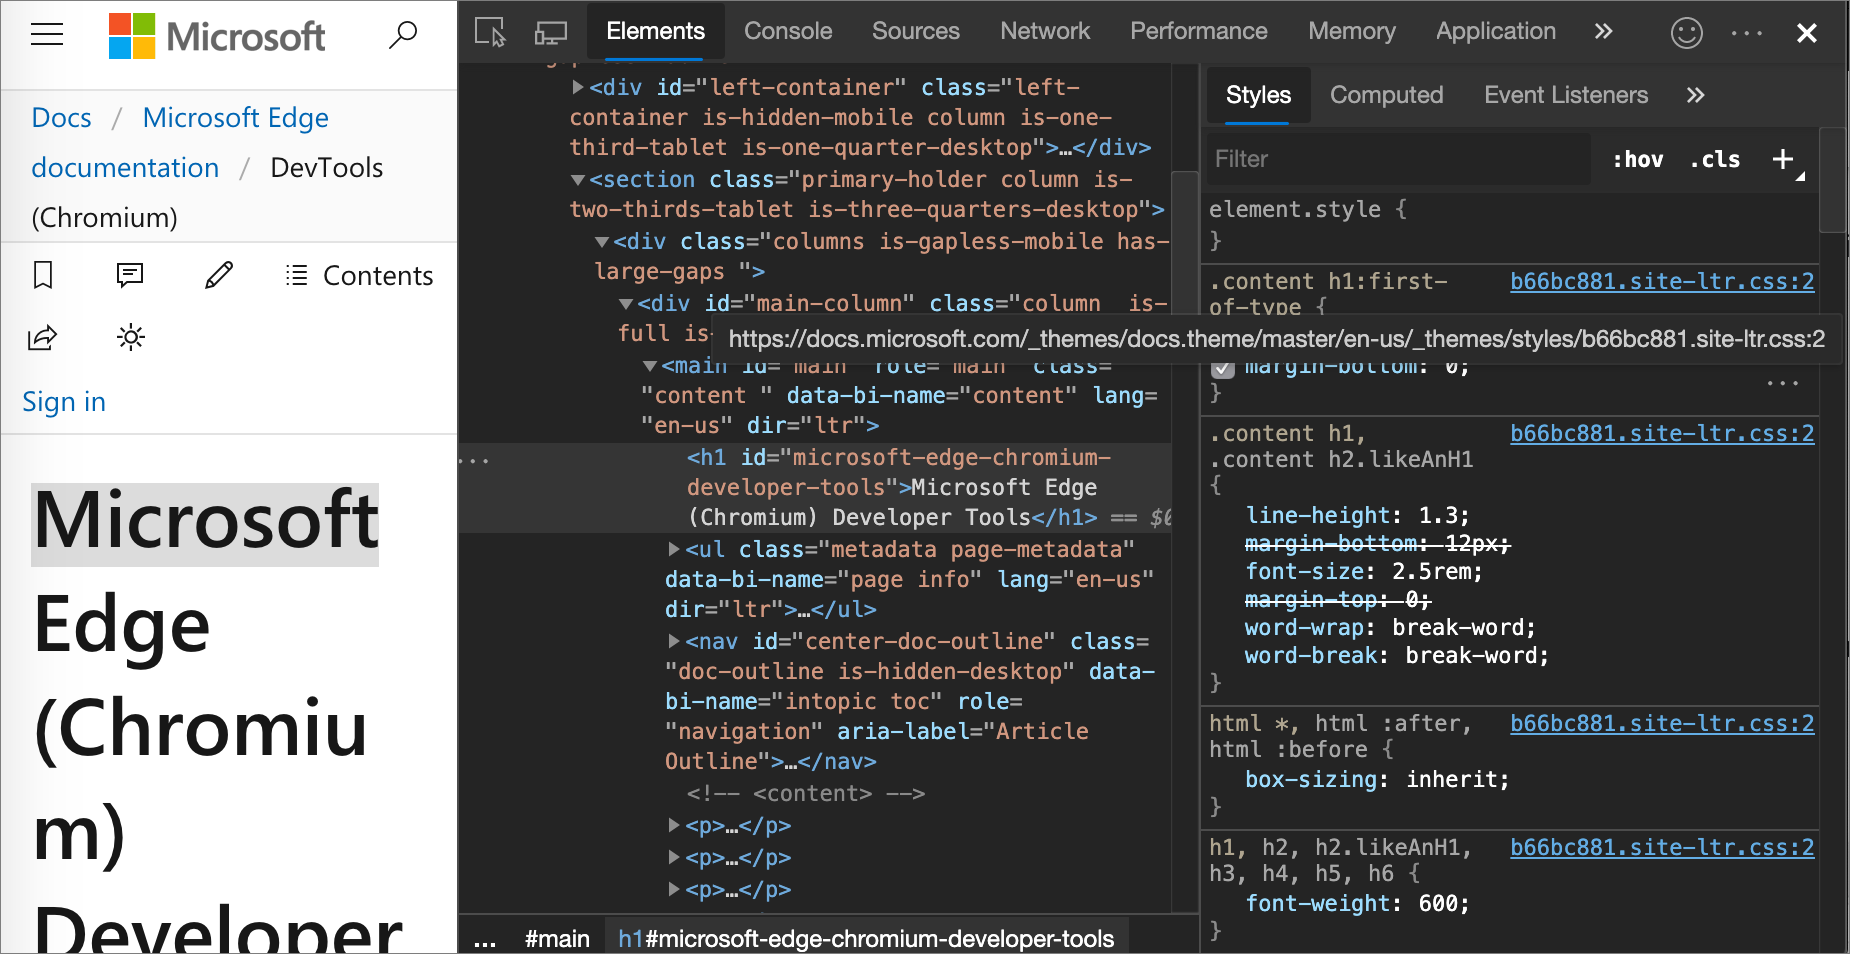
The Elements tool in DevTools lets you view or change the CSS of one element at a time. The selected element is highlighted in the DOM Tree. The styles of the element are shown in the Styles pane. For a tutorial, see View the CSS for an element.
In the following figure, the h1 element that is highlighted in the DOM Tree is the selected element. On the right, the styles of the element are shown in the Styles pane. On the left, the element is highlighted in the viewport, but only because the mouse is currently hovering over it in the DOM Tree:

There are many ways to select an element:
In a rendered webpage, right-click a page element, and then click Inspect.
In DevTools, click Select an element (
 ) or press Ctrl+Shift+C (Windows, Linux) or Command+Shift+C (macOS), and then click the element in the viewport.
In DevTools, click the element in the DOM Tree.
In DevTools, run a query such as
document.querySelector('p')in the Console, right-click the result, and then select Reveal in Elements panel.
View the external stylesheet where a rule is defined
In the Styles pane, click the link next to a CSS rule to open the external stylesheet that defines the rule. The stylesheet opens in the Editor pane of the Sources tool.
If the stylesheet is minified, click the Format (![]() ) button, at the bottom of the Editor pane. For more information, see Reformat a minified JavaScript file with pretty-print.
) button, at the bottom of the Editor pane. For more information, see Reformat a minified JavaScript file with pretty-print.
In the following figure, after you click
https://learn.microsoft.com/_themes/docs.theme/master/en-us/_themes/styles/b66bc881.site-ltr.css:2 you are taken to line 2 of
https://learn.microsoft.com/_themes/docs.theme/master/_themes/styles/b66bc881.site-ltr.css, where the .content h1:first-of-type CSS rule is defined.
View only the CSS that is actually applied to an element
The Styles pane shows you all of the rules that apply to an element, including declarations that have been overridden. When you aren't interested in overridden declarations, use the Computed pane to view only the CSS that is actually being applied to an element.
Go to the Computed pane in the Elements tool.
On a wide DevTools window, the Computed pane doesn't exist. The contents of the Computed pane are shown on the Styles pane.
Inherited properties are opaque.
To display all inherited values, select the Show All checkbox.
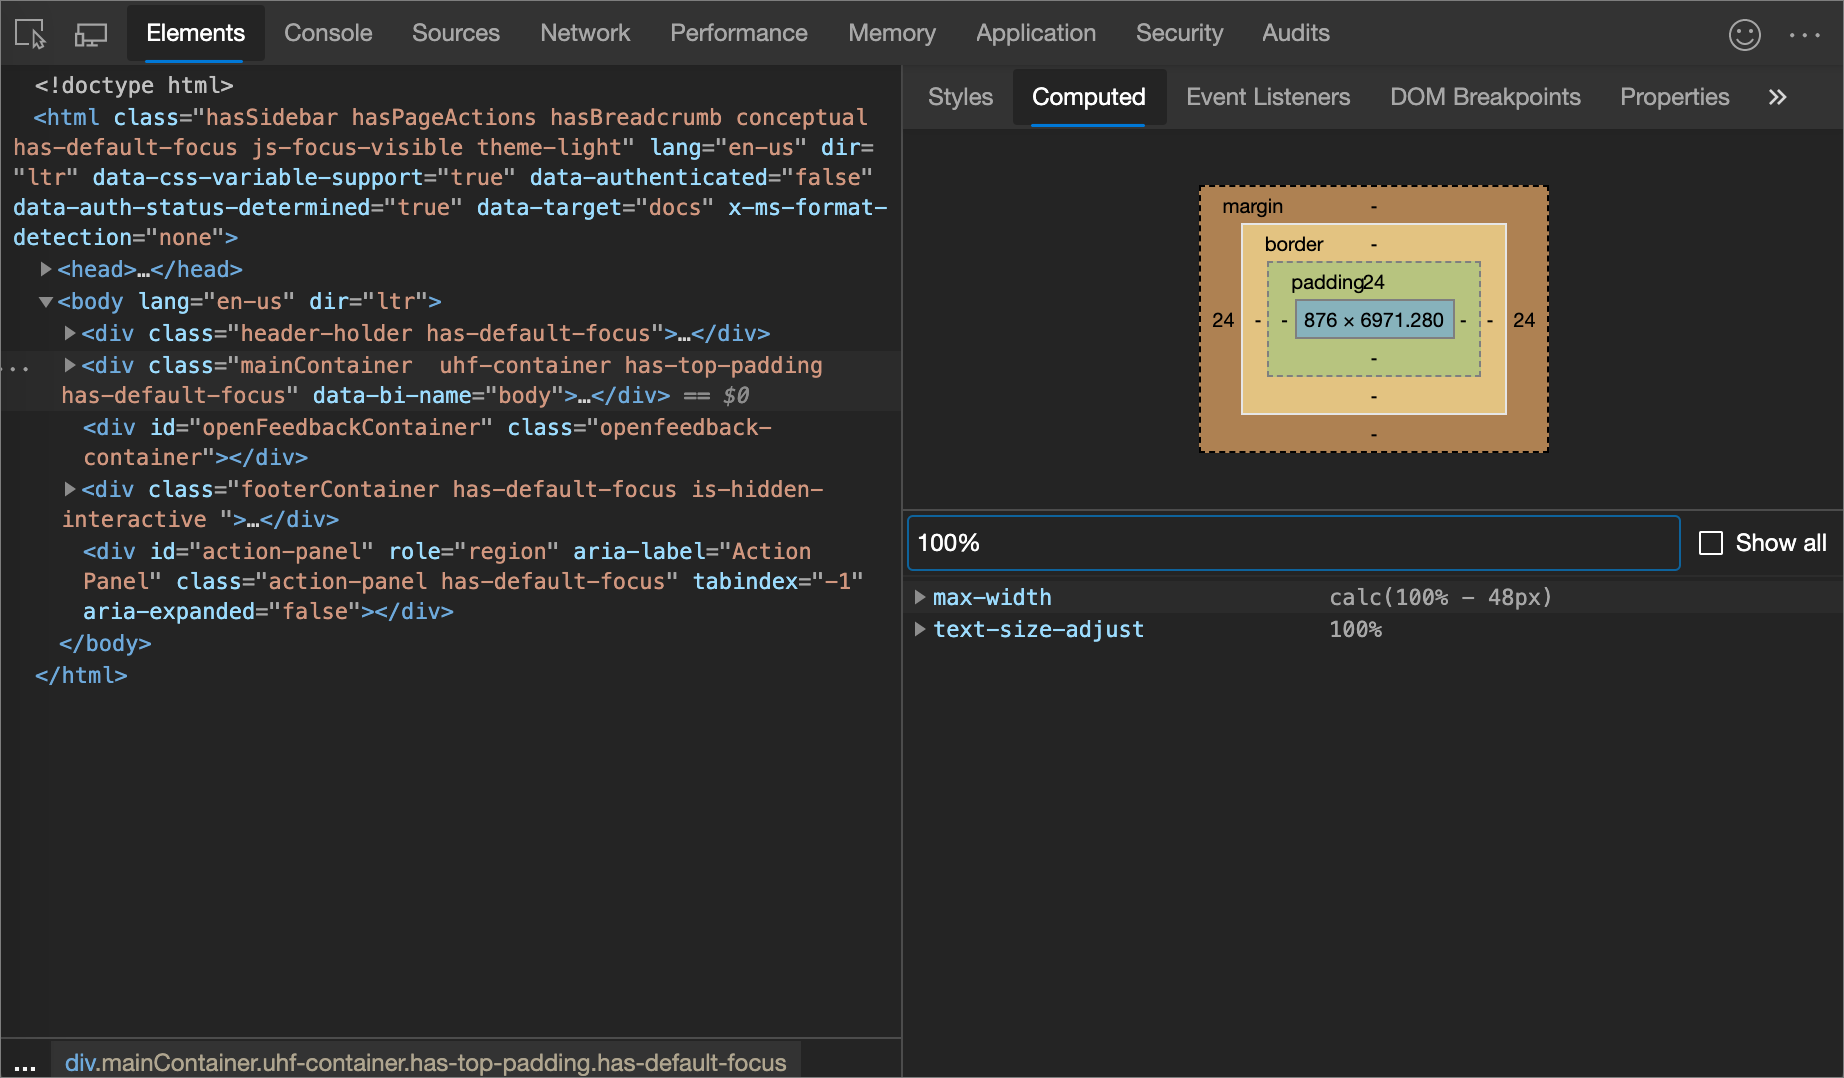
In the following figure, the Computed pane shows the CSS properties being applied to the currently selected
h1element: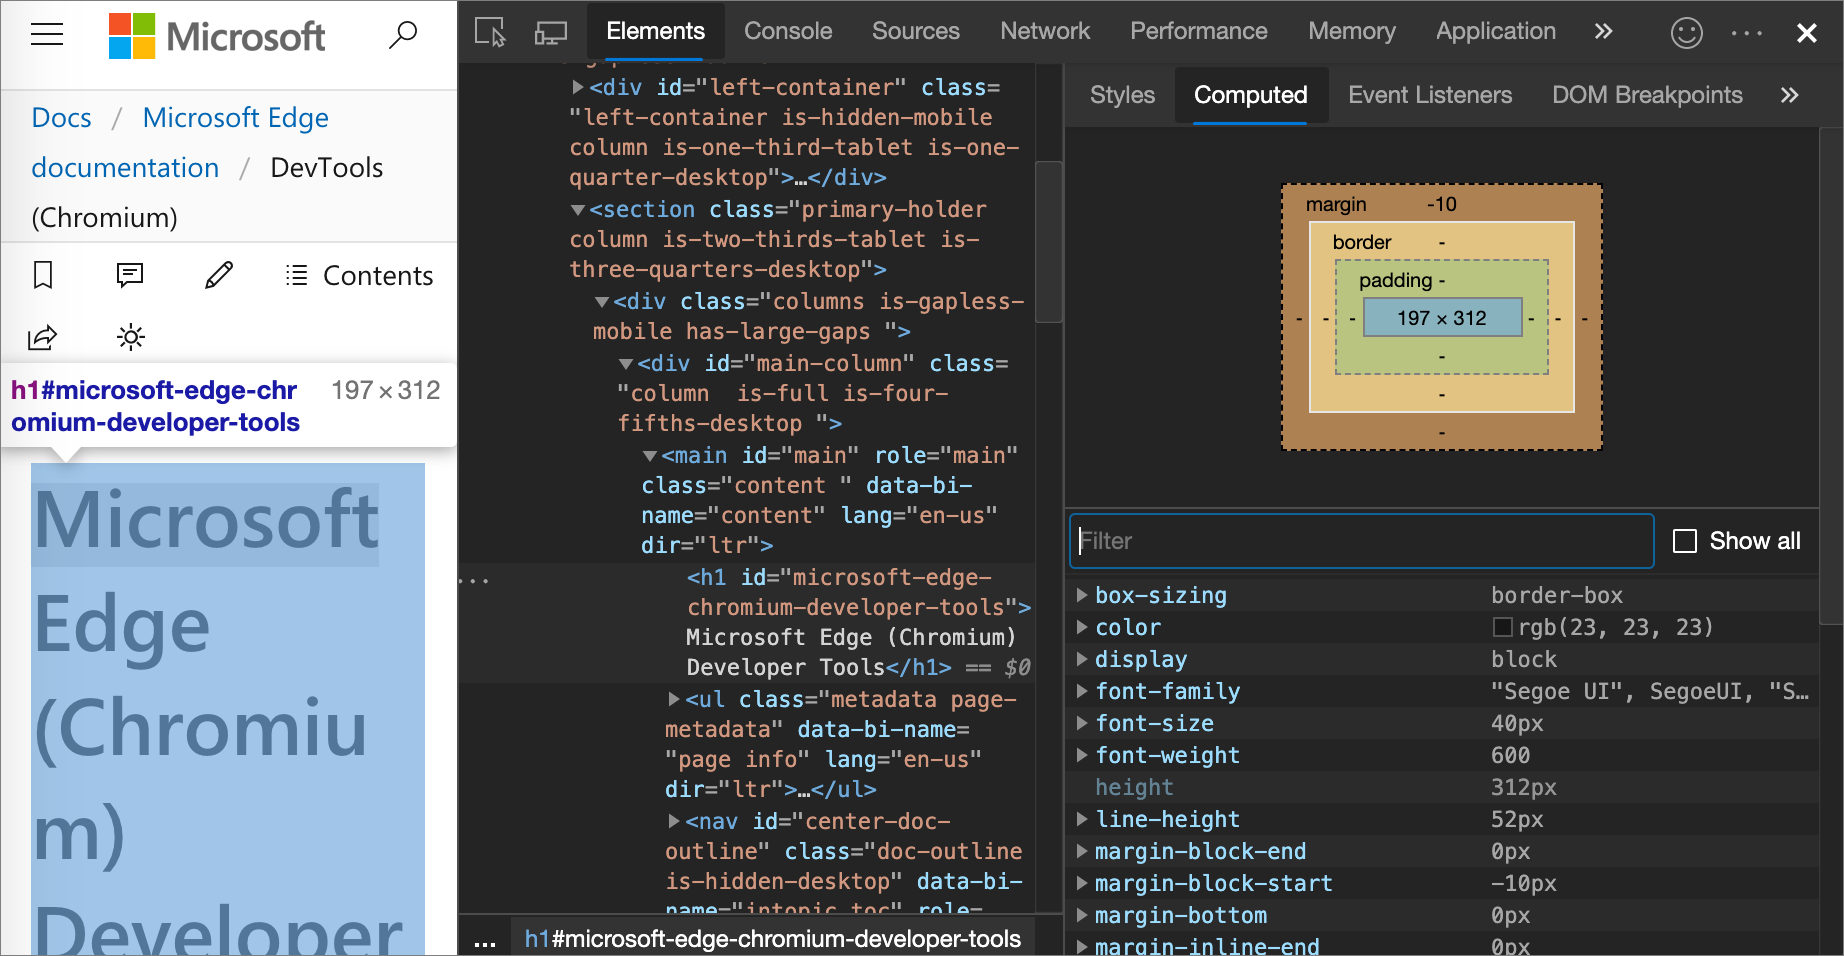
View CSS properties in alphabetical order
Use the Computed pane. See View only the CSS that is actually applied to an element.
View inherited CSS properties
Check the Show All checkbox in the Computed pane. See View only the CSS that is actually applied to an element.
View an element's box model
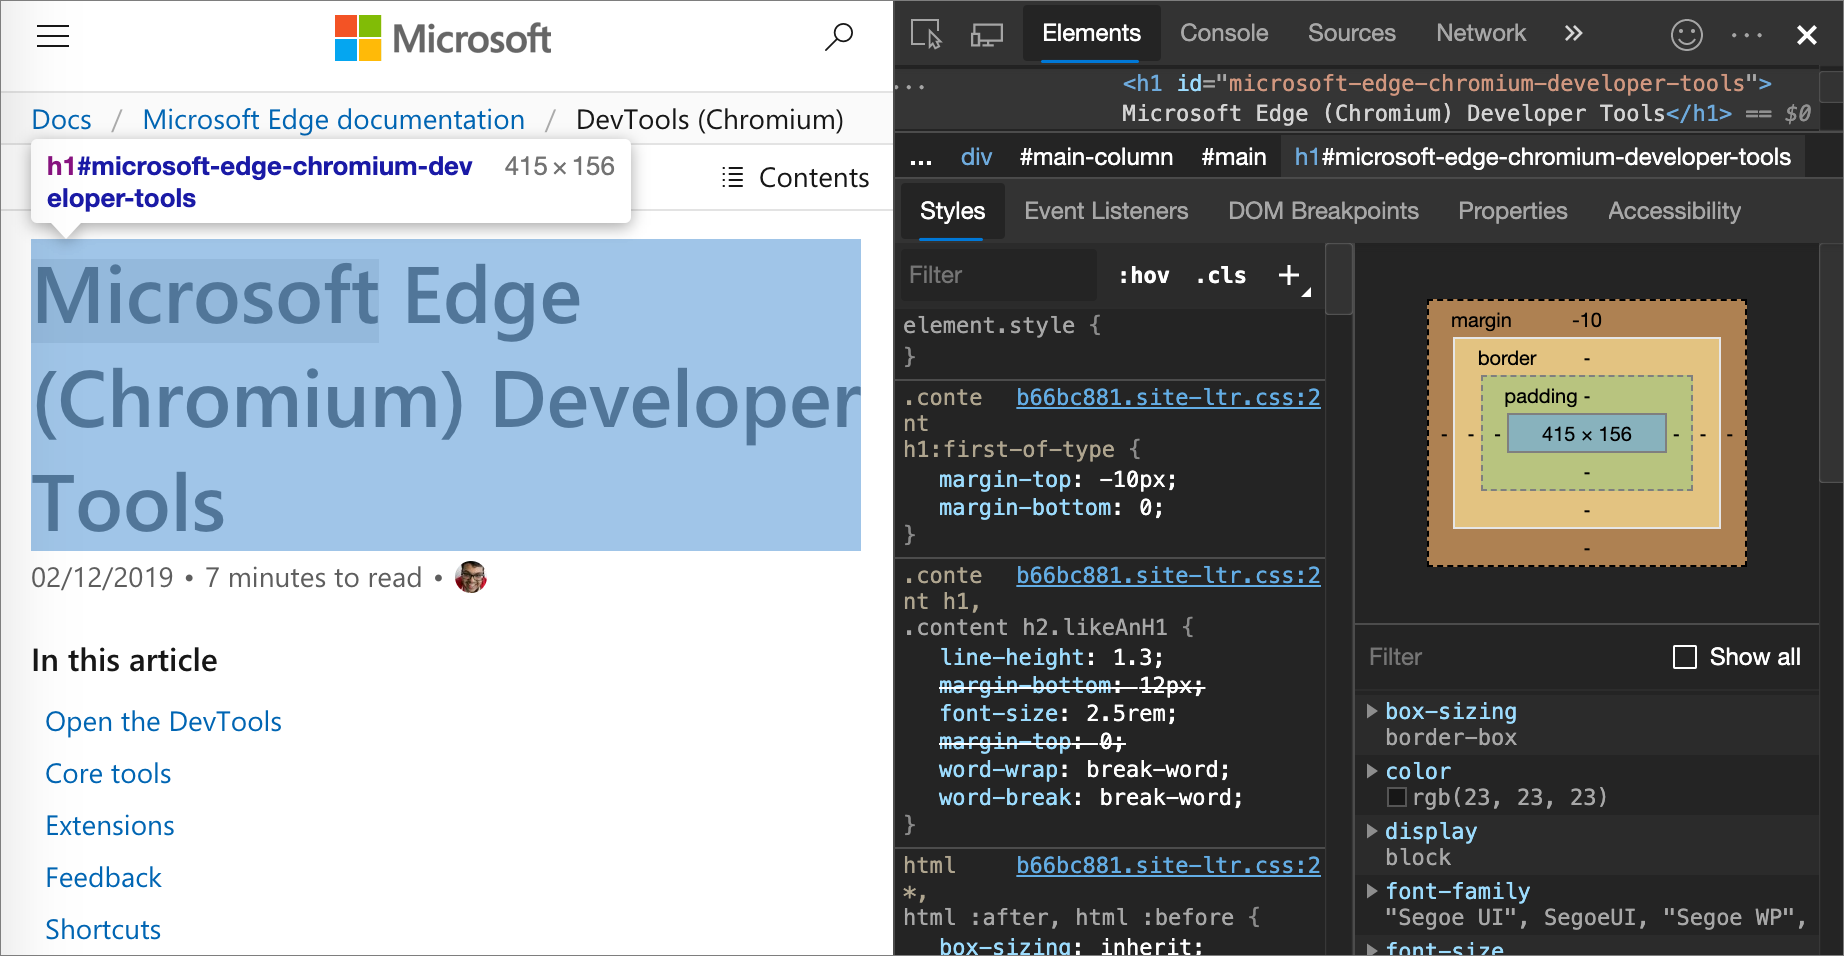
To view the box model of an element, go to the Styles pane. If your DevTools window is narrow, the Box Model diagram is at the bottom of the panel.
To change a value, double-click it.
In the following figure, the Box Model diagram in the Styles pane shows the box model for the currently selected h1 element.
Search and filter the CSS of an element
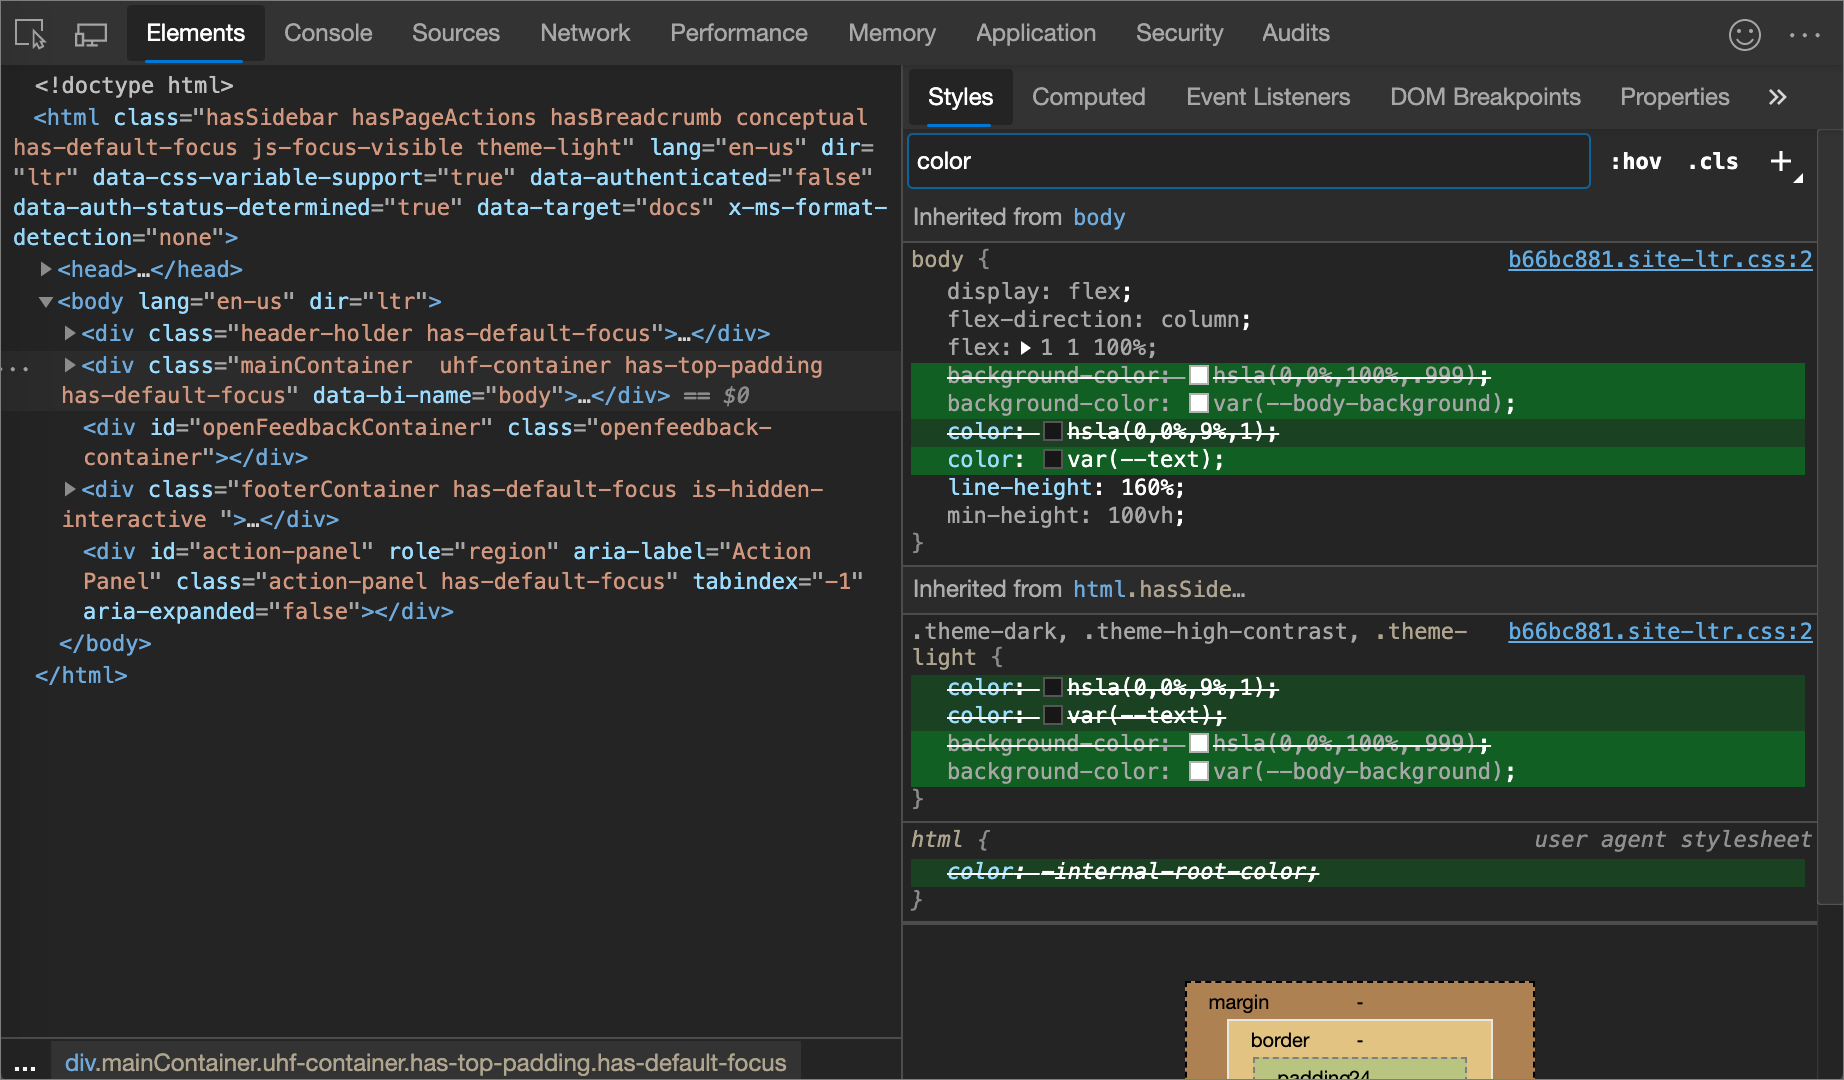
Use the Filter text box on the Styles and Computed panes to search for specific CSS properties or values.
To also search inherited properties in the Computed pane, check the Show All checkbox.
In the following figure, the Styles pane is filtered to only show rules that include the search query color.
In the following figure, the Computed pane is filtered to only show declarations that include the search query 100%.
Toggle a pseudo-class
To toggle a pseudo-class, such as :active, :focus, :hover, or :visited:
On the Elements tool, go to the Styles pane.
Click :hov.
Select the pseudo-class that you want to enable.
The following figure shows toggling the
:hoverpseudo-class. In the viewport, thebackground-color: cornflowerbluedeclaration is applied to the element, even though the element isn't actually being hovered over.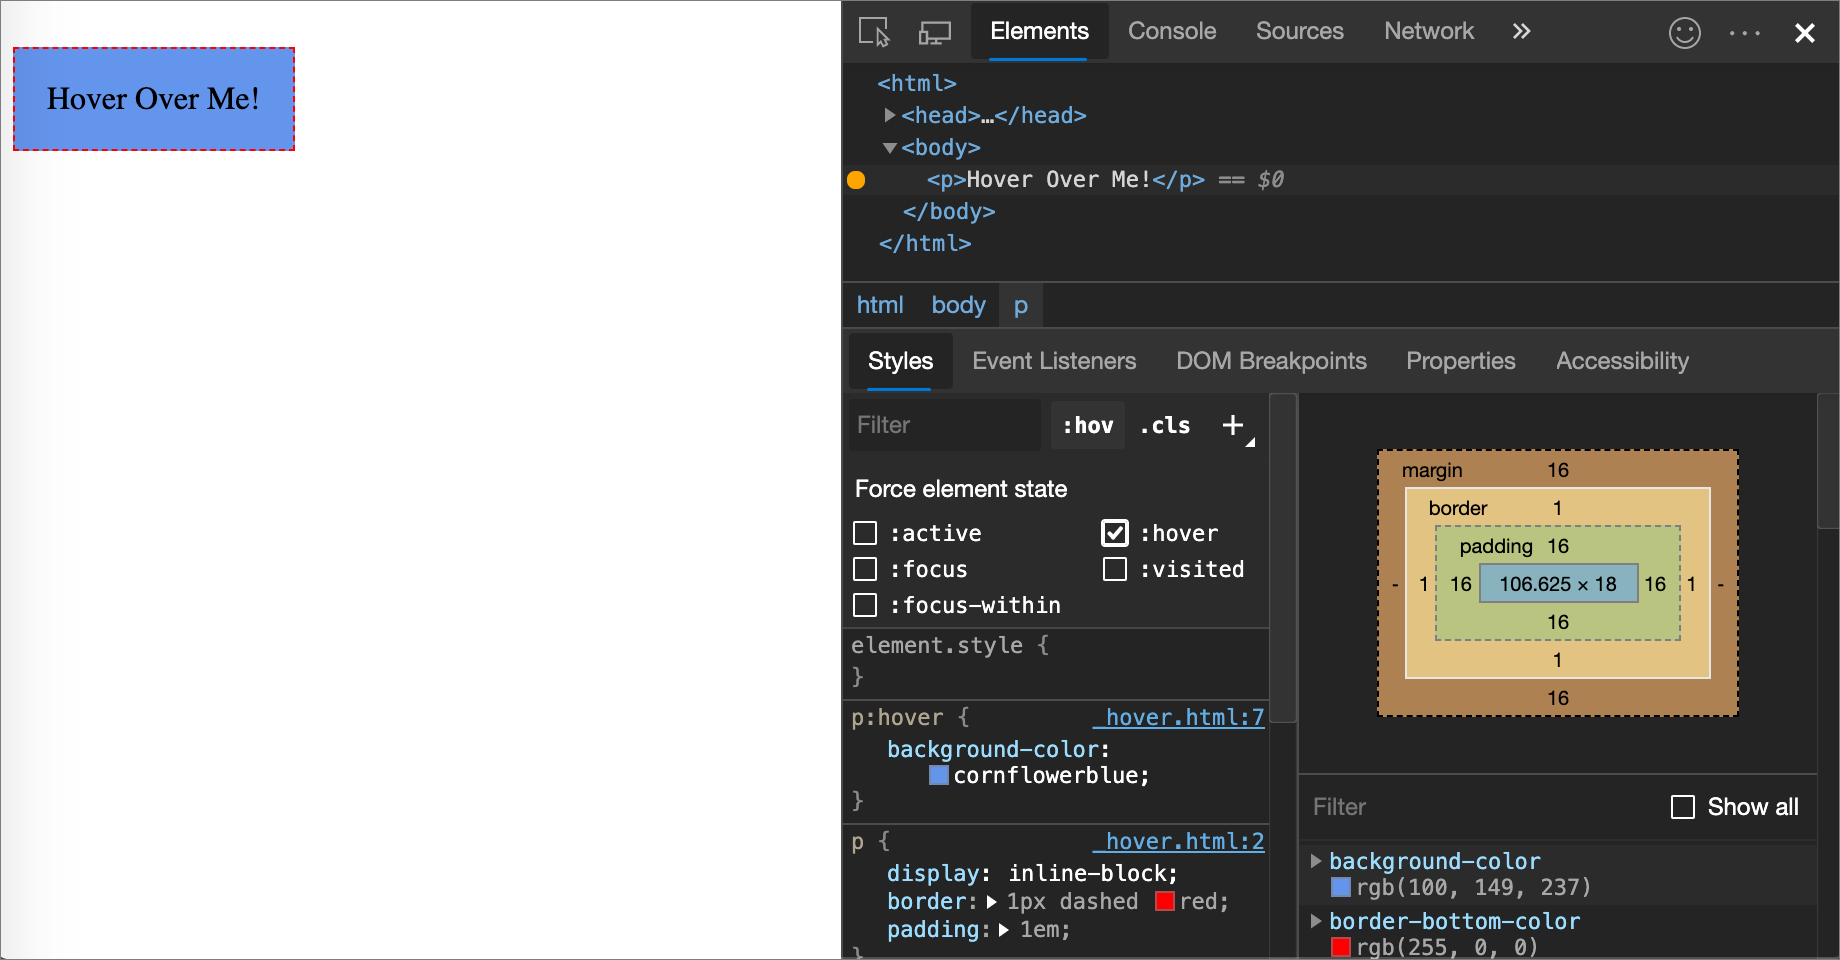
For an interactive tutorial, see Add a pseudo-state to a class.
View a page in print mode
To view a page in print mode:
Open the Command Menu.
Start typing
rendering, and then select Show Rendering.Click the Emulate CSS Media dropdown list, and then select print.
View used and unused CSS with the Coverage tool
The Coverage tool shows you what CSS a page actually uses.
Open the Command Menu by pressing Ctrl+Shift+P (Windows, Linux) or Command+Shift+P (macOS), while DevTools has focus.
Start typing
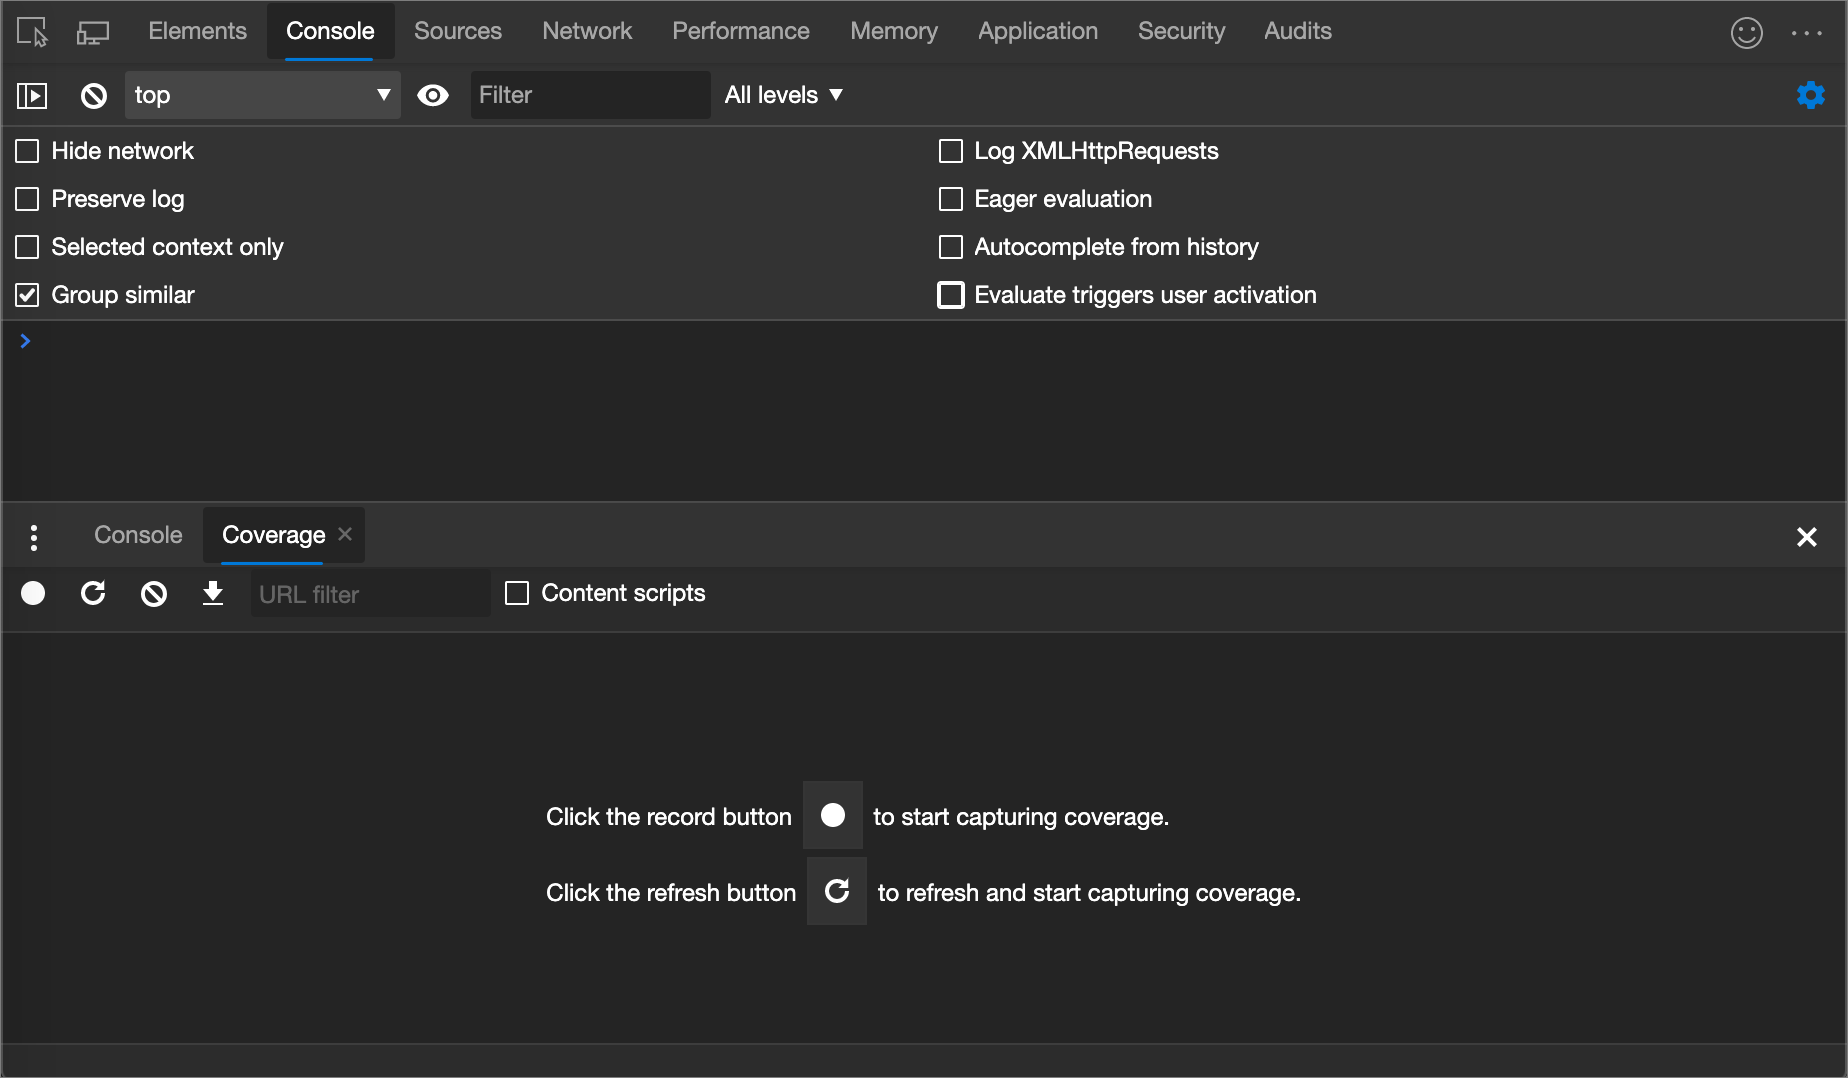
coverage, and then select Show Coverage:
The Coverage tool appears:
Click Start instrumenting coverage and refresh the page (
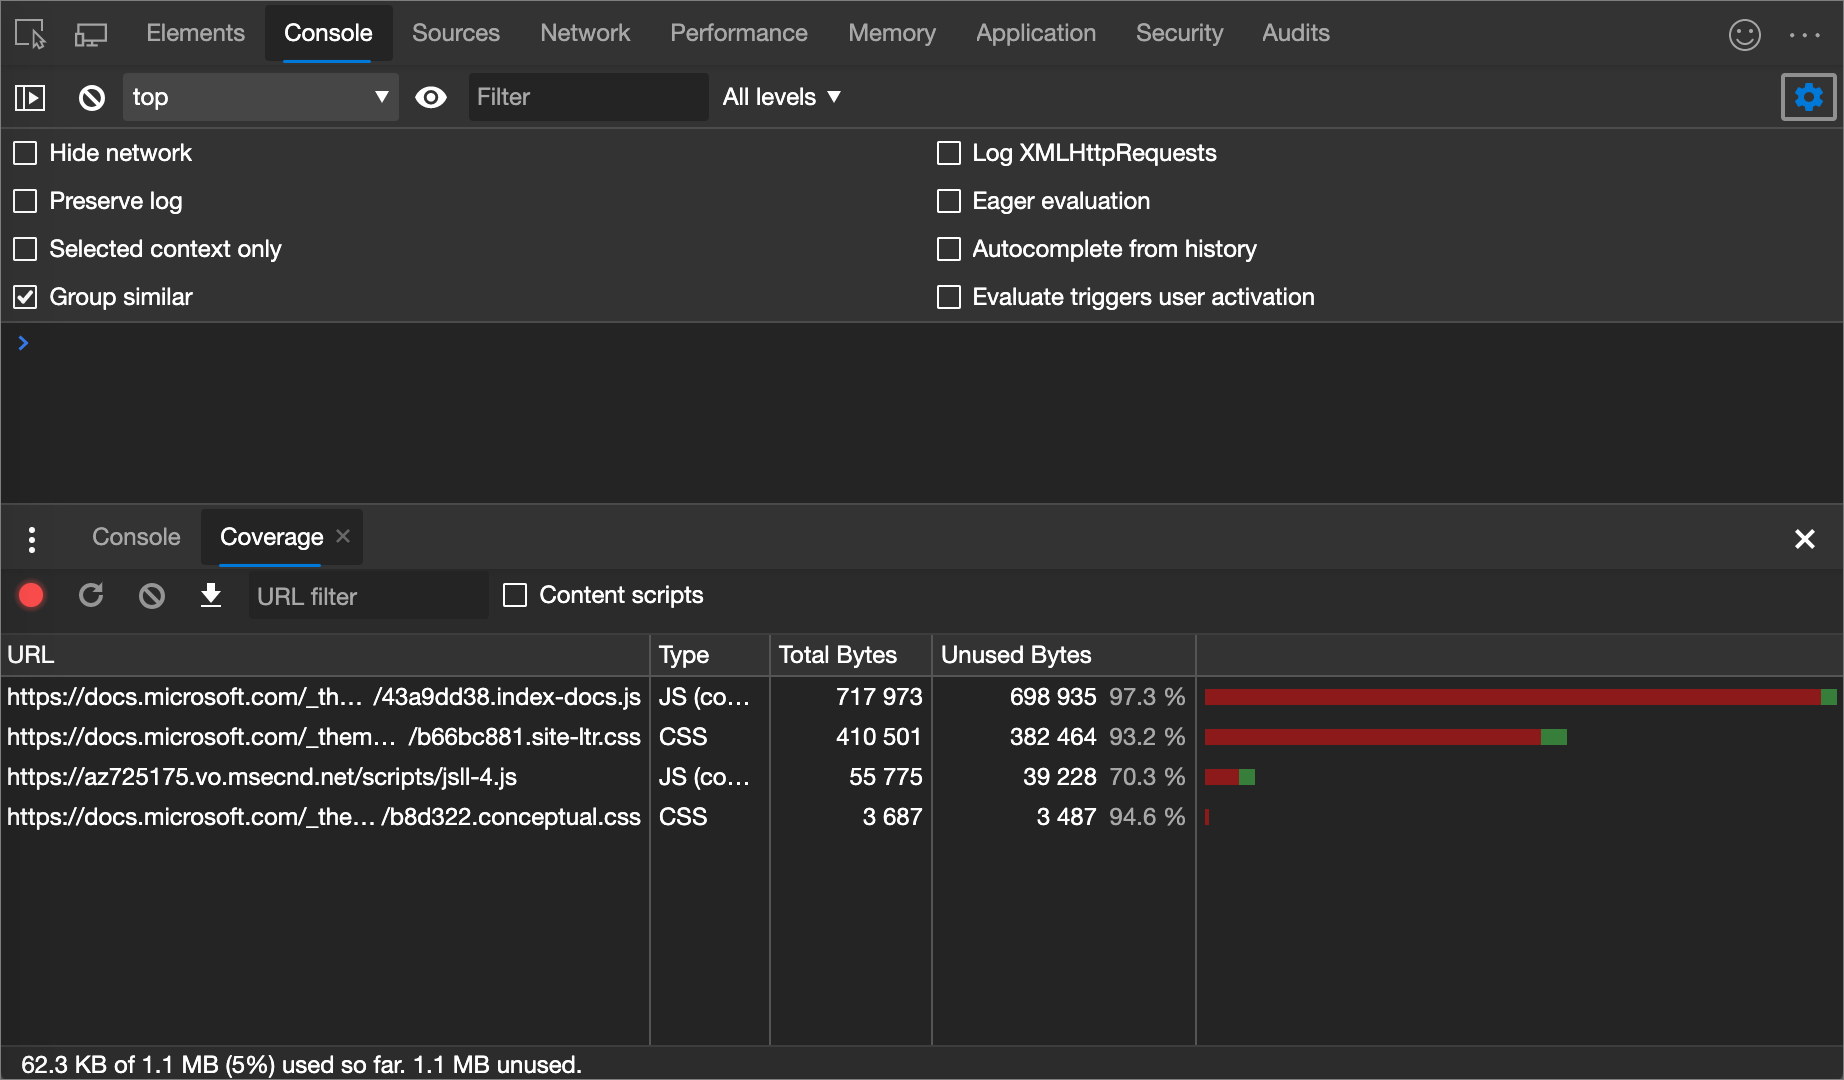
 ). The page refreshes and the Coverage tool provides an overview of how much CSS (and JavaScript) is used from each file that the browser loads. Green represents used CSS. Red represents unused CSS.
An overview of how much CSS (and JavaScript) is used and unused:
To display a line-by-line breakdown of what CSS is used, click a CSS file.
In the following figure, lines 145 to 147 and 149 to 151 of
b66bc881.site-ltr.cssare unused, whereas lines 163 to 166 are used: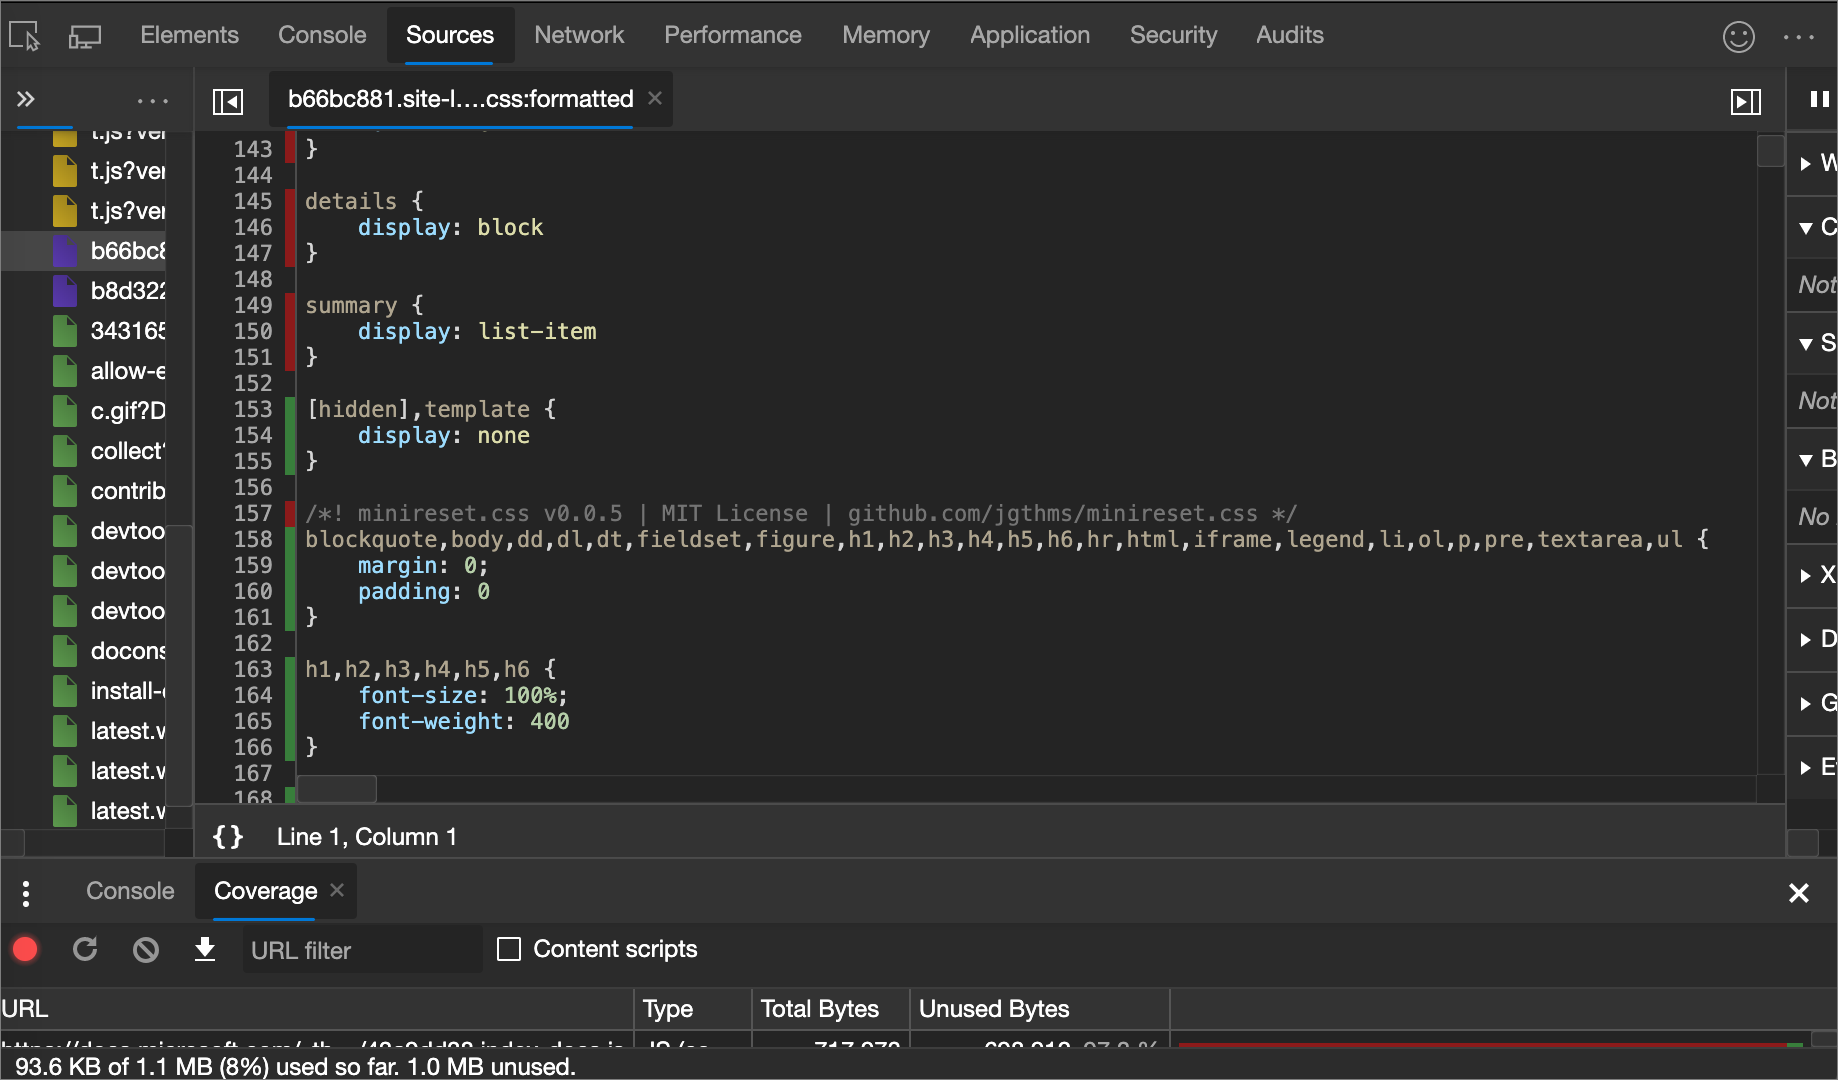
Force print preview mode
See Force DevTools into Print Preview mode.
Two ways to add a CSS declaration to an element
The order of declarations affects how an element is styled. You can add declarations either by adding an inline declaration, or by adding a declaration to a style rule. These two approaches are described in the following sections.
Adding an inline CSS declaration to an element
Adding a inline declaration is equivalent to adding a style attribute to the HTML of an element. For most scenarios, you probably want to use inline declarations.
Inline declarations have higher specificity than external declarations, so using inline declarations ensures that the changes take effect in your specific, expected element. For more information about specificity, see Selector Types.
To add an inline declaration:
In the Styles pane, click between the brackets of the element.style section. The cursor focuses, allowing you to enter text.
Enter a property name and press Enter.
Enter a valid value for that property and press Enter. In the DOM Tree, a
styleattribute has been added to the element.
Alternatively, enter the value in the property field, and DevTools will then suggest a list of matching property: value pairs to select from. For example, if you enter bold in the property field, DevTools suggests font-weight: bold and font-weight: bolder as the possible rules. Press Enter to apply the rule.
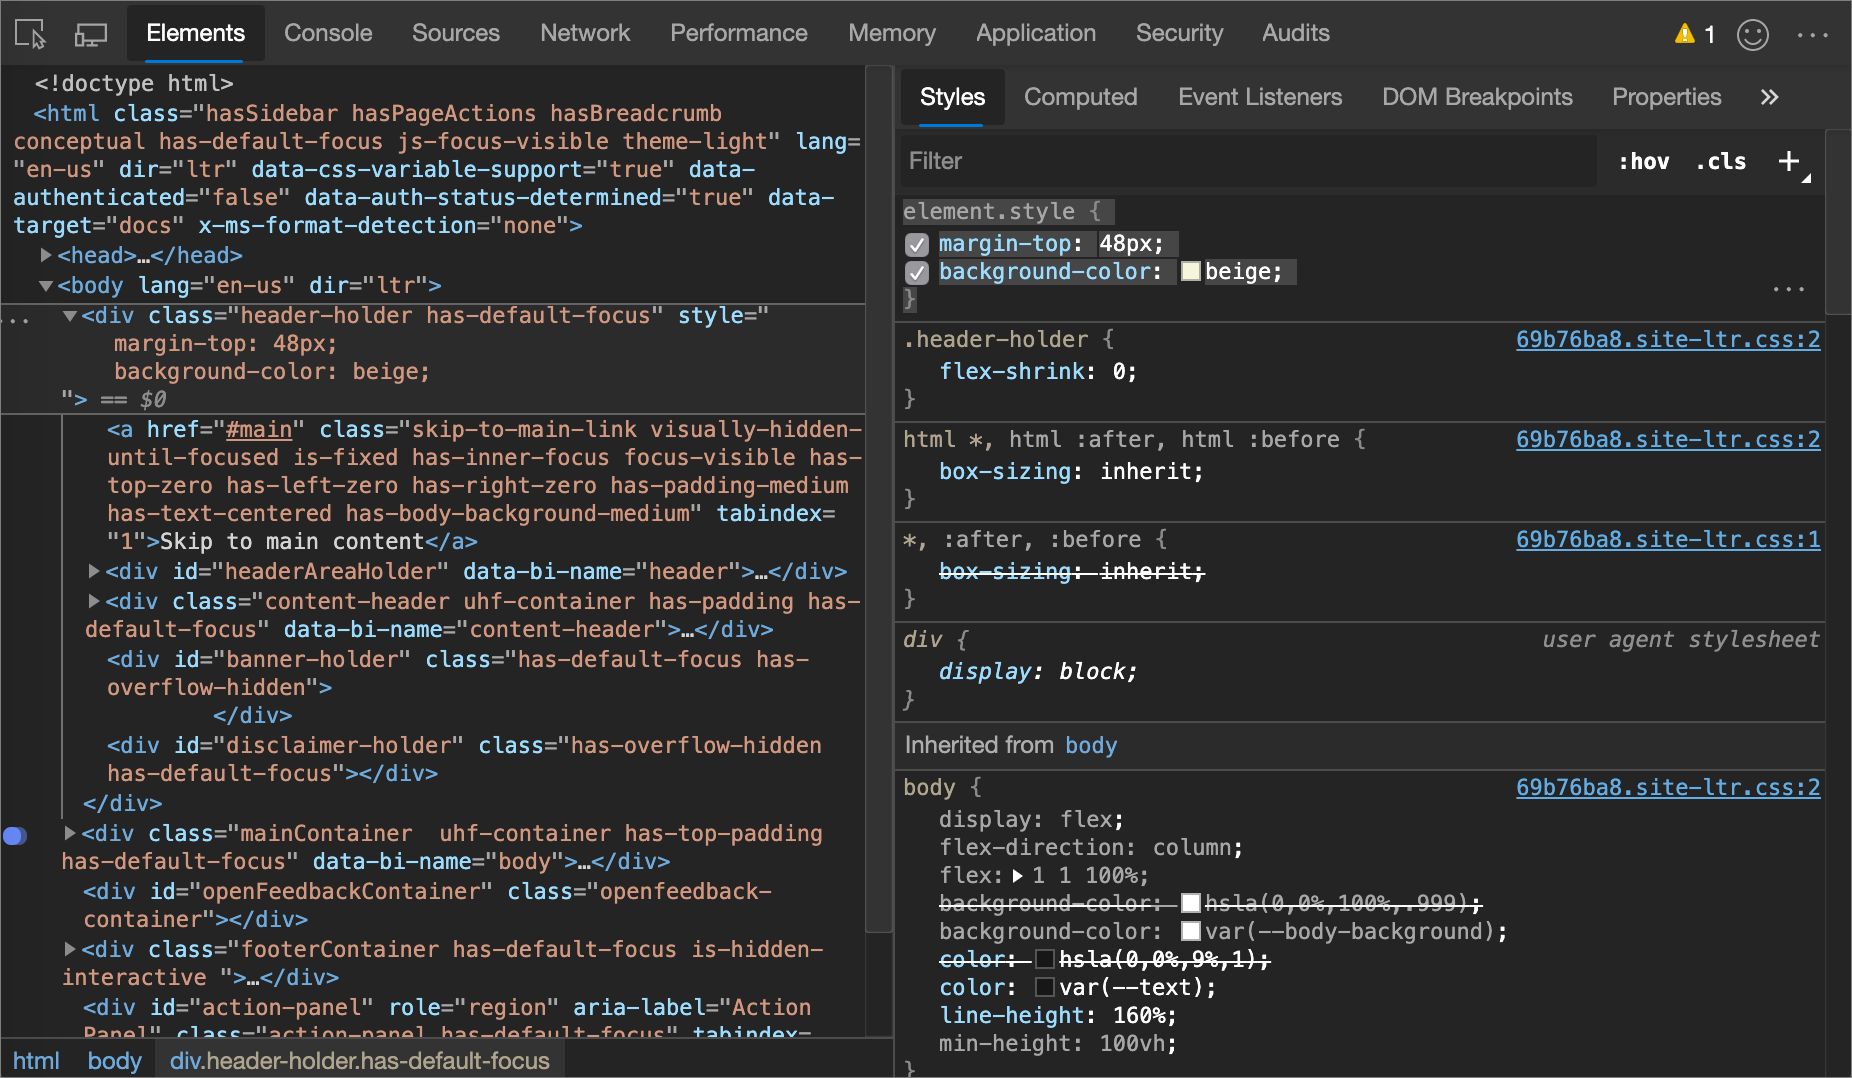
In the following figure, the margin-top and background-color properties have been applied to the selected element. In the DOM Tree, the declarations are reflected in the element's style attribute.
Adding a CSS declaration to an existing style rule
If you're debugging an element's styles and you need to specifically test what happens when a declaration is defined in different places, add a declaration to an existing style rule.
To add a declaration to an existing style rule:
In the Styles pane, click between the brackets of the style rule to which you want to add the declaration. The cursor focuses, allowing you to enter text.
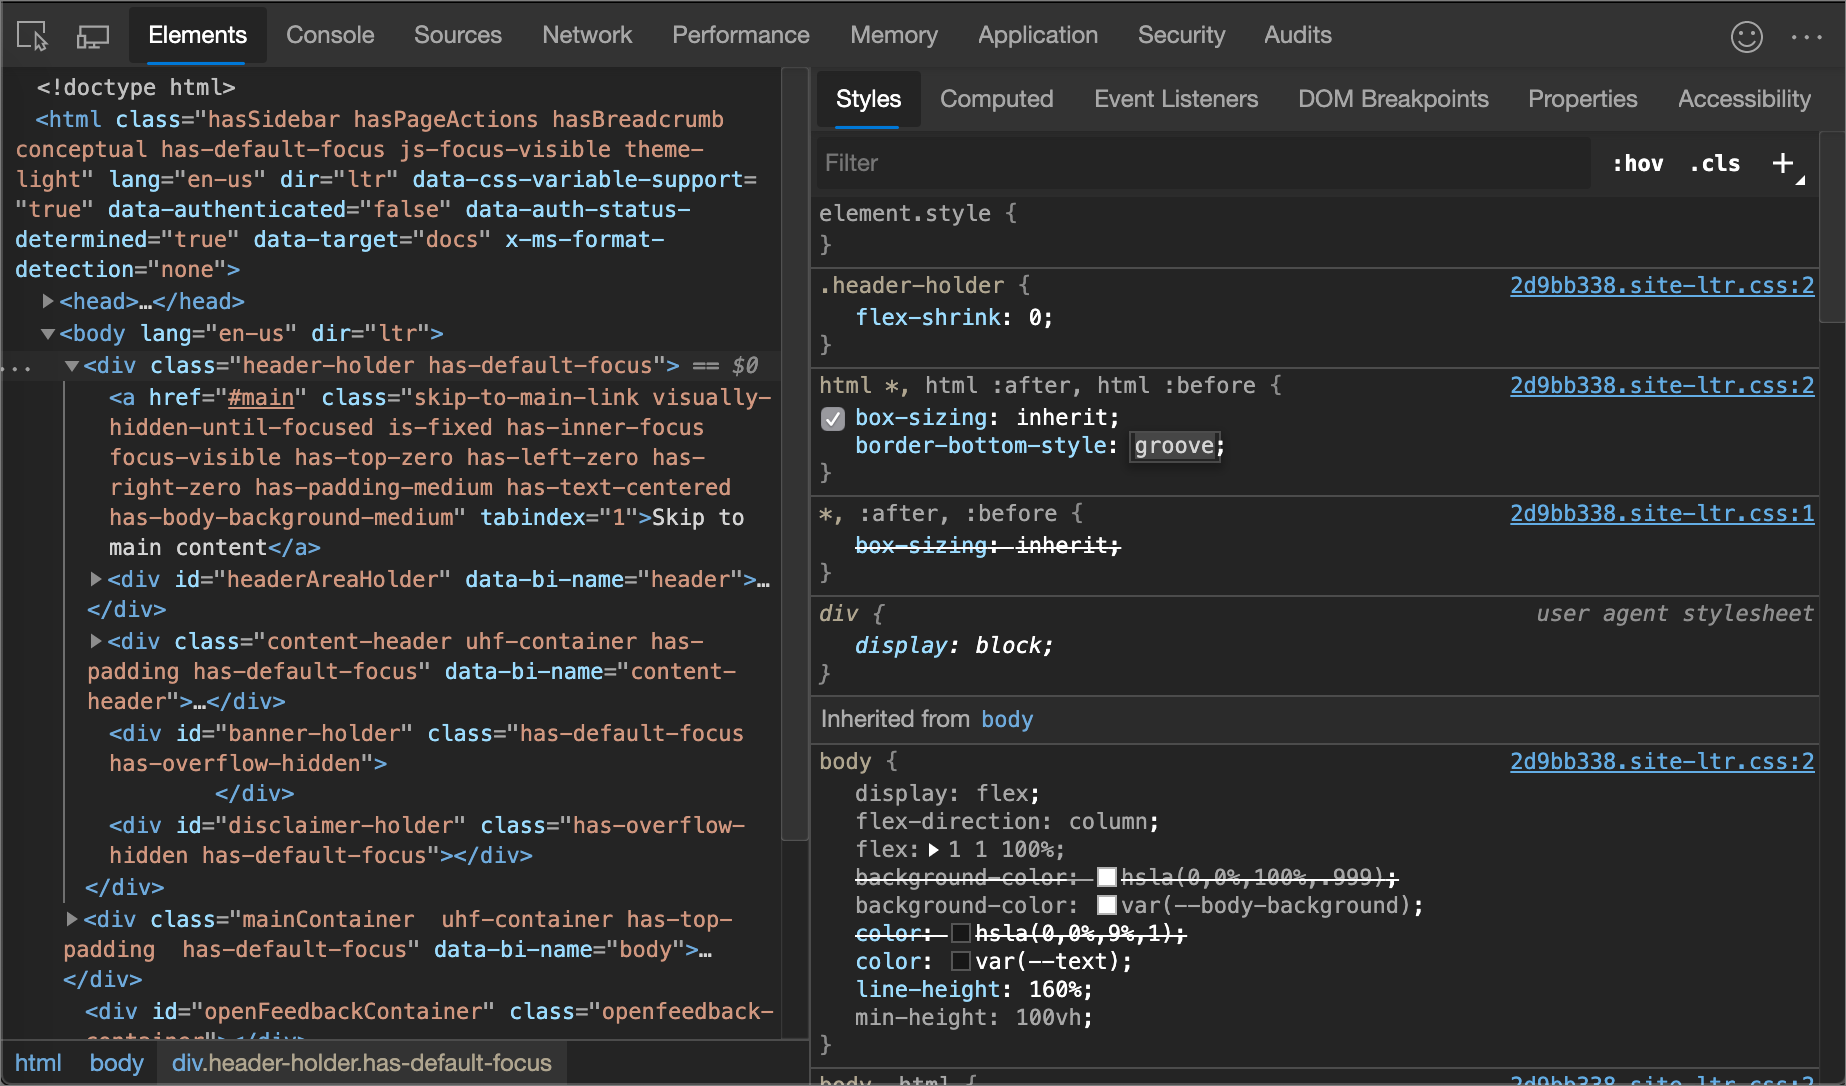
Enter a property name and press Enter.
Enter a valid value for that property and press Enter.
Change a declaration name or value
To change the name of a CSS declaration, double-click the declaration's name.
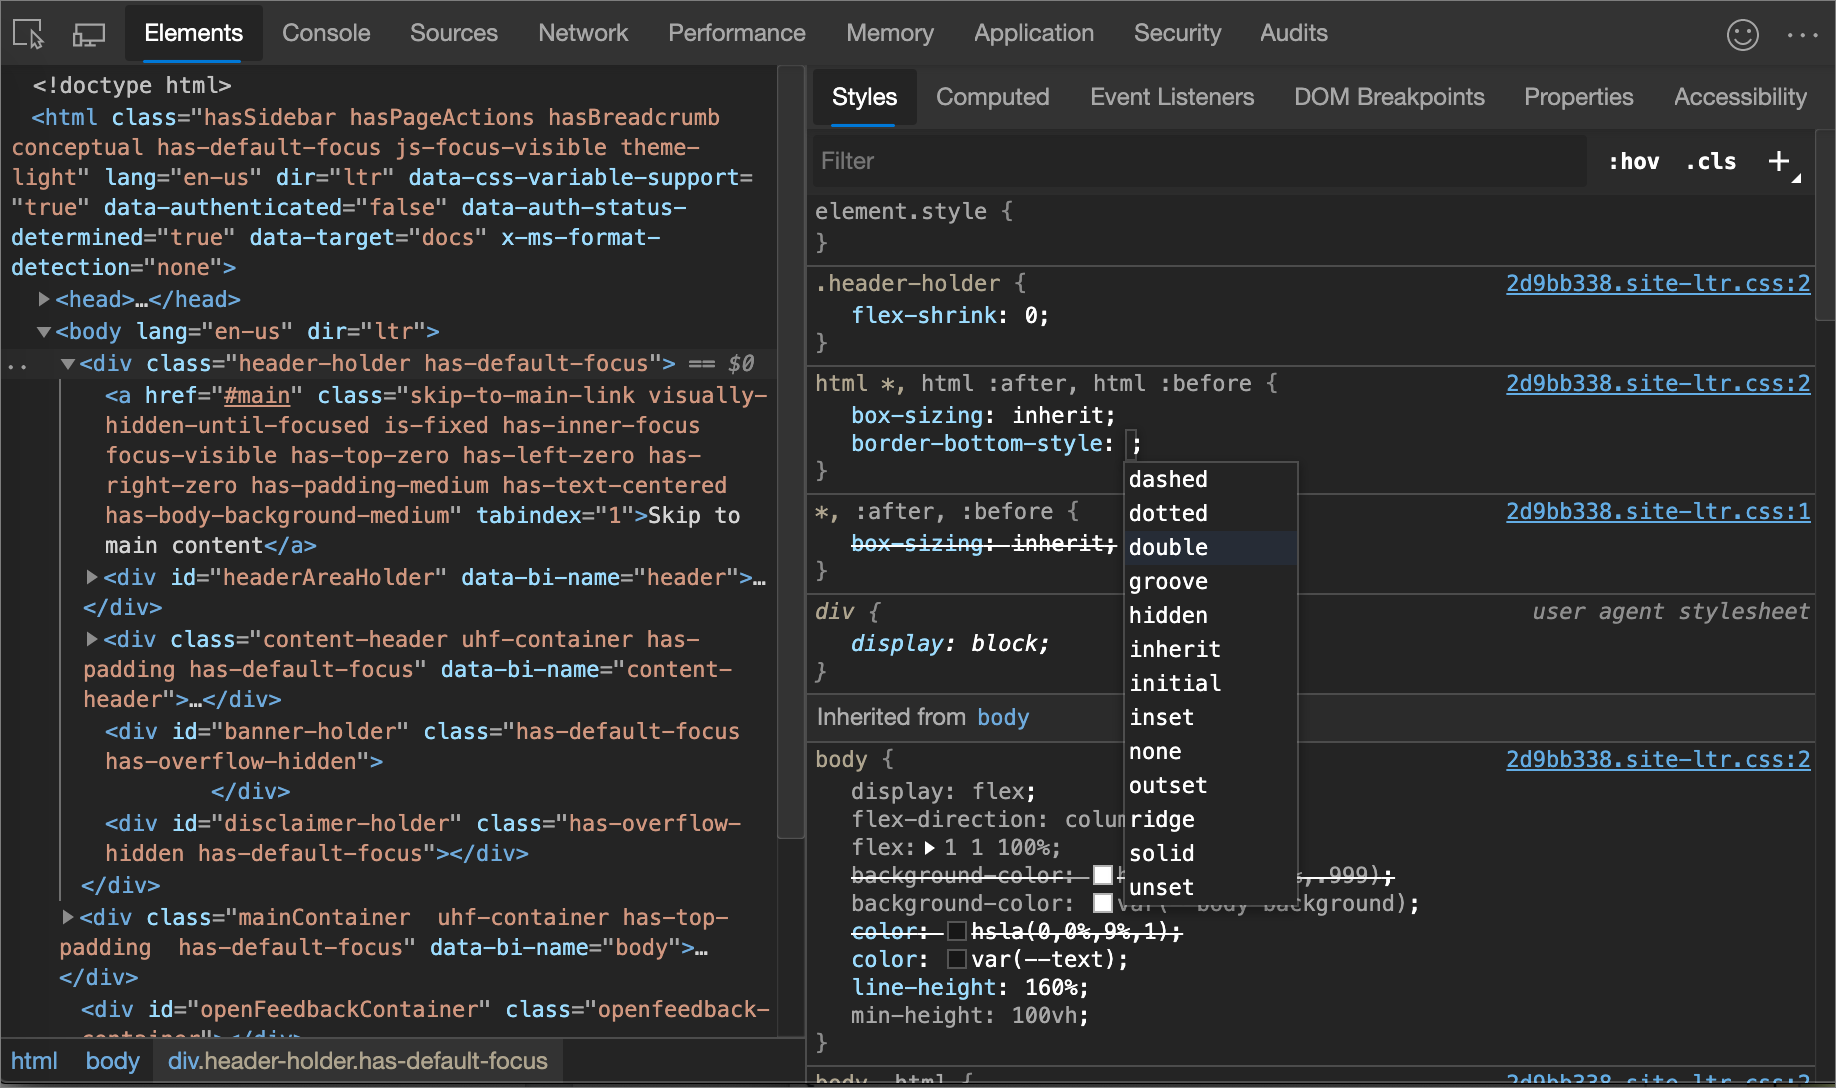
To change the value of a CSS declaration, double-click the declaration's value. The following screenshot shows selecting a value from a list:
To change a numerical value, type in the value, or use the arrow keys, per the next section.
Increment numerical declaration values
To change a numerical value of a CSS declaration, type in the value, or use the arrow keys to increment the value by a specific amount:
| Keyboard shortcut | Increments by |
|---|---|
| Alt+Up Arrow (Windows, Linux) or Option+Up Arrow (macOS) | 0.1 |
| Up Arrow | 1 (or 0.1, if the current value is between -1 and 1) |
| Shift+Up Arrow | 10 |
| Shift+Page Up (Windows, Linux) or Shift+Command+Up Arrow (macOS) | 100 |
To decrement, press the Down Arrow (or Page Down) key instead of the Up Arrow (or Page Up) key.
Add a class to an element
To add a class to an element:
Select the element in the DOM Tree.
Click .cls.
Enter the name of the class in the Add new class text box.
Press Enter.
Toggle a class
To enable or disable a class on an element:
Select the element in the DOM Tree.
Open the Element Classes pane. See Add a class to an element. Below the Add New Class text boxes are all of the classes that are being applied to this element.
Toggle the checkbox next to the class that you want to enable or disable.
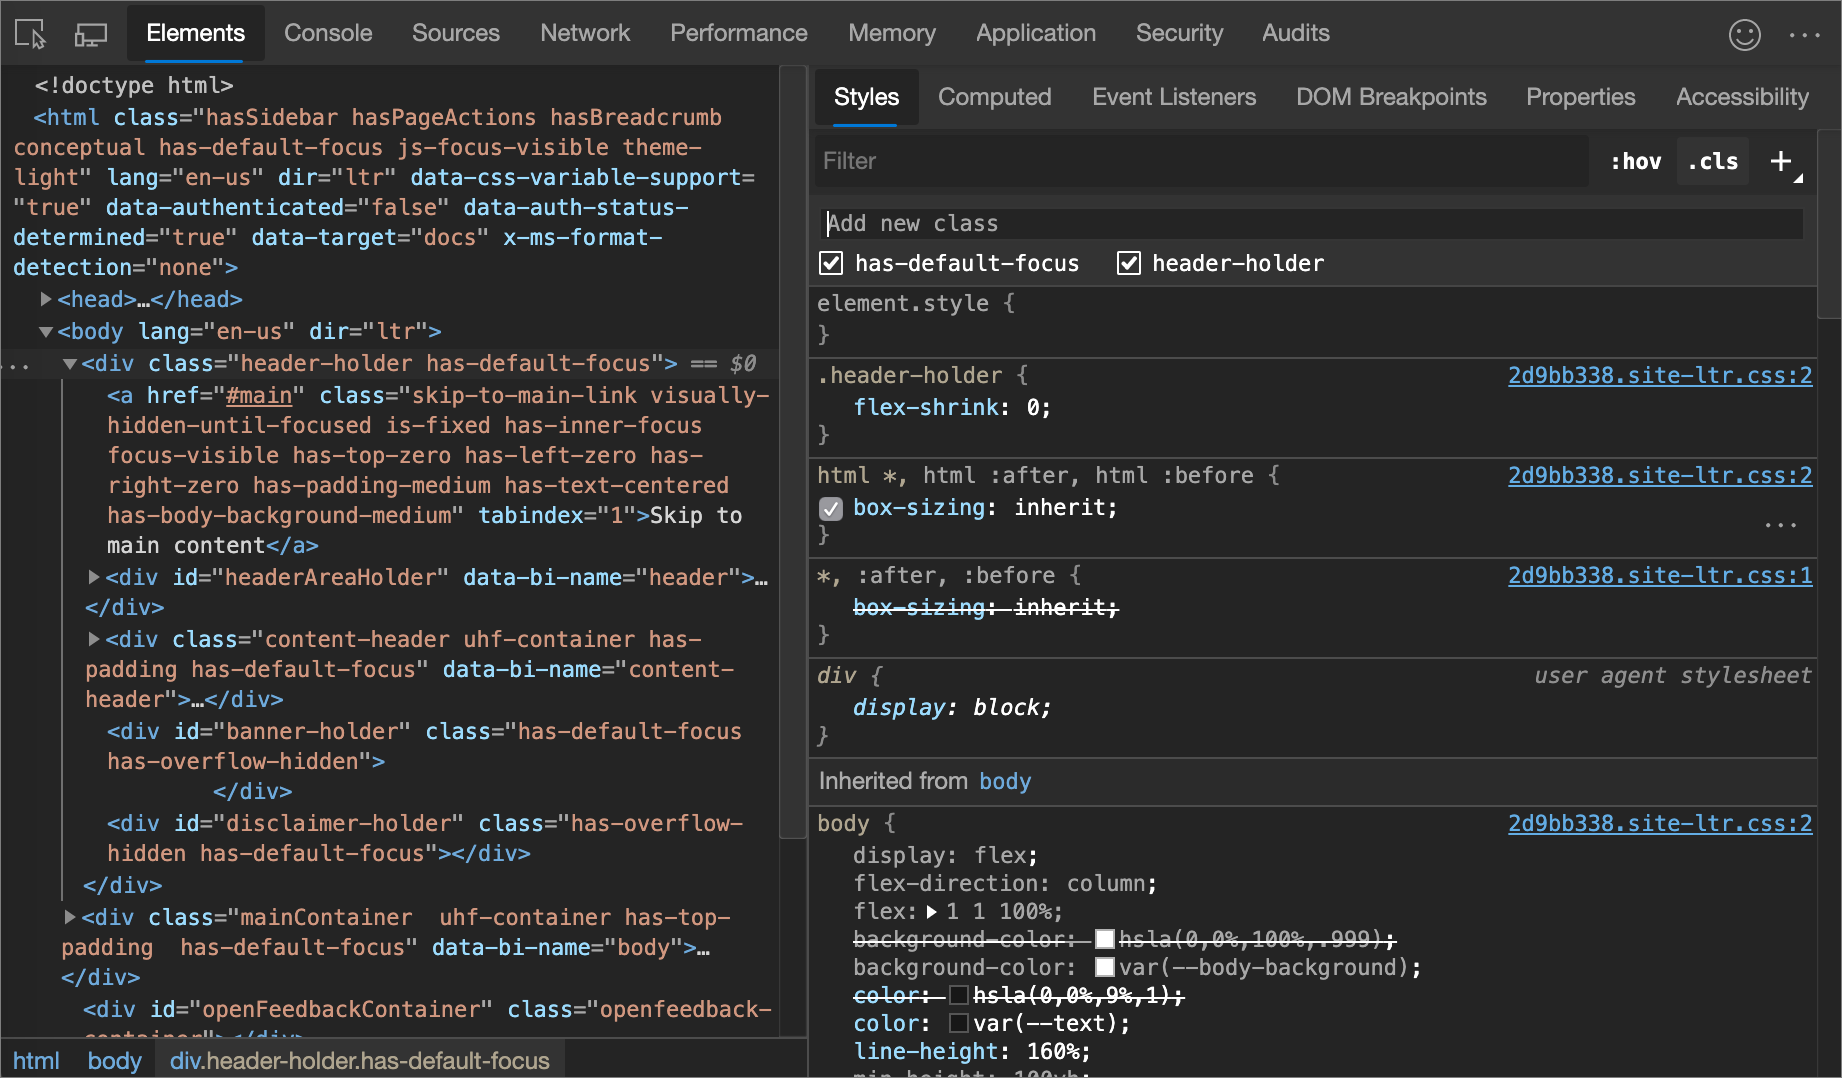
Add a style rule
To add a new style rule:
Click New Style Rule (
 ). DevTools inserts a new rule beneath the element.style rule.
In the following figure, DevTools adds the
h1.devsite-page-titlestyle rule after you click New Style Rule.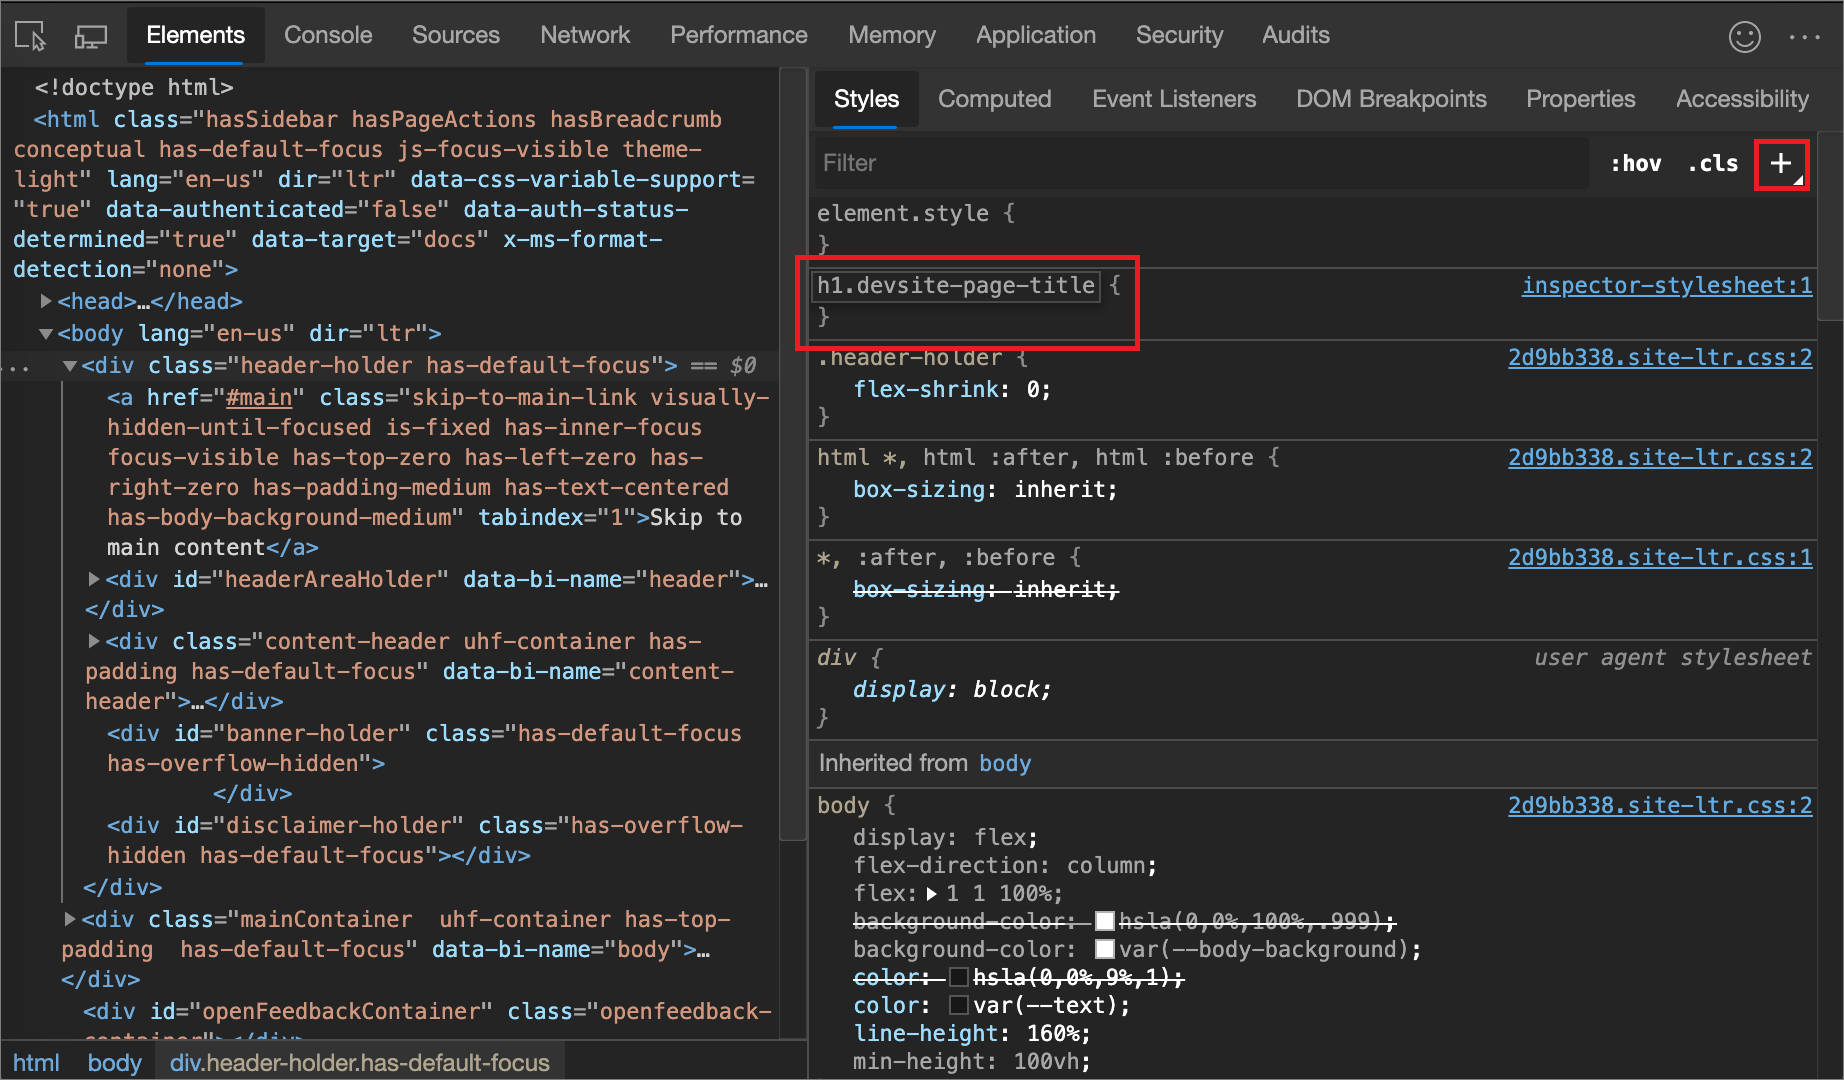
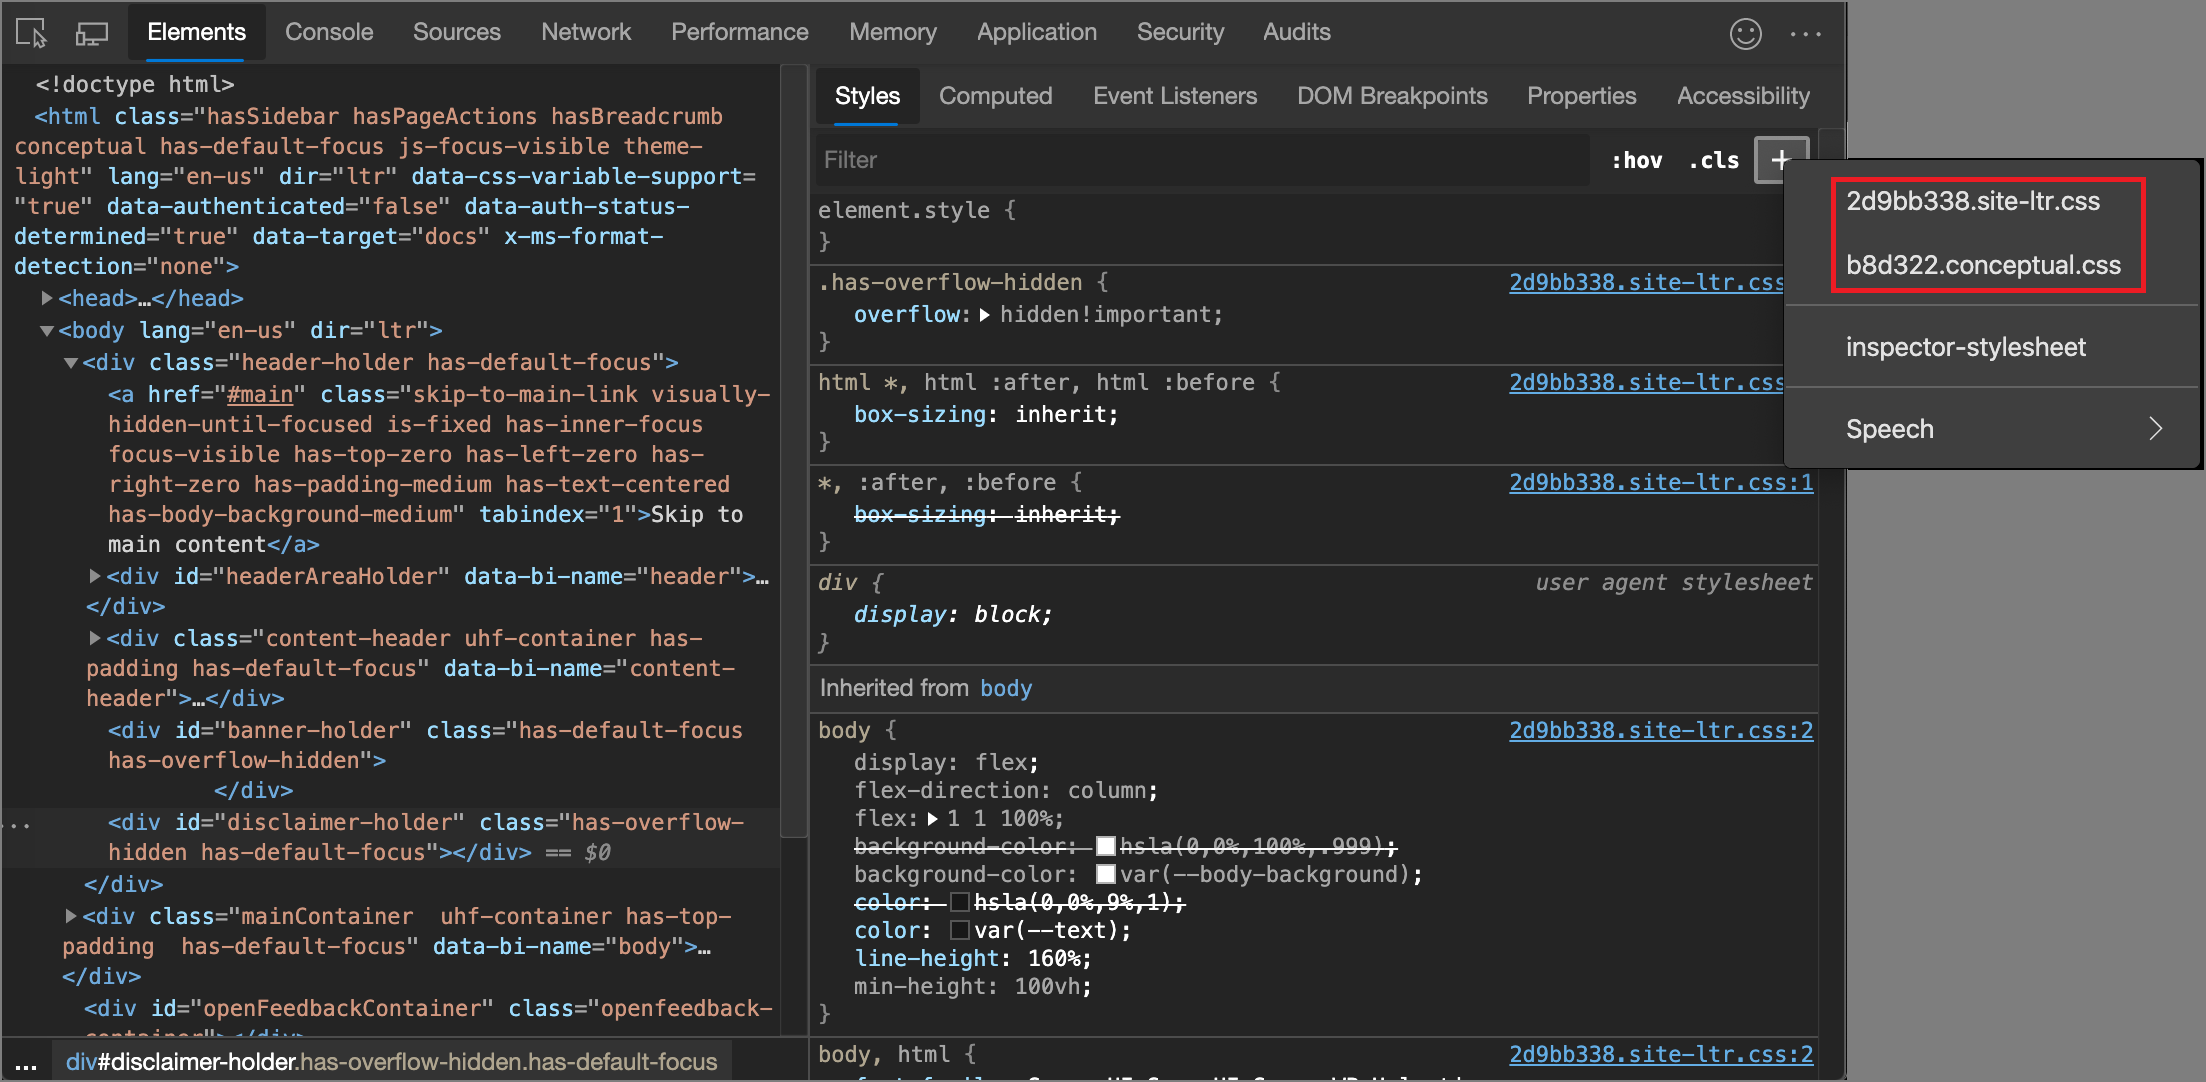
Select a stylesheet to add a rule to
By default, when adding a style rule, DevTools creates a new stylesheet named inspector-stylesheet in the document and then adds the new style rule in this stylesheet.
To instead add the rule in an existing stylesheet:
- Click and hold New Style Rule () and then select a stylesheet from the list to add the style rule to.
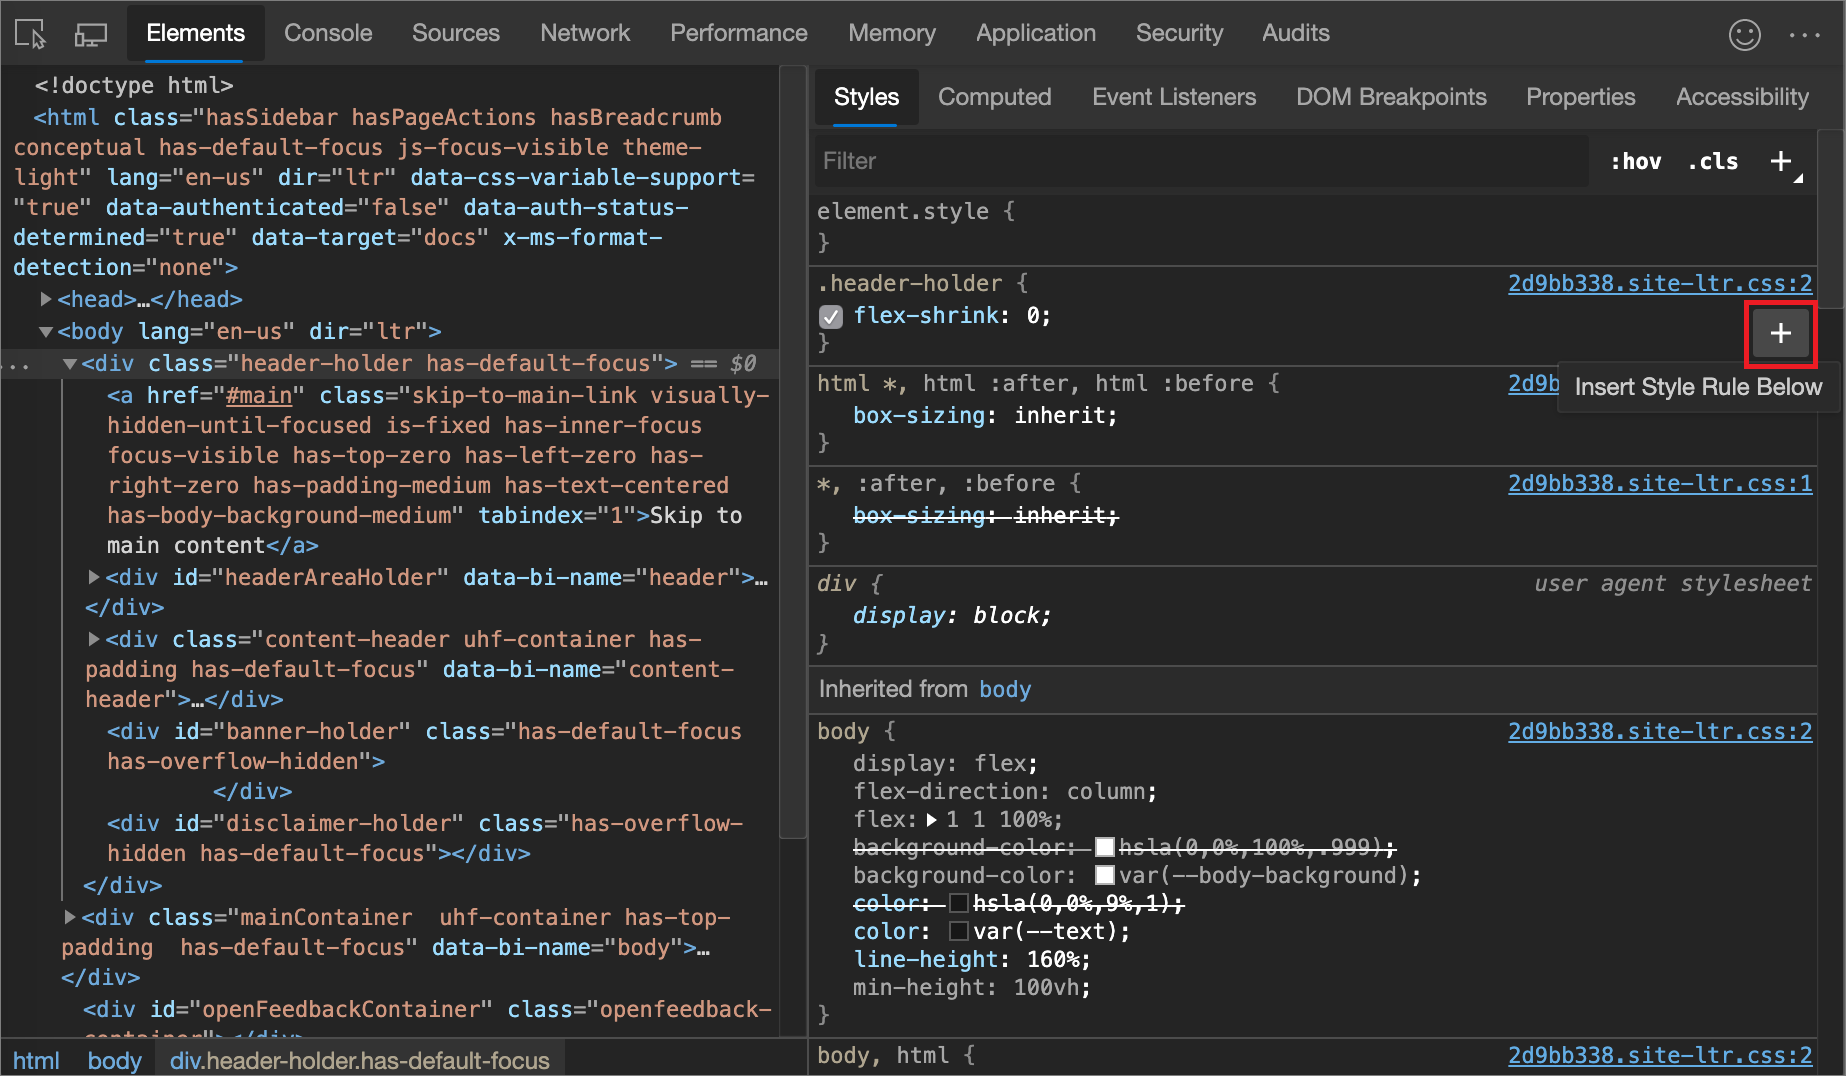
Add a style rule to a specific location
By default, adding a style rule by clicking on New Style Rule inserts the new rule beneath the element.style rule in the inspector-stylesheet stylesheet.
To add a style rule in a specific location of the Styles pane instead:
Hover on the style rule that is directly above where you want to add your new style rule.
Click Insert Style Rule Below (
).
Toggle a declaration
To toggle a single declaration on or off:
In the Styles pane, hover on the rule that defines the declaration. A checkbox appears next to each declaration.
Select or clear the checkbox next to the declaration. When you clear a declaration, DevTools crosses it out, to indicate that it is no longer active.
In the following figure, the
margin-topproperty for the currently selected element has been toggled off.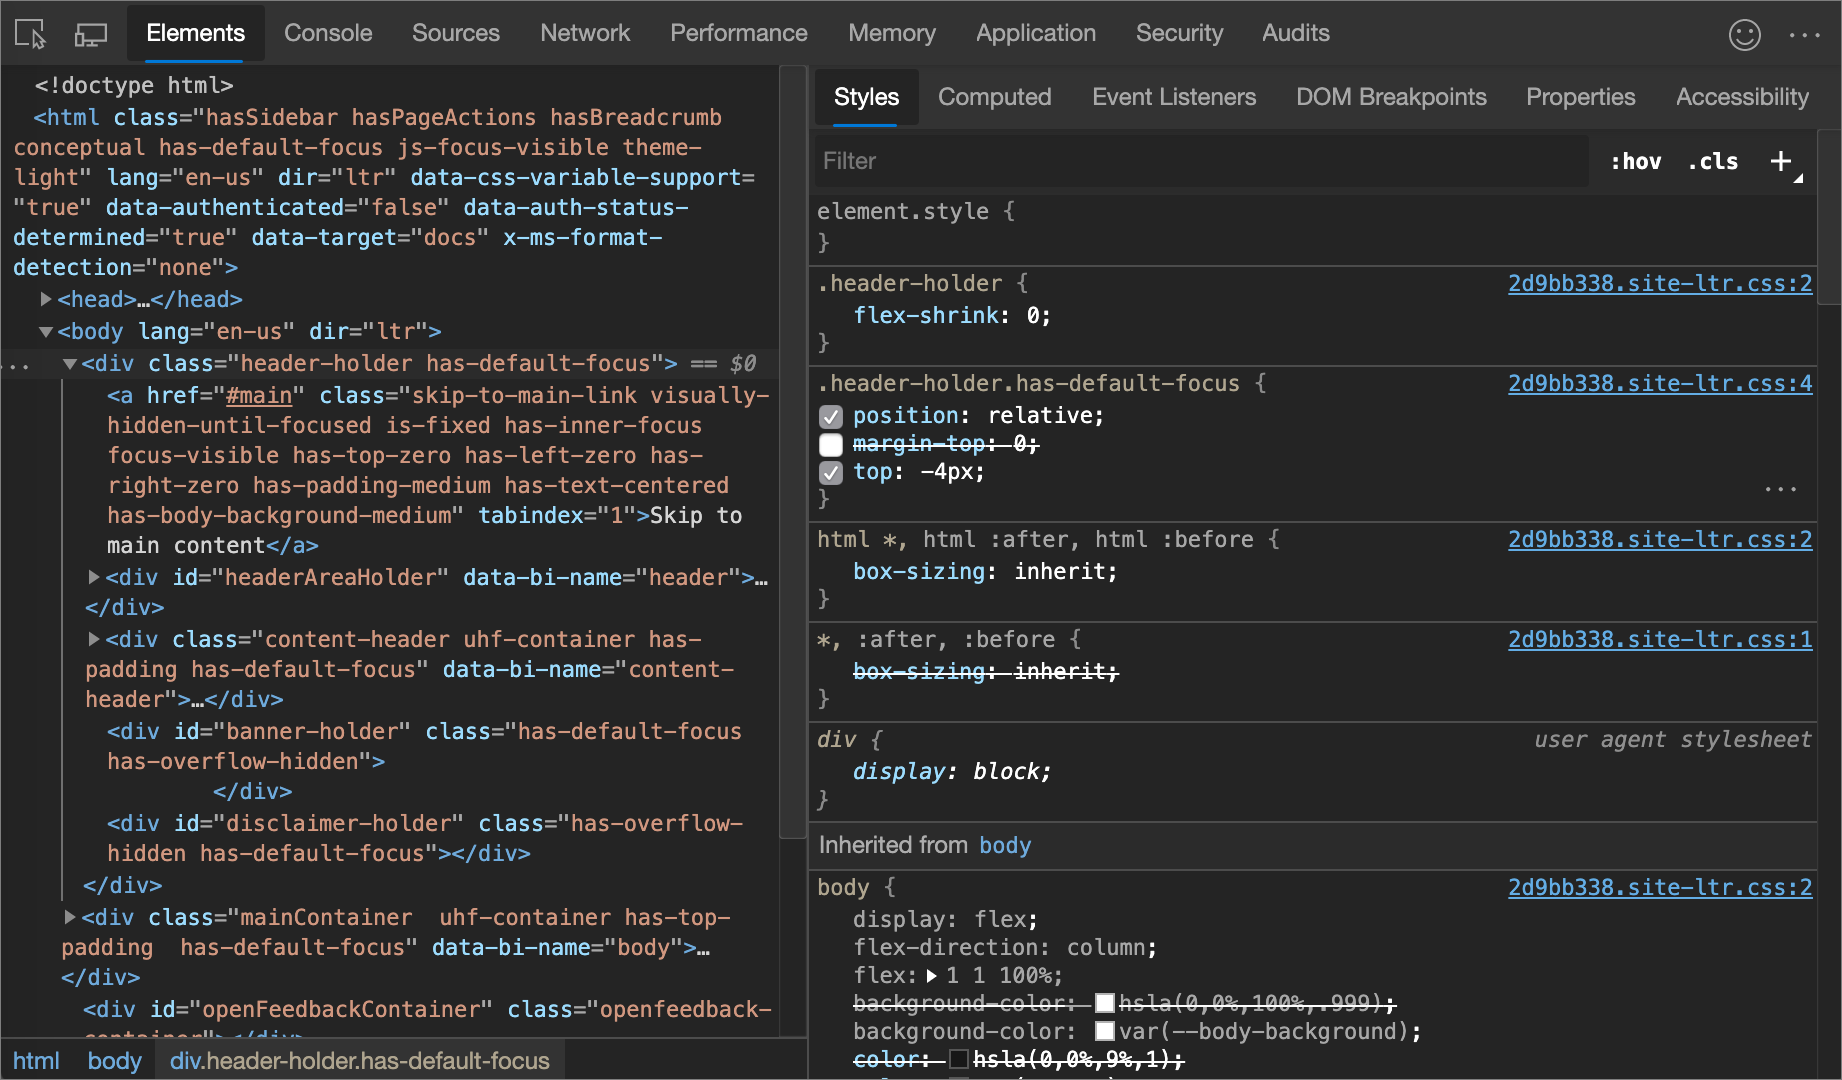
Change colors with the Color Picker
The Color Picker provides a user interface for changing color and background-color declarations.
To open the Color Picker:
In the Styles pane, find the
color,background-color, or similar declaration that you want to change. To the left of thecolor,background-color, or similar value, there is a small square, which is a preview of the color.In the following figure, the small square to the left of
rgba(0, 0, 0, 0.7)is a preview of that color.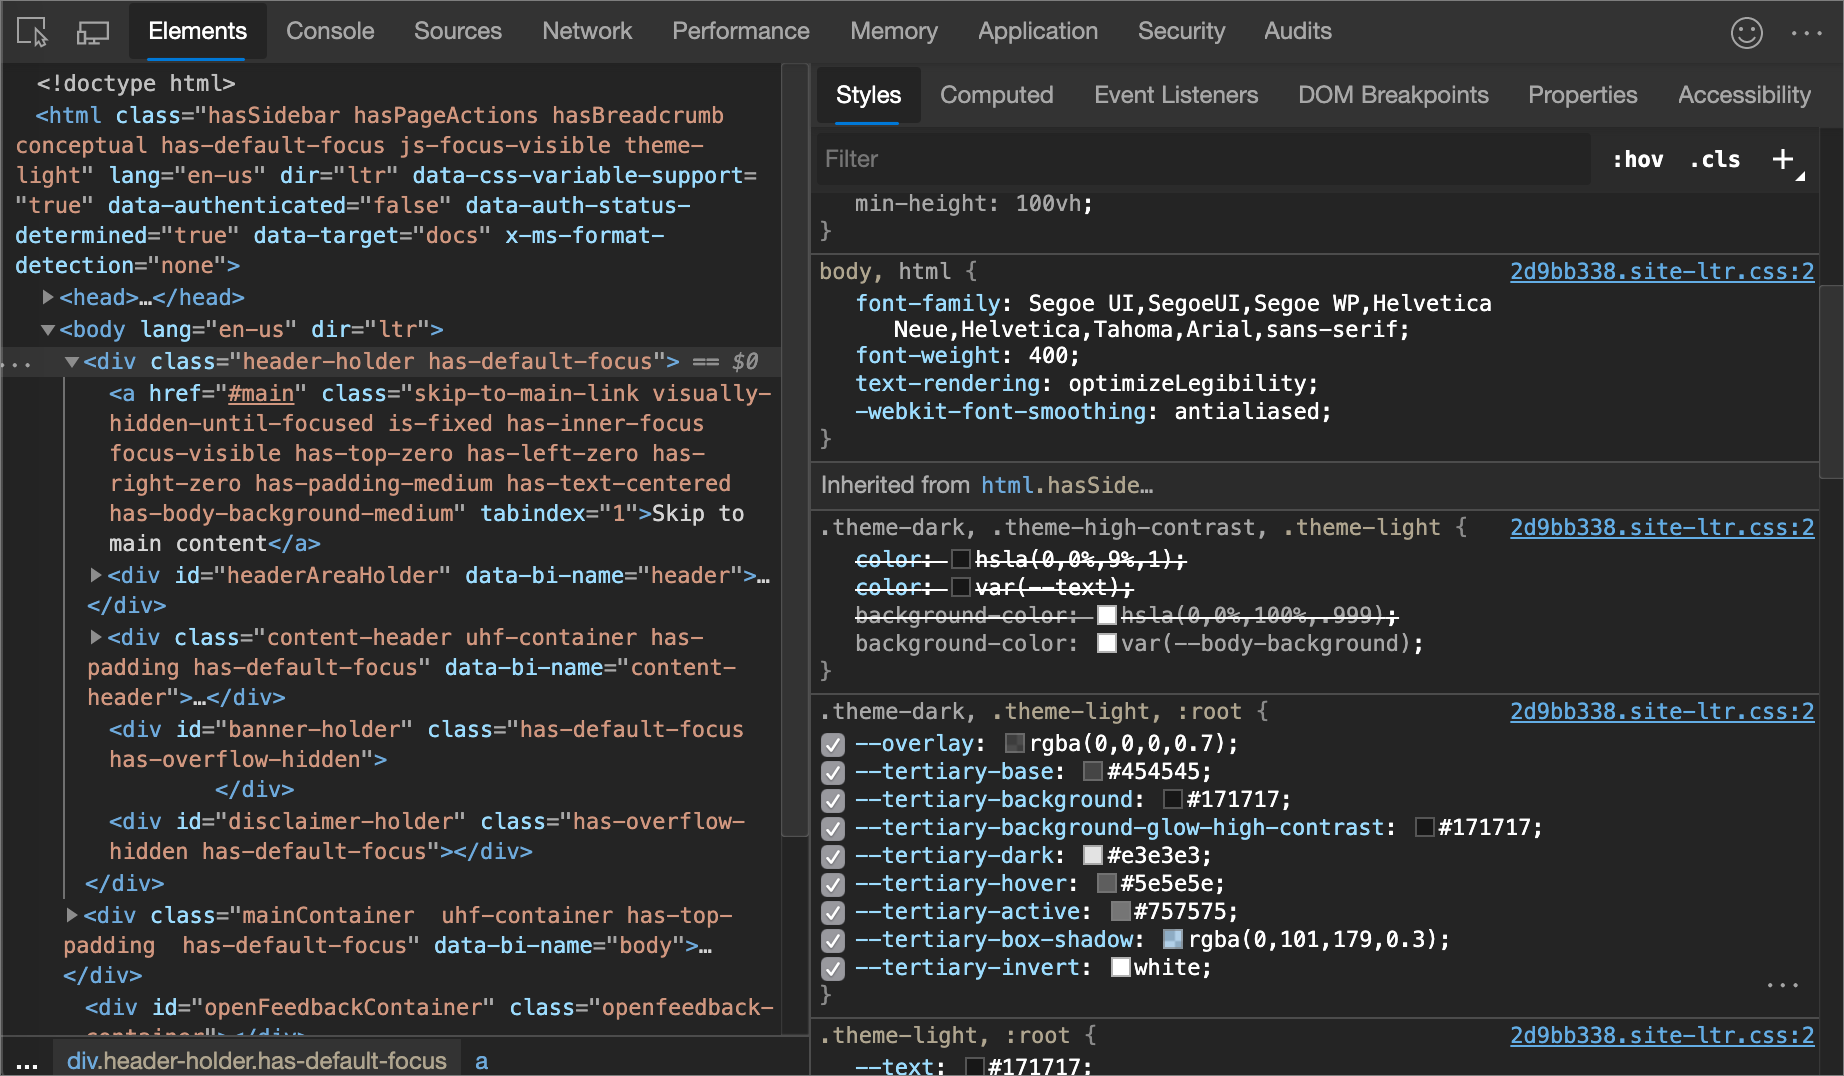
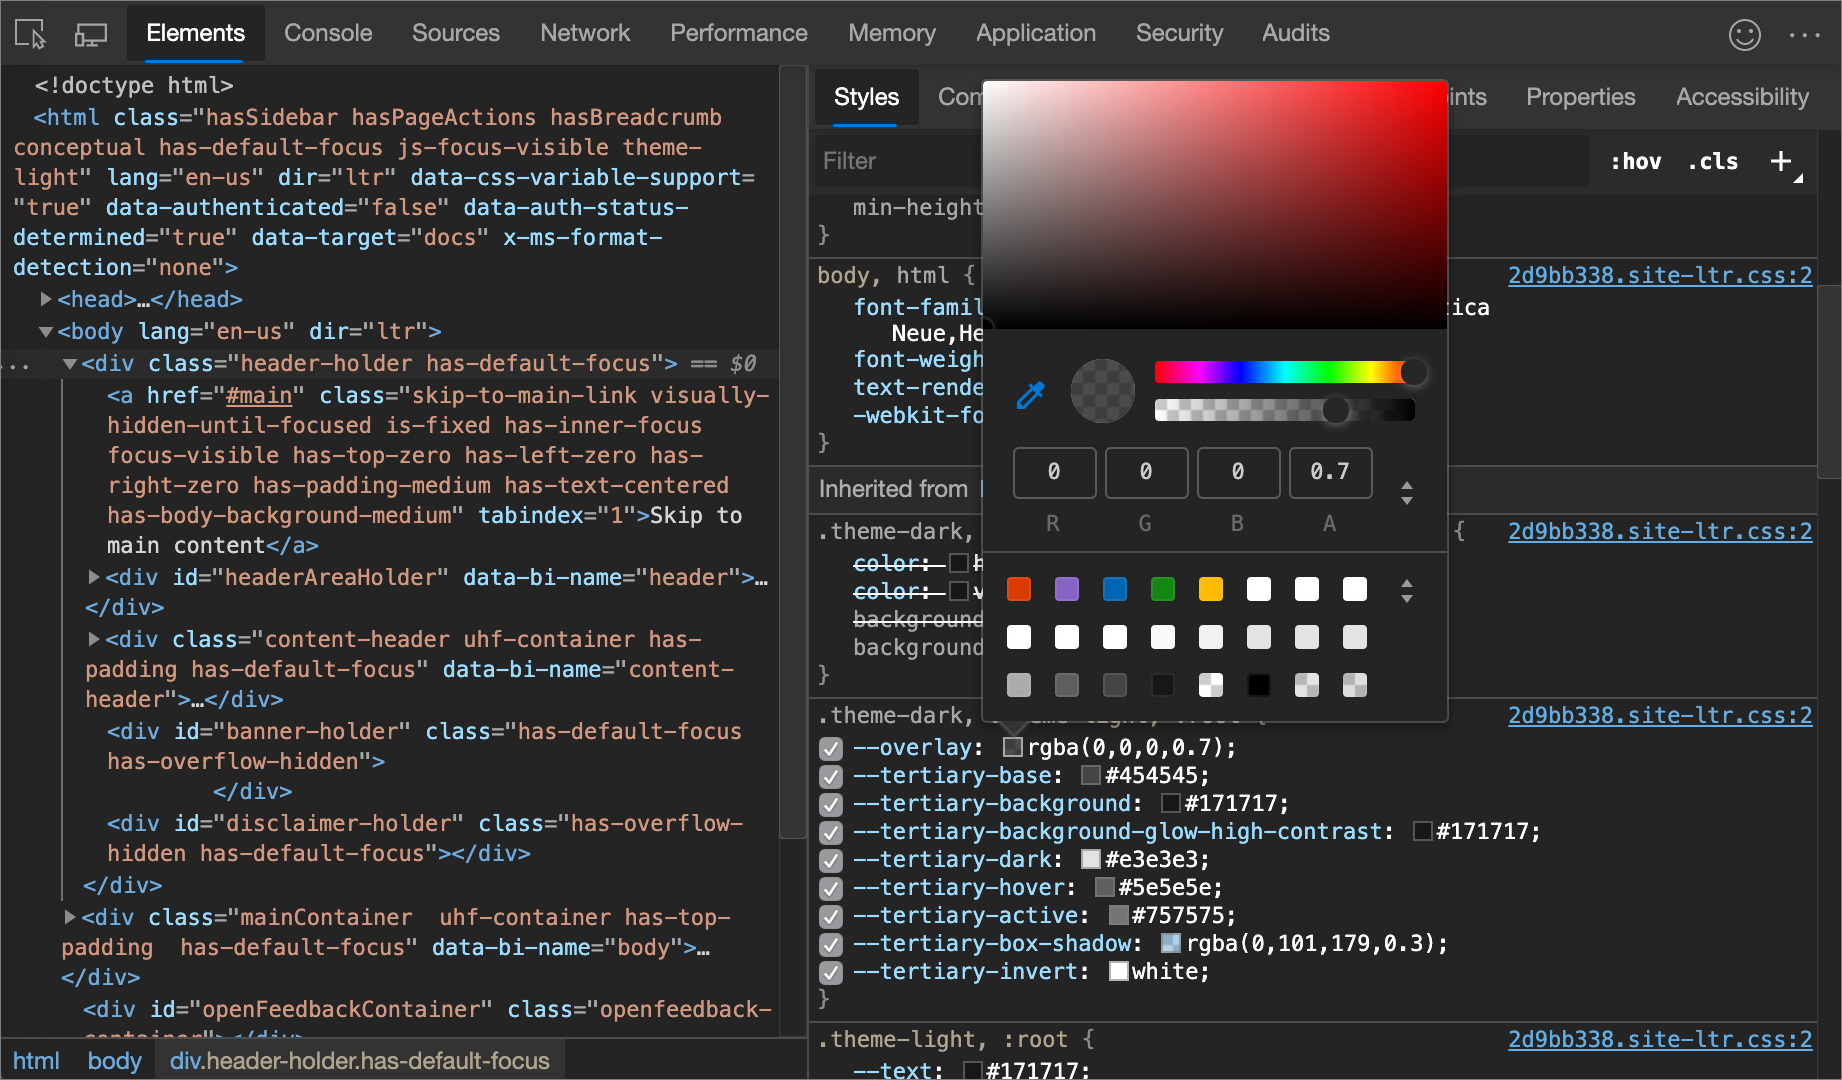
Click the preview to open the Color Picker.
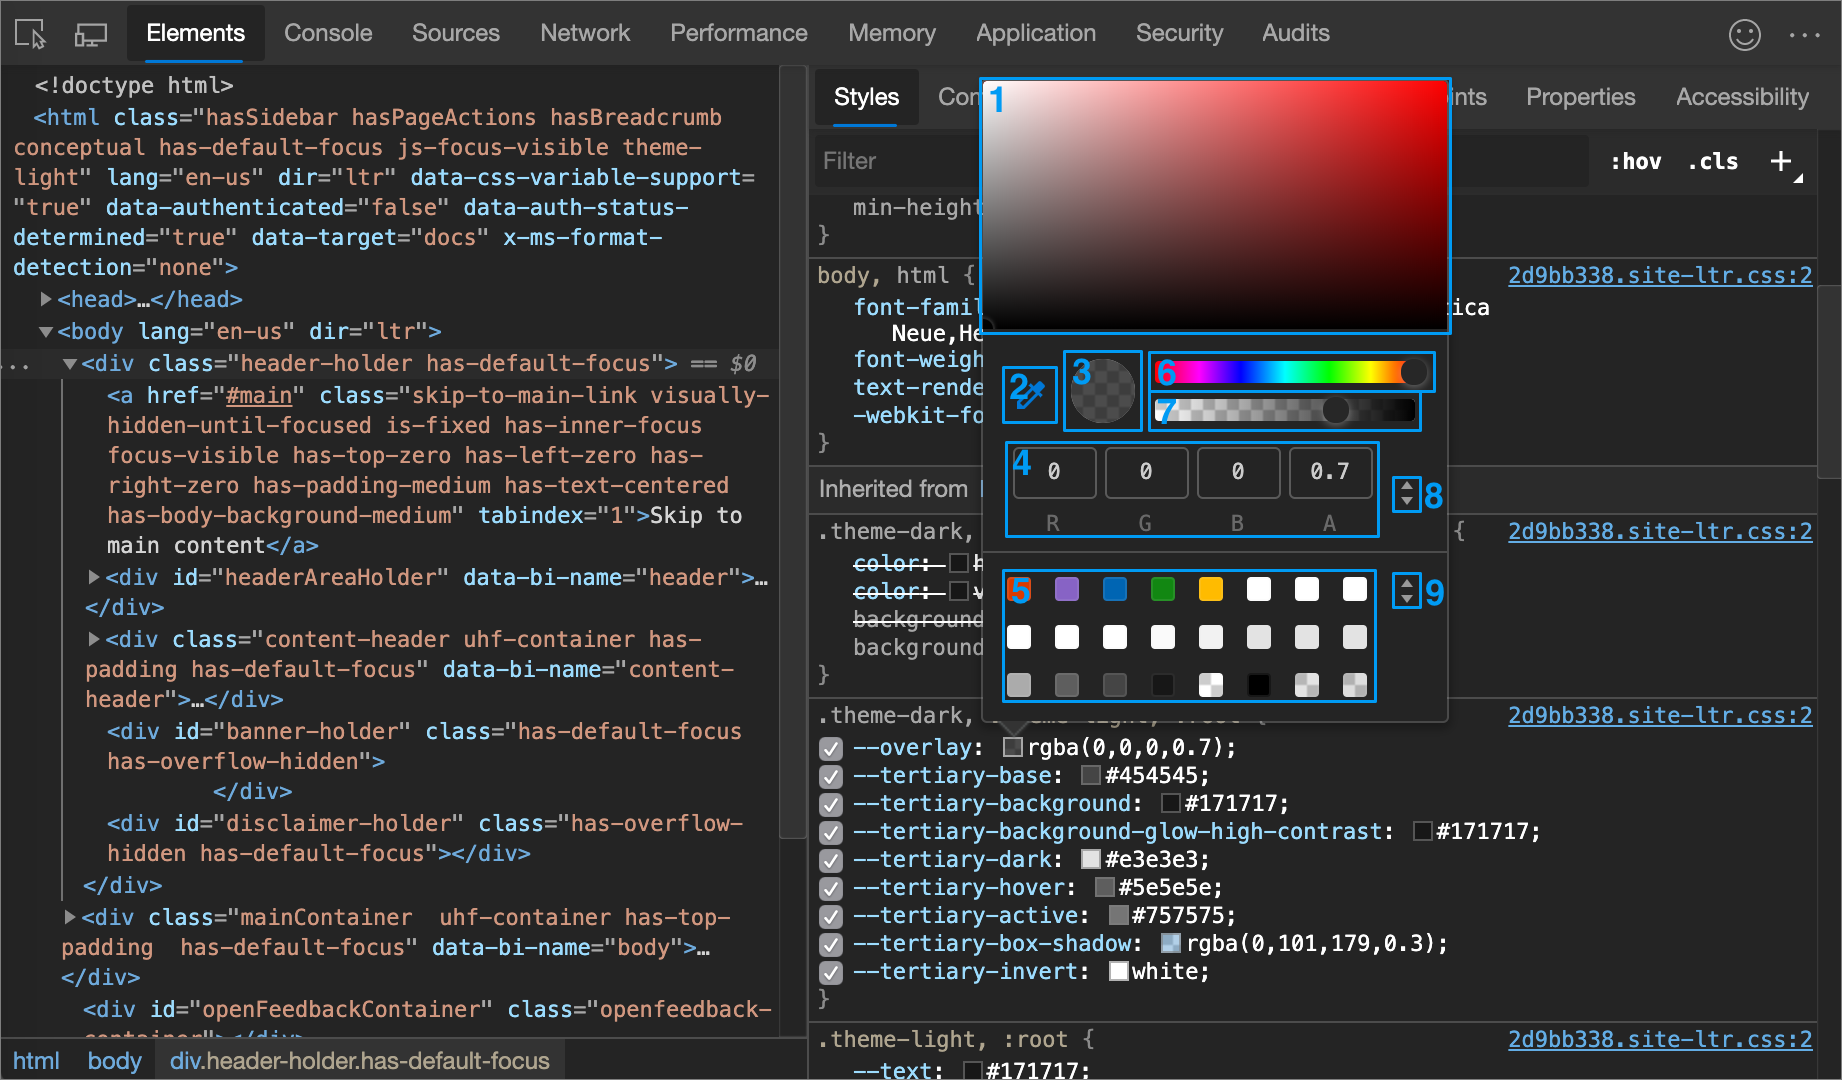
The following figure and list describes of each of the UI elements of the Color Picker.
| Callout | Component | Description |
|---|---|---|
| 1 | Shades | |
| 2 | Eyedropper | Sample a color off the page with the Eyedropper |
| 3 | Copy To Clipboard | Copy the Display Value to your clipboard. |
| 4 | Display Value | The RGBA, HSLA, or Hex representation of the color. |
| 5 | Color Palette | Click a square to change the color. |
| 6 | Hue | |
| 7 | Opacity | |
| 8 | Display Value Switcher | Toggle between the RGBA, HSLA, and Hex representations of the current color. |
| 9 | Color Palette Switcher | Toggle between the Material Design palette, a custom palette, or a page colors palette. DevTools generates the page color palette based on the colors that it finds in your stylesheets. |
Sample a color off the page with the Eyedropper
To change the selected color to some other color on the page:
Click the Eyedropper icon (
 ). Your cursor changes to a magnifying glass.
Hover on the pixel that has the color you want to sample, anywhere on your screen.
Click to confirm.
In the following figure, the Color Picker shows a current color value of
rgba(0,0,0,0.7), which is close to black. The specific color changes to the version of black that is currently highlighted in the viewport after you clicked it.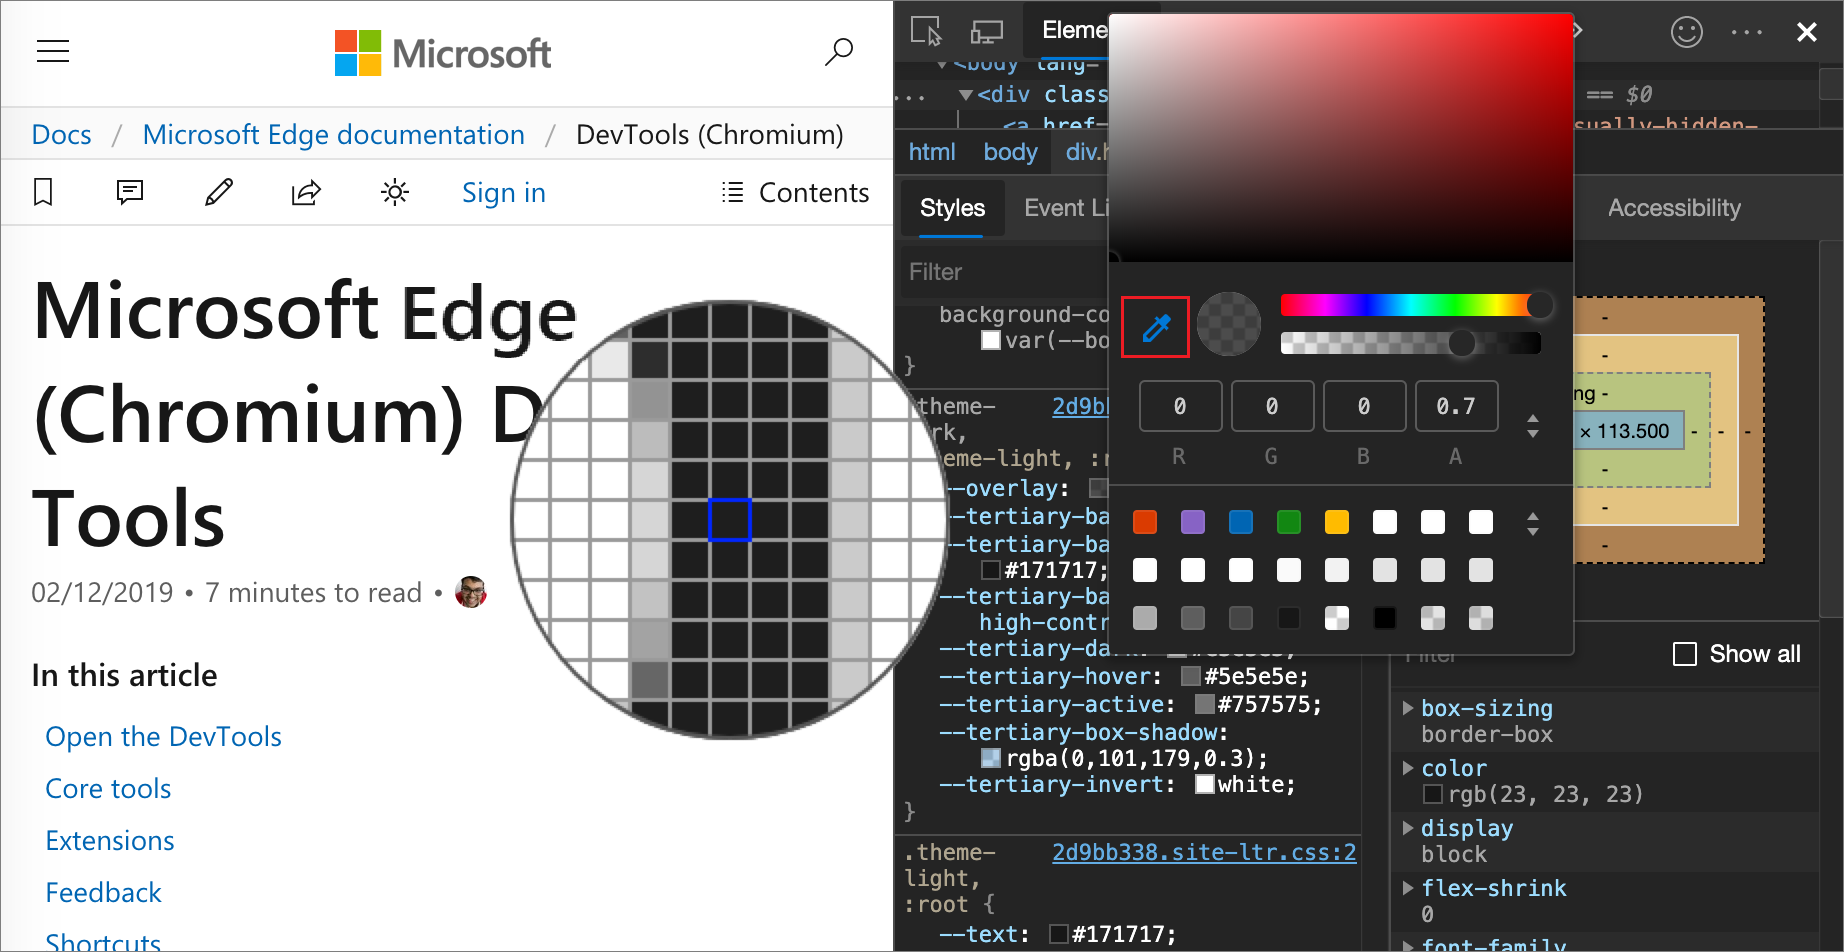
See also:
Change angle value with the Angle Clock
The Angle Clock provides a user interface for changing the angle amounts in CSS property values.
To open the Angle Clock:
Select an element which includes an angle declaration.
In the Styles pane, find the
transformorbackgrounddeclaration that you want to change. Click the Angle Preview box next to the angle value.In the following figure, the small clock to the left of
100degis a preview of the angle.Click the preview to open the Angle Clock:
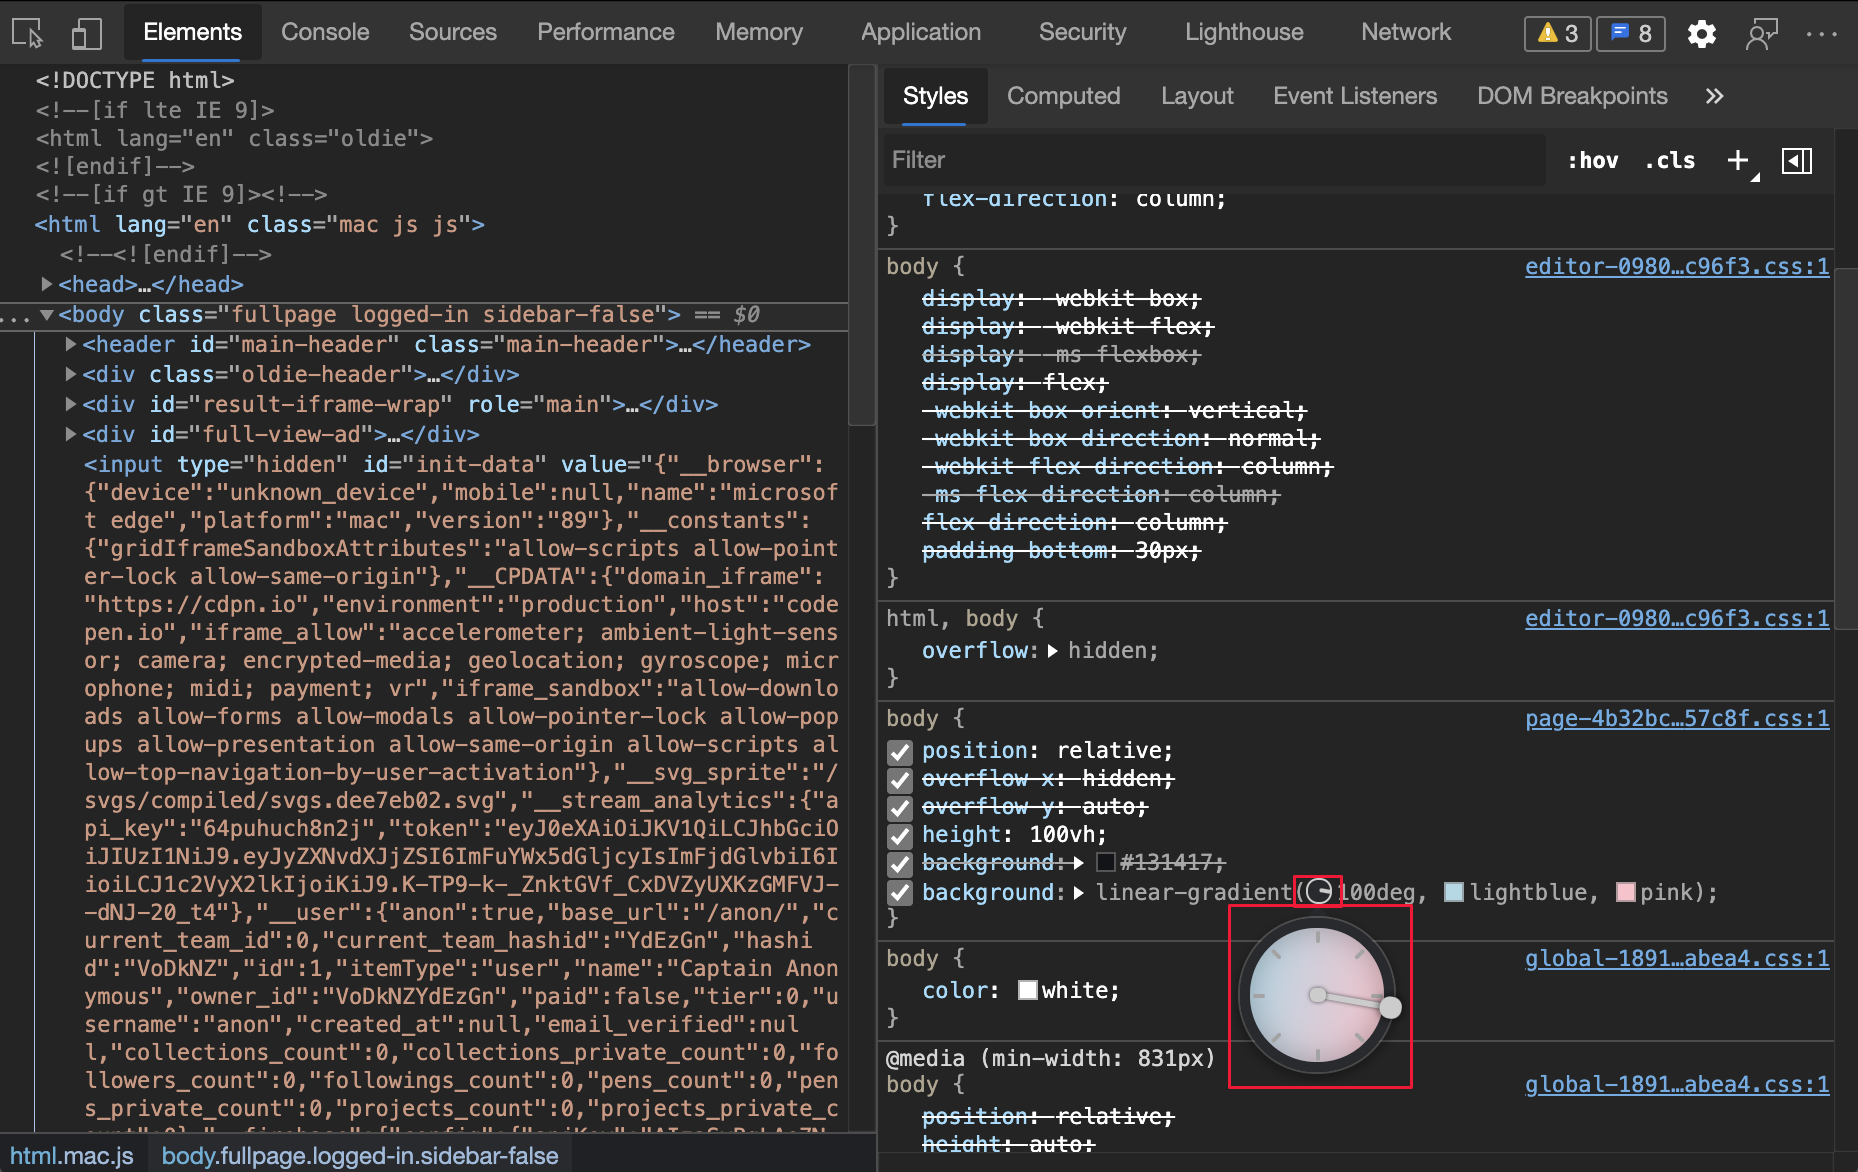
Change the angle value by clicking on the Angle Clock circle, or scroll your mouse to increase or decrease the angle value by 1.
There are more keyboard shortcuts to change the angle value. Find out more in the Styles pane keyboard shortcuts.
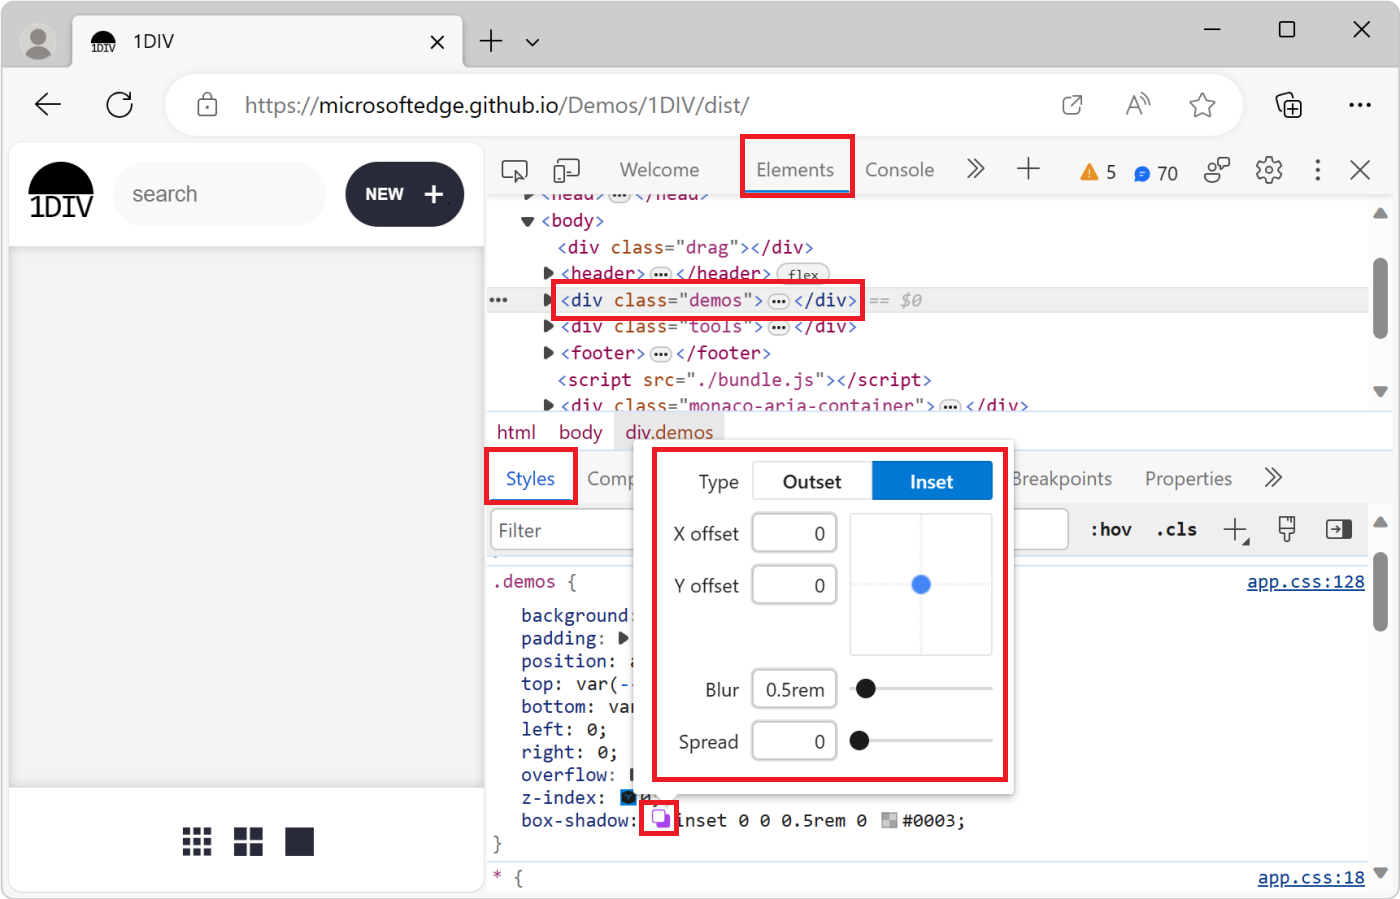
Change box and text shadows with the Shadow Editor
Use the Shadow Editor to change the value of the box-shadow or text-shadow CSS property on an HTML element:
Select an element with a
box-shadowortext-shadowdeclaration.For example, open the 1DIV demo page in a new tab or window, right-click the page and select Inspect to open DevTools, and then in the Elements tool, select the
<div class="demos">element.In the Styles pane, in the
.demosCSS rule, find thebox-shadowdeclaration, and then click its Open shadow editor ( ) button.
The Shadow Editor opens:
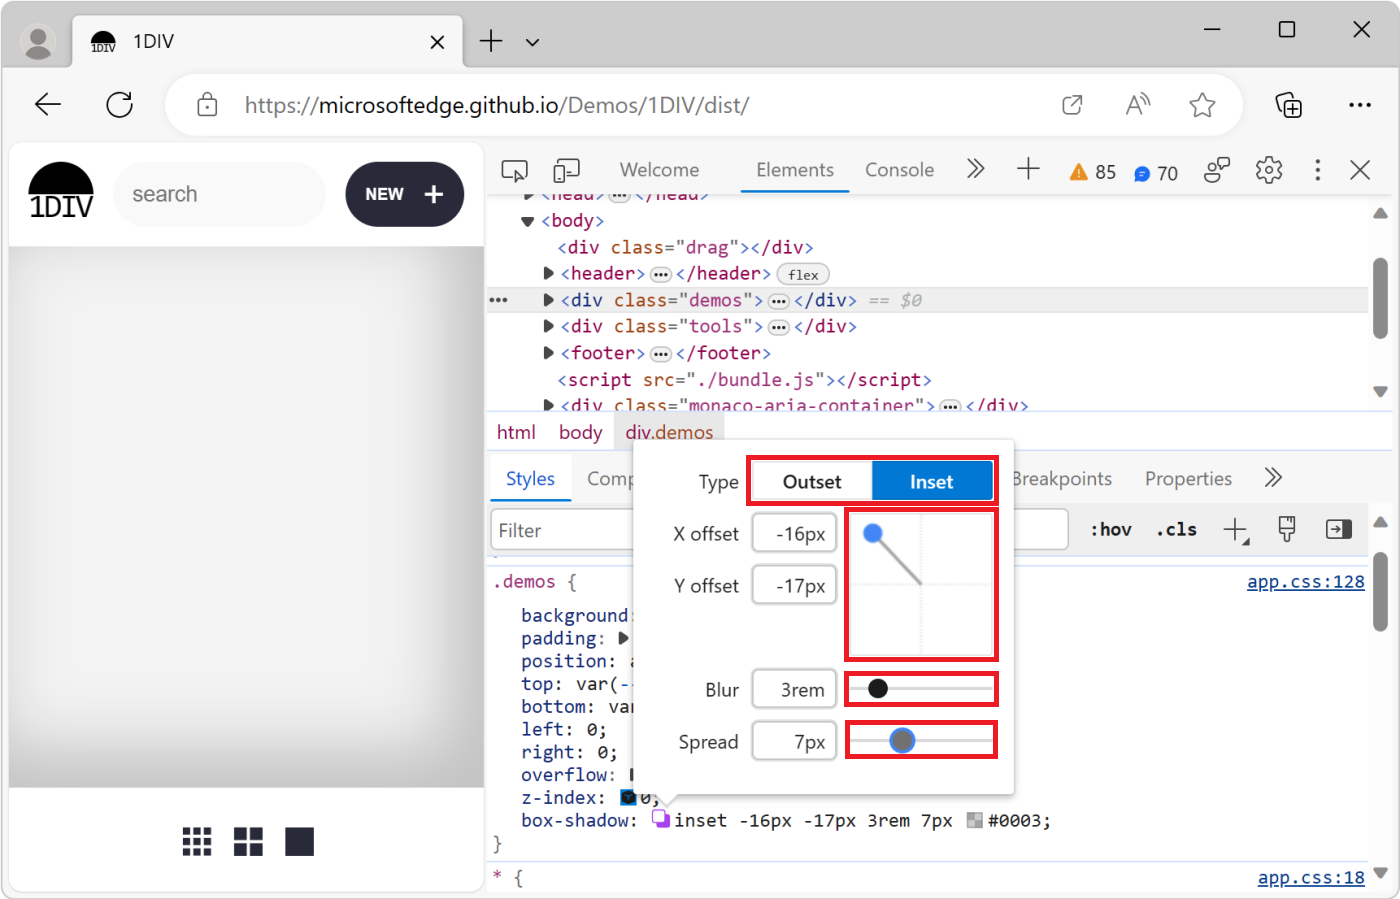
Change the shadow properties, as follows:
Property How to change Type Select Outset or Inset. Only for box-shadow.X offset Specify a value in the text box, or drag the blue dot. Y offset Specify a value in the text box, or drag the blue dot. Blur Specify a value in the text box, or drag the slider. Spread Specify a value in the text box, or drag the slider. Only for box-shadow.The changes are applied to the element in the rendered webpage in real time:
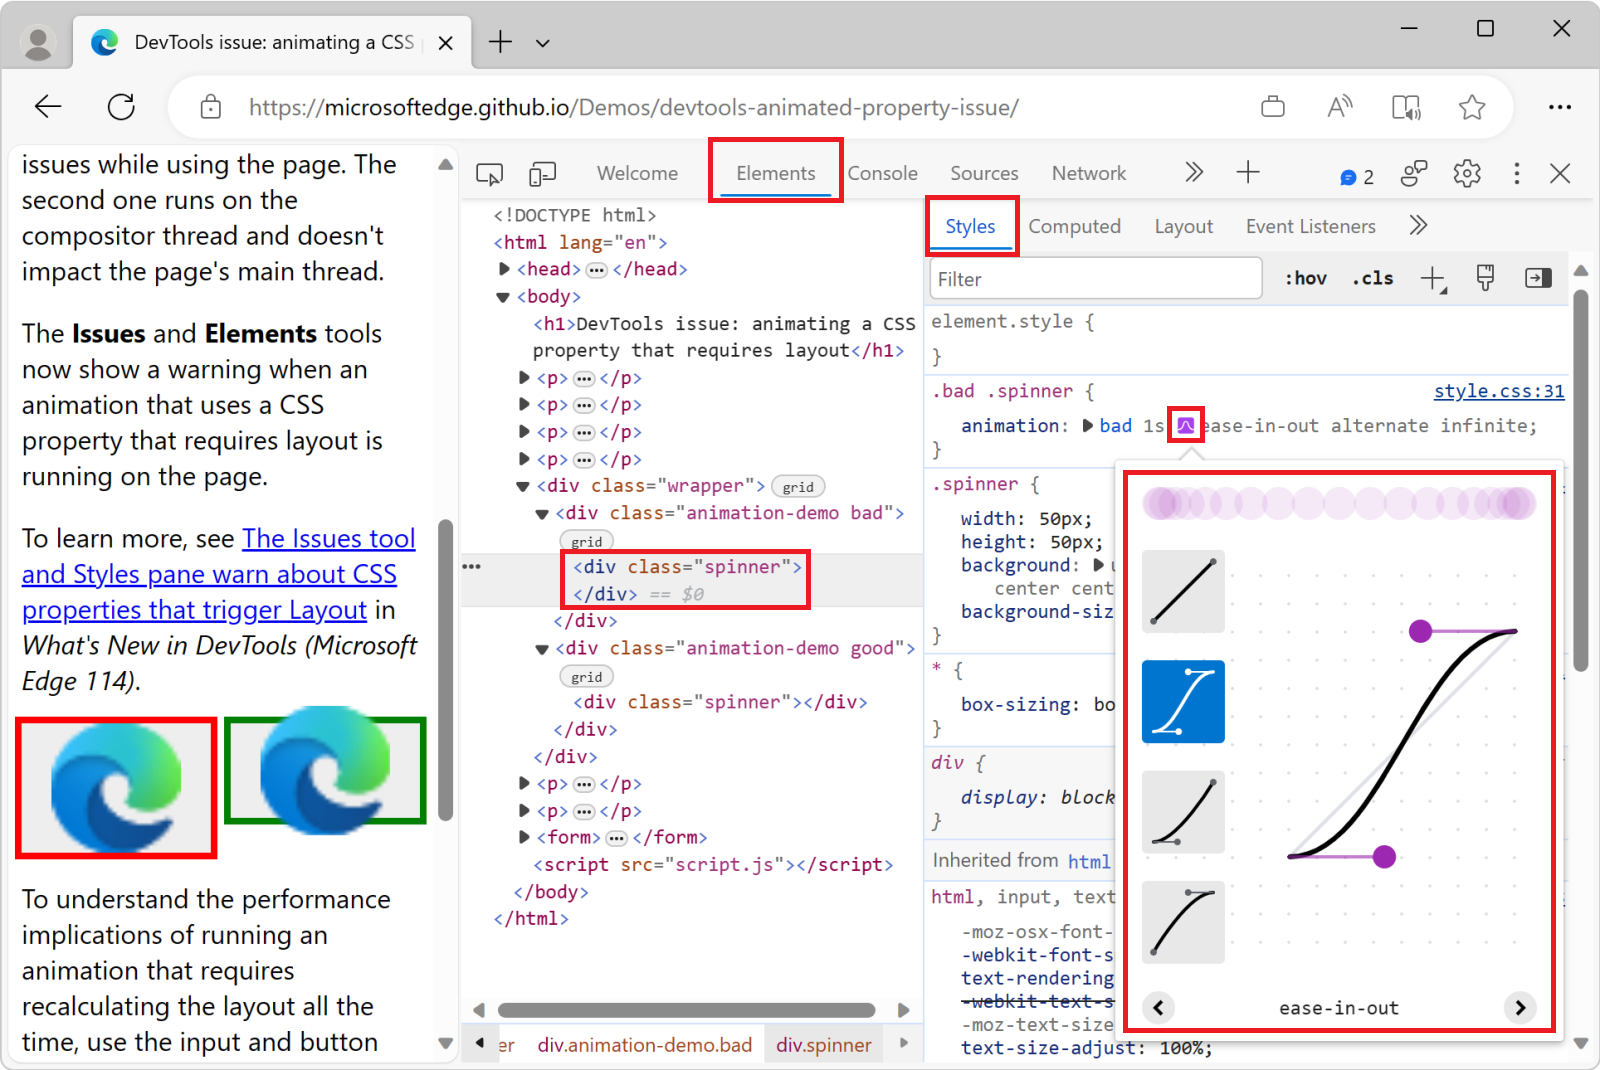
Edit animation and transition timings with the Easing Editor
Use the Easing Editor to change the value of the animation-timing-function or transition-timing-function property on an HTML element:
Select an element that has a CSS animation or transition applied.
For example, open the animated property demo page in a new tab or window, right-click the page and select Inspect to open DevTools, and then in the Elements tool, press Ctrl+F and find "spinner", and then select the
<div class="spinner">element.The red and green boxes on this demo page are two different CSS animations. Both animations run with CSS by using the
animationCSS property, and define anease-in-outtiming function.In the Styles pane, find the
animationdeclaration in the.bad .spinnerCSS rule, and click the Open cubic bezier editor ( ) button.
The Easing Editor opens:
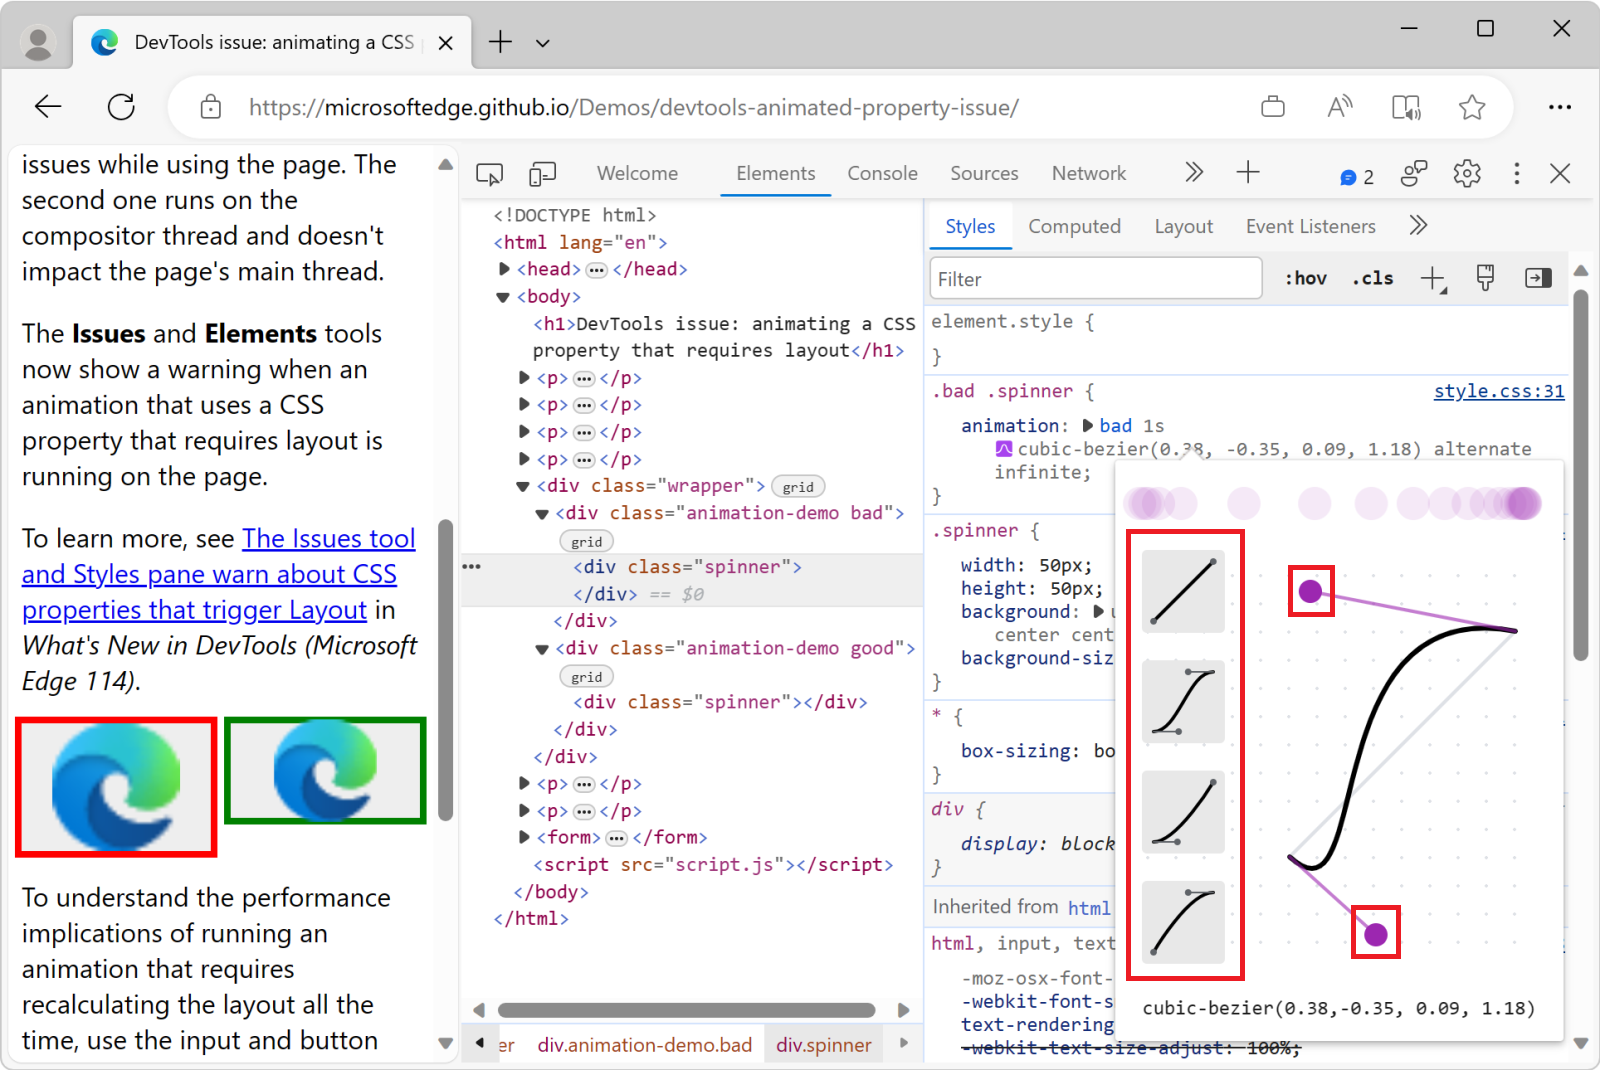
Change the properties of the animation timing function:
- Choose one of the pre-defined timing functions from the list.
- Create your own timing function by dragging the cubic-bezier curve handles.
The changes are applied to the element in the rendered webpage in real time:
Note
Portions of this page are modifications based on work created and shared by Google and used according to terms described in the Creative Commons Attribution 4.0 International License. The original page is found here and is authored by Kayce Basques.
![]() This work is licensed under a Creative Commons Attribution 4.0 International License.
This work is licensed under a Creative Commons Attribution 4.0 International License.