Note
Access to this page requires authorization. You can try signing in or changing directories.
Access to this page requires authorization. You can try changing directories.
This tutorial teaches you how to read data from a workbook with an Office Script for Excel. You'll be writing a new script that formats a bank statement and normalizes the data in that statement. As part of that data clean-up, your script will read values from the transaction cells, apply a simple formula to each value, and write the resulting answer to the workbook. Reading data from the workbook lets you automate some of your decision making processes in the script.
Tip
If you're new to Office Scripts, we recommend starting with Tutorial: Create and format an Excel table. Office Scripts use TypeScript and this tutorial is intended for people with beginner to intermediate-level knowledge of JavaScript or TypeScript. If you're new to JavaScript, we recommend starting with the Mozilla JavaScript tutorial.
Prerequisites
You'll need access to Office Scripts for this tutorial. Please review the Platform support if the Automate tab doesn't appear.
Read a cell
Scripts made with the Action Recorder can only write information to the workbook. With the Code Editor, you can edit and make scripts that also read data from a workbook.
Start by making a script that reads data and acts based on what was read. Throughout the tutorial, you'll work with a sample banking statement. This statement is a combined checking and credit statement. Unfortunately, the bank reports balance changes differently. The checking statement gives income as positive credit and costs as negative debit. The credit statement does the opposite.
Over the rest of the tutorial, you'll normalize this data using a script. First, you need to read data from the workbook.
Create a new worksheet in the workbook you've used for the rest of the tutorial.
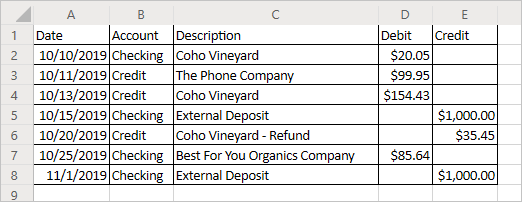
Copy the following data and paste it into the new worksheet, starting at cell A1.
Date Account Description Debit Credit 10/10/2019 Checking Coho Vineyard -20.05 10/11/2019 Credit The Phone Company 99.95 10/13/2019 Credit Coho Vineyard 154.43 10/15/2019 Checking External Deposit 1000 10/20/2019 Credit Coho Vineyard - Refund -35.45 10/25/2019 Checking Best For You Organics Company -85.64 11/01/2019 Checking External Deposit 1000 Go to the Automate tab and select New Script > Create in Code Editor.
Clean up the formatting. This is a financial document, so have your script change the number formatting in the Debit and Credit columns to show values as dollar amounts. Also have your script fit the column width to the data.
Replace the script contents with the following code:
function main(workbook: ExcelScript.Workbook) {
    // Get the current worksheet.
    let selectedSheet = workbook.getActiveWorksheet();

    // Format the range to display numerical dollar amounts.
    selectedSheet.getRange("D2:E8").setNumberFormat("$#,##0.00");

    // Fit the width of all the used columns to the data.
    selectedSheet.getUsedRange().getFormat().autofitColumns();
}
Now read a value from one of the number columns. Add the following code to the end of the script (before the closing
}).// Get the value of cell D2. let range = selectedSheet.getRange("D2"); console.log(range.getValues());Run the script.
You should see
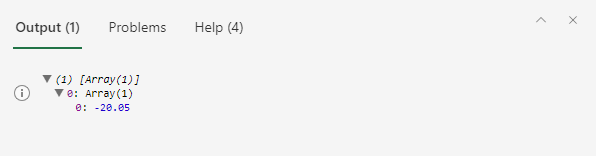
[Array[1]]in the console. This is not a number because ranges are two-dimensional arrays of data. That two-dimensional range is being logged to the console directly. Luckily, the Code Editor lets you see the contents of the array.When a two-dimensional array is logged to the console, it groups column values under each row. Expand the array log by selecting the blue triangle.
Expand the second level of the array by selecting the newly revealed blue triangle. You should now see this:
Modify the value of a cell
Now that your script can read data, use that data to modify the workbook. Make the value of the cell D2 positive with the Math.abs function. The Math object contains many functions to which your scripts have access. More information about Math and other built-in objects can be found at Using built-in JavaScript objects in Office Scripts.
Use
getValueandsetValuemethods to change the value of the cell. These methods work on a single cell. When handling multi-cell ranges, you'll want to usegetValuesandsetValues. Add the following code to the end of the script.// Run the `Math.abs` method with the value at D2 and apply that value back to D2. let positiveValue = Math.abs(range.getValue() as number); range.setValue(positiveValue);Note
We are casting the returned value of
range.getValue()to anumberby using theaskeyword. This is necessary because a range could be strings, numbers, or booleans. In this instance, we explicitly need a number.The value of cell D2 should now be positive.
Modify the values of a column
Now that you know how to read and write to a single cell, you can generalize the script to work on the entire Debit and Credit columns.
Remove the code that affects only a single cell (the previous absolute value code), such that your script now looks like this:
function main(workbook: ExcelScript.Workbook) {
    // Get the current worksheet.
    let selectedSheet = workbook.getActiveWorksheet();

    // Format the range to display numerical dollar amounts.
    selectedSheet.getRange("D2:E8").setNumberFormat("$#,##0.00");

    // Fit the width of all the used columns to the data.
    selectedSheet.getUsedRange().getFormat().autofitColumns();
}
Add a loop to the end of the script that iterates through the rows in the last two columns. For each cell, the script sets the value to the current value's absolute value.
Note that the array defining cell locations is zero-based. That means cell A1 is
range[0][0].// Get the values of the used range. let range = selectedSheet.getUsedRange(); let rangeValues = range.getValues(); // Iterate over the fourth and fifth columns and set their values to their absolute value. let rowCount = range.getRowCount(); for (let i = 1; i < rowCount; i++) { // The column at index 3 is column "4" in the worksheet. if (rangeValues[i][3] != 0) { let positiveValue = Math.abs(rangeValues[i][3] as number); selectedSheet.getCell(i, 3).setValue(positiveValue); } // The column at index 4 is column "5" in the worksheet. if (rangeValues[i][4] != 0) { let positiveValue = Math.abs(rangeValues[i][4] as number); selectedSheet.getCell(i, 4).setValue(positiveValue); } }This portion of the script does several important tasks. First, it gets the values and row count of the used range. This lets the script look at values and know when to stop. Second, it iterates through the used range, checking each cell in the Debit or Credit columns. Finally, if the value in the cell is not 0, it is replaced by its absolute value. The script ignores zeroes, so you can leave the blank cells as they were.
Run the script.
Your banking statement should now have properly formatted positive numbers.
Next steps
Open the Code Editor and try out some of our Sample scripts for Office Scripts in Excel. You can also visit Fundamentals for Office Scripts in Excel to learn more about creating Office Scripts.
The next series of Office Scripts tutorials focus on using Office Scripts with Power Automate. Learn more about the advantages combining the two platforms in Run Office Scripts with Power Automate or try Tutorial: Update a spreadsheet from a Power Automate flow to create a Power Automate flow that uses an Office Script.
Collaborate with us on GitHub
The source for this content can be found on GitHub, where you can also create and review issues and pull requests. For more information, see our contributor guide.
Office Scripts