Understand the cloud flows designer
You can create, configure, and customize your cloud flows with the classic designer or the cloud flows designer. For a description of the types of cloud flows, go to Overview of cloud flows.
Note
Here are some visual cues that tell you that you're using the cloud flows designer (not the classic designer):
- The cards in the flow are small.
- The standalone action configuration pane appears on the left when you select a card.
More information: Identify differences between the classic designer and the cloud flows designer
The following screenshot shows the features of the AI-powered cloud flows designer.
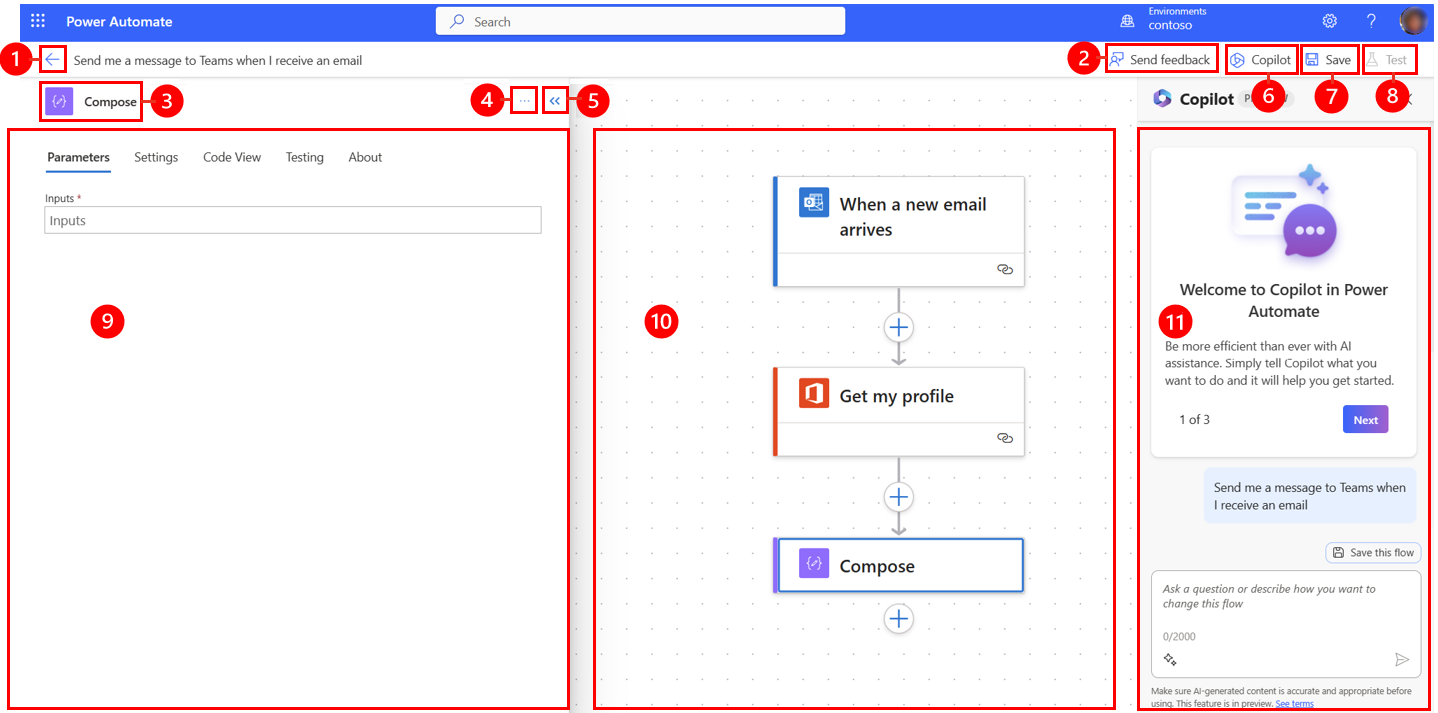
Legend:
- Left arrow button: Return to the previous page.
- Send feedback button: Send us feedback about your flow creation experience or general comments about the AI-powered designer.
- Action/trigger name: The action or trigger card that is selected in your flow in the center of the page.
- More commands button: Add a note to the selected card, or delete the card.
- Collapse button: Hide the pane. When the pane is collapsed, the Expand button (>>) appears in the upper-left corner. Select it to show the pane again.
- Copilot button: Show or hide the Copilot pane. The Copilot pane appears by default when the AI-powered designer opens.
- Save button: Save your flow.
- Test button: Test your flow to make sure that it works as you intended.
- Action configuration pane: After you select an action card to configure on the canvas, the action configuration pane opens on the left side of the AI-powered designer.
- Canvas: The canvas is where you build your flow. It's free-flowing and therefore allows for easier navigation.
- Copilot pane: Copilot stays with you during your flow editing and fit-and-finish journey. It can help you update and make changes to your flow, based on your conversational-style prompt. It can also help answer flow-related and product-related questions.
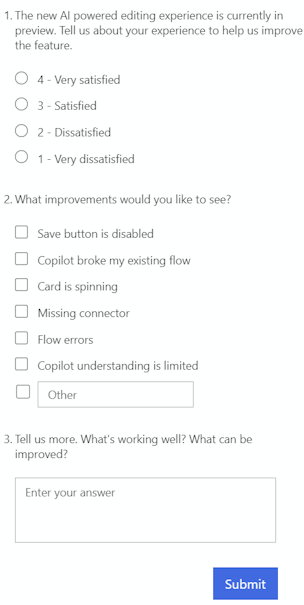
Send feedback
We want to hear from you to help us measure and improve our impact. To provide your feedback, select Send Feedback, answer the three questions in the feedback form that opens, and then select Submit.
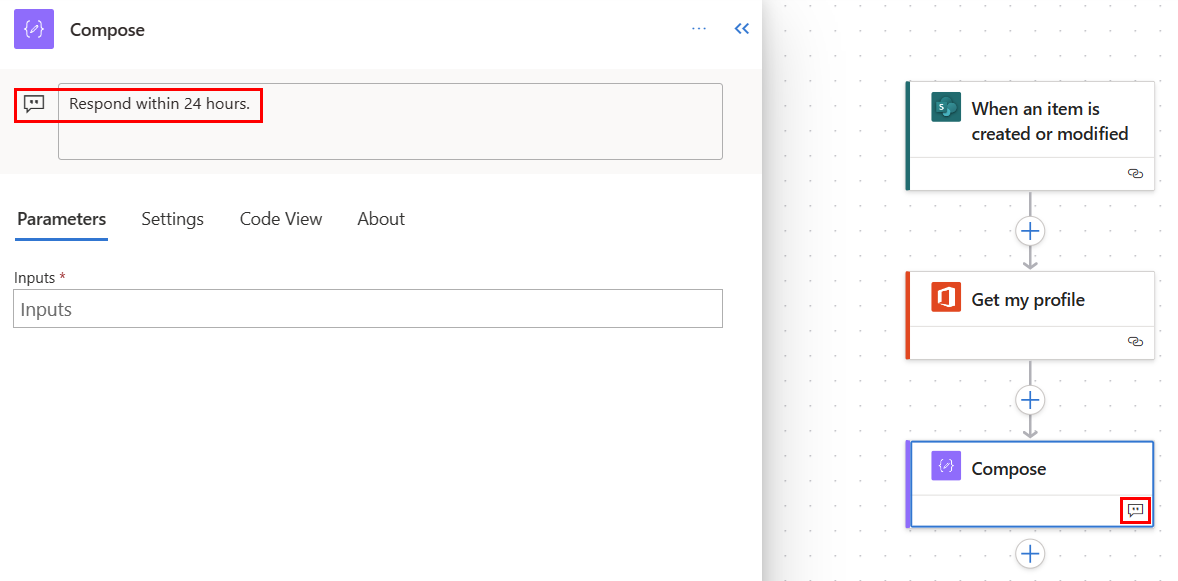
More commands
Select the More commands (…) button to add a note to the selected card in your flow, or to delete the card. Select Add a note to describe the purpose of the card in your flow. After you add a note, a note symbol appears in the lower right of the card. To view the note, hover over this symbol.
Save button
Select Save to save your flow. If there are no errors, the message, "Your flow is ready to go. We recommend you test it" appears in the upper left with a green check.

If an error is found, a description of the error and a red X appear in the upper left. The following screenshot shows an example of an error message.

The error also appears on the card that caused the error in your flow. Correct the error, and then select Save again.
When there are no errors, your next step should be to test your flow.
Test button
After your flow is saved successfully, Test becomes active. To test your flow, select Test > After your flow is successfully saved, the Test button becomes available. To test your flow, select Test, select the Manually option, and then select Test.
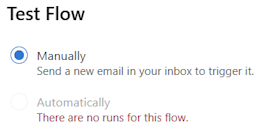
Instructions appear and tell you what you must do to test your flow. The following screenshot shows an example of an instructional message.

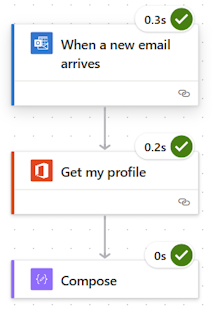
To test your flow, follow the instructions. In this example, you must send an email. The flow test then runs. When the test finishes running, a green check mark appears on each card, together with the number of seconds that it took to be processed.
Testing is part of the planning for a Power Automate project. To learn more, go to Introduction: Planning a Power Automate project.
Action configuration pane
Use the action configuration pane to customize parameters, settings, and code for the selected card in your flow.
Parameters
On the Parameters tab, you can use the blue Insert token (lightning bolt) and Insert expression (fx) buttons next to the Inputs field to quickly enter values for the selected action card.
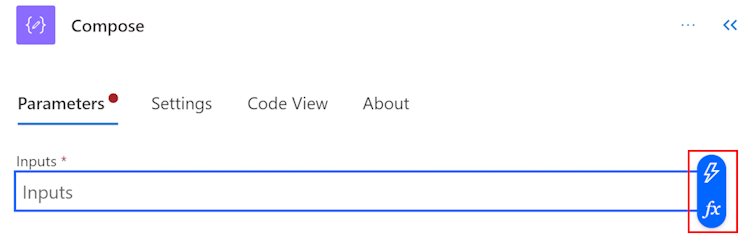
To insert a dynamic token into the Inputs field, select the Insert token (lightning bolt) button. In the pop-up window that opens, search for or scroll to find the tokens that you can use. After you select a token, it appears in the Inputs field.
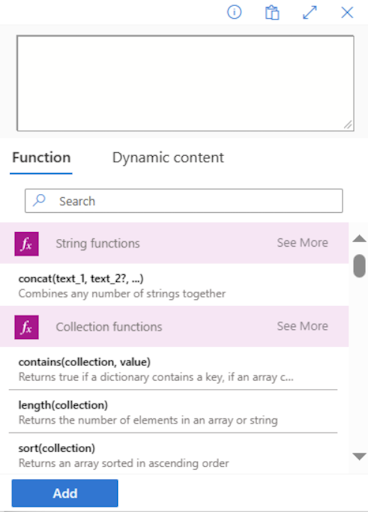
To insert an expression into the Inputs field, select the Insert expression (fx) button. In the pop-up window that opens, select a function to start your expression. To complete your expression, place the cursor in the function, and then select Dynamic content. Search for or select the content/tokens to add, and then select Add. Your completed expression appears in the Inputs field.
To learn more about expressions, go to Reference guide to workflow expression functions.
Alternatively, use the keyboard to enter a slash (/) in the Inputs field. Then select the dynamic content/token and expression pop-ups.
Settings
On the Settings tab, you can set the action time-out, network retry policy, how an action should run, security input and output, and tracking properties. The following table provides a description of the settings.
| Setting | Description |
|---|---|
| General | In the Action Timeout field, set the maximum duration between retries and asynchronous responses for the selected action. This setting doesn't change the request time-out of a single request. |
| Networking | In the Retry Policy field, select a retry policy for intermittent failures. The default setting is an exponential interval policy that is set to retry four times. You can also set your own exponential or fixed interval settings, or choose none at all. |
| Run After | In the Run After field, configure how an action should run after the execution of any of the preceding flow actions. For example, you can choose to run an action after the preceding action runs successfully, times out, skips, or fails. |
| Security | Use the Secure inputs and Secure outputs toggles to turn the operations, and references of output properties, on or off. |
| Tracking | Set the key and value of tracked properties. |
Configurable trigger polling setting
In select triggers such as When an item is created-Sharepoint, and more, you can manually configure the trigger polling setting. This means you can configure how often the flow should check for new items in Sharepoint and others. This in turn ensures how quickly your flow responds to any changes or trigger events. The default polling period is three (3) minutes, which means the flow checks every three (3) minutes if a new item was created.
On the action configuration pane, select the Parameters tab.
Under the How often do you want to check for items? heading, enter the interval number and the frequency from the dropdown menu.

Code View
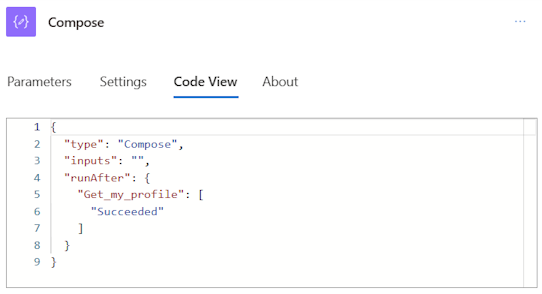
To view the code behind any card in your flow, select the card on the canvas, and then select Code View in the action configuration pane. As you customize the code on the Parameters tab, you can view the new code on the Code View tab.
The following screenshot shows an example of the code for the Compose action card.
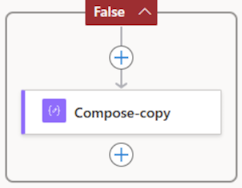
Copy and paste actions
You can copy actions to the clipboard whether they're atomic actions or container actions. Examples of atomic actions are Compose, Get items, Create item, and others. Examples of container actions are Scope, Switch, Condition, Apply to each, and others.
To copy and paste an action, follow these steps.
Right-click on any action (or trigger) you want to copy.
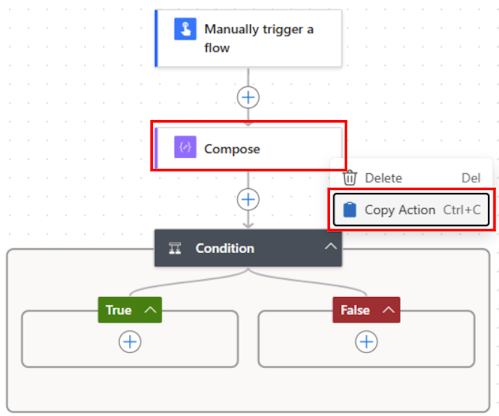
On the canvas, select + on the canvas to add an action, and then select Paste an action.
You can copy and paste actions across different parts of your flow, or in between flows.
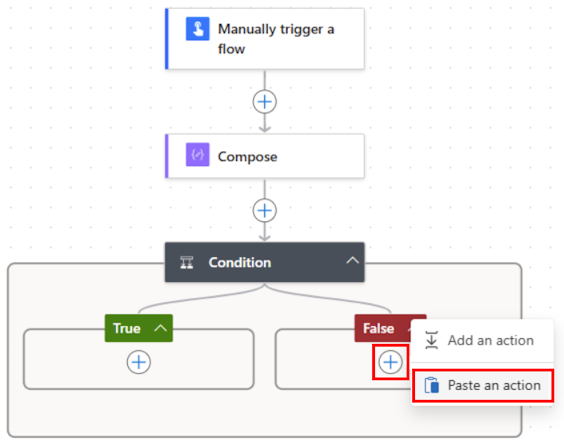
After you paste your action, the copied action name is followed by -copy.
If you don't have access to a mouse, you can use your keyboard. To copy, press Ctrl + C. To paste, press Ctrl + V.
Canvas
For easy navigation, you can drag your flow on the canvas. You configure the actions of each card in the action configuration pane on the left. The cards on the canvas are compact to allow for easy visibility and navigation, especially in large flows.
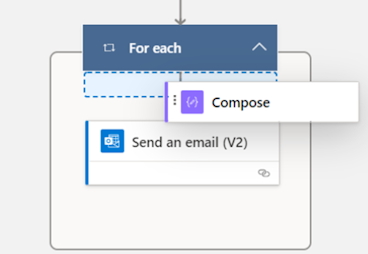
Drop zones
The canvas contains AI-powered designer drop zones to help you easily drag cloud flow actions. The drop zones are represented by blue dashed lines.
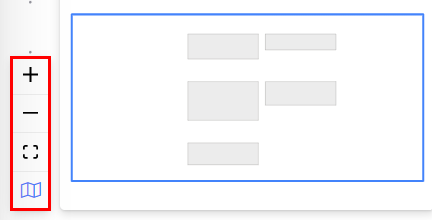
Zoom buttons
Depending on the size and complexity of your flow, you might want to adjust its size on the canvas as you're building it. Use the zoom buttons to zoom in, zoom out, fit to screen, and toggle a minimap. The buttons appear when the Action configuration pane is closed.
The bottom button is for the minimap. Use it to focus on a specific section of a large flow.
Expression editor and token picker
The expression editor in the designer is multi-line, which allows you to easily create and edit long, complex expressions. A gripper allows you to temporarily expand the box by one or two (1-2) lines, as needed. If that's not enough, you can expand the popup to a full page view. A search box allows you to search for tokens and functions, both in the Dynamic content view and Function view.
Tip
You can use a forward slash ( / ) keyboard shortcut to invoke the token picker/expression editor popup when you're on an action field.
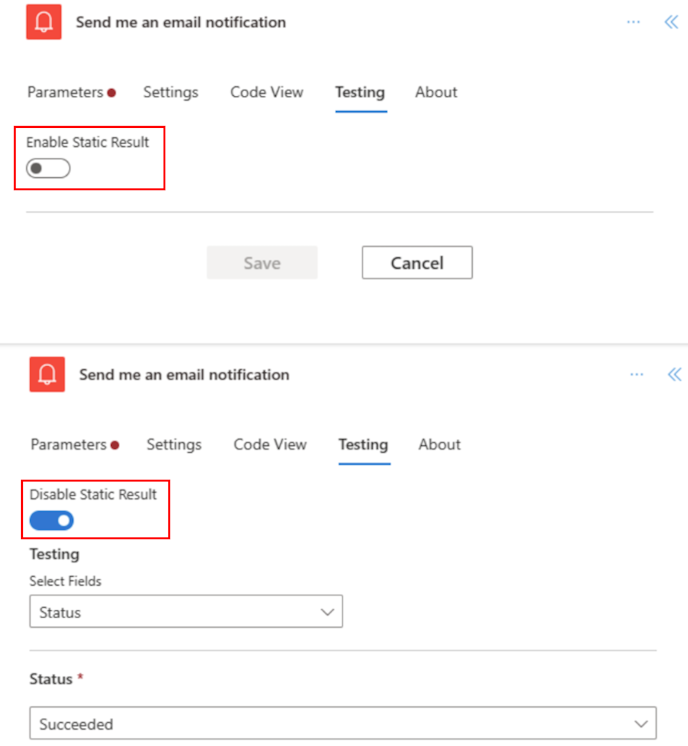
Disable an action or enable static results on an action
On the designer, if you want to disable an action rather than remove it entirely, go to the Testing tab of the action and enable static outputs by turning on the Enable Static Result toggle. When the flow runs, this essentially treats the action as successful, without actually running the action.
Similarly, if you want to see how your flow reacts if a certain action fails with a code or succeeds with a code, you can use the same capability of static outputs available on the action to mock the action execution to your needs.
When static outputs are disabled, the toggle label is Enable Static Result. When static outputs are enabled, the toggle label is Disable Static Result.
Identify differences between the classic designer and the cloud flows designer
To quickly identify which designer version you're using, ask yourself the following questions:
- Are the action cards on the flow small or large?
- Is the action configuration pane inline or in a separate pane?
The cloud flows designer has smaller cards to facilitate easy navigation. It also has a standalone action configuration pane on the left.
Limitations and known issues
You might notice that some functionalities that were in the classic designer aren't available in the cloud flows designer yet. Currently, the designer doesn't support the following items:
- Non-Open API flows (If there's Peek code on an action and if you see the APIConnection value instead of OpenAPIConnection in Kind field, it's a non-Open API flow.)
- Some hybrid triggers:
- When a flow is run from business process flow (Dataverse)
- For a selected message (v2 Teams) - Plan to enable worldwide by July end
- Teams On Compose Message (Teams) - Plan to enable worldwide by July end
- Microsoft 365 Compliance Connector
- A comment
- Power Pages connector
- Power Apps v1 trigger
- Perform a changeset request action (Dataverse)
- A solution flow using connections instead of connection reference isn't supported. We recommend that you use connection reference instead.
- Email auto-complete suggestions in Send Email/Post message in Teams actions
- Ability to make manual trigger fields optional
Some known issues
- Dynamic content friendly names are getting updated to internal code names upon save.
- Autoamted trigger polling setting (How often do you want to check for new items) reverts to 1min after saving
As we continue to innovate, we're introducing a new designer alongside our classic designer. While the classic designer remains valuable, the new designer is our future direction. While the classic designer isn't supported indefinitely, the new designer is gradually becoming the primary interface.
If you prefer to access features not yet available in the new designer, or encounter any limitations or known issues, you can temporarily revert to the classic designer. Simply turn off the New designer toggle on the menu in the cloud flows designer.

Note
The Power Automate cloud flows designer isn't yet available in integration surfaces such as Power Apps, Teams, and others.
FAQ
Why do I get this error "O.split(...).at is not a function" when signing in?
Power Automate designer doesn't support browsers that are more than two (2) years old. You could see the aforementioned or similar errors in the designer if your browser version is old. It's generally a good idea to update your browser to latest version to avoid such issues.
Why do I get this error "The provided flow name contains invalid characters" when importing a flow in a new tenant?
This error is a temporary gap, which you can work around by adding a query parameter v3=false in your URL.
Why do I not see dynamic content from triggers like 'When a response is submitted' or why is the flow automatically putting an unnecessary loop?
This scenario might be because of a temporary issue where the Split On setting of the trigger is off. If you enable the setting, the issue should go away.
- On the action configuration pane, select the Settings tab.
- Under the Split On heading, move the toggle to On,
Why don't I see new or updated SharePoint or Excel column values in my flow?
Power Automate designer requires a flow action to be re-added in order to pick up new entities of the underlying action. For example, if you have a SharePoint Get item action in your flow and Sharepoint item has four (4) columns, the flow allows you to access all four column values of the SharePoint item. Now, if you navigate to SharePoint, add a fifth column, and come back to the flow, you can't access the fifth column unless you delete the Get item action and re-add it again to force the designer to pick up the latest changes. The same behavior applies in Excel columns, Dataverse, OneDrive folder/files, and others.
Will the new cloud flows designer eventually replace the classic designer fully?
Yes, once the issues noted here are resolved and the new cloud flows designer can cover most, if not all, of the classic designer scenarios. At this time, the classic designer will be fully replaced.
Related information
Feedback
Coming soon: Throughout 2024 we will be phasing out GitHub Issues as the feedback mechanism for content and replacing it with a new feedback system. For more information see: https://aka.ms/ContentUserFeedback.
Submit and view feedback for