Note
Access to this page requires authorization. You can try signing in or changing directories.
Access to this page requires authorization. You can try changing directories.
Power BI lets users create and edit semantic models in the Power BI service using actions such as Power Query editing, managing relationships, creating DAX measures, and defining row-level security roles. In this experience, users can work and collaborate simultaneously on the same semantic model.
Create new semantic models
You can create new import semantic models in the service by selecting Get Data in the Create page.

This will launch the modern Power Query 'Get data' experience where you can choose your connector and make transformations. From this experience you have the following options as the last step for creating your new import semantic model:
- Create a report: This option takes you into the report editing experience in the Power BI service. Here, you can immediately start building a report on top of your newly created semantic model. The report editor provides all the familiar tools for designing visuals, adding filters, and customizing your report layout—right in the browser.
- Create a semantic model only: Selecting this option creates just the semantic model, without launching the report editor. You’ll land in the model editor in the web, where you can make further edits to your semantic model. This is ideal if you want to refine your semantic model, add relationships, create DAX measures, or configure row-level security before building reports.

Open an existing semantic model
You can open an existing semantic model in the following ways:
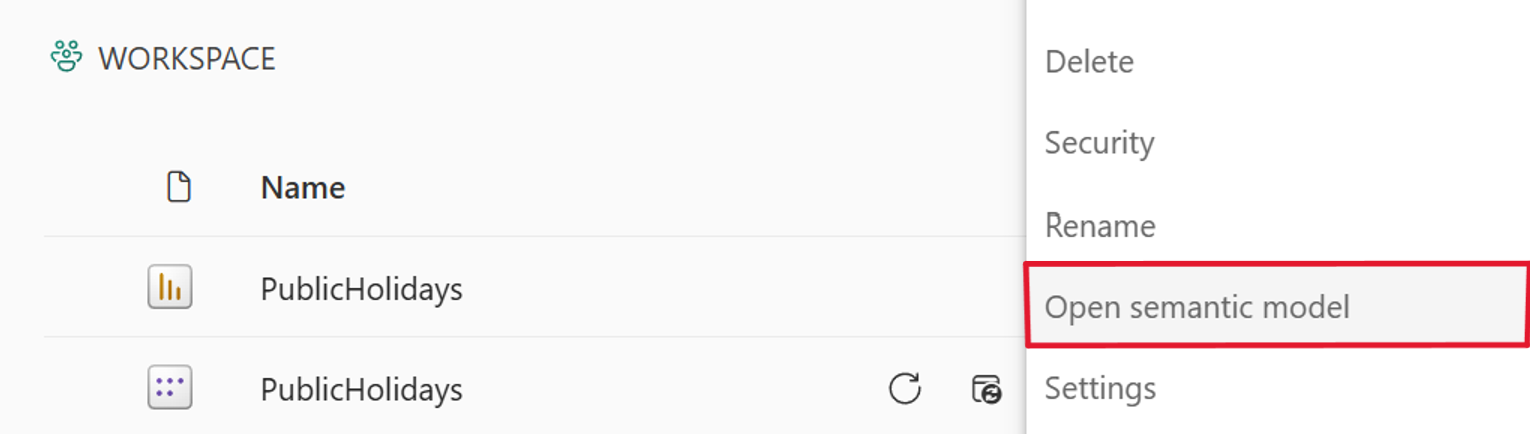
From the workspace content list, select More options (...) for the semantic model and select Open semantic model.
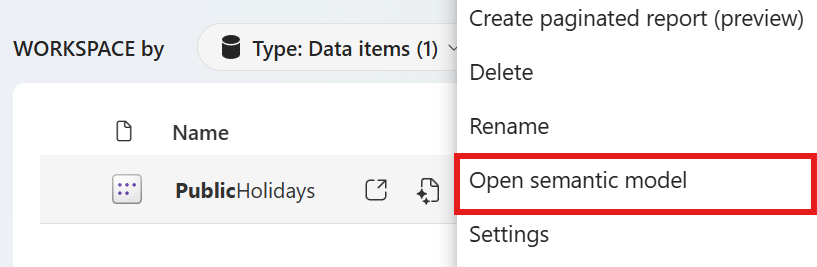
From the OneLake catalog, select More options (...) for the semantic model and select Open semantic model.
From the semantic model details page, select Open semantic model.

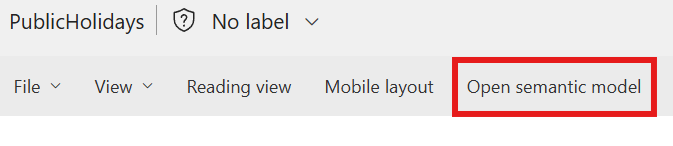
From edit mode for a report connected to the semantic model, select Open semantic model to open the corresponding model in another tab.
Viewing mode
When you open your semantic models on the web they default to Viewing mode, allowing you to safely view the model without the risk of accidental edits. While you can adjust your diagram layouts in Viewing mode, such changes won't be saved for future sessions. To make permanent modifications, switch to Editing mode.

Model data
When you open your semantic model you can see all the tables, columns, and relationships in your model. You can now edit your semantic model, and any changes are automatically saved.
Create measures
To create a measure (a measure is a collection of standardized metrics) select the table in the Data Pane and select the New measure button from the ribbon, as shown in the following image.

Enter the measure into the formula bar and specify the table and the column to which it applies. Similar to Power BI Desktop, the DAX editing experience in the Power BI service presents a rich editor complete with autocomplete for formulas (intellisense).
You can expand the table to find the measure in the table.
Create calculated columns
To create a calculated column, select the table in the Data Pane and select the New column button in the ribbon, as shown in the following image.

Enter the calculated column into the formula bar and specify the table to which it applies. Similar to Power BI Desktop, the DAX editing experience in the Power BI service presents a rich editor complete with autocomplete for formulas (intellisense).
You can expand the table to find the calculated column in the table.
Create calculated tables
To create a calculated table, select the table in the Data Pane and select the New table button in the ribbon, as shown in the following image.

Enter the calculated table into the formula bar. Similar to Power BI Desktop, the DAX editing experience in the Power BI service presents a rich editor complete with autocomplete for formulas (intellisense). You can now see the newly created calculated table in your model.
Create a relationship
There are two ways to create a new relationship in the Power BI Service.
The first method is to drag the column from one table in the relationship diagram to the column of the other table to create the relationship.
The other method of creating a relationship is by selecting Manage relationships in the ribbon as shown in the following image.

This opens the revamped Manage relationships dialog. From here, you can select New relationship to create a new relationship in your model.

From here, configure the relationship properties, and select the Ok button when your relationship is complete to save the relationship information.

Edit a relationship
There are three ways to edit an existing relationship in the Power BI Service.
The first method to edit a relationship is using the Editing relationships in the Properties pane, where you can select any line between two tables to see the relationship options in the Properties pane. Be sure to expand the Properties pane to see the relationship options.

The next method is to right-click an existing relationship in the diagram view and select Properties.

In the window that appears, configure the relationship properties, and select the Ok button when your relationship is complete to save the relationship information.
The third method is by selecting Manage relationships in the ribbon. In the Manage relationships dialog you can choose a relationship to edit and then select Edit.

Alternatively, you can select Edit from the context menu of a given relationship in the dialog.

From here, configure the relationship properties, and select the Ok button when editing your relationship is complete to save the relationship information.

See a list of all your relationships
Selecting Manage relationships in the ribbon opens the revamped Manage relationships dialog, which provides a comprehensive view of all your relationships, along with their key properties, in one convenient location. From here, you can then choose to create new relationships or edit an existing relationship.

Additionally, you have the option to filter and focus on specific relationships in your model based on cardinality and cross filter direction.

Set properties
You can change the properties for a given object using the Properties pane. You can set common properties across multiple objects at once by holding down the Ctrl key and selecting multiple objects either in the relationship diagram or Data pane. When multiple objects are highlighted, changes applied in the Properties pane apply to all selected objects.
For example, you could change the data type for multiple columns by holding down the Ctrl key, selecting columns, then changing the data type setting in the Properties pane.

Get data
You can add new import tables to your semantic models using the Power Query 'Get Data' experience. Select Get data in the ribbon to choose your connector and bring in new data to your semantic model.

Transform data and edit queries
You can shape data for your import semantic models with the full Power Query editor by selecting Transform data in the ribbon.

Refresh
You can refresh both the schema and data for your import semantic models by selecting Refresh in the ribbon.

If you select ‘Cancel’ to cancel the refresh, all data loaded into the model prior to the cancellation remains in the model. If desired, you can use semantic model version history to recover the model to a point before the refresh was initiated. Additional changes can't be made to the semantic model while a refresh is ongoing.
Set your own date table
To set a date table, select the table you want to use as a date table in the Data pane, then right-click the table and choose Mark as date table > Mark as date table in the menu that appears as shown in the following image.

Next, specify the date column by selecting it from the dropdown menu within the Mark as date table dialog.

Setting your own date table follows the same behavior as what exists in Power BI Desktop. Further details on column validation, scenarios for creating your own date table, and impact on date hierarchies can be found in the date tables documentation
Define row-level security roles and rules
You can define security roles by taking the following steps:
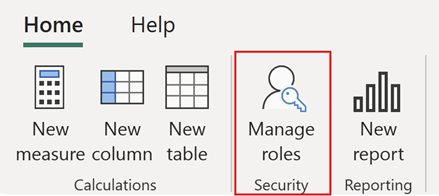
From the ribbon, select Manage roles.
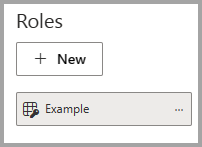
From the Manage roles window, select New to create a new role.
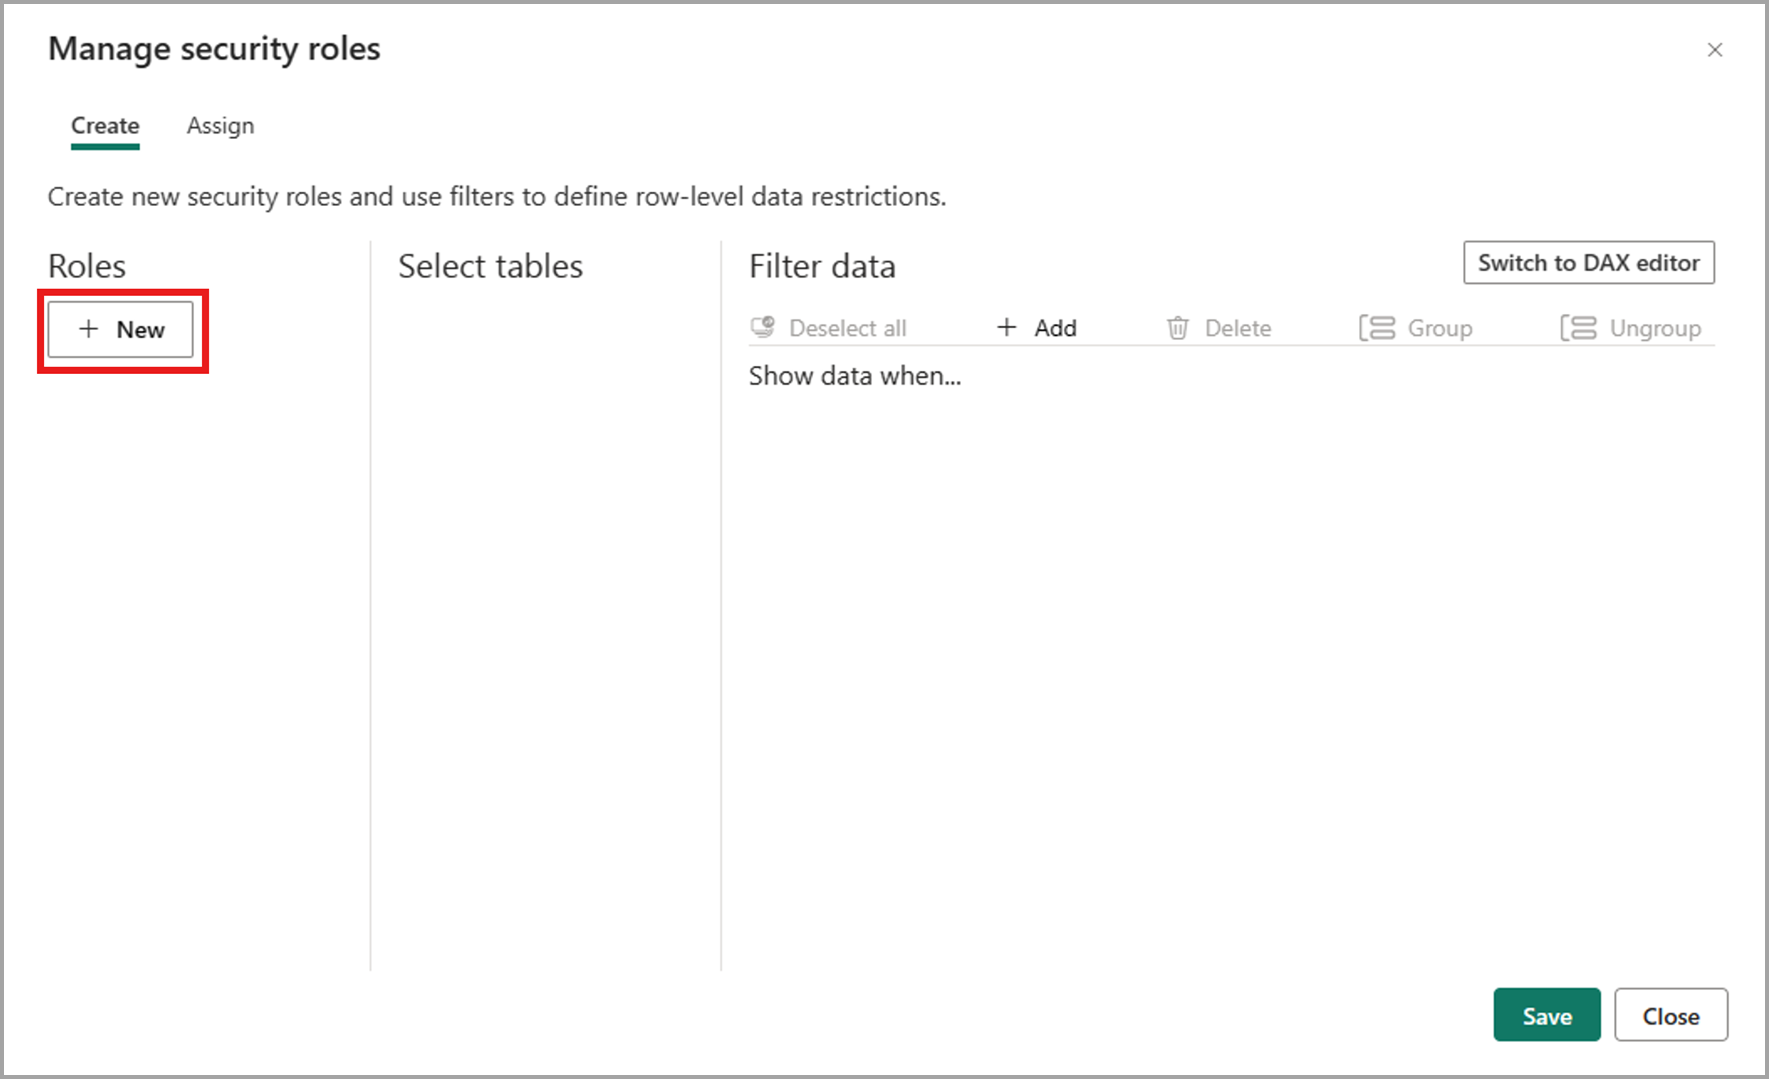
Under Roles, provide a name for the role and select enter.
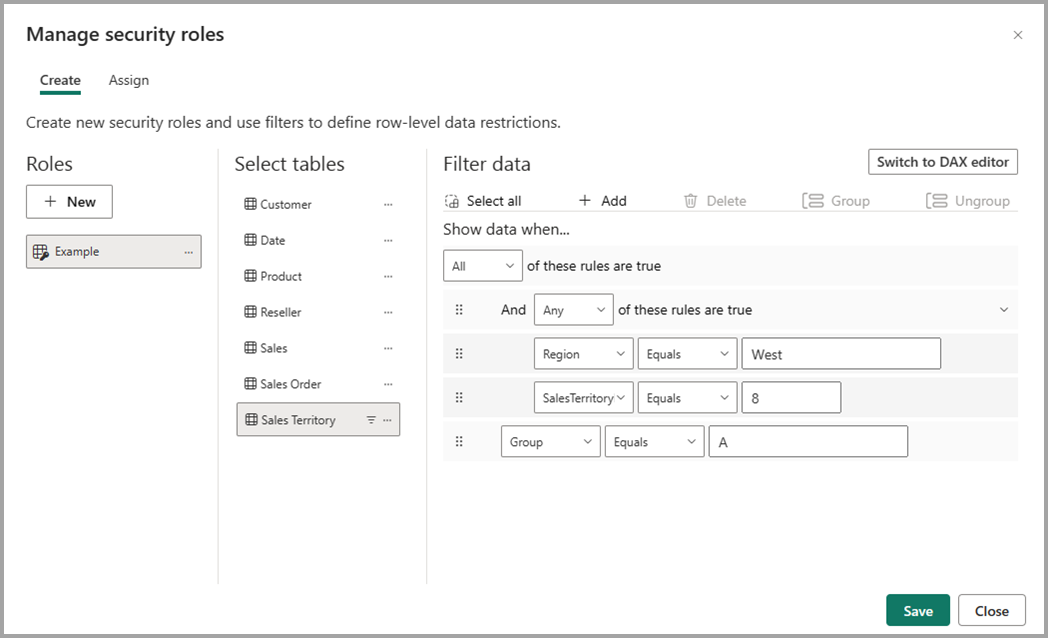
Under Select tables, select the table to which you want to apply a row-level security filter.
Under Filter data, use the default editor to define your roles. The expressions created return a true or false value.
Note
Not all row-level security filters supported in Power BI can be defined using the default editor. Limitations include expressions that today can only be defined using DAX, including dynamic rules such as username or userprincipalname. To define roles using these filters, switch to use the DAX editor.
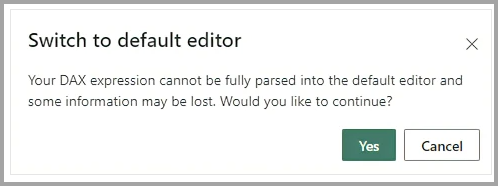
Optionally select Switch to DAX editor to use the DAX editor to define your role. You can switch back to the default editor by selecting Switch to default editor. All changes made in either editor interface persist when switching interfaces when possible.
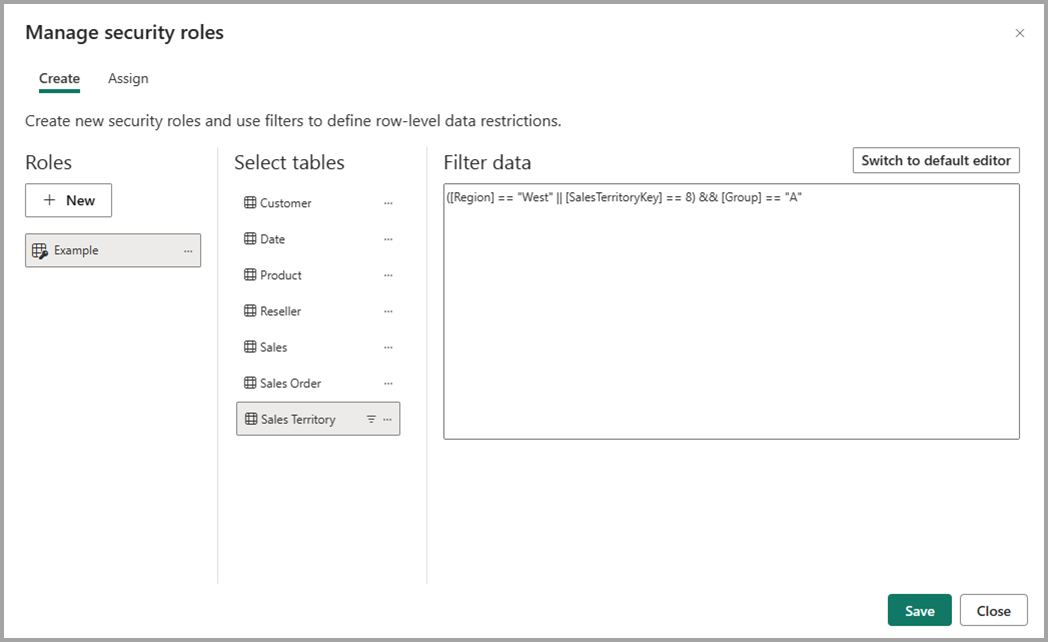
When defining a role using the DAX editor that can't be defined in the default editor, if you attempt to switch to the default editor you'll be prompted with a warning that switching editors might result in some information being lost. To keep this information, select Cancel and continue only editing this role in the DAX editor.
Select Save to save the role.
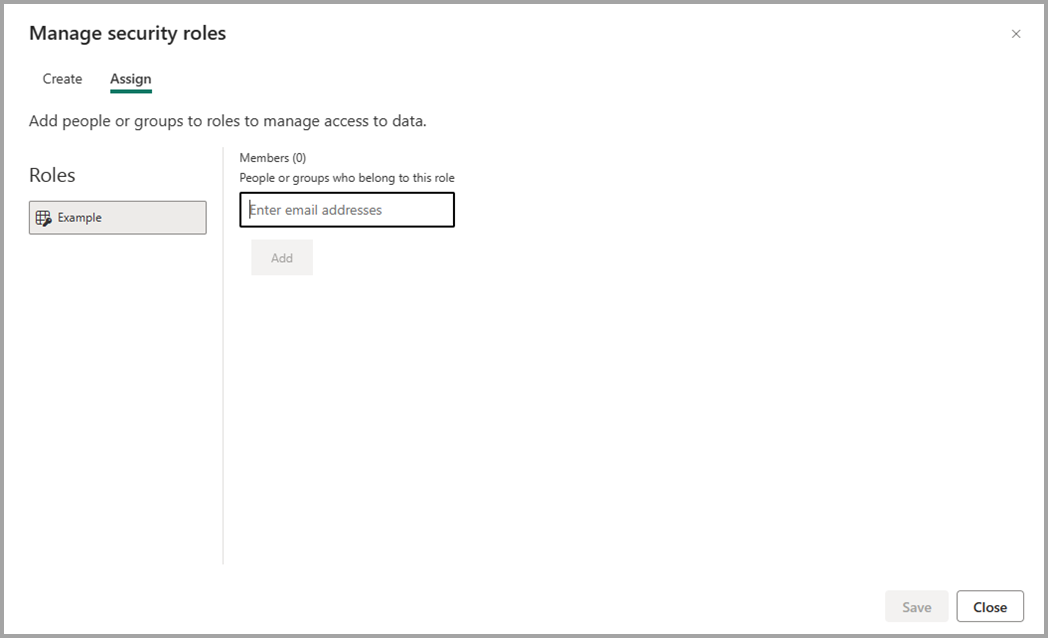
Once the role is saved, select Assign to add users to the role. Once assigned, select Save to save the role assignments and close the RLS settings modal.


Create layouts
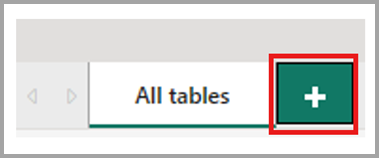
You can create layouts of your model that contain only a subset of the tables in your model. This reorganization can help provide a clearer view into the tables you want to work with, and make working with complex semantic models easier. To create a new layout with only a subset of the tables, select the + button next to the All tables tab along the bottom of the window.
You can then drag a table from the Data pane onto the new layout. Right-click the table, and then select Add related tables from the menu that appears. Doing so includes any table that is related to the original table to the layout.

Create reports
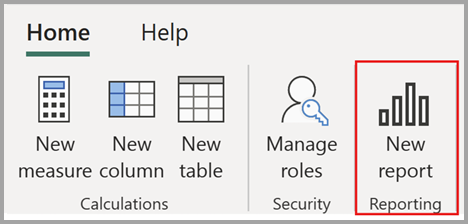
You can create a new report from the semantic model editing in the service experience by selecting the New report button in the ribbon. This opens a new browser tab to the report editing canvas to a new report that is built on the semantic model.
When you save your new report, you're prompted to choose a workspace, provided you have write permissions for that workspace. If you don't have write permissions, or if you're a free user and the semantic model resides in a Premium-capacity or Fabric F64 or greater workspace, the new report is saved in your My workspace.
AutoSave
As you made changes to your semantic model, your changes are automatically saved. Changes are permanent with no option to undo.
Permissions
*A user must have write and build semantic model permissions in order to open and edit the corresponding semantic model in the Power BI service. *If granular access control is enabled on the semantic model, then users who have write but not owner permissions on the semantic model can only switch to Editing mode if they have access to all the underlying data sources for the model. Semantic model owners will always be able to toggle to Editing mode. *A user must be the semantic model owner in order to access the Get data dialog and add additional import tables to a semantic model.
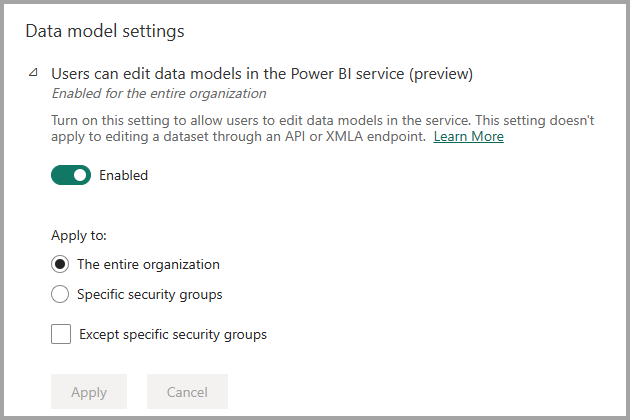
Enabling semantic model editing in the admin portal
Power BI administrators can enable or disable semantic model editing in the service for the entire organization or for specific security groups, using the setting found in the Power BI admin portal, as shown in the following image.
Viewing audit logs and activity events
Power BI administrators can audit operations pertaining to editing semantic models in the web operations from the Microsoft 365 Admin Center. Audit operations supported for editing semantic models in the web are the following:
| Friendly name | Operation name | Notes |
|---|---|---|
| Applied a change to model in Power BI | ApplyChangeToPowerBIModel | A user makes a change to a semantic model. This occurs whenever any edit is made to the model (example: write a DAX measure, manage relationships, others) |
| Retrieved a model from Power BI | GetPowerBIDataModel | A user opens the Open semantic model experience or resyncs a semantic model. |
| Executed queries on a semantic model in Power BI | ApplyQueriesExecution | A user executes Power Query operations against a semantic model in the web. This includes actions such as Refresh all and Transform data, which re‑evaluate queries and may update data and/or schema in the model. |
For more information on accessing your audit logs, see the Access your audit logs article.
Capacity utilization and reporting
You can monitor the effect editing semantic models in the service has on your Power BI Premium capacities using the Premium metrics app. Capacity effect can be monitored for editing semantic models in the web using the following operations.
| Operation | Description | Workload | Type |
|---|---|---|---|
| Web Modeling read | A semantic model read operation in the semantic model web modeling user experience | Semantic models | Interactive |
| Web Modeling write | A semantic model write operation in the semantic model web modeling user experience | Semantic models | Interactive |
Considerations and limitations
There are a few limitations for this release of editing semantic models in the Power BI service, which fall into a handful of categories.
Considerations with the Power Query editor
Keep in mind the following considerations when interacting with the Power Query editor:
- Using the Power Query editor to Transform data or connect to new data sources is only supported for import storage mode. These capabilities aren't support for Direct Lake or DirectQuery tables.
- Adding import tables to the model from custom connectors, Azure Database for PostgreSQL, IBM Informix database (Beta), Essbase, Microsoft Exchange, Hadoop File (HDFS), OLE DB, R, and Python aren't supported. Models using these connectors also do not support query editing in the Power Query editor or refreshing via the ribbon button in the web model editing experience.
- Semantic models with connected goals do not support editing queries in the Power Query editor or refreshing via the ribbon button in the web model editing experience.
- If you select Cancel or close the Power Query dialog, any changes made to queries will be discarded. In the web, changes made in the Power Query editor must be explicitly saved and applied to the model for them to persist beyond the editor.
- You can use existing personal cloud connections in the Power Query editor for the semantic model, but you can't create new ones there. When connecting to a data source in the editor, only on-premises or shared cloud connections can be created. To use a personal cloud connection, link it through the semantic model settings page. Configuration and management of these personal cloud connections can be done in the Power BI Manage Connections and Gateways page.
- When opening the Power Query editor for a model published from Desktop, connections may initially appear unlinked in the Manage Connections dialog. You'll be able to configure these connections by clicking the "+" sign.
- A data gateway is needed to certain data sources. These gateways can be managed from the semantic model settings page. When publishing from Desktop, gateway connections aren't configured by default for sources that require them. You’ll need to manually set them up under Gateway connections in the semantic model settings.
- Dynamic data sources aren't supported in the Power Query editor.
- When adding a new import data source using Power Query on the web, the semantic model doesn't automatically inherit the sensitivity label from that data source.
- When importing data using Power Query in the Power BI service, relationships defined in the underlying data sources aren't automatically imported. These relationships must be manually recreated in the semantic model.
- You cannot use the Power Query editor when editing models with incremental refresh in the web experience.
Unsupported semantic models
The following scenarios don't support opening the semantic model in the service:
- Semantic models deployed through deployment pipelines can only be edited on the web in the development workspace. Editing in test and production workspaces isn't supported.
- Semantic models that haven't yet been upgraded to enhanced metadata format. You can upgrade to enhanced metadata format by opening the corresponding pbix in Desktop and republishing.
- Semantic models that have automatic aggregations configured.
- Semantic models that have a live connection.
- Semantic models migrated from Azure Analysis Services (AAS).
- Not all semantic models in Pro workspaces are currently supported in UAE North.
To see which limitation is preventing you from opening your semantic model, hover over the Open semantic model button in the semantic model details page. This displays a tooltip indicating which limitation is causing the Open semantic model button to be disabled.

Limitations
There are still some functional gaps between the model view in Power BI desktop and service. Functionality not yet supported in the service includes:
- The refresh button within the web editor for semantic models is disabled for Direct Lake, DirectQuery, and composite models as well as models containing customer connectors or cube data sources.
- Setting a table as a feature table
- Configuring any feature table properties
- Changing the storage mode of a table
- Changing to and from the data category ‘barcode’
- View as dialog
- Q&A setup and configuration including editing synonyms
- Classifying sensitivity of your report
- When modifying your semantic model within the Service, changing the name of data fields won't automatically update in existing visuals in downstream artifacts that depend on that semantic model.
- Data Load settings defined in the Options dialog in Power BI Desktop aren’t available for viewing or modification in the web experience. However, any changes made to these settings in Desktop persist and are respected when the semantic model is edited in the web experience.
Additionally, keep in mind the following:
- As you make changes to your semantic model, your changes will be automatically saved. Semantic model version history is supported for semantic models edited in the web. This feature allows you to recover from critical mistakes.
- Editing on the web isn't available in collaborative workspaces if converting the model to large semantic model storage format fails. In this case you can still use Viewing mode to view but not edit the model.
- The Edit in Desktop option from the Viewing/Editing mode toggle is available only for Direct Lake models. This launches live editing of the Direct Lake semantic model in Power BI Desktop, and it's supported only on Windows machines. All requirements for live editing Direct Lake models in Power BI Desktop apply.
Semantic models edited with external tools
Utilizing external tools to modify the semantic model using the XMLA endpoint might cause unexpected behavior when editing your semantic model in the web if the write operation isn't supported. For more information about supported write operations, please refer to our documentation on changes outside of Power BI.
Related content
This article provided information about editing semantic models in the Power BI service. For more information on semantic modeling in Power BI, see the following resources: