Note
Access to this page requires authorization. You can try signing in or changing directories.
Access to this page requires authorization. You can try changing directories.
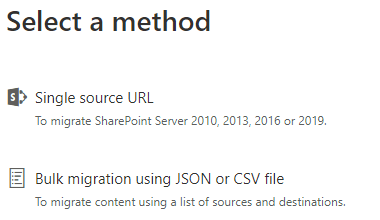
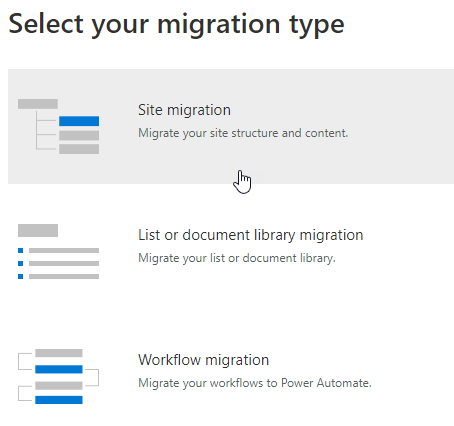
When creating a migration task, you can choose to migrate your sites, just your SharePoint Server lists or document libraries, or migrate your SharePoint workflows to Power Automate. A bulk method is also available, letting you enter all your task information into a CSV or JSON file and uploading the file into SPMT.
Migration types
| How | Description |
|---|---|
| Site migration | Migrate a single site or include all your subsites. Optionally you can choose to modernize your site structure during migration. |
| List and document library migration | Enter the site and select the document library where your files are located. |
| Workflow migration | Migrate SharePoint Server workflows to Power Automate. |
| Bulk migration using a CSV or JSON file | If you have a large number of sources you can enter them into a CSV or JSON file, and upload the file into SPMT. |
Before you begin
- Username and password. When you first open SPMT, you're prompted for your Microsoft 365 username and password. The credentials you provide must be to the migration destination.
- Proxy connections are not supported. Using Proxy connections yields errors such as "SharePoint login fail" or "Can't load document library".
- If you're already signed in to the destination site while using SPMT, you aren't prompted again for the same site credentials.
Site migration
Note
If you haven't scanned your site, learn more: Scan and assess a SharePoint Server site.
Start SPMT, and then enter your Microsoft 365 username and password.
Select Add new migration.
Under Select a method, choose Single source URL.
Select Site migration as your migration type.
Enter the URL of the SharePoint Server site that you want to migrate, and then select Next.
Note
If not already logged in you may be prompted for the username and password to the SharePoint Server site; it can be UserID or user email.
For site migration, select This site and all subsites.
Under select a destination, choose SharePoint.
Enter the SharePoint site where you want to migrate your content.
Select a site structure. Select either Keep the classic site structure (make no changes to the site structure) or Switch to modern site structure to modernize your site structure during migration.
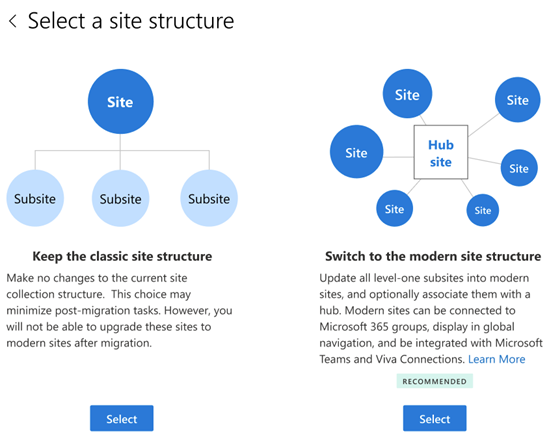
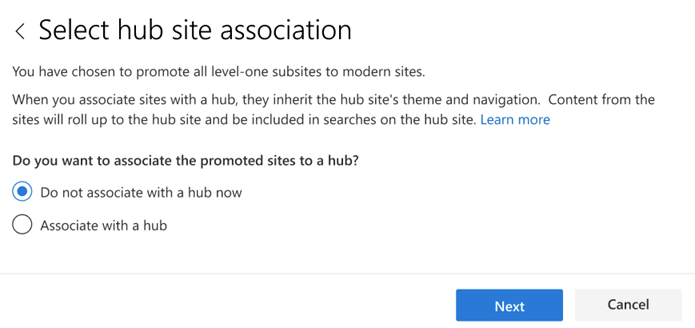
If you chose Switch to modern site structure, select the hub association option if you want the promoted level-one subsites associated with a hub.
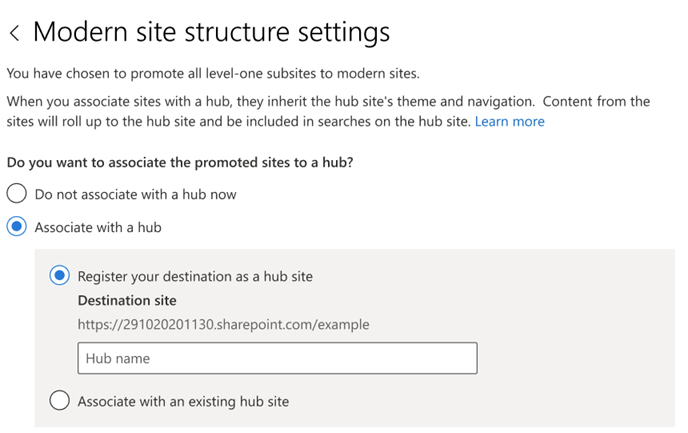
If you choose to associate with a hub, select the associate destination registration option if you want to register your destination as a hub or associate the sites with an existing hub.
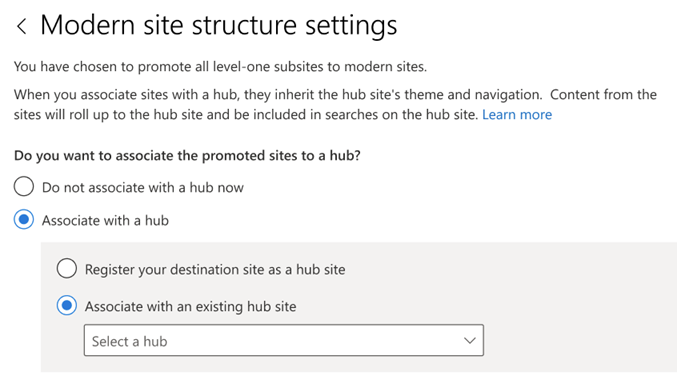
If you selected to associate the promoted level-one subsites with an existing hub, select the hub name from the dropdown list, and select Next.
Review your migration. Select Next to review your migration settings.
Select Start to begin migration your content.
List and document library migration
- Start SPMT, and then enter your Microsoft 365 username and password.
- Select Add new migration.
- Under Select a method, choose List or document library migration.
- Enter the URL of the list or library you want to migrate. Select a list or library from the dropdown list. Select Next.
- Select a destination: Microsoft Teams, SharePoint, or OneDrive. Enter the URL, email address, or Team name where you want to migrate. Select Next.
- Enter the list destination. Select Next. 7.Select Next to review settings. Select Start to begin migration.
Workflow migration
For a complete overview and step by step solution on migrating SharePoint Server workflows, see:
Bulk migration
If you have many sources to migrate, you can use either a JSON or CSV file to do a bulk migration. You can learn more on how to create a JSON or CSV file for data content migration. See How to format your JSON or CSV file for data content migration.
Start SPMT, and then enter your Microsoft 365 username and password.
Select Add a new migration.
Select JSON or CSV file for bulk migration.
Enter the full path of your .CSV or .JSON file where your content is located, and then select Add.
Note
If you're migrating files from an on-premises SharePoint Server, you're prompted for your username and password for that site unless you provided those credentials in a previous step.
If any errors appear in your file, they're detected on a line-by-line basis. The error indicates which line or lines contain the errors. You can't proceed until you correct the errors in your file.
If you want to select another set of data files to migrate, select Add another migration. If not, select Next. Or choose if you want to save this task for later.
Review your settings, and then select Start.
Incremental migration
After a migration task completes, you can save it to be rerun at a later date, allowing you to copy only those new or updated files in the source location.
Note
If you wish to make changes to this setting, do so before your initial migration job is submitted. This setting is global; it applies to all subsequent tasks you submit.
When this setting is on, an incremental check of the SharePoint target environment is performed. Files are evaluated as follows:
| Status | Result |
|---|---|
| Modified time of the source file is earlier than the modified time of the target file. | File isn't migrated. |
| Files or lists exist in the SharePoint target location. | Migration skips those existing objects during scan. |
| Time stamp on files or object in the source location is newer in the source. | The newer files are migrated. |
| Source is a file share. | Validation for migration is based on the file/folder path. |
| Source is an on-premises SharePoint Server. | Validation for migration is based on list item GUID. Use the folder path as a fallback. |
Important
We strongly recommend that you don't rename or move migrated files before the final migration is completed. Doing so results in files being overwritten.