Configure Surface Hub Start menu
Surface Hub ships with a default Start menu that admins can modify with specific apps to meet organizational requirements. For example, you can install Progressive Web Apps and include them in the Start menu for quick user access at the start of every Hub session.
Overview
The Surface Hub Start menu is rendered from a Start layout XML file that includes App ID values (AppUserModelID) for default applications such as Microsoft PowerPoint, Word, and Excel. You can add new tiles or replace the default values with the AppUserModelID associated with the apps you wish to display. As described below, use a mobile device management (MDM) provider such as Microsoft Intune to deploy a Start layout device policy containing your modified Start layout XML. To learn more, refer to Manage Surface Hub with an MDM provider.
Differences between Surface Hub and desktop Start menu
There are a few key differences between Start menu customization for Surface Hub and a Windows 10 desktop:
- You cannot use the Start layout XML to configure the taskbar or the Welcome screen for Surface Hub.
- The Start layout policy should be assigned only to devices, not users.
- The OMA-URI setting to use in the policy is
./Device/Vendor/MSFT/Policy/Config/Start/StartLayout - DesktopApplicationTile is only supported for Edge and Microsoft Teams. All other Win32 apps are blocked by Code Integrity policy
Default Surface Hub Start menu
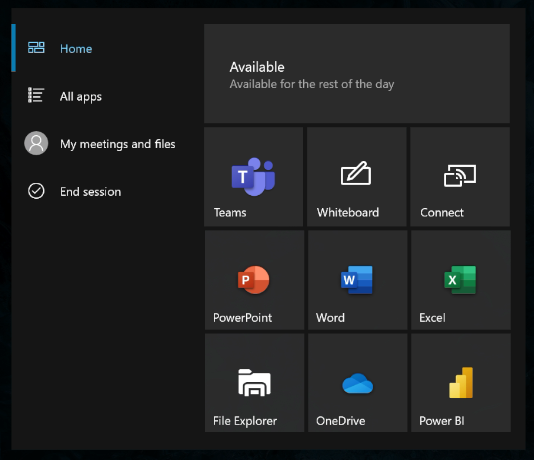
The default Start menu is rendered by the following Start XML layout.
<LayoutModificationTemplate Version="1" xmlns="http://schemas.microsoft.com/Start/2014/LayoutModification">
  <LayoutOptions StartTileGroupCellWidth="8" />
  <DefaultLayoutOverride>
    <StartLayoutCollection>
      <defaultlayout:StartLayout GroupCellWidth="8" xmlns:defaultlayout="http://schemas.microsoft.com/Start/2014/FullDefaultLayout">
        <start:Group Name="" xmlns:start="http://schemas.microsoft.com/Start/2014/StartLayout">
        <start:DesktopApplicationTile
            DesktopApplicationID="MSEdge"
            Size="2x2"
            Row="0"
            Column="0"/>
        <start:Tile
            AppUserModelID="Microsoft.Getstarted_8wekyb3d8bbwe!App"
            Size="4x2"
            Row="0"
            Column="2"/>
        <start:Tile
            AppUserModelID="Microsoft.Office.PowerPoint_8wekyb3d8bbwe!Microsoft.pptim"
            Size="2x2"
            Row="2"
            Column="0"/>
        <start:Tile
            AppUserModelID="Microsoft.Office.Word_8wekyb3d8bbwe!Microsoft.Word"
            Size="2x2"
            Row="2"
            Column="2"/>
        <start:Tile
            AppUserModelID="Microsoft.Office.Excel_8wekyb3d8bbwe!Microsoft.Excel"
            Size="2x2"
            Row="2"
            Column="4"/>
        <start:Tile
            AppUserModelID="c5e2524a-ea46-4f67-841f-6a9465d9d515_cw5n1h2txyewy!App"
            Size="2x2"
            Row="4"
            Column="0"/>
        <start:Tile
            AppUserModelID="microsoft.microsoftskydrive_8wekyb3d8bbwe!App"
            Size="2x2"
            Row="4"
            Column="2"/>
        <start:Tile
            AppUserModelID="Microsoft.MicrosoftPowerBIForWindows_8wekyb3d8bbwe!Microsoft.MicrosoftPowerBIForWindows"
            Size="2x2"
            Row="4"
            Column="4"/>
        </start:Group>
      </defaultlayout:StartLayout>
    </StartLayoutCollection>
  </DefaultLayoutOverride>
</LayoutModificationTemplate>
Modify default Start menu
Customize the Start menu by modifying the Start:Tile elements of the XML. Surface Hub supports a maximum of 12 tiles. Do not adjust the default width: GroupCellWidth="8".
This example adds the following Progressive Web Apps to the default XML layout. See Appendix A for the modified Start layout XML file containing these PWAs.
| App | AppUserModelID |
|---|---|
| WebEx | signin.webex.com-8846C236_2aab1d9x9fqba!App |
| Zoom | zoom.us-F576B427_j0dtdqw38r40m!App |
| YouTube | www.youtube.com-756BE99A_pd8mbgmqs65xy!App |
Tip
See Appendix B for instructions on obtaining the AppUserModelID for other apps installed on Surface Hub.
Deploy modified Start menu to Surface Hub
Save your modified Start menu XML to a separate PC.
Sign in to the Intune portal at Microsoft Intune admin center.
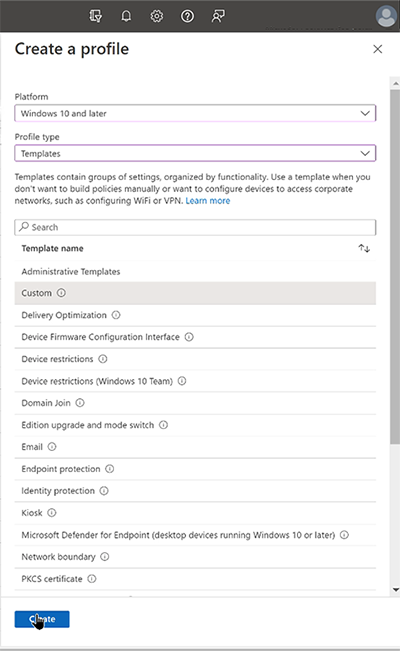
Go to Devices > Configuration Policies > Create profile.
Under Platform, select Windows 10 and later. Under Profile type, select Templates. Under Template name, select Custom and choose Create.
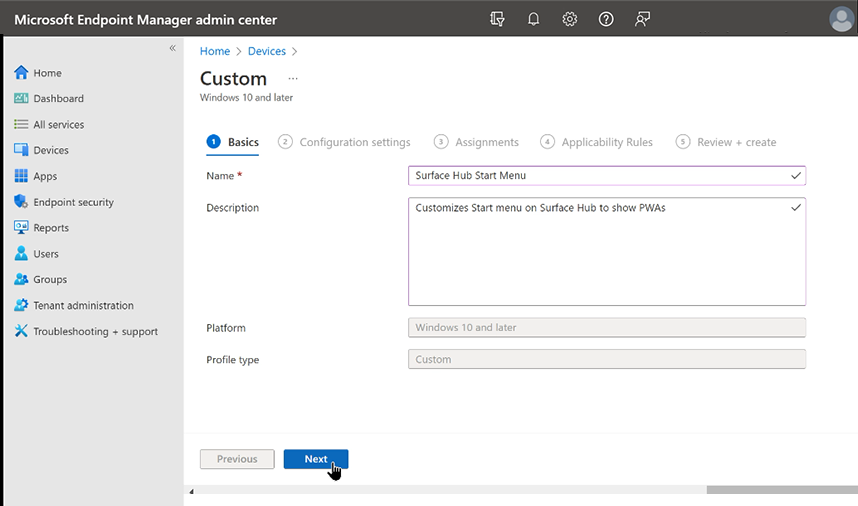
On the configuration settings page, select Add. Enter a name and optional description. Select Next.
For OMA-URI, enter the following string:
./Device/Vendor/MSFT/Policy/Config/Start/StartLayout
- For Data type, select String (XML file) and open your modified Start layout XML file. Select Save and then click Next.
Assign Start layout policy
The Configuration profile must be assigned to devices and targeted to the device URI. Do not use: ./User/Vendor/MSFT/Policy/Config/Start/StartLayout.
On the Assignments page, under Included groups, select Add groups.
Under Select groups to include, enter the name of a group containing the Surface Hubs you wish to target, choose Select, and then click Next. To learn more about assigning a Configuration profile to a group, see Add groups to organize users and devices.
On the Applicability Rules page, enter optional criteria if desired. Otherwise, select Next.
Review the Configuration profile and select Create.
To apply the Configuration profile immediately, select Devices > All devices and find the Surface Hub you targeted. Open its Overview pane, and select Sync.
Once applied, you will see the modified Start menu on your Surface Hub.
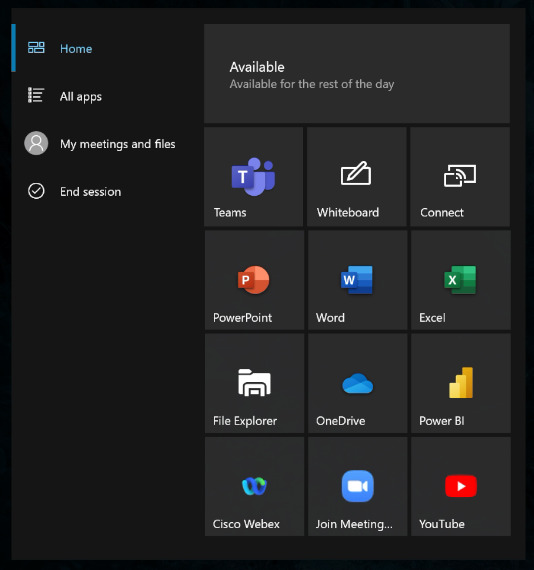
Appendix A: Surface Hub Start menu modified for Progressive Web Apps
The following modified Start layout XML includes PWAs for WebEx, Zoom, and YouTube.
<LayoutModificationTemplate Version="1" xmlns="http://schemas.microsoft.com/Start/2014/LayoutModification">
  <LayoutOptions StartTileGroupCellWidth="8" />
  <DefaultLayoutOverride>
    <StartLayoutCollection>
      <defaultlayout:StartLayout GroupCellWidth="8" xmlns:defaultlayout="http://schemas.microsoft.com/Start/2014/FullDefaultLayout">
        <start:Group Name="" xmlns:start="http://schemas.microsoft.com/Start/2014/StartLayout">
        <start:DesktopApplicationTile
            DesktopApplicationID="MSEdge"
            Size="2x2"
            Row="0"
            Column="0"/>
        <start:Tile
            AppUserModelID="Microsoft.Getstarted_8wekyb3d8bbwe!App"
            Size="4x2"
            Row="0"
            Column="2"/>
        <start:Tile
            AppUserModelID="Microsoft.Office.PowerPoint_8wekyb3d8bbwe!Microsoft.pptim"
            Size="2x2"
            Row="2"
            Column="0"/>
        <start:Tile
            AppUserModelID="Microsoft.Office.Word_8wekyb3d8bbwe!Microsoft.Word"
            Size="2x2"
            Row="2"
            Column="2"/>
        <start:Tile
            AppUserModelID="Microsoft.Office.Excel_8wekyb3d8bbwe!Microsoft.Excel"
            Size="2x2"
            Row="2"
            Column="4"/>
        <start:Tile
            AppUserModelID="c5e2524a-ea46-4f67-841f-6a9465d9d515_cw5n1h2txyewy!App"
            Size="2x2"
            Row="4"
            Column="0"/>
        <start:Tile
            AppUserModelID="microsoft.microsoftskydrive_8wekyb3d8bbwe!App"
            Size="2x2"
            Row="4"
            Column="2"/>
        <start:Tile
            AppUserModelID="Microsoft.MicrosoftPowerBIForWindows_8wekyb3d8bbwe!Microsoft.MicrosoftPowerBIForWindows"
            Size="2x2"
            Row="4"
            Column="4"/>
        <start:Tile
            AppUserModelID="signin.webex.com-8846C236_2aab1d9x9fqba!App"
            Size="2x2"
            Row="6"
            Column="0"/>
        <start:Tile
            AppUserModelID="zoom.us-F576B427_j0dtdqw38r40m!App"
            Size="2x2"
            Row="6"
            Column="2"/>
        <start:Tile
            AppUserModelID="www.youtube.com-756BE99A_pd8mbgmqs65xy!App"
            Size="2x2"
            Row="6"
            Column="4"/>
        </start:Group>
      </defaultlayout:StartLayout>
    </StartLayoutCollection>
  </DefaultLayoutOverride>
</LayoutModificationTemplate>
Appendix B: Extract AppUserModelIDs from installed apps
To obtain the AppUserModelID of apps installed on Surface Hub:
- Sign in to Surface Hub as an admin, open Settings, and select Update & Security.
- Select Logs. Insert a USB drive, then select Collect logs.
- On a separate PC, open the USB drive and unzip the Log folder.
- In the Registry folder, open HKLM_SOFTWARE_Microsoft.txt.
- Search for the ApplicationUserModelId associated with the app you want to include in the Start menu.

Related links
Feedback
Coming soon: Throughout 2024 we will be phasing out GitHub Issues as the feedback mechanism for content and replacing it with a new feedback system. For more information see: https://aka.ms/ContentUserFeedback.
Submit and view feedback for