Introduction to creating a code component
Power Apps provides numerous built-in functionalities for app makers to build their apps, but sometimes, you'll need to create custom user experiences to handle your unique requirements. Examples might be replacing a percentage value with a gauge, rendering a bar code rather than an ID, or replacing existing controls with controls that have more functionality—like a drag-and-drop grid view. You can also wrap the Power Apps component framework around existing components you've written in other web frameworks, like React or Angular.
Creating these components allows you to use the full breadth of the modern web development ecosystem: the libraries, frameworks, and other tools you might be familiar with, and packages that capability into a form that allows app makers to build apps with your code as if it were an out-of-the-box part of the platform.
Note
Other sample components, including those that use Angular or React are available.
Custom Power Apps components are frequently referred to as code components because they require custom code to build them. They consist of three elements: a manifest, an implementation, and resources.
In the following exercise, you'll create a custom code component to handle a scenario for your company. Your company would like to have some fields on the form in the application that are read-only until the user manually initiates an edit on the data value. The team has identified that none of the built-in controls will work so they have asked you to create a custom code component.
To solve this requirement, you'll create an editable field custom component that will look like the following image. The value will be read-only until the user selects edit.

This component will listen to changes coming from the host app and allow the user to make changes that are then pushed to the host app. The following steps will help you build this component.
Install Power Platform CLI
To prepare your computer to build code components, follow these steps:
Install Node.js (comes with npm). We recommend that you use an LTS (Long-Term Support) version such as the one located here. You'll want to verify that you don't have Node/NPM already installed. You can do this by going to a command prompt and typing the following:
// Launch a standard command prompt and type both of the following

npm --version
Node --version
If you receive an error running these commands, you'll need to install Node.js using the links above.
A successful installation of node will return the Version Numbers in the command window when entering the commands above as seen below:
// If installed properly you will see something like the output below. The version numbers may be slightly different based on the version installed.

C:\npm --version
10.5.0

C:\Node --version
v20.12.2
Install Visual Studio Code.
Install Power Platform Tools extension. Be sure you have completed the Visual Studio Code install before installing the Power Platform Tools.
The Power Platform Tools won't allow you to run CLI commands for Power Platform in a command prompt outside of Visual Studio Code. It's recommended that you install the CLI MSI for PowerPlatform as well.
To install the CLI at the Windows level follow these instructions. You can have the CLI and the Power Platform Tools extension installed simultaneously.
Create a new component project
Before starting the component builds verify that the installed components listed above are working properly. NPM and CLI Commands will work from a Terminal Window in Visual Studio Code. If you have issues with running them properly from within VS Code, you can elect to run the Terminal commands given in the steps below in a Command Prompt if you have installed the CLI for Power Platform.
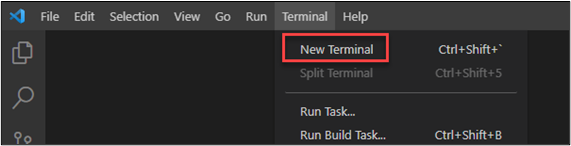
In Visual Studio Code, navigate to Terminal > New Terminal (or press CTRL+SHFT+`). In the Terminal window in VS Code, repeat the npm and Node version statements. If everything returns proper version numbers you can proceed to creating the solution.
// Test installs from Steps 1-3 listed above

// This will verify NPM installation
C:\npm --version
10.5.0

// This will verify Node installation
C:\Node --version
v20.12.2

// This will launch Visual Studio Code from the command line.
C:\Code
Now you're ready to create a new component project, follow these steps to get started:
Create a directory where you'll build your component. In this sample, you'll place the component in C:\source\Editable-pcf. To create your own directory, you'll use Visual Studio Code. Alternatively you can create the folders using the command prompt if you have issues with VS Code Terminal usage.
Start Visual Studio Code.
Select Terminal and select New Terminal.
Your Terminal session will default to the last folder you used. This will be illustrated in the TERMINAL command prompt area as illustrated below:
//Note Your PS will not list exactly what is seen below, but will be specific to your starting path.

PS C:\Users\Name\Folder
Change directory to a location where you want to build this solution. You can use the CD command to navigate to an appropriate location.
Note
Be aware that the folder you execute NPM or other commands is important. Always be sure you are in your Projects folder before executing build commands. Failure to do so can corrupt the build and cause issues producing optimal results.
To create a new folder in the default location use md (make directory) as shown below in your VS Code Terminal Window.
md source
cd source
This will create a directory called source and navigate you to that directory using the cd (change directory) command.
From your source directory created, create a directory named editable-pcf. This will be your PROJECT directory where all of your project files will be stored. We'll also change the directory to our new Project directory.
md editable-pcf
cd editable-pcf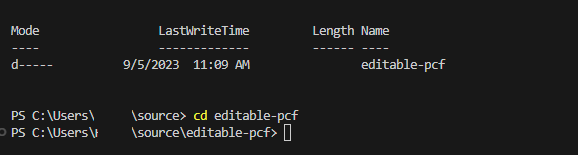
Initialize your component project by using Power Platform CLI with the following command:
pac pcf init --namespace SampleNamespace --name EditablePCF --template fieldThe following image shows an example of the output that you should see.

Caution
If the PAC PCF INIT command will not run in a terminal window in VS Code and you installed the Power Platform CLI you can opt to run a command prompt and CD to your editable-pcf directory. Once you are there you can enter the command in the Command Prompt and it will work properly. You should see the same output as listed above.
Install the project build tools by using the command
npm install. You might see some warnings displayed; however, you can ignore them. Be sure you are in your PROJECT directory before issuing this command.npm installCaution
If the npm install will not run in a terminal window in VS Code and you installed the Power Platform CLI you can opt to run a command prompt and CD to your editable-pcf directory. Once you are there you can enter the command in the Command Prompt and it will work properly.
You can verify everything is working by executing a DIR command in the Terminal Window in VS Code or in the Command Prompt is you opted to build outside of Visual Studio Code. You should see a series of files and folders in your editable-pcf directory. This is the project you created in the steps above that we'll build against using VS Code.
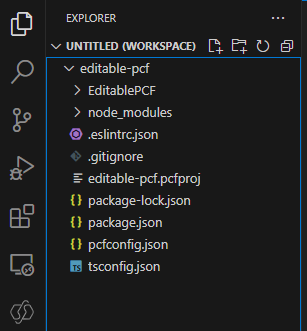
Run the command below to open project in Visual Studio Code or if you're using a command prompt in the command prompt window. This should launch your created project in VS Code.
code -a .The project contents should look like the image below.

Update your code component's manifest
Update the manifest file to accurately represent your control.
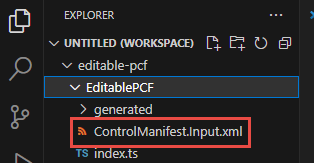
Expand the EditablePCF folder and open the ControlManifest.Input.xml file.
Change the version to 1.0.0 and description-key to Edits project name.

Locate the property node.
Change the name value to Name, display-name-key to Name, and description-key to A name.

Locate the resources node.
Include a reference to a CSS file named editable-pcf.css that you'll create in the steps below.
<css path="css/EditablePCF.css" order="1" />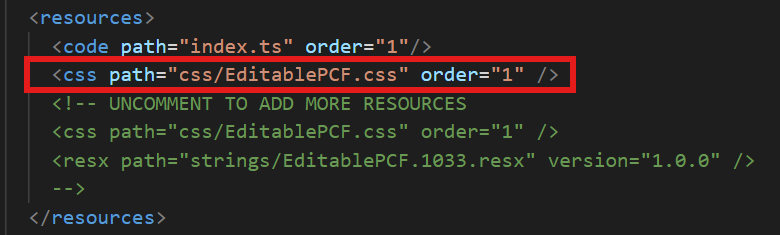
Save your changes by selecting File and then Save or press CTRL+S to save the file.


Add styling to your code component
To add styling to your code component, follow these steps:
Make sure you still have the ControlManifest.Input.xml file selected and then select New Folder.
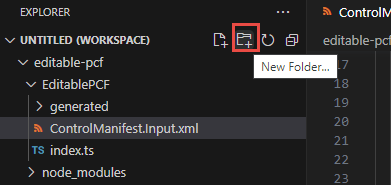
Name the new folder css.
Select the css folder you created and select New File.
Name the new file EditablePCF.css (or whatever you named the css file in Step 6 above).
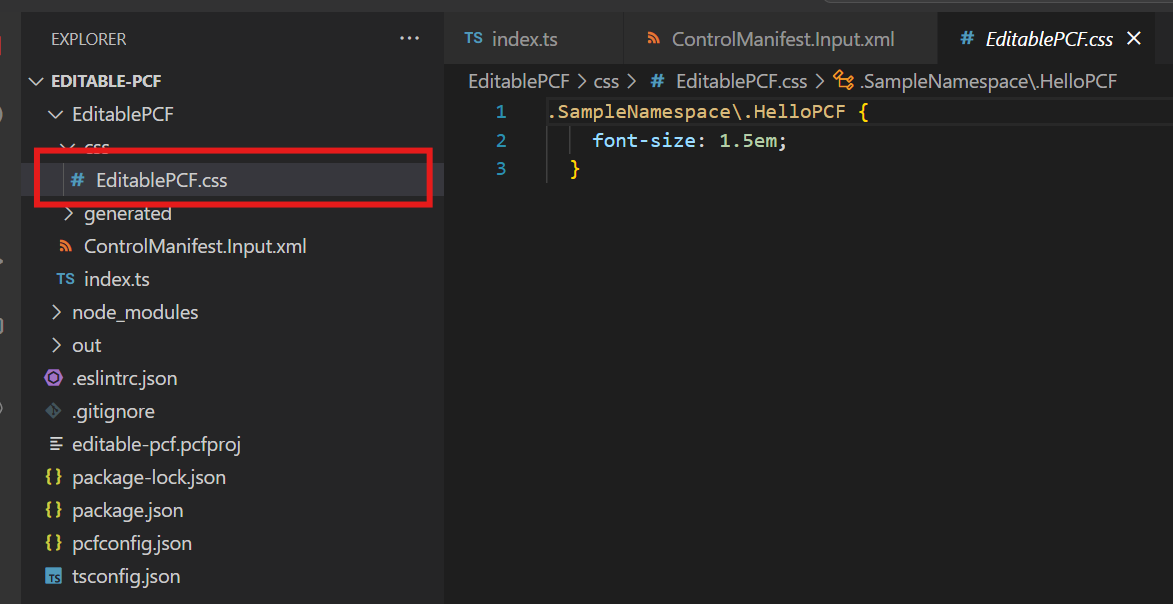
Open the new EditablePCF.css file you created, and paste the following CSS snippet. This is the Resource reference name you used earlier when you added the css path code to the manifest file.
.SampleNamespace\.HelloPCF {
      font-size: 1.5em;
    }
The content of the CSS file should now look like the image below.
Select File and select Save or press CTRL+S to save the file.
Build your code component
Before you can implement your component logic you need to run a build on your component. This makes sure that the right TypeScript types are generated to match the properties in your ControlManifest.xml document.
Go back to the terminal in VS Code and build your project by using the following command. If for any reason, you have issues using Terminal in Visual Studio Code you can navigate to your folder using the command prompt and run the command from there.
Caution
Be sure you are in your PROJECT folder in your terminal before issuing this command.
npm run build
The component is compiled into the out/controls/EditablePCF directory. The build artifacts include:
css folder
bundle.js - Bundled component source code
ControlManifest.xml - Actual component manifest file that is uploaded to the Microsoft Dataverse organization
Warning
The most common error usually received here is a typo in the file name for the CSS file you created earlier. If that happens simply rename the files accordingly and rerun the npm run build command until it runs to completion without error. Check your RESOURCE section in he COntrolManifest.Input.xml file against the file created in the CSS folder. They must match 100%.
Implement your code component's logic
To implement your code component's logic, follow these steps once the build completes from the above steps. In Visual Studio Code, in the EXPLORER look for a file called index.ts. That is where we'll begin writing the code for our component.
Open index.ts file in Visual Studio Code.
Above the constructor method, insert the following private variables:
// The PCF context object\
private context: ComponentFramework.Context<IInputs>;
// The wrapper div element for the component\
private container: HTMLDivElement;
// The callback function to call whenever your code has made a change to a bound or output property\
private notifyOutputChanged: () => void;
// Flag to track if the component is in edit mode or not\
private isEditMode: boolean;
// Tracking variable for the name property\
private name: string | null;
Locate the public init method and replace it with the method below.
public init(context: ComponentFramework.Context<IInputs>, notifyOutputChanged: () => void, state: ComponentFramework.Dictionary, container: HTMLDivElement) {

    // Track all the things
    this.context = context;
    this.notifyOutputChanged = notifyOutputChanged;
    this.container = container;
    this.isEditMode = false;

    // Create the span element to hold the project name
    const message = document.createElement("span");
    message.innerText = `Project name ${this.isEditMode ? "" :context.parameters.Name.raw}`;

    // Create the textbox to edit the name
    const text = document.createElement("input");
    text.type = "text";
    text.style.display = this.isEditMode ? "block" : "none";

    if (context.parameters.Name.raw) {
        text.value = context.parameters.Name.raw;
        // Wrap the two above elements in a div to box out the content
        const messageContainer = document.createElement("div");
        messageContainer.appendChild(message);
        messageContainer.appendChild(text);

        // Create the button element to switch between edit and read modes

        const button = document.createElement("button");
        button.textContent = this.isEditMode ? "Save" : "Edit";
        button.addEventListener("click", () => { this.buttonClick(); });

        // Add the message container and button to the overall control container
        this.container.appendChild(messageContainer);
        this.container.appendChild(button);
    }

}
Warning
You may notice that the EventListener for the buttonClick is underlined in red. Don't worry, we will create the method for that event below. If you see other sections in red you will want to verify everything was either copied or entered properly.
Add button select handler method. Add the following method below the init method.
public buttonClick() {
    // Get our controls via DOM queries
    const text = this.container.querySelector("input")!;
    const message = this.container.querySelector("span")!;
    const button = this.container.querySelector("button")!;

    // If not in edit mode, copy the current name value to the textbox
    if (!this.isEditMode) {
        text.value = this.name ?? "";
    }
    else if (text.value != this.name) {
        // if in edit mode, copy the textbox value to name and call the notify callback
        this.name = text.value;
        this.notifyOutputChanged();
    }

    // flip the mode flag
    this.isEditMode = !this.isEditMode;

    // Set up the new output based on changes
    message.innerText = `Project name ${this.isEditMode ? "" : this.name}`;
    text.style.display = this.isEditMode ? "inline" : "none";
    text.value = this.name ?? "";
    button.textContent = this.isEditMode ? "Save" : "Edit";
}
Locate the updateView method and replace it with the method below.
public updateView(context: ComponentFramework.Context<IInputs>): void {

// Checks for updates coming in from outside

this.name = context.parameters.Name.raw;
const message = this.container.querySelector("span")!;
message.innerText = `Project name ${this.name}`;
}
Locate the replace getOutputs and replace it with the method below.
public getOutputs(): IOutputs {
return {
// If our name variable is null, return undefined instead
Name: this.name ?? undefined
};
}
Locate the destroy method and replace it with the method below.
public destroy() {
// Remove the event listener we created in init
this.container.querySelector("button")!.removeEventListener("click", this.buttonClick);
}
Your final Index.ts should now look like the code below:
import { IInputs, IOutputs } from "./generated/ManifestTypes";

export class EditablePCF implements ComponentFramework.StandardControl<IInputs, IOutputs> {

    /**
    * Empty constructor.
    */

    // The PCF context object\
    private context: ComponentFramework.Context<IInputs>;
    // The wrapper div element for the component\
    private container: HTMLDivElement;
    // The callback function to call whenever your code has made a change to a bound or output property\
    private notifyOutputChanged: () => void;
    // Flag to track if the component is in edit mode or not\
    private isEditMode: boolean;
    // Tracking variable for the name property\
    private name: string | null;

    constructor()
    {

    }

    /**
    * Used to initialize the control instance. Controls can kick off remote server calls and other initialization actions here.
    * Data-set values are not initialized here, use updateView.
    * @param context The entire property bag available to control via Context Object; It contains values as set up by the customizer mapped to property names defined in the manifest, as well as utility functions.
    * @param notifyOutputChanged A callback method to alert the framework that the control has new outputs ready to be retrieved asynchronously.
    * @param state A piece of data that persists in one session for a single user. Can be set at any point in a controls life cycle by calling 'setControlState' in the Mode interface.
    * @param container If a control is marked control-type='standard', it will receive an empty div element within which it can render its content.
    */
    public init(context: ComponentFramework.Context<IInputs>, notifyOutputChanged: () => void, state: ComponentFramework.Dictionary, container: HTMLDivElement) {

        // Track all the things
        this.context = context;
        this.notifyOutputChanged = notifyOutputChanged;
        this.container = container;
        this.isEditMode = false;

        // Create the span element to hold the project name

        const message = document.createElement("span");
        message.innerText = `Project name ${this.isEditMode ? "" :context.parameters.Name.raw}`;

        // Create the textbox to edit the name
        const text = document.createElement("input");
        text.type = "text";
        text.style.display = this.isEditMode ? "block" : "none";

        if (context.parameters.Name.raw) {
            text.value = context.parameters.Name.raw;
            // Wrap the two above elements in a div to box out the content
            const messageContainer = document.createElement("div");
            messageContainer.appendChild(message);
            messageContainer.appendChild(text);

            // Create the button element to switch between edit and read modes

            const button = document.createElement("button");
            button.textContent = this.isEditMode ? "Save" : "Edit";
            button.addEventListener("click", () => { this.buttonClick(); });

            // Add the message container and button to the overall control container
            this.container.appendChild(messageContainer);
            this.container.appendChild(button);
        }

    }

    public buttonClick() {
        // Get our controls via DOM queries

        const text = this.container.querySelector("input")!;
        const message = this.container.querySelector("span")!;
        const button = this.container.querySelector("button")!;

        // If not in edit mode, copy the current name value to the textbox

        if (!this.isEditMode) {
            text.value = this.name ?? "";
        }
        else if (text.value != this.name) {

            // if in edit mode, copy the textbox value to name and call the notify callback
            this.name = text.value;
            this.notifyOutputChanged();
        }

        // flip the mode flag
        this.isEditMode = !this.isEditMode;

        // Set up the new output based on changes
        message.innerText = `Project name ${this.isEditMode ? "" : this.name}`;
        text.style.display = this.isEditMode ? "inline" : "none";
        text.value = this.name ?? "";
        button.textContent = this.isEditMode ? "Save" : "Edit";
    }

    /**
    * Called when any value in the property bag has changed. This includes field values, data-sets, global values such as container height and width, offline status, control metadata values such as label, visible, etc.
    * @param context The entire property bag available to control via Context Object; It contains values as set up by the customizer mapped to names defined in the manifest, as well as utility functions
    */
    public updateView(context: ComponentFramework.Context<IInputs>): void {

        // Checks for updates coming in from outside
        this.name = context.parameters.Name.raw;
        const message = this.container.querySelector("span")!;
        message.innerText = `Project name ${this.name}`;
    }

    /**
    * It is called by the framework prior to a control receiving new data.
    * @returns an object based on nomenclature defined in manifest, expecting object[s] for property marked as "bound" or "output"
    */
    public getOutputs(): IOutputs {
        return {
        // If our name variable is null, return undefined instead
        Name: this.name ?? undefined
        };
    }

    /**
    * Called when the control is to be removed from the DOM tree. Controls should use this call for cleanup.
    * i.e. cancelling any pending remote calls, removing listeners, etc.
    */
    public destroy() {
        // Remove the event listener we created in init
        this.container.querySelector("button")!.removeEventListener("click", this.buttonClick);
    }
}
Rebuild and run your code component
To rebuild and run your code component, follow these steps:
Now that your component's logic is implemented, go back to the terminal and rebuild it by using the command below. You can run this directly in VS Code or through the command prompt so long as you navigate to your editable-pcf folder first.
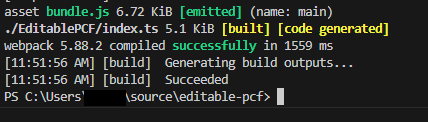
npm run buildThe build should succeed.
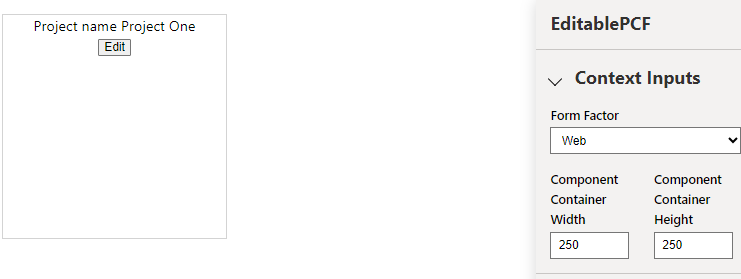
Run your component in Node's test harness by running the command below. If you haven't done this before it should launch a browser with your newly created component displayed.
npm startNote
You can also enable watch mode to ensure that any changes to the following assets are made automatically without having to restart the test harness by using the
npm start watchcommand.index.ts file.
ControlManifest.Input.xml file
Imported libraries in index.ts
All resources listed in the manifest file
A new browser window should load the test harness. (The window should open automatically, but you can also reference the address as found in the command window).
Select Edit.

Enter Project One and select Save.
You can change the container size.
The test harness should now look like the image below.
Close the test harness browser window.
Go back to the terminal or your command prompt (if you aren't using VS Code Terminal) and stop the watcher by holding [CONTROL] + C.
Type Y and then [ENTER].