Correct journal entries
Business Central provides several functions that you can use to correct posted journal entries.
Reverse journal entries
To undo an erroneous journal posting, you can select the entry and create a reverse entry, which is identical to the original but with an opposite sign in the amount field. In this unit, you'll learn how to create the reverse entry with the same document number and posting date as the original. Then, after reversing the entry, you'll make the correct entry.
You can only reverse entries that are posted from a general journal line. An entry can only be reversed once. If you want to reverse customer or vendor ledger entries, they must not be applied.
You can reverse entries from all Ledger Entries windows. The following procedure is based on the General Ledger Entries window.
Select the Search for Page icon in the top-right corner of the page, enter General Ledger Entries, and then select the related link.
Select the entry that you want to reverse and then select Process > Reverse Transaction.
In the Reverse Transaction Entries window, select the relevant entry and then select Reverse.
Select Yes on the confirmation message.
Correct journal lines from the Posted General Journals
From the Posted General Journal page, you can copy posted journal lines to a general journal from where you can make corrections.

To copy journal lines to the Posted General Journal page, you must enable the Copy to Posted Jnl. Lines field on the General Journal Templates page or the General Journal Batches page.

When you post journal lines from a journal for which this field is enabled, Business Central copies the posted journal lines to the Posted General Journal page form where you can copy them back to the general journal, where you can correct them.
To copy lines from the Posted General Journal, follow these steps:
Select the Search for Page icon in the top-right corner of the page, enter posted general journal, and then select the related link.
Select one or multiple entries and then select Copy Selected Lines to Journal.
In the Copy Gen. Journal Parameters page, enter the following details:
Target Journal Template
Target Journal Batch
Replace Posting Date
Replace Document No.
Reverse Sign
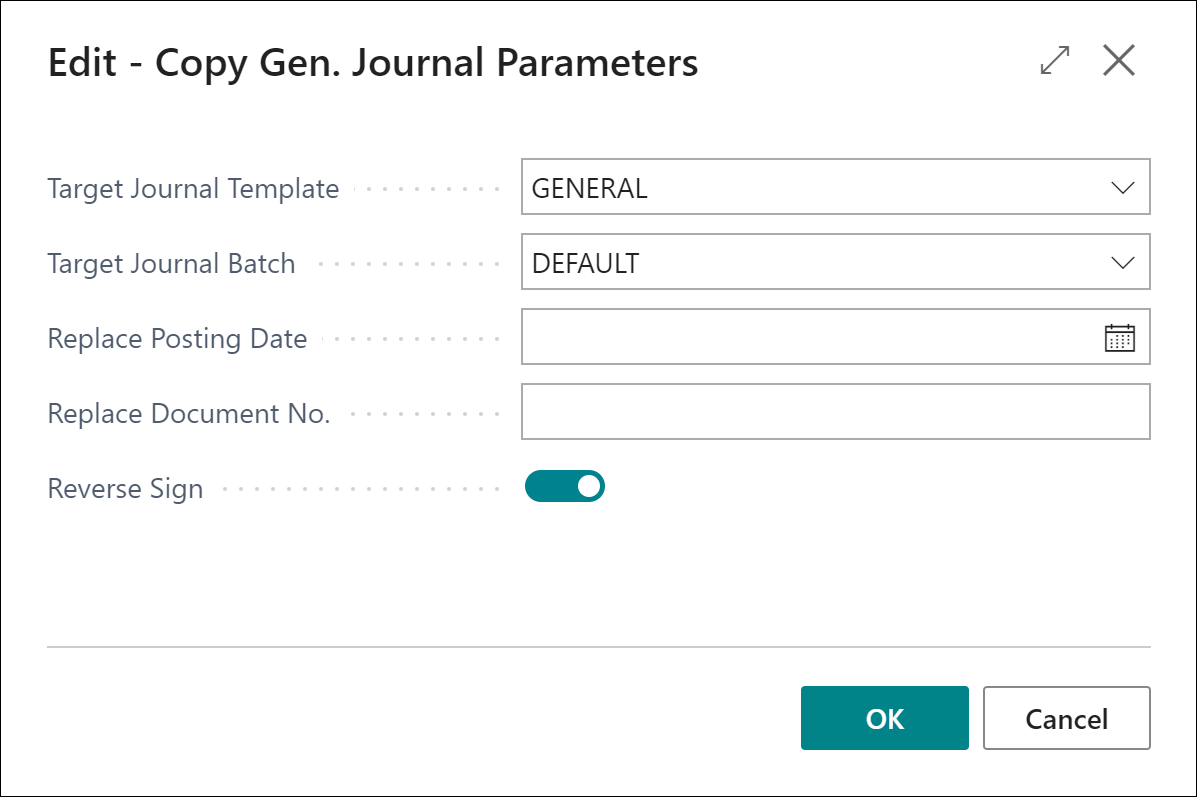
Select OK.
Select Yes to open the target general journal.

Based on the parameters you entered, the posted journal lines are now copied to the general journal. Instead of copying selected lines, you can also copy a G/L register. This will copy all the lines from the selected G/L register to the general journal.
To copy a G/L register to the general journal, follow these steps:
Select the Search for Page icon in the top-right corner of the page, enter posted general journal, and then select the related link.
Select one or multiple entries and then select Copy G/L Register to Journal.
In the Copy Gen. Journal Parameters page, enter the following details:
Target Journal Template
Target Journal Batch
Replace Posting Date
Replace Document No.
Reverse Sign
Select OK.
Select Yes to open the target general journal.
Based on the parameters you entered, the journal lines of the G/L register are now copied to the general journal.