Create a basic project system, part 2
The first walkthrough in this series, Create a basic project system, part 1, shows how to create a basic project system. This walkthrough builds on the basic project system by adding a Visual Studio template, a property page, and other features. You must complete the first walkthrough before you start this one.
This walkthrough teaches how to create a project type that has the project file name extension .myproj. To complete the walkthrough, you do not have to create your own language because the walkthrough borrows from the existing Visual C# project system.
This walkthrough teaches how to accomplish these tasks:
Create a Visual Studio template.
Deploy a Visual Studio template.
Create a project type child node in the New Project dialog box.
Enable parameter substitution in the Visual Studio template.
Create a project property page.
Note
The steps in this walkthrough are based on a C# project. However, except for specifics such as file name extensions and code, you can use the same steps for a Visual Basic project.
Create a Visual Studio template
- Create a basic project system, part 1 shows how to create a basic project template and add it to the project system. It also shows how to register this template with Visual Studio by using the ProvideProjectFactoryAttribute attribute, which writes the full path of the \Templates\Projects\SimpleProject\ folder in the system registry.
By using a Visual Studio template (.vstemplate file) instead of a basic project template, you can control how the template appears in the New Project dialog box and how template parameters are substituted. A .vstemplate file is an XML file that describes how source files are to be included when a project is created by using the project system template. The project system itself is built by collecting the .vstemplate file and the source files in a .zip file, and deployed by copying the .zip file to a location that is known to Visual Studio. This process is explained in more detail later in this walkthrough.
In Visual Studio, open the SimpleProject solution that you created by following Create a basic project system, part 1.
In the SimpleProjectPackage.cs file, find the ProvideProjectFactory attribute. Replace the second parameter (the project name) with null, and the fourth parameter (the path to the project template folder) with ".\\NullPath", as follows.
[ProvideProjectFactory(typeof(SimpleProjectFactory), null,
    "Simple Project Files (*.myproj);*.myproj", "myproj", "myproj",
    ".\\NullPath",
LanguageVsTemplate = "SimpleProject")]
Add an XML file named SimpleProject.vstemplate to the \Templates\Projects\SimpleProject\ folder.
Replace the contents of SimpleProject.vstemplate with the following code.
<VSTemplate Version="2.0.0" Type="Project"
    xmlns="http://schemas.microsoft.com/developer/vstemplate/2005">
  <TemplateData>
    <Name>SimpleProject Application</Name>
    <Description>
      A project for creating a SimpleProject application
    </Description>
    <Icon>SimpleProject.ico</Icon>
    <ProjectType>SimpleProject</ProjectType>
  </TemplateData>
  <TemplateContent>
    <Project File="SimpleProject.myproj" ReplaceParameters="true">
      <ProjectItem ReplaceParameters="true" OpenInEditor="true">
        Program.cs
      </ProjectItem>
      <ProjectItem ReplaceParameters="true" OpenInEditor="false">
        AssemblyInfo.cs
      </ProjectItem>
    </Project>
  </TemplateContent>
</VSTemplate>
In the Properties window, select all five files in the \Templates\Projects\SimpleProject\ folder and set the Build Action to ZipProject.
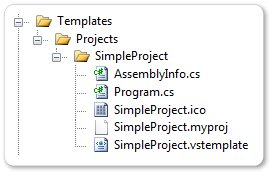
The <TemplateData> section determines the location and appearance of the SimpleProject project type in the New Project dialog box, as follows:
The <Name> element names the project template to be SimpleProject Application.
The <Description> element contains the description that appears in the New Project dialog box when the project template is selected.
The <Icon> element specifies the icon that appears together with the SimpleProject project type.
The <ProjectType> element names the Project type in the New Project dialog box. This name replaces the project name parameter of the ProvideProjectFactory attribute.
Note
The <ProjectType> element must match the
LanguageVsTemplateargument of theProvideProjectFactoryattribute in the SimpleProjectPackage.cs file.The <TemplateContent> section describes these files that are generated when a new project is created:
SimpleProject.myproj
Program.cs
AssemblyInfo.cs
All three files have
ReplaceParametersset to true, which enables parameter substitution. The Program.cs file hasOpenInEditorset to true, which causes the file to be opened in the code editor when a project is created.For more information about the elements in the Visual Studio Template schema, see the Visual Studio template schema reference.
Note
If a project has more than one Visual Studio template, every template is in a separate folder. Every file in that folder must have the Build Action set to ZipProject.
Adding a minimal .vsct file
Visual Studio must be run in setup mode to recognize a new or modified Visual Studio template. Setup mode requires a .vsct file to be present. Therefore, you must add a minimal .vsct file to the project.
Add an XML file named SimpleProject.vsct to the SimpleProject project.
Replace the contents of the SimpleProject.vsct file with the following code.
<?xml version="1.0" encoding="utf-8" ?>
<CommandTable
  xmlns="http://schemas.microsoft.com/VisualStudio/2005-10-18/CommandTable">
</CommandTable>
Set the Build Action of this file to VSCTCompile. You can do this only in the .csproj file, not in the Properties window. Make sure that the Build Action of this file is set to None at this point.
Right-click the SimpleProject node and then click Edit SimpleProject.csproj.
In the .csproj file, locate the SimpleProject.vsct item.
<None Include="SimpleProject.vsct" />Change the build action to VSCTCompile.
<VSCTCompile Include="SimpleProject.vsct" />the project file and close the editor.
Save the SimpleProject node, and then in the Solution Explorer click Reload Project.
Examine the Visual Studio template build steps
The VSPackage project build system typically runs Visual Studio in setup mode when the .vstemplate file is changed or the project that contains the .vstemplate file is rebuilt. You can follow along by setting the verbosity level of MSBuild to Normal or higher.
On the Tools menu, click Options.
Expand the Projects and Solutions node, and then select Build and Run.
Set MSBuild project build output verbosity to Normal. Click OK.
Rebuild the SimpleProject project.
The build step to create the .zip project file should resemble the following example.
ZipProjects:
1>  Zipping ProjectTemplates
1>  Zipping <path>\SimpleProject\SimpleProject\obj\Debug\SimpleProject.zip...
1>  Copying file from "<path>\SimpleProject\SimpleProject\obj\Debug\SimpleProject.zip" to "<%LOCALAPPDATA%>\Microsoft\VisualStudio\14.0Exp\ProjectTemplates\\\\SimpleProject.zip".
1>  Copying file from "<path>\SimpleProject\SimpleProject\obj\Debug\SimpleProject.zip" to "bin\Debug\\ProjectTemplates\\\\SimpleProject.zip".
1>  SimpleProject -> <path>\SimpleProject\SimpleProject\bin\Debug\ProjectTemplates\SimpleProject.zip
1>ZipItems:
1>  Zipping ItemTemplates
1>  SimpleProject ->
Deploy a Visual Studio template
Visual Studio templates do not contain path information. Therefore, the template .zip file must be deployed to a location that is known to Visual Studio. The location of the ProjectTemplates folder is typically <%LOCALAPPDATA%>\Microsoft\VisualStudio\14.0Exp\ProjectTemplates.
To deploy your project factory, the installation program must have administrator privileges. It deploys templates under the Visual Studio installation node: ...\Microsoft Visual Studio 14.0\Common7\IDE\ProjectTemplates.
Test a Visual Studio template
Test your project factory to see whether it creates a project hierarchy by using the Visual Studio template.
Reset the Visual Studio SDK experimental instance.
On Windows 7: On the Start menu, find the Microsoft Visual Studio/Microsoft Visual Studio SDK/Tools folder, and then select Reset the Microsoft Visual Studio Experimental instance.
On later versions of Windows: On the Start screen, type Reset the Microsoft Visual Studio <version> Experimental Instance.
A command prompt window appears. When you see the words Press any key to continue, click ENTER. After the window closes, open Visual Studio.
Rebuild the SimpleProject project and start debugging. The experimental instance appears.
In the experimental instance, create a SimpleProject project. In the New Project dialog box, select SimpleProject.
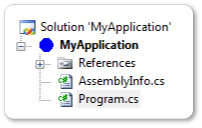
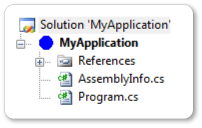
You should see a new instance of SimpleProject.
Create a project type child node
You can add a child node to a project type node in the New Project dialog box. For example, for the SimpleProject project type, you could have child nodes for console applications, window applications, web applications, and so on.
Child nodes are created by altering the project file and adding <OutputSubPath> children to the <ZipProject> elements. When a template is copied during build or deployment, every child node becomes a subfolder of the project templates folder.
This section shows how to create a Console child node for the SimpleProject project type.
Rename the \Templates\Projects\SimpleProject\ folder to \Templates\Projects\ConsoleApp\.
In the Properties window, select all five files in the \Templates\Projects\ConsoleApp\ folder and make sure the Build Action is set to ZipProject.
In the SimpleProject.vstemplate file, add the following line at the end of the <TemplateData> section, just before the closing tag.
<NumberOfParentCategoriesToRollUp>1</NumberOfParentCategoriesToRollUp>This causes the Console Application template to appear both in the Console child node and in the SimpleProject parent node, which is one level above the child node.
Save the SimpleProject.vstemplate file.
In the .csproj file, add <OutputSubPath> to each of the ZipProject elements. Unload the project, as before, and edit the project file.
Locate the <ZipProject> elements. To each <ZipProject> element, add an <OutputSubPath> element and give it the value Console. The ZipProject
<ZipProject Include="Templates\Projects\ConsoleApp\AssemblyInfo.cs">
  <OutputSubPath>Console</OutputSubPath>
</ZipProject>
<ZipProject Include="Templates\Projects\ConsoleApp\Program.cs">
  <OutputSubPath>Console</OutputSubPath>
</ZipProject>
<ZipProject Include="Templates\Projects\ConsoleApp\SimpleProject.myproj">
  <OutputSubPath>Console</OutputSubPath>
</ZipProject>
<ZipProject Include="Templates\Projects\ConsoleApp\SimpleProject.vstemplate">
  <OutputSubPath>Console</OutputSubPath>
</ZipProject>
<ZipProject Include="Templates\Projects\ConsoleApp\SimpleProject.ico">
  <OutputSubPath>Console</OutputSubPath>
</ZipProject>
Add this <PropertyGroup> to the project file:
<PropertyGroup>
  <VsTemplateLanguage>SimpleProject</VsTemplateLanguage>
</PropertyGroup>
Save the project file and reload the project.
Test the project type child node
Test the modified project file to see whether the Console child node appears in the New Project dialog box.
Run the Reset the Microsoft Visual Studio Experimental Instance tool.
Rebuild the SimpleProject project and start debugging. The experimental instance should appear
In the New Project dialog, click the SimpleProject node. The Console Application template should appear in the Templates pane.
Expand the SimpleProject node. The Console child node should appear. The SimpleProject Application template continues to appear in the Templates pane.
Click Cancel and stop debugging.


Substitute project template parameters
- Creating a basic project system, part 1 showed how to overwrite the
ProjectNode.AddFileFromTemplatemethod to do a basic kind of template parameter substitution. This section teaches how to use the more sophisticated Visual Studio template parameters.
When you create a project by using a Visual Studio template in the New Project dialog box, template parameters are replaced with strings to customize the project. A template parameter is a special token that begins and ends with a dollar sign, for example, $time$. The following two parameters are especially useful for enabling customization in projects that are based on the template:
$GUID[1-10]$ is replaced by a new Guid. You can specify up to 10 unique GUIDs, for example, $guid1$.
$safeprojectname$ is the name provided by a user in the New Project dialog box, modified to remove all unsafe characters and spaces.
For a complete list of template parameters, see Template parameters.
To substitute project template parameters
In the SimpleProjectNode.cs file, remove the
AddFileFromTemplatemethod.In the \Templates\Projects\ConsoleApp\SimpleProject.myproj file, locate the <RootNamespace> property and change its value to $safeprojectname$.
<RootNamespace>$safeprojectname$</RootNamespace>In the \Templates\Projects\SimpleProject\Program.cs file, replace the contents of the file with the following code:
using System;
using System.Collections.Generic;
using System.Text;
using System.Runtime.InteropServices;    // Guid

namespace $safeprojectname$
{
    [Guid("$guid1$")]
    public class $safeprojectname$
    {
        static void Main(string[] args)
        {
            Console.WriteLine("Hello VSX!!!");
            Console.ReadKey();
        }
    }
}
Rebuild the SimpleProject project and start debugging. The experimental instance should appear.
Create a new SimpleProject Console application. (In the Project types pane, select SimpleProject. Under Visual Studio installed templates, select Console Application.)
In the newly-created project, open Program.cs. It should look something like the following (GUID values in your file will differ.):
using System;
using System.Collections.Generic;
using System.Text;
using System.Runtime.InteropServices;    // Guid

namespace Console_Application1
{
    [Guid("00000000-0000-0000-00000000-00000000)"]
    public class Console_Application1
    {
        static void Main(string[] args)
        {
            Console.WriteLine("Hello VSX!!!");
            Console.ReadKey();
        }
    }
}
Create a project property page
You can create a property page for your project type so that users can view and change properties in projects that are based on your template. This section shows you how to create a configuration-independent property page. This basic property page uses a properties grid to display the public properties that you expose in your property page class.
Derive your property page class from the SettingsPage base class. The properties grid provided by the SettingsPage class is aware of most primitive data types and knows how to display them. In addition, the SettingsPage class knows how to persist property values to the project file.
The property page you create in this section lets you alter and save these project properties:
AssemblyName
OutputType
RootNamespace.
In the SimpleProjectPackage.cs file, add this
ProvideObjectattribute to theSimpleProjectPackageclass:[ProvideObject(typeof(GeneralPropertyPage))] public sealed class SimpleProjectPackage : ProjectPackageThis registers the property page class
GeneralPropertyPagewith COM.In the SimpleProjectNode.cs file, add these two overridden methods to the
SimpleProjectNodeclass:protected override Guid[] GetConfigurationIndependentPropertyPages() { Guid[] result = new Guid[1]; result[0] = typeof(GeneralPropertyPage).GUID; return result; } protected override Guid[] GetPriorityProjectDesignerPages() { Guid[] result = new Guid[1]; result[0] = typeof(GeneralPropertyPage).GUID; return result; }Both of these methods return an array of property page GUIDs. The GeneralPropertyPage GUID is the only element in the array, so the Property Pages dialog box will show only one page.
Add a class file named GeneralPropertyPage.cs to the SimpleProject project.
Replace the contents of this file by using the following code:
using System;
using System.Runtime.InteropServices;
using Microsoft.VisualStudio;
using Microsoft.VisualStudio.Project;
using System.ComponentModel;

namespace SimpleProject
{
    [ComVisible(true)]
    [Guid("6BC7046B-B110-40d8-9F23-34263D8D2936")]
    public class GeneralPropertyPage : SettingsPage
    {
        private string assemblyName;
        private OutputType outputType;
        private string defaultNamespace;

        public GeneralPropertyPage()
        {
            this.Name = "General";
        }

        [Category("AssemblyName")]
        [DisplayName("AssemblyName")]
        [Description("The output file holding assembly metadata.")]
        public string AssemblyName
        {
            get { return this.assemblyName; }
        }
        [Category("Application")]
        [DisplayName("OutputType")]
        [Description("The type of application to build.")]
        public OutputType OutputType
        {
            get { return this.outputType; }
            set { this.outputType = value; this.IsDirty = true; }
        }
        [Category("Application")]
        [DisplayName("DefaultNamespace")]
        [Description("Specifies the default namespace for added items.")]
        public string DefaultNamespace
        {
            get { return this.defaultNamespace; }
            set { this.defaultNamespace = value; this.IsDirty = true; }
        }

        protected override void BindProperties()
        {
            this.assemblyName = this.ProjectMgr.GetProjectProperty("AssemblyName", true);
            this.defaultNamespace = this.ProjectMgr.GetProjectProperty("RootNamespace", false);

            string outputType = this.ProjectMgr.GetProjectProperty("OutputType", false);
            this.outputType = (OutputType)Enum.Parse(typeof(OutputType), outputType);
        }

        protected override int ApplyChanges()
        {
            this.ProjectMgr.SetProjectProperty("AssemblyName", this.assemblyName);
            this.ProjectMgr.SetProjectProperty("OutputType", this.outputType.ToString());
            this.ProjectMgr.SetProjectProperty("RootNamespace", this.defaultNamespace);
            this.IsDirty = false;

            return VSConstants.S_OK;
        }
    }
}
The
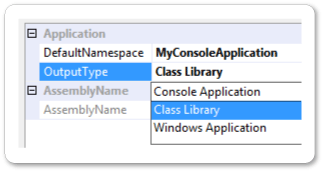
GeneralPropertyPageclass exposes the three public properties AssemblyName, OutputType, and RootNamespace. Because AssemblyName has no set method, it is displayed as a read-only property. OutputType is an enumerated constant, so it appears as dropdown list.The
SettingsPagebase class providesProjectMgrto persist the properties. TheBindPropertiesmethod usesProjectMgrto retrieve the persisted property values and set the corresponding properties. TheApplyChangesmethod usesProjectMgrto get the values of the properties and persist them to the project file. The property set method setsIsDirtyto true to indicate that the properties have to be persisted. Persistence occurs when you save the project or solution.Rebuild the SimpleProject solution and start debugging. The experimental instance should appear.
In the experimental instance, create a new SimpleProject Application.
Visual Studio calls your project factory to create a project by using the Visual Studio template. The new Program.cs file is opened in the code editor.
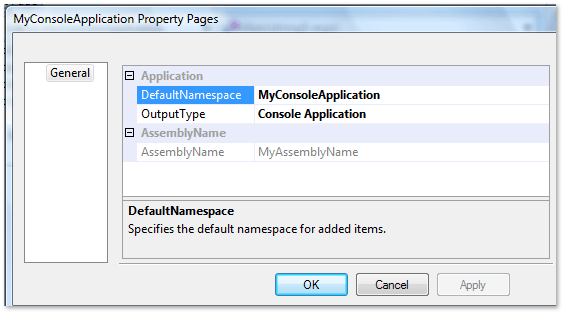
Right-click the project node in Solution Explorer, and then click Properties. The Property Pages dialog box is displayed.
Test the project property page
Now you can test whether you can modify and change property values.
In the MyConsoleApplication Property Pages dialog box, change the DefaultNamespace to MyApplication.
Select the OutputType property, and then select Class Library.
Click Apply, and then click OK.
Reopen the Property Pages dialog box and verify that your changes have been persisted.
Close the experimental instance of Visual Studio.
Reopen the experimental instance.
Reopen the Property Pages dialog box and verify that your changes have been persisted.
Close the experimental instance of Visual Studio.
