Compound authentication and AD DS claims in AD FS
Windows Server 2012 enhances Kerberos authentication by introducing compound authentication. Compound authentication enables a Kerberos Ticket-Granting Service (TGS) request to include two identities:
- the identity of the user
- the identity of the user's device.
Windows accomplishes compound authentication by extending Kerberos Flexible Authentication Secure Tunneling (FAST), or Kerberos armoring.
AD FS 2012 and later versions allows consumption of AD DS issued user or device claims that reside in a Kerberos authentication ticket. In previous versions of AD FS, the claims engine could only read user and group security IDs (SIDs) from Kerberos but was not able to read any claims information contained within a Kerberos ticket.
You can enable richer access control for federated applications by using Active Directory Domain Services (AD DS)-issued user and device claims together, with Active Directory Federation Services (AD FS).
Requirements
The Computers accessing federated applications, must Authenticate to AD FS using Windows Integrated Authentication.
- Windows Integrated Authentication is only available when connecting to the Backend AD FS Servers.
- Computers must be able to reach the Backend AD FS Servers for Federation Service Name
- AD FS Servers must offer Windows Integrated Authentication as a Primary Authentication method in its Intranet settings.
The policy Kerberos client support for claims compound authentication and Kerberos armoring must be applied to all Computers accessing federated applications that are protected by Compound Authentication. This is applicable in case of single forest or cross forest scenarios.
The Domain housing the AD FS Servers must have the KDC support for claims compound authentication and Kerberos armoring policy setting applied to the Domain Controllers.
Steps for configuring AD FS in Windows Server 2012 R2
Use the following steps for configuring compound authentication and claims
Step 1: Enable KDC support for claims, compound authentication, and Kerberos armoring on the Default Domain Controller Policy
- In Server Manager, select Tools, Group Policy Management.
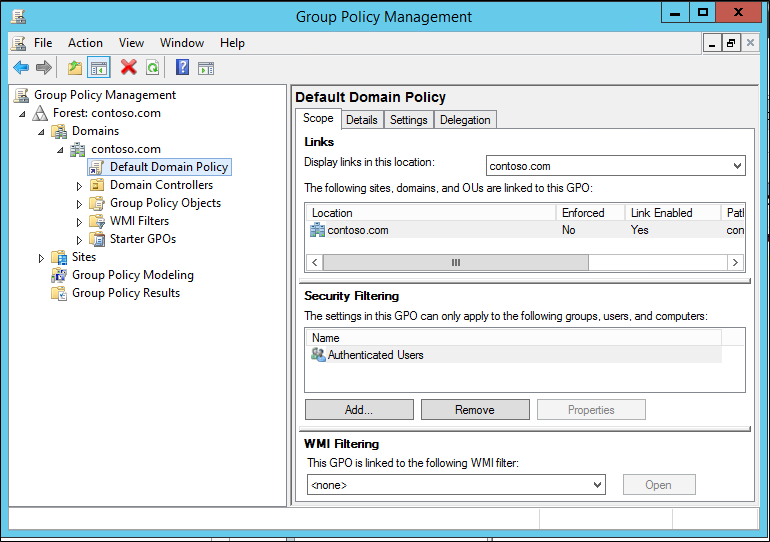
- Navigate down to the Default Domain Controller Policy, right-click and select edit.
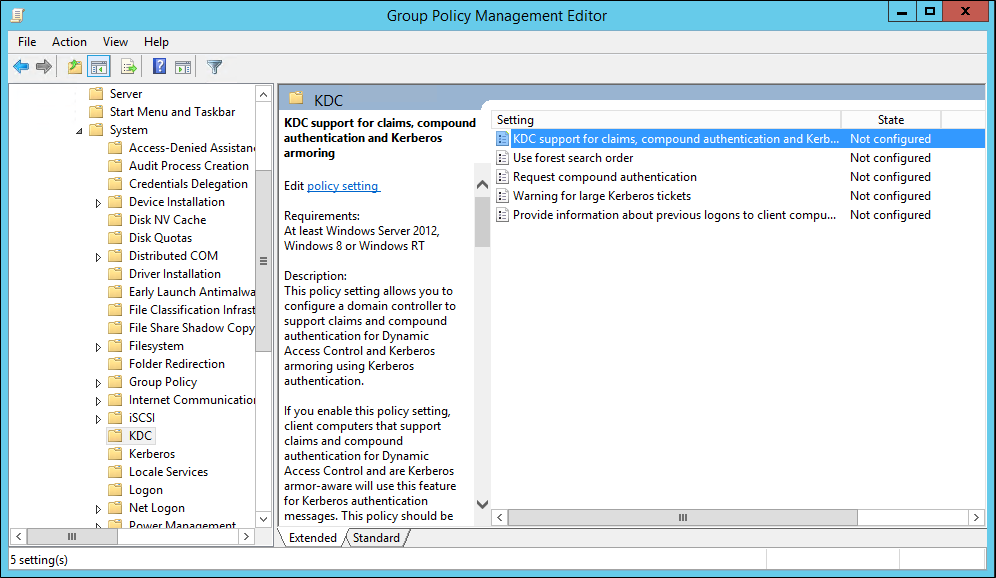
- On the Group Policy Management Editor, under Computer Configuration, expand Policies, expand Administrative Templates, expand System, and select KDC.
- In the right pane, double-click KDC support for claims, compound authentication, and Kerberos armoring.
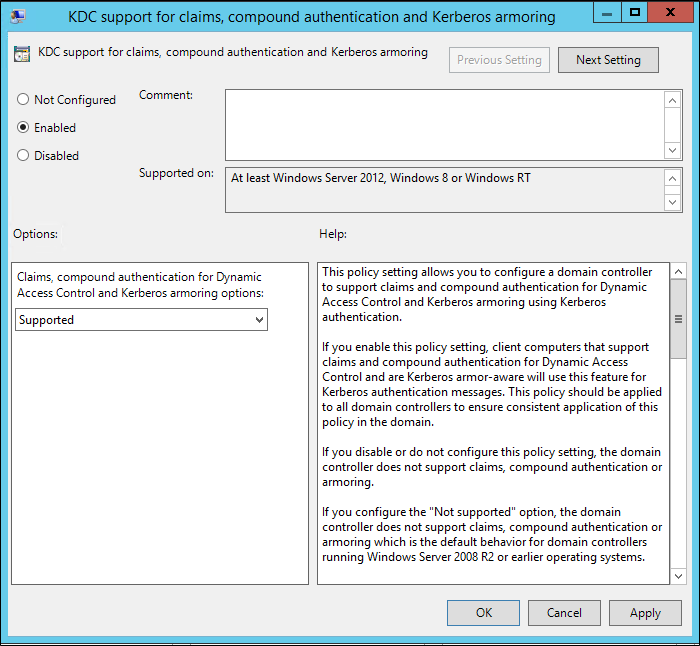
- In the new dialog window, set KDC support for claims to Enabled.
- Under Options, select Supported from the drop-down menu and then click Apply and OK.
Step 2: Enable Kerberos client support for claims, compound authentication, and Kerberos armoring on computers accessing federated applications
- On a Group Policy applied to the computers accessing federated applications, in the Group Policy Management Editor, under Computer Configuration, expand Policies, expand Administrative Templates, expand System, and select Kerberos.
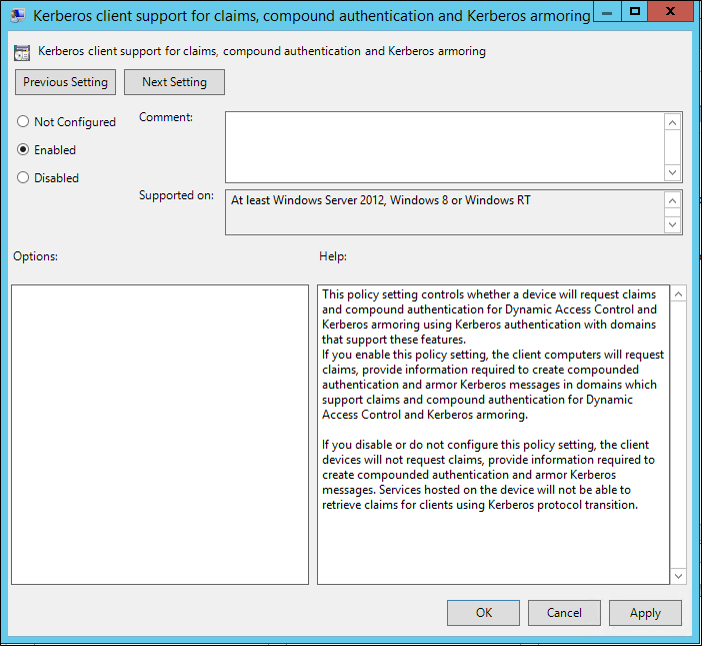
- In the right pane of the Group Policy Management Editor window, double-click Kerberos client support for claims, compound authentication, and Kerberos armoring.
- In the new dialog window, set Kerberos client support to Enabled and click Apply and OK.
- Close the Group Policy Management Editor.
Step 3: Ensure the AD FS servers have been updated.
You need to ensure that the following updates are installed on your AD FS servers.
| Update | Description |
|---|---|
| KB2919355 | Cumulative security update(includes KB2919355,KB2932046,KB2934018,KB2937592,KB2938439) |
| KB2959977 | Update for Server 2012 R2 |
| Hotfix 3052122 | This update adds support for compound ID claims in Active Directory Federation Services. |
Step 4: Configure the Primary Authentication Provider
Set the Primary Authentication Provider to Windows Authentication for AD FS Intranet settings.
In AD FS Management, under Authentication Policies, select Primary Authentication and under Global Settings click edit.
On Edit Global Authentication Policy under Intranet select Windows Authentication.
Click Apply and Ok.
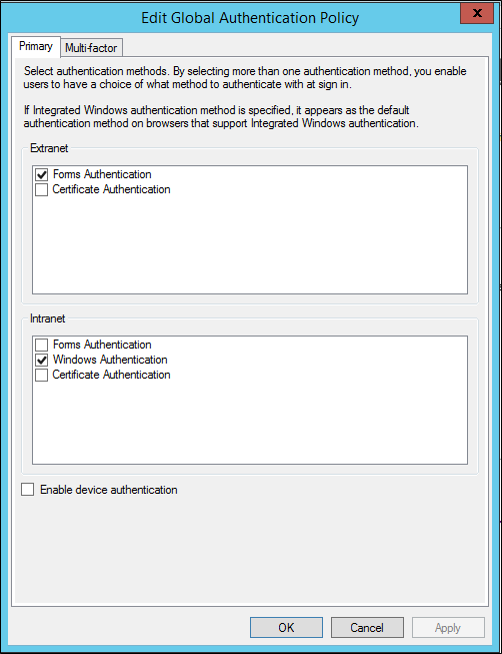
Using PowerShell you can use the Set-AdfsGlobalAuthenticationPolicy cmdlet.
Set-AdfsGlobalAuthenticationPolicy -PrimaryIntranetAuthenticationProvider 'WindowsAuthentication'
Note
In a WID based farm, the PowerShell command must be executed on the Primary AD FS Server. In a SQL based farm, the PowerShell command may be executed on any AD FS server that is a member of the farm.
Step 5: Add the claim description to AD FS
Add the following Claim Description to the farm. This Claim Description is not present by default in AD FS 2012 R2 and needs to be manually added.
In AD FS Management, under Service, right-click Claim description and select Add claim description
Enter the following information in the claim description
- Display Name: 'Windows device group'
- Claim Description:
'<https://schemas.microsoft.com/ws/2008/06/identity/claims/windowsdevicegroup>'`
Place a check in both boxes.
Click OK.
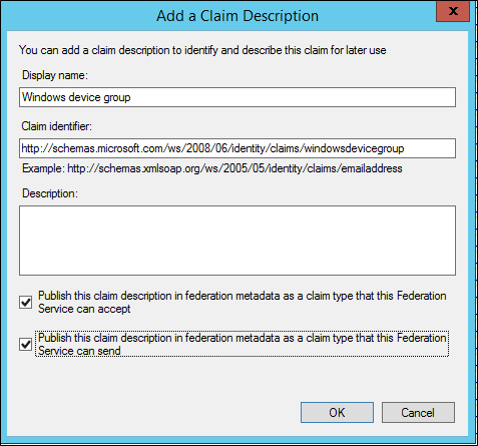
Using PowerShell you can use the Add-AdfsClaimDescription cmdlet.
Add-AdfsClaimDescription -Name 'Windows device group' -ClaimType 'https://schemas.microsoft.com/ws/2008/06/identity/claims/windowsdevicegroup' `
-ShortName 'windowsdevicegroup' -IsAccepted $true -IsOffered $true -IsRequired $false -Notes 'The windows group SID of the device'
Note
In a WID based farm, the PowerShell command must be executed on the Primary AD FS Server. In a SQL based farm, the PowerShell command may be executed on any AD FS server that is a member of the farm.
Step 6: Enable the compound authentication bit on the msDS-SupportedEncryptionTypes attribute
- Enable compound authentication bit on the msDS-SupportedEncryptionTypes attribute on the account you designated to run the AD FS service using the Set-ADServiceAccount PowerShell cmdlet.
Note
If you change the service account, then you must manually enable compound authentication by running the Set-ADUser -compoundIdentitySupported:$true Windows PowerShell cmdlets.
Set-ADServiceAccount -Identity “ADFS Service Account” -CompoundIdentitySupported:$true
- Restart the AD FS Service.
Note
Once ‘CompoundIdentitySupported' is set to true, installation of the same gMSA on new Servers (2012R2/2016) fails with the following error – Install-ADServiceAccount : Cannot install service account. Error Message: 'The provided context did not match the target.'.
Solution: Temporarily set CompoundIdentitySupported to $false. This step causes AD FS to stop issuing WindowsDeviceGroup claims. Set-ADServiceAccount -Identity 'ADFS Service Account' -CompoundIdentitySupported:$false Install the gMSA on the new Server and then enable CompoundIdentitySupported back to $True. Disabling CompoundIdentitySupported and then reenabling does not need AD FS service to be restarted.
Step 7: Update the AD FS Claims Provider Trust for Active Directory
- Update the AD FS Claims Provider Trust for Active Directory to include the following ‘Pass-through' Claim rule for ‘WindowsDeviceGroup' Claim.
- In AD FS Management, click Claims Provider Trusts and in the right pane, right-click Active Directory and select Edit Claim Rules.
- On the Edit Claim Rules for Active Director click Add Rule.
- On the Add Transform Claim Rule Wizard select Pass Through or Filter an Incoming Claim and click Next.
- Add a display name and select Windows device group from the Incoming claim type drop-down.
- Click Finish. Click Apply and Ok.
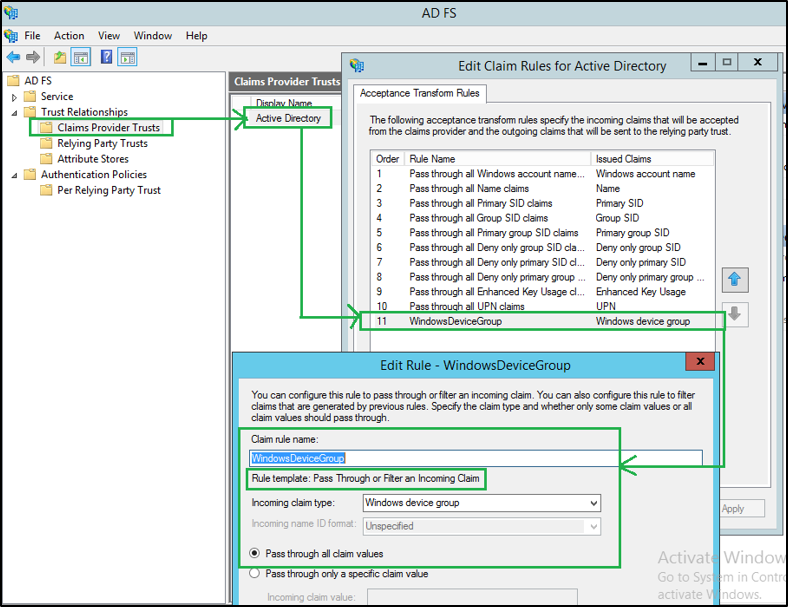
Step 8: On the Relying Party where the ‘WindowsDeviceGroup' claims are expected, add a similar ‘Pass-through' Or ‘Transform' claim rule.
- In AD FS Management, click Relying Party Trusts and in the right pane, right-click your RP and select Edit Claim Rules.
- On the Issuance Transform Rules click Add Rule.
- On the Add Transform Claim Rule Wizard select Pass Through or Filter an Incoming Claim and click Next.
- Add a display name and select Windows device group from the Incoming claim type drop-down.
- Click Finish. Click Apply and Ok.
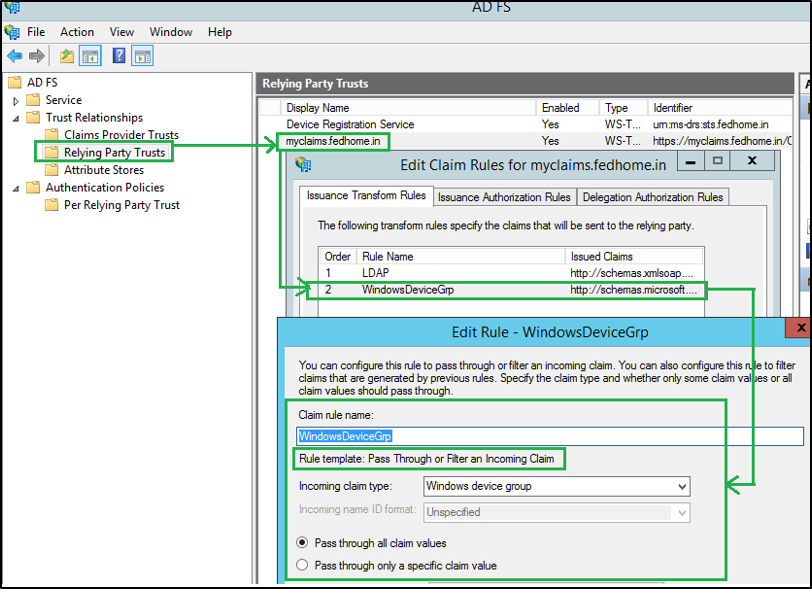
Steps for configuring AD FS in Windows Server 2016
The following will detail the steps for configuring compound authentication on AD FS for Windows Server 2016.
Step 1: Enable KDC support for claims, compound authentication, and Kerberos armoring on the Default Domain Controller Policy
- In Server Manager, select Tools, Group Policy Management.
- Navigate down to the Default Domain Controller Policy, right-click and select edit.
- On the Group Policy Management Editor, under Computer Configuration, expand Policies, expand Administrative Templates, expand System, and select KDC.
- In the right pane, double-click KDC support for claims, compound authentication, and Kerberos armoring.
- In the new dialog window, set KDC support for claims to Enabled.
- Under Options, select Supported from the drop-down menu and then click Apply and OK.
Step 2: Enable Kerberos client support for claims, compound authentication, and Kerberos armoring on computers accessing federated applications
- On a Group Policy applied to the computers accessing federated applications, in the Group Policy Management Editor, under Computer Configuration, expand Policies, expand Administrative Templates, expand System, and select Kerberos.
- In the right pane of the Group Policy Management Editor window, double-click Kerberos client support for claims, compound authentication, and Kerberos armoring.
- In the new dialog window, set Kerberos client support to Enabled and click Apply and OK.
- Close the Group Policy Management Editor.
Step 3: Configure the Primary Authentication Provider
- Set the Primary Authentication Provider to Windows Authentication for AD FS Intranet settings.
- In AD FS Management, under Authentication Policies, select Primary Authentication and under Global Settings click edit.
- On Edit Global Authentication Policy under Intranet select Windows Authentication.
- Click Apply and Ok.
- Using PowerShell you can use the Set-AdfsGlobalAuthenticationPolicy cmdlet.
Set-AdfsGlobalAuthenticationPolicy -PrimaryIntranetAuthenticationProvider 'WindowsAuthentication'
Note
In a WID based farm, the PowerShell command must be executed on the Primary AD FS Server. In a SQL based farm, the PowerShell command may be executed on any AD FS server that is a member of the farm.
Step 4: Enable the compound authentication bit on the msDS-SupportedEncryptionTypes attribute
- Enable compound authentication bit on the msDS-SupportedEncryptionTypes attribute on the account you designated to run the AD FS service using the Set-ADServiceAccount PowerShell cmdlet.
Note
If you change the service account, then you must manually enable compound authentication by running the Set-ADUser -compoundIdentitySupported:$true Windows PowerShell cmdlets.
Set-ADServiceAccount -Identity “ADFS Service Account” -CompoundIdentitySupported:$true
- Restart the AD FS Service.
Note
Once ‘CompoundIdentitySupported' is set to true, installation of the same gMSA on new Servers (2012R2/2016) fails with the following error – Install-ADServiceAccount : Cannot install service account. Error Message: 'The provided context did not match the target.'.
Solution: Temporarily set CompoundIdentitySupported to $false. This step causes AD FS to stop issuing WindowsDeviceGroup claims. Set-ADServiceAccount -Identity 'ADFS Service Account' -CompoundIdentitySupported:$false Install the gMSA on the new Server and then enable CompoundIdentitySupported back to $True. Disabling CompoundIdentitySupported and then reenabling does not need AD FS service to be restarted.
Step 5: Update the AD FS Claims Provider Trust for Active Directory
- Update the AD FS Claims Provider Trust for Active Directory to include the following ‘Pass-through' Claim rule for ‘WindowsDeviceGroup' Claim.
- In AD FS Management, click Claims Provider Trusts and in the right pane, right-click Active Directory and select Edit Claim Rules.
- On the Edit Claim Rules for Active Director click Add Rule.
- On the Add Transform Claim Rule Wizard select Pass Through or Filter an Incoming Claim and click Next.
- Add a display name and select Windows device group from the Incoming claim type drop-down.
- Click Finish. Click Apply and Ok.
Step 6: On the Relying Party where the ‘WindowsDeviceGroup' claims are expected, add a similar ‘Pass-through' Or ‘Transform' claim rule.
- In AD FS Management, click Relying Party Trusts and in the right pane, right-click your RP and select Edit Claim Rules.
- On the Issuance Transform Rules click Add Rule.
- On the Add Transform Claim Rule Wizard select Pass Through or Filter an Incoming Claim and click Next.
- Add a display name and select Windows device group from the Incoming claim type drop-down.
- Click Finish. Click Apply and Ok.
Validation
To validate the release of ‘WindowsDeviceGroup' claims, create a test Claims Aware Application using .Net 4.6. With WIF SDK 4.0.
Configure the Application as a Relying Party in AD FS and update it with Claim Rule as specified in steps above.
When authenticating to the Application using Windows Integrated Authentication provider of AD FS, the following claims are created.
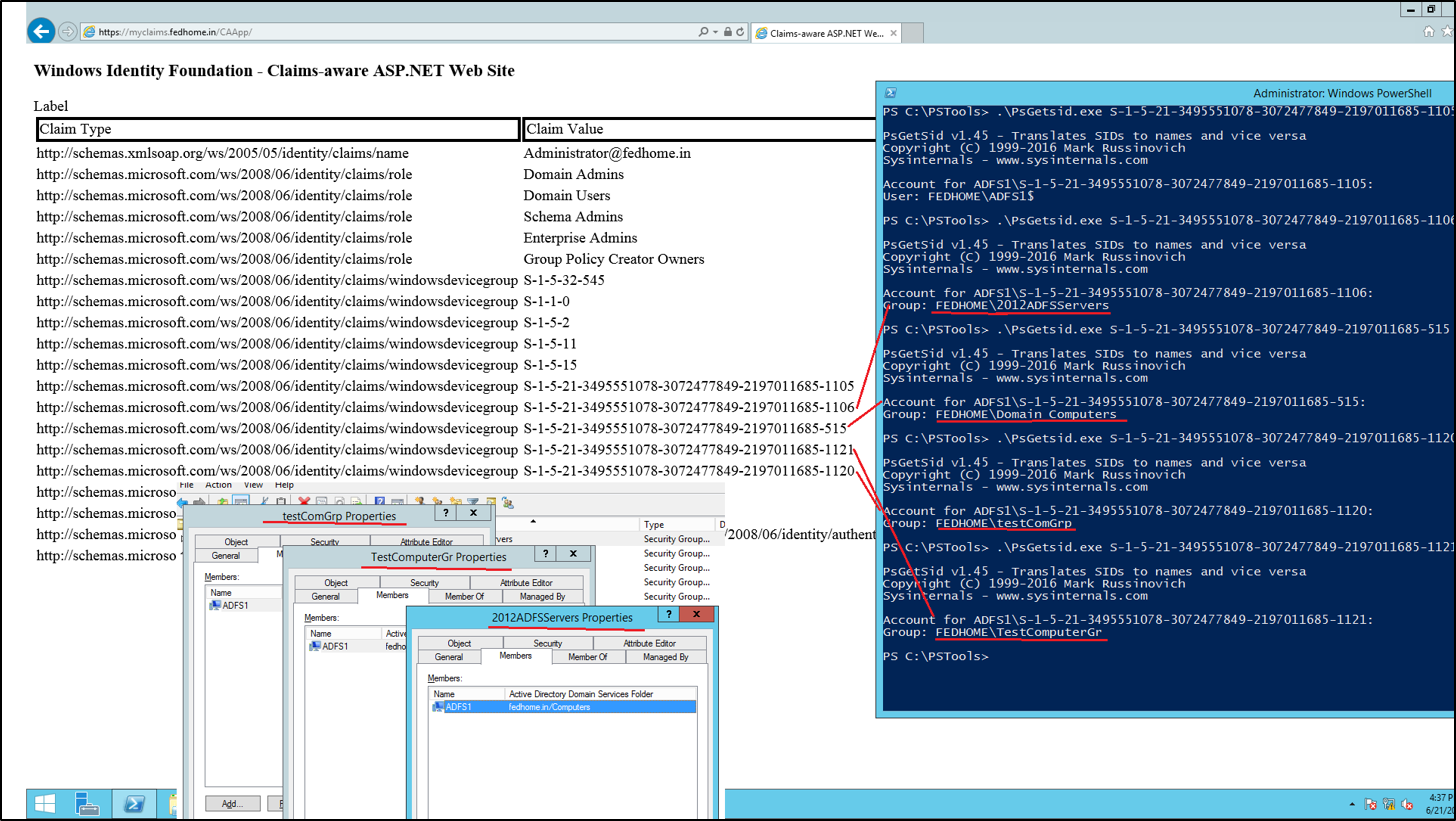
The Claims for the computer/device may now be consumed for richer access controls.
For example – The following AdditionalAuthenticationRules Tells AD FS to invoke MFA if – The Authenticating User is not member of the security group “-1-5-21-2134745077-1211275016-3050530490-1117” AND the Computer (where is the user is Authenticating from) is not member of the security group "S-1-5-21-2134745077-1211275016-3050530490-1115 (WindowsDeviceGroup)"
However, if any of the above conditions are met, do not invoke MFA.
'NOT EXISTS([Type == "https://schemas.microsoft.com/ws/2008/06/identity/claims/windowsdevicegroup", Value =~ "S-1-5-21-2134745077-1211275016-3050530490-1115"])
&& NOT EXISTS([Type == "https://schemas.microsoft.com/ws/2008/06/identity/claims/groupsid", Value =~ "S-1-5-21-2134745077-1211275016-3050530490-1117"])
=> issue(Type = "https://schemas.microsoft.com/ws/2008/06/identity/claims/authenticationmethod", Value = "https://schemas.microsoft.com/claims/multipleauthn");'