Tutorial: Enable storage bus cache with Storage Spaces on standalone servers
Applies to: Windows Server 2022
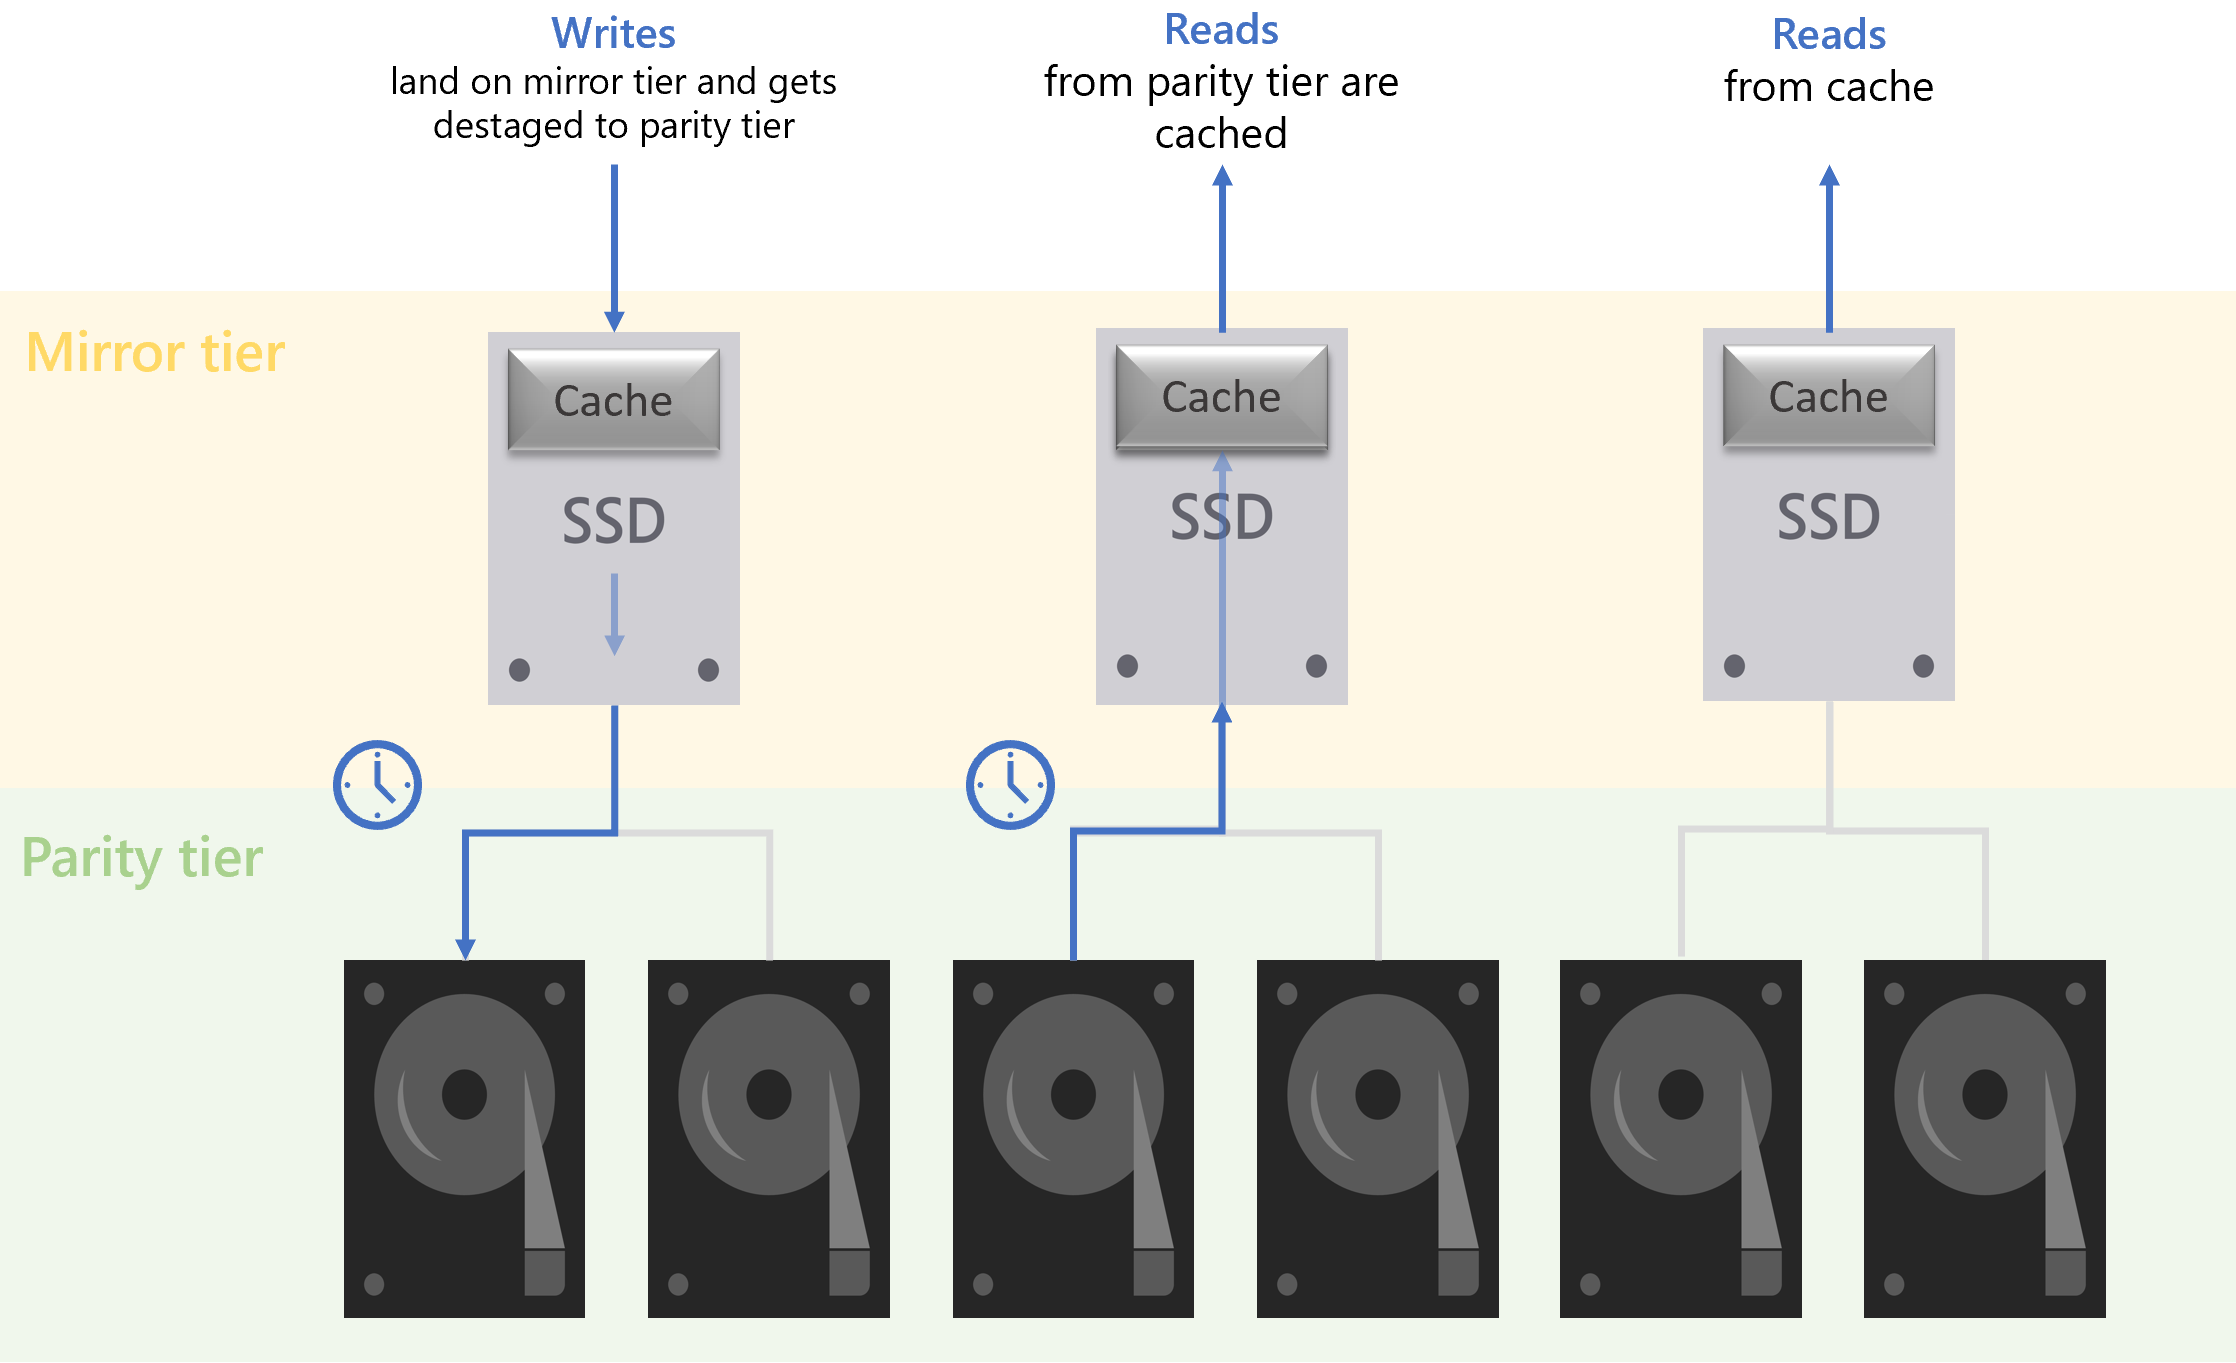
The storage bus cache for standalone servers can significantly improve read and write performance, while maintaining storage efficiency and keeping the operational costs low. This feature binds together faster media (for example, SSD) with slower media (for example, HDD) to create tiers. For more information, see Understanding the storage pool cache. By default, only a portion of the faster media tier is reserved for the cache.
| Resiliency | Cache type |
|---|---|
| None (Simple space) | Read and write |
| Mirror accelerated parity | Read |
If your system doesn't require resiliency or has external backups, the storage bus cache supports both read and write caching. For resilient systems, the storage bus cache only serves as a read cache, and you should choose Resilient File System (ReFS) Mirror-accelerated parity as the volume resiliency. This combination improves random read performance as data is read from the parity tier and cached on the faster mirror tier. The mirror tier also provides write caching capabilities if the Provision Mode is set to Shared (default).
In this tutorial, you learn about:
- What the storage bus cache is
- How to enable the storage bus cache
- Managing the cache after deployment
Prerequisites
 You should consider storage bus cache if your environment matches all of the following characteristics
- Your server runs Windows Server 2022; and
- Your server has 2 media/ drive types, one of which must be HDD (for example: SSD+HDD or NVMe+HDD); and
- Your server has the Failover Clustering feature installed
 You can't use storage bus cache if your environment matches any of the following characteristics
- Your server runs Windows Server 2016 or 2019; or
- Your server has an all flash configuration; or
- Your server is a member of a Failover Cluster
Note
This feature requires your server to have the Failover Clustering feature installed, but your server can't be a part of a Failover Cluster.
Feature overview
This section explains what each configurable field of the storage bus cache is and applicable values.
Get-StorageBusCache
When not enabled, the output should resemble the following example:
ProvisionMode                  : Shared
SharedCachePercent             : 15
CacheMetadataReserveBytes      : 34359738368
CacheModeHDD                   : ReadWrite
CacheModeSSD                   : WriteOnly
CachePageSizeKBytes            : 16
Enabled                        : False
Note
For general use, you should use default settings. Any changes must be made prior to enabling the storage bus cache.
Provision Mode
This field determines if the faster media tier, or only a portion of it, is used for caching. This field can't be modified after enabling the storage bus cache. Prvision Mode has two options:
- Shared (default): The cache only takes up a portion of the faster media tier. The exact percentage is configurable by the Shared Cache Percentage field.
- Cache: Dedicate most of the faster media tier to caching as opposed to only a portion. For more information, see Understanding the storage pool cache.
Shared cache percentage
This field is only applicable when the Provision Mode is set to Shared. The default value is 15%, and the field can be set from 5% to 90%. You shouldn't use a value over 50% when you use mirror accelerated parity volumes because there needs to be a balance between the cache and the mirror tier.
Enabled
This field refers to the state of the storage bus cache and can either be true or false.
Advanced fields
Important
Changes to these fields aren't recommended. Adjustments after enabling the storage bus cache can't be made.
Cache metadata reserve bytes: The amount of disk space (in bytes) reserved for Storage Spaces. This field is only applied if the Provision Mode is Cache.
Cache mode HDD: The default is to allow the HDD capacity devices to cache reads and writes. For Simple spaces, this setting can be set to ReadWrite or WriteOnly.
Cache mode SSD: This mode is for future use when all flash systems are supported. The default is to allow the SSD capacity devices to cache writes only.
Cache page size KBytes: This field can be set to 8, 16 (default), 32 and 64.
Enable storage bus cache in PowerShell
This section is a step-by-step guide on how to enable the storage bus cache for your stand-alone server in PowerShell.
Import the module.
Import-Module StorageBusCacheConfigure storage bus cache settings.
You should use default settings. If you do, skip this step to continue with the defaults.
Important
If configuration is needed, do so before enabling the storage bus cache. Refer to Feature overview section for details of the fields.
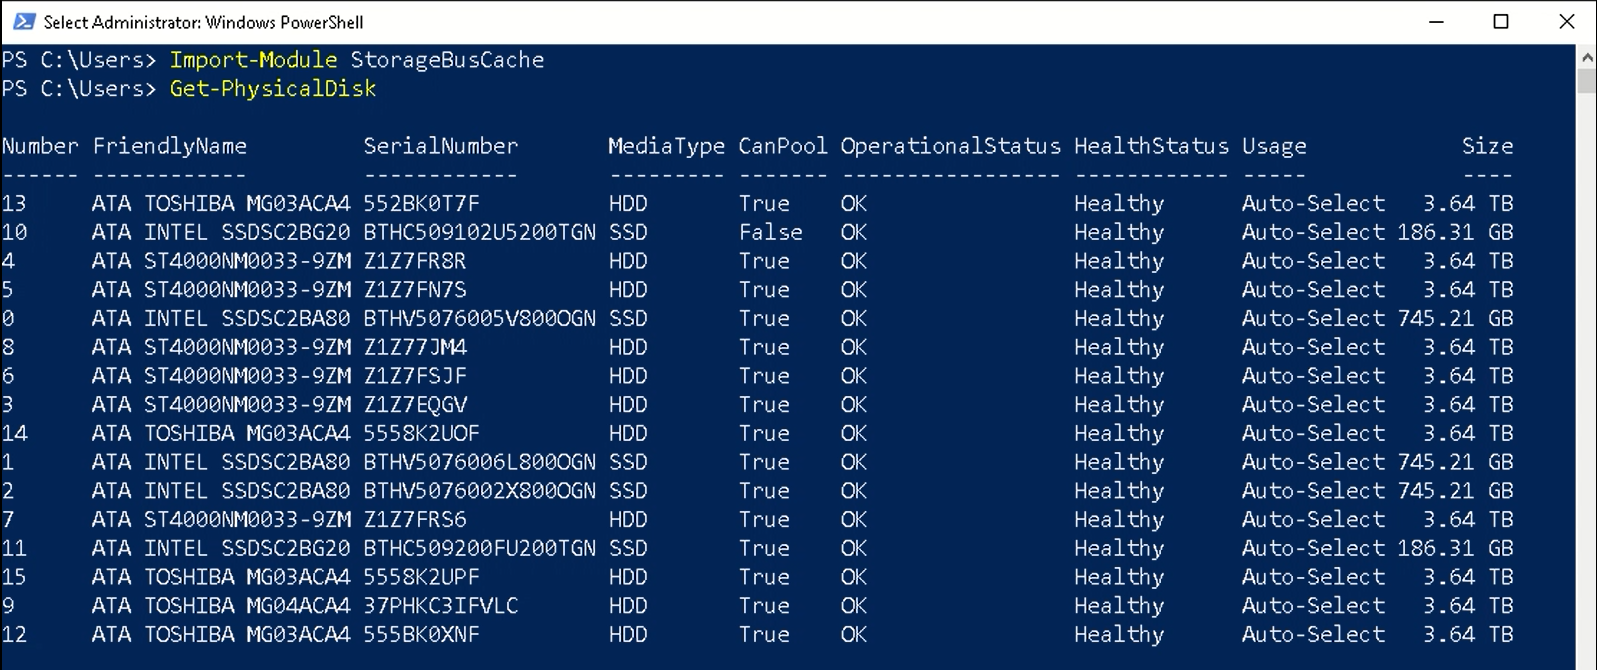
Check the drive status.
Get-PhysicalDiskThe output should resemble the following image, where the Number column shows values under 500 and the CanPool column shows true for all nonboot drives.
Enable storage bus cache.
Enable-StorageBusCacheThis step will:
- Create a storage pool with all the available drives.
- Bind the fast and slow media and form the cache.
- Add the storage bus cache with default or custom settings.
You can run
Get-StoragePoolto see the name of the storage pool andGet-PhysicalDiskagain to see the effects of enabling storage bus cache. The output should resemble the following image. The Number column shows values over 500, indicating the storage bus claimed the drive. The CanPool column now shows False for all nonboot drives. If theProvisionModeis set to Cache prior to enabling, the Usage column shows as Journal for the faster drives.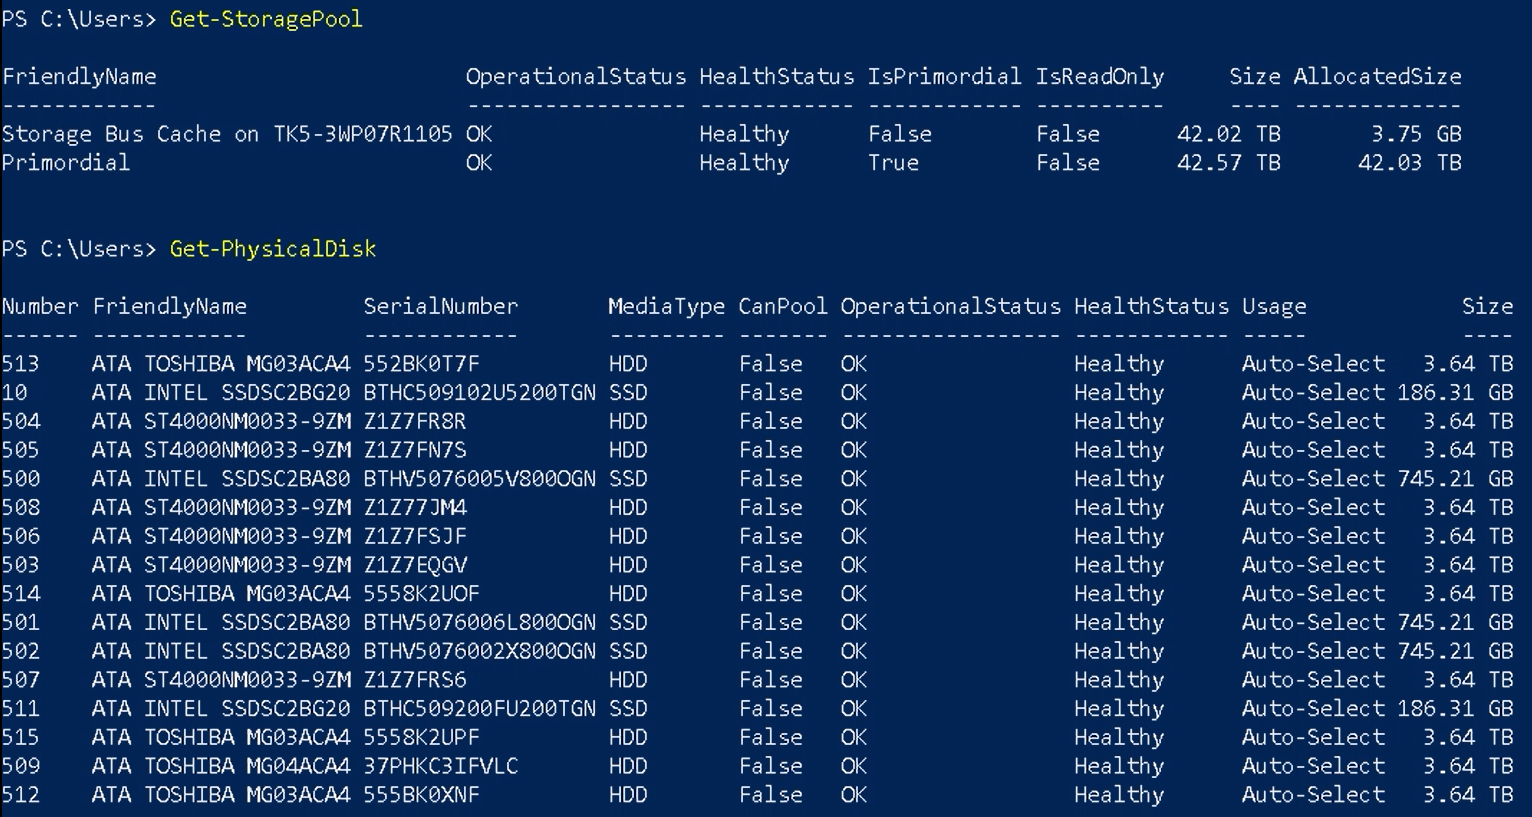
Check the storage bus cache state.
Check that the fields are correct and the Enabled field is now set to true.
Get-StorageBusCacheThe output should resemble the following example:
ProvisionMode                  : Shared
SharedCachePercent             : 15
CacheMetadataReserveBytes      : 34359738368
CacheModeHDD                   : ReadWrite
CacheModeSSD                   : WriteOnly
CachePageSizeKBytes            : 16
Enabled                        : True
Because the storage bus cache has been successfully enabled, the next step is to create a volume.
Create a volume
The volume you should create depends on whether you're creating that volume with or without resiliency.
Volumes with resiliency
The following PowerShell cmdlet creates a 1-TiB mirror-accelerated parity volume with a Mirror:Parity ratio of 20:80, which is the configuration you should use for most workloads. For more information, see Mirror-accelerated parity.
New-Volume –FriendlyName "TestVolume" -FileSystem ReFS -StoragePoolFriendlyName Storage* -StorageTierFriendlyNames MirrorOnSSD, ParityOnHDD -StorageTierSizes 200GB, 800GB
Volumes without resiliency
The following PowerShell cmdlet creates a 1-TB Simple volume that can't tolerate any disk failure. Both read and write caching is supported.
New-Volume -FriendlyName "TestVolume" -FileSystem ReFS -StoragePoolFriendlyName Storage* -ResiliencySettingName Simple -Size 1TB
Make changes after enabling storage bus cache
After you run Enable-StorageBusCache, the Provision mode, Shared cache percent, Cache metadata reserve bytes, Cache mode HDD, Cache mode SSD, and Cache page size can't be modified. Limited changes can be made to the physical setup. For more information, see the following common scenarios.
Add or replace capacity drives (HDDs)
Once the drive has been manually added, run the following cmdlet to finish the intake process.
Update-StorageBusCache
Add or replace cache drives (NVMes or SSDs)
There's no cmdlet to unbind/rebind existing bindings and balance the relationship. The following steps cause the existing read cache to be lost.
Remove-StorageBusBinding
New-StorageBusBinding
Check and balance the cache and capacity bindings
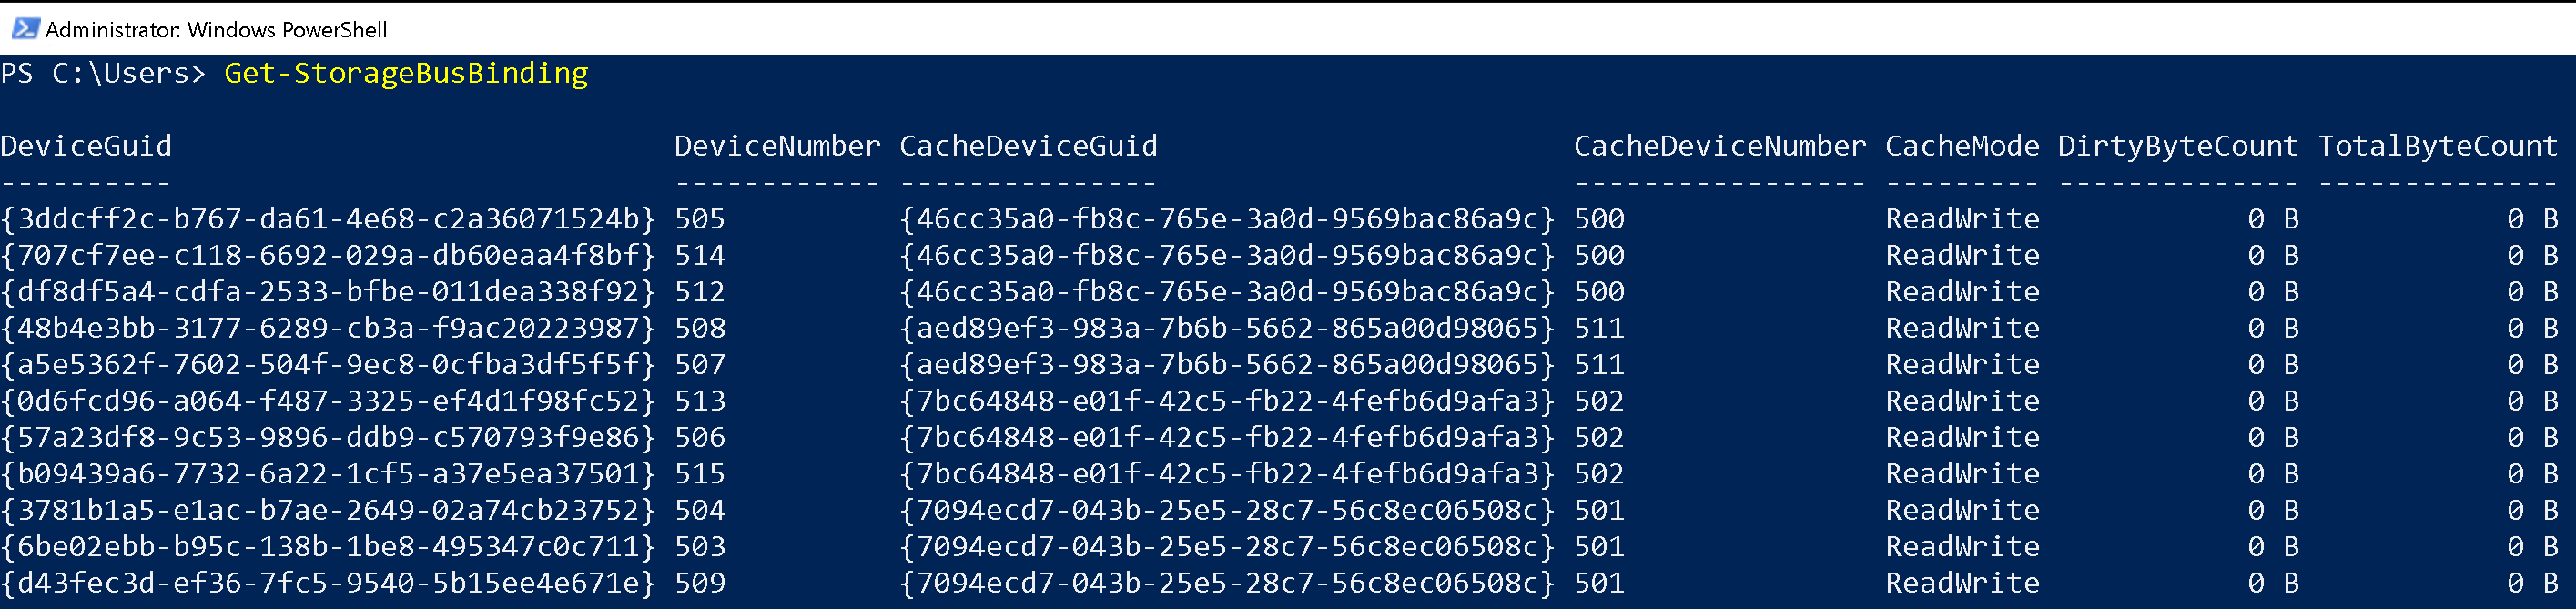
Use the following cmdlet to check the existing cache and capacity bindings.
Get-StorageBusBinding
In the following example, the first column lists capacity drives, and the third column lists the cache drives that they're bound to. Follow the instructions in adding or replacing cache drives to balance, so the existing cache isn't preserved.
Storage bus cache FAQ
This section answers frequently asked questions about the storage bus cache on Windows Server 2022.
Why does the Failover Clustering feature need to be installed when the server isn't a part of a Failover Cluster?
This feature is designed for standalone servers but built on top of the storage bus layer (SBL) cache for Storage Spaces Direct. The Failover Clustering feature needs to be installed as clustering components are needed.
Will the storage bus cache work with an all flash configuration?
No, this feature only works when there are two media types, one of which must be HDD. This feature doesn't work with RAID, SAN, or flash systems.
How can the storage bus cache settings be changed?
See the following example for changing the Provision mode from Shared (default) to Cache. Default settings are recommended, and any changes should be made before the storage bus cache is enabled.
Set-StorageBusCache -ProvisionMode Cache
Feedback
Coming soon: Throughout 2024 we will be phasing out GitHub Issues as the feedback mechanism for content and replacing it with a new feedback system. For more information see: https://aka.ms/ContentUserFeedback.
Submit and view feedback for