Convert your PyTorch model to ONNX format
In the previous stage of this tutorial, we used PyTorch to create our machine learning model. However, that model is a .pth file. To be able to integrate it with Windows ML app, you'll need to convert the model to ONNX format.
Export the model
To export a model, you will use the torch.onnx.export() function. This function executes the model, and records a trace of what operators are used to compute the outputs.
- Copy the following code into the
DataClassifier.pyfile in Visual Studio, above your main function.
#Function to Convert to ONNX
def convert():

    # set the model to inference mode
    model.eval()

    # Let's create a dummy input tensor
    dummy_input = torch.randn(1, 3, 32, 32, requires_grad=True)

    # Export the model
    torch.onnx.export(model,         # model being run
         dummy_input,       # model input (or a tuple for multiple inputs)
         "Network.onnx",       # where to save the model
         export_params=True,  # store the trained parameter weights inside the model file
         opset_version=11,    # the ONNX version to export the model to
         do_constant_folding=True,  # whether to execute constant folding for optimization
         input_names = ['input'],   # the model's input names
         output_names = ['output'], # the model's output names
         dynamic_axes={'input' : {0 : 'batch_size'},    # variable length axes
                                'output' : {0 : 'batch_size'}})
    print(" ")
    print('Model has been converted to ONNX')
It's important to call model.eval() or model.train(False) before exporting the model, as this sets the model to inference mode. This is needed since operators like dropout or batchnorm behave differently in inference and training mode.
- To run the conversion to ONNX, add a call to the conversion function to the main function. You don't need to train the model again, so we'll comment out some functions that we no longer need to run. Your main function will be as follows.
if __name__ == "__main__":
    num_epochs = 10
    train(num_epochs)
    print('Finished Training\n')
    test()
    test_species()
    convert()
- Run the project again by selecting the
Start Debuggingbutton on the toolbar, or pressingF5. There's no need to train the model again, just load the existing model from the project folder.
Navigate to your project location and find the ONNX model next to the .pth model.
Note
Interested in learning more? Review the PyTorch tutorial on exporting a mdoel.
Explore your model.
Open the
Network.onnxmodel file with Neutron.Select the data node to open the model properties.
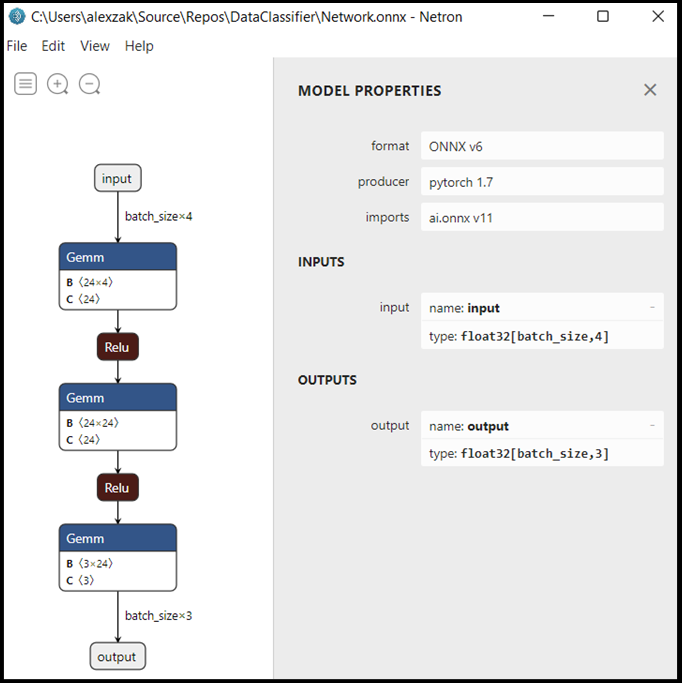
As you can see, the model requires a 32-bit tensor (multi-dimensional array) float object as an input, and returns a Tensor float as an output. The output array will include the probability for every label. The way you built the model, the labels are represented by 3 numbers, each one associated with a specific type of iris flower.
| Label 1 | label 2 | Label 3 |
|---|---|---|
| 0 | 1 | 2 |
| Iris-setosa | Iris-versicolor | Iris-virginica |
You'll need to extract these values to show the correct prediction with Windows ML app.
Next Steps
Our model is ready to deploy. Next, for the main event - let's build a Windows application and run it locally on your Windows device.
Feedback
Coming soon: Throughout 2024 we will be phasing out GitHub Issues as the feedback mechanism for content and replacing it with a new feedback system. For more information see: https://aka.ms/ContentUserFeedback.
Submit and view feedback for