QR codes in Unity
HoloLens 2 headsets can track and detect QR codes that can be used to provide holograms and other AR features. This article guides you through everything you need to know to start using QR codes in your Unity app, including:
- Adding QR code detection to your Unity app.
- Understanding important concepts and Unity components you need to use.
- Provides tutorials that cover common QR code usage.
- Introduces the AR Marker sample scenario that demonstrates of a QR code-enabled scene and example scripts.
Before continuing with this article, we recommend going through the QR codes overview.
![]()
Configuring your Unity project and app
Your Unity project and app must be set up and configured properly to enable QR code functionality, which requires:
- OpenXR for Windows Mixed Reality version 113.2403.5001 or later.
Note
This comes with the OS and can be updated through Windows Store. Please be aware that users may have earlier versions installed, and their devices will be unable to work with AR markers such as QR codes until updating to version 113.2403.5001 or later.
- A project compatible with a supported version of Unity:
- Unity 2022.3 LTS (Recommended)
- Unity 2021.3 LTS
- The Mixed Reality OpenXR Plugin.
- Webcam capabilities enabled for your Unity project.
- Camera permissions granted to your app.
The following sections guide you through how to configure your Unity project and app to enable QR code detection.
Getting the Mixed Reality OpenXR Plugin
The Mixed Reality OpenXR Plugin package contains C# APIs you can use to access QR code functionality.
To import the package:
The Mixed Reality Feature Tool also simplifies package management and can be used to find, update, and add the Mixed Reality features your app requires. See Welcome to the Mixed Reality Feature Tool for detailed instructions on how to use the tool.
Enabling WebCam capabilities
To detect and track QR codes, your Unity project needs to have WebCam capabilities enabled.
To enable WebCam capabilities:
- Open your Unity project.
- Click Edit in the Unity editor’s app menu.
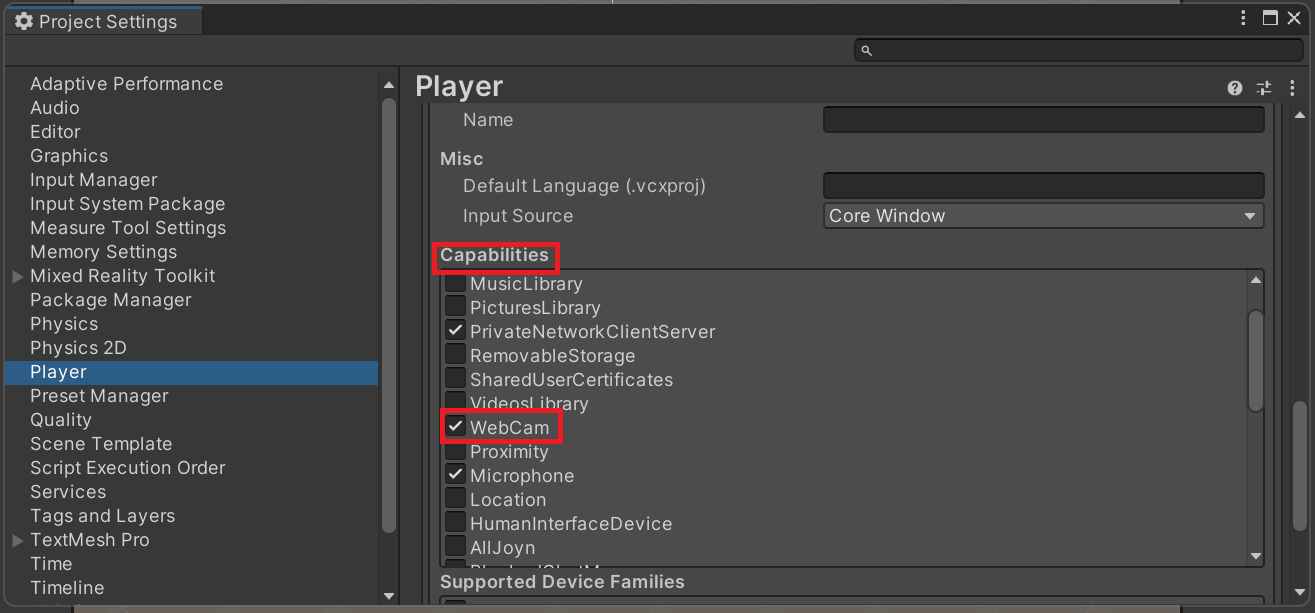
- Go to Project Settings > Player and select the UWP tab as shown:

- Enable WebCam in the Capabilities list.

- Exit Project Settings.
WebCam capabilities are now enabled for your Unity app. However, your app must still be granted permissions to access the device camera.
Granting your app camera access permissions
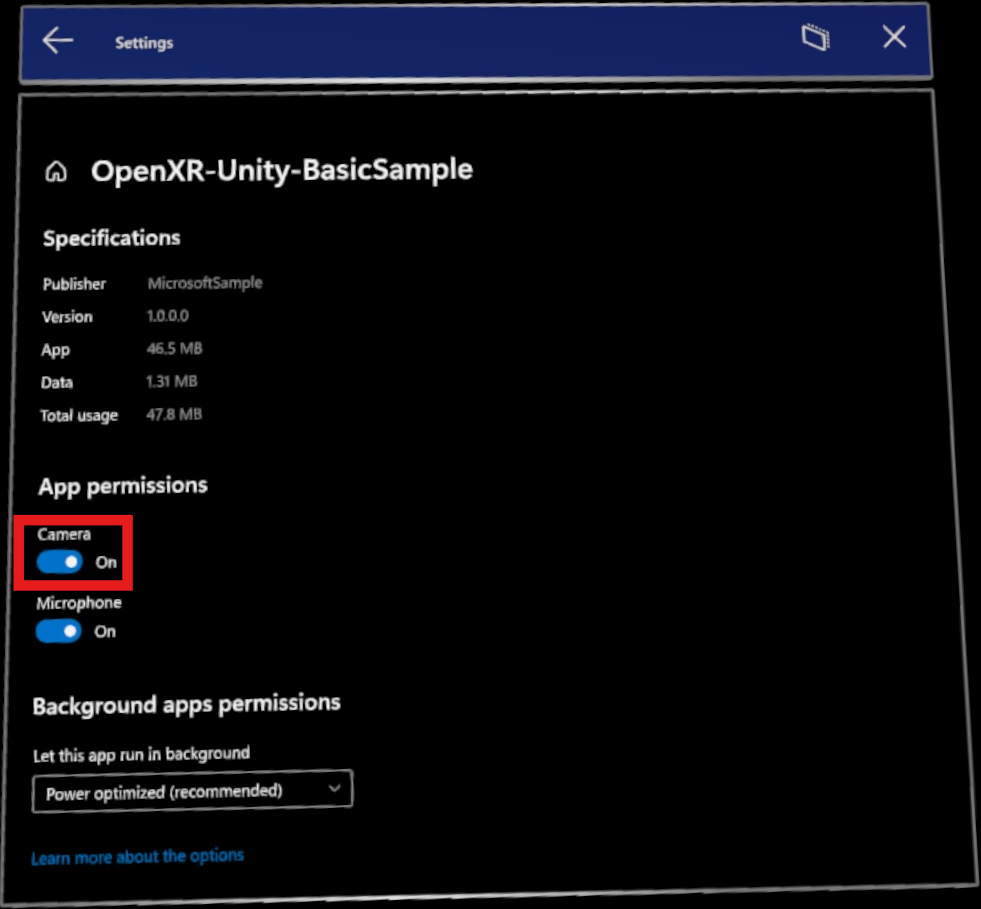
If your app has WebCam capabilities enabled, the permissions dialog prompts users to grant your app access to the device camera.

This dialog is shown to users only once, typically when entering a scene containing an ARMarkerManager with QR code marker support enabled. If camera access is denied, users can go to Settings > Apps and enable it through the app's Advanced Options.

Building QR code detection into a scene
QR code detection must be built into every scene you want to use QR codes in, which requires:
- A
GameObjectwithARMarkerManagerattached.ARMarkerManageris solely responsible for creating, updating, and removing everyGameObjectfor detected QR codes. - A prefab with
ARMarkerattached. ARMarkerManagerconfigured to use the prefab when creating aGameObjectwhen a QR code is detected.
Creating a prefab for QR codes
To use QR codes in your scene, you need to create a prefab for QR codes. ARMarkerManager uses this prefab to create a GameObject from whenever a QR code is detected.
To make a prefab for QR codes:
- Create a new prefab for your project.
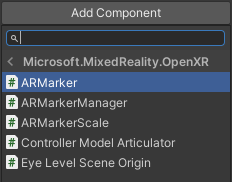
- Add the
ARMarkercomponent to the prefab, located under Script > Microsoft.MixedReality.OpenXR > ARMarker.

You now have a basic prefab to work with. You likely want your app to visually represent QR codes that are detected in the environment. The next section walks you through how to add a visual representation for QR codes.
Adding Visuals
In the previous section, adding ARMarkerto the prefab also automatically added the ARMarkerScale component. This component is used to match the scale of a QR code's visual representation to its physical counterpart.
To do so:
- Add an empty
GameObjectto the prefab you created in the previous section. It will represent all visual marker content. - Add a child 3D
GameObject, such as aQuad, to the marker contentGameObject.
- In the prefab's
ARMarkerScalecomponent, set Marker Scale Transform to the marker contentGameObject. Setting this field ensures the 3DGameObjectyou chose is scaled correctly to match real-world QR codes.
Adding ARMarkerManager to a scene
ARMarkerManager is solely responsible for creating, updating, and removing every GameObject for detected QR codes.
To add ARMarkerManager to your scene:
- Place a
GameObjectinto your scene. - Add the
ARMarkerManagercomponent to theGameObject, located under Script > Microsoft.MixedReality.OpenXR > ARMarkerManager.

- Set the
ARMarkerManagerMarker Prefab field to the prefab you created in the previous section.
- Expand Enabled Marker Types, then choose an element and set it to QR Code.

Keeping track of QR code changes
ARMarkerManager contains the markersChanged event, which provides ARMarkersChangedEventArgs to subscribers. Use these event arguments to track which QR codes are added or removed from detection or updated pose data.
The following code demonstrates subscribing to the ARMarkerManager.markersChanged event, using its event arguments to iterate through the ARMarker objects ARMarkerManager is handling and writing to Debug whether they are added, removed, or updated.
using System;
using Microsoft.MixedReality.OpenXR;

// ...

private void Awake()
{
    m_arMarkerManager = GetComponent<ARMarkerManager>();
    m_arMarkerManager.markersChanged += OnQRCodesChanged;
}

void OnQRCodesChanged(ARMarkersChangedEventArgs args)
{
    foreach (ARMarker qrCode in args.added)
        Debug.Log($"QR code with the ID {qrCode.trackableId} added.");

    foreach (ARMarker qrCode in args.removed)
        Debug.Log($"QR code with the ID {qrCode.trackableId} removed.");

    foreach (ARMarker qrCode in args.updated)
    {
        Debug.Log($"QR code with the ID {qrCode.trackableId} updated.");
        Debug.Log($"Pos:{qrCode.transform.position} Rot:{qrCode.transform.rotation} Size:{qrCode.size}");
    }
}
Getting the time a QR code was last detected
Use the ARMarker.lastSeenTime property to determine when the device last tracked a detected QR code and the amount of time, if any, tracking is lost. Time is measured in the number of seconds since Unity started your application and is analogous to UnityEngine.Time.realtimeSinceStartup.
Using a QR code's trackable ID
QR codes are trackables, which are anything an AR device can detect and track in a physical environment. Trackables derive from the type ARTrackable<TSessionRelativeData, TTrackable> that provides an ID, tracking state, pose, and other data.
The trackable ID for a QR code can be passed into ARMarkerManager methods to get the QR code’s properties, raw byte data, and string representation, and to set the transform mode for the QR code. These methods allow you to retrieve data for a QR code without having to hold on to an ARMarker object reference.
You can pass a QR code's ID into the following ARMarkerManager methods:
GetDecodedString(UnityEngine.XR.ARSubsystems.TrackableId trackableId)GetMarker(UnityEngine.XR.ARSubsystems.TrackableId trackableId)GetQRCodeProperties(UnityEngine.XR.ARSubsystems.TrackableId)GetRawData(UnityEngine.XR.ARSubsystems.TrackableId, Unity.Collections.Allocator)SetTransformMode(UnityEngine.XR.ARSubsystems.TrackableId, Microsoft.MixedReality.OpenXR.TransformMode)
Note
For the GetRawData method parameter allocator, passing Unity.Collections.Allocator.Temp is sufficient for most scenarios.
Following the tracking state of a QR code
Because an ARMarker is trackable, it inherits the trackingState property and is set to one of three UnityEngine.XR.ARSubsystems.TrackingState:
Limited: Indicates that the QR code is being tracked but limited information is available or is of poor quality.Tracking: Specifies that the QR code is being fully tracked.None: Indicates that the QR code isn't being tracked.
To monitor tracking state for a QR code, subscribe to the ARMarkerManager.markersChanged and iterate through the ARMarker marker collections provided in the event arguments passed to your event handler.
The following code demonstrates using the ARMarkerManager.markersChanged event to iterate through ARMarker objects for newly detected QR codes and writing their trackable ID to the Debug window.
using System;
using Microsoft.MixedReality.OpenXR;

// ...

private void Awake()
{
    m_arMarkerManager = GetComponent<ARMarkerManager>();
    m_arMarkerManager.markersChanged += OnQRCodesChanged;
}

void OnQRCodesChanged(ARMarkersChangedEventArgs args)
{
    foreach (ARMarker qrCode in args.added)
    {
       if (qrCode.trackingState == UnityEngine.XR.ARSubsystems.TrackingState.Tracking)
           Debug.Log($"Fully tracked QR code with the ID {qrCode.trackableId} was added.");
    }
}
Getting a QR code's version and QR code type
To get the version and type of a detected QR code:
- Call
ARMarker.GetQRCodeProperties(), which returns aQRCodePropertiesinstance. - Access the field
QRCodePropertiesin the return value to get the QR code's type. The value is eitherQRCodeType.QRCodeorQRCodeType.MicroQRCode. - Access the return value's
QRCodeProperties.versionfield to get the QR code's version. The value ranges from 1 to 40 if the type isQRCodeType.QRCode, and from 1 to 4 if the type isQRCodeType.MicroQRCode.
As an alternative, pass an ARMarker object's trackable ID to ARMarkerManager.GetQRCodeProperties(TrackableId) to get a QR code's type and version.
Warning
QR codes are the only marker type currently supported though support for other marker types may be added in future releases. If markerType is not ARMarkerType.QRCode, calling GetQRCodeProperties(TrackableId) throws System.InvalidOperationException. Consider wrapping calls to GetQRCodeProperties(TrackableId) in try-catch blocks if this could cause issues in your app later on.
Reading QR data
The ARMarker component is attached to every GameObject that ARMarkerManager creates. ARMarker provides two methods that return QR code data:
GetDecodedString(): This method gets the QR code's string representation, such as a URL.GetRawData(Unity.Collections.Allocator allocator): This method returns QR code content as a byte array, allowing fine-grain tuning on how the array is allocated. Use this method in hot paths and other situations where performance is critical.
The following code demonstrates basic usage of GetDecodedString() and GetRawData(Unity.Collections.Allocator allocator):
using System;
using Microsoft.MixedReality.OpenXR;

// ...

void OnQRCodesChanged(ARMarkersChangedEventArgs args)
{
    foreach (ARMarker qrCode in args.added)
    {
        var text = qrCode.GetDecodedString();
        Debug.Log($"QR code text: {text}");

        var bytes = qrCode.GetRawData(Unity.Collections.Allocator.Temp);
        Debug.Log($"QR code bytes: {bytes.Length}");
        bytes.Dispose();
    }
}
Obtaining QR code size, position, rotation, and center
An ARMarker object provides the size, position, rotation, and center of the QR code that it represents.
To obtain the QR code's size in meters, use the property ARMarker.size.
Use the ARMarker.transform property to obtain the rotation and world space position of the QR code's transform, and ARMarker.center to QR code's 2D coordinates relative to the QR code's transform. The transform itself is centered according to whether ARMarker.transformMode (the transform mode) is set to TransformMode.MostStable (most stable, the QR code's top-left) or TransformMode.Center (center, the QR code's geometric center).
Use the ARMarkerManager.defaultTransformMode field to set the transform mode ARMarkerManager creates new ARMarker objects with. The field is initialized with the Default Transform Mode field is set to in the Unity Inspector as shown:

As an alternative to using ARMarker.transformMode, pass an ARMarker object's trackable ID to ARMarkerManager.SetTransformMode(TrackableId, TransformMode) to set its transform mode.
The following code demonstrates getting a new QR code's size and center, the position and rotation of its transform, and updated transform position after changing the transform mode.
using System;
using Microsoft.MixedReality.OpenXR;

// ...

void OnMarkersChanged(ARMarkersChangedEventArgs args)
{
    Debug.Log($"Default transform mode is {ARMarkerManager.Instance.defaultTransformMode}./n");

    if (e.added.Count > 0)
    {
        ARMarker qrCode = args.added[0];

        Debug.Log($"Position: {qrCode.transform.position}");
        Debug.Log($"Rotation: {qrCode.transform.rotation}");
        Debug.Log($"Center: {qrCode.center}");

        if (qrCode.transformMode == TransformMode.Center)
            qrCode.transformMode = TransformMode.MostStable;
        else
            qrCode.transformMode = TransformMode.Center;

        Debug.Log($"QR code's transform mode is now set to {qrCode.transformMode}. /n");
        Debug.Log($"New position: {qrCode.transform.position}");
    }
}
AR marker sample scenario
The sample provided with the OpenXR Plugin package contains a QR code-enabled scene that provides an example of how ARMarkerManager and ARMarker can be used.
The scene is located in Assets > ARMarker as shown:

You can find the C# scripts used in the scene in the OpenXR Unity Mixed Reality Samples repo on GitHub: /OpenXR-Unity-MixedReality-Samples/tree/main/SampleScenarios/Scenarios/MarkerSample/Scripts