Integrating the Xandr HTML5 Library with Google Web Designer ads
Follow these instructions to modify an ad created in Google Web Designer such that it works seamlessly with the Xandr HTML5 Library. This is required to properly track clicks.
Banner ads
Prerequisites
You will require a text editor to complete the procedure below. If you do not have one, we recommend Sublime Text.
Step 1: Locate the index.html file
Before you begin, locate the folder containing the ad created in Google Web Designer. If the ad is located in a .zip file, you must unzip the file to reveal a folder containing its various assets.
Then, locate and open the file named index.html. This file is where you will make all of the necessary changes in the steps below.
Step 2: Add the Xandr HTML5 Library
Ensure that the actual Xandr HTML5 Library is linked to inside index.html.
Link the library inside the <head> tag in the index.html file, by adding the following <script> tag:
<script type="text/javascript" src="https://acdn..com/html5-lib/1.3.0/-html5-lib.min.js"></script>
Tip
Use https to ensure the creative can serve on secure inventory.
Step 3: Replace hard-coded URL with APPNEXUS.getClickTag()
You could have an ad created in Google Web Designer that has a hard-coded URL embedded.
Search for gwd-events="handlers" in the index.html file to find hard-coded URLs. If they are present, you will find a block of code that looks like this:
<script type="text/javascript" gwd-events="handlers">
        gwd.auto_BodyClick = function(event) {
                // GWD Predefined Function
    gwd.actions.gwdGenericad.exit('gwd-ad', 'https://appnexus.com', true);
  };
</script>
Note
The hardcoded URL (in this case, https://xandr.com/) will vary based on the specific ad you are working with.
Replace "https://xandr.com" (including the quotation marks) with APPNEXUS.getClickTag(). The function should look something like this:
<script type="text/javascript" gwd-events="handlers">
        gwd.auto_BodyClick = function(event) {
                // GWD Predefined Function
    gwd.actions.gwdGenericad.exit('gwd-ad', APPNEXUS.getClickTag(), true);
  };
</script>
Step 4. Save changes
Save the changes.
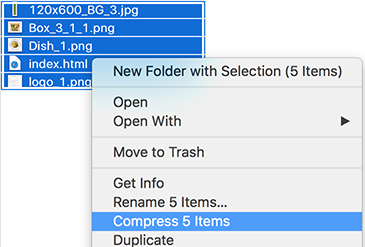
Step 5. Re-zip creative contents
Select all of the contents within the folder created when you unzipped the file. Compress the contents into a new .zip file.
You are now ready to upload your HTML5 creative onto the Xandr platform.
Note
For information on using Google Web Designer to build HTML5 creative that will properly track clicks in Xandr, go to: Build an HTML5 Xandr Creative in Google Web Designer.
If you are facing any build related issue, you can raise a ticket on the Xandr Customer Support Portal or get in touch with your Xandr Account Representative.
IAB validator (optional)
If you would like to verify how this creative measures up to IAB guidelines, you can do so using the HTML5 Ad Validator tool.