Note
Access to this page requires authorization. You can try signing in or changing directories.
Access to this page requires authorization. You can try changing directories.
Azure DevOps Services | Azure DevOps Server | Azure DevOps Server 2022
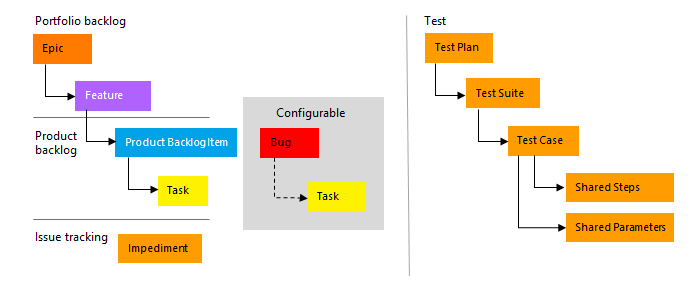
Use Scrum in Azure Boards to plan and prioritize software delivery, and to track defects. Teams capture work as Product Backlog Items (PBIs) and bugs, map those items to features for portfolio visibility, and break sprint work into tasks that link to PBIs and bugs.
Note
If you're new to the Scrum process, review About Sprints, Scrum and project management.
This article helps you:
- Define and prioritize PBIs and bugs.
- Track work through Scrum workflow states.
- Break backlog items into sprint tasks.
- Link test cases and bugs to track quality.
- Track blockers and maintain backlog order.
Prerequisites
| Area | Requirement | Why it matters |
|---|---|---|
| Project membership | You must be a member of the project with permission to view and edit work items in Azure Boards. | Required to create, update, and move work items through Scrum workflow states. |
| Access level | You need at least Basic access to create and update work items. | Required for core backlog, board, and task tracking actions. |
| Backlog and board access | You need access to team backlogs and boards. | Required to prioritize PBIs, plan sprints, and update status from boards and taskboards. |
| Team configuration permissions | To define team settings, backlog levels, or board configuration, you need Project Administrators membership or equivalent delegated permissions. | Required for team-level setup and customization. |
| Test management access | To create and run test cases, you need access to Azure Test Plans (or equivalent test tools for your deployment). | Required to link test cases to PBIs and track test outcomes. |
For more information, see Set permissions and access for work tracking.
Define PBIs and bugs
Define PBIs and bugs to capture customer value first, then implementation details as work nears execution.
Use this pattern:
- Create items from the quick add panel on the product backlog page.
- Prioritize by business value, effort, and dependencies.
- Add full detail for highest-priority items and items planned for the current or next sprint.
As priorities change, update backlog order. The backlog page tracks this order through Backlog Priority.

Set Effort so forecast and velocity charts can project future sprint capacity. Set Business Value to express priority independently from stack rank.
Use the following fields to complete each item consistently before sprint planning. For details on bugs, see Manage bugs.
| Field | How to use it |
|---|---|
| Effort | Estimate the work required to complete the PBI by using your team's numeric unit (for example, story points or time). Depending on your process customization, this field can be optional or required. Velocity charts and forecast use this value. |
| Business Value | Enter a number that indicates relative business value compared to other PBIs. Higher numbers indicate higher value. |
| Description | Describe who the feature serves, what the user needs to accomplish, and why it matters. Include enough context for task breakdown and test design. |
| Acceptance Criteria | Define the conditions for done before implementation starts. Clear criteria align team and stakeholder expectations and support acceptance testing. |
Capture comments in the Discussion section
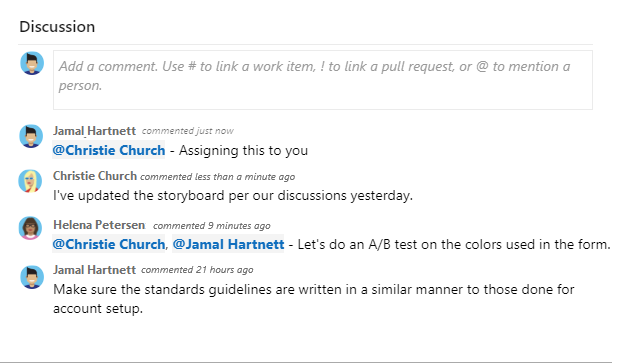
Use the Discussion section to collaborate on work items by adding and reviewing comments.
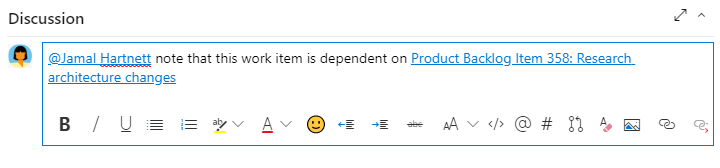
When you place your cursor in a text box that supports formatting, the rich-text editor toolbar appears.
Note
A Discussion work item field doesn't exist. To query work items with comments from the Discussion area, filter on the History field. The full content of the text entered in the Discussion text box is added to the History field.
Mention someone, a group, work item, or pull request
Use one of the following icons to open recent entries for people, work items, or pull requests:


You can open the same menu with keyboard shortcuts: at-mention @, hashtag #, and exclamation point !.
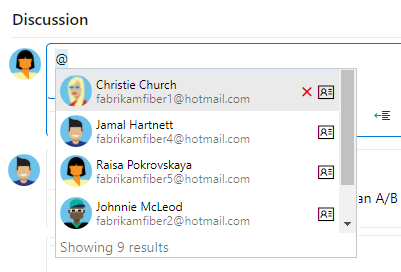
Enter a name or number to filter the list, and then select the item you want to add. To mention a group, enter @ followed by the group name, such as a team or security group.
Edit or delete a comment
To update or remove one of your comments, select Edit  or select More actions (
 ) and then select Delete:

After you change a comment, select Update. To remove a comment, confirm deletion. The History tab maintains an audit trail of all edited and deleted comments.
Important
For on-premises Azure DevOps Server, configure an SMTP server so team members can receive notifications.
Add a reaction to a comment
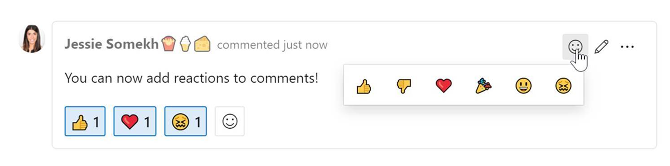
Add one or more reactions to a comment by selecting an emoji on the comment. To remove your reaction, select the same reaction again. The following image shows an example of adding and viewing reactions on a comment.
Save a comment without saving the work item
Note
This feature is available starting in Azure DevOps Server 2022.1.
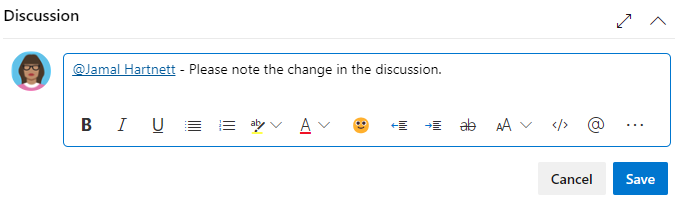
If you only have permissions to add to the Discussion of a work item, then you can do so by saving comments. This permission is controlled by Area Path nodes and the Edit work item comments in this node permission. For more information, see Set work tracking permissions - Create child nodes, modify work items under an area or iteration path.
When you save comments, you don't need to save the work item.
Note
When you save changes made to the Discussion control, only the comment is saved. No work item rules defined for the work item type are executed.
Track progress
As work moves forward, update State to reflect the current status and set Reason when needed. Both fields appear in the work item header.
Use state updates consistently to keep backlog, board, and reporting views aligned.
Quick flow:
- Define and prioritize PBIs and bugs.
- Move items through workflow states as work progresses.
- Review board and reports to confirm status alignment.

Scrum workflow states
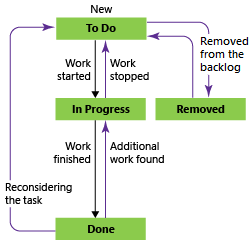
Update State to show whether an item is new, in progress, completed, or removed from scope. Most WITs support both forward and backward transitions.
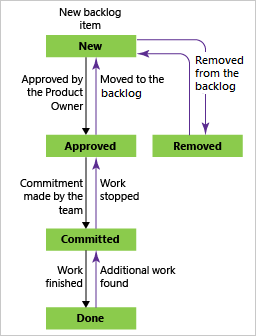
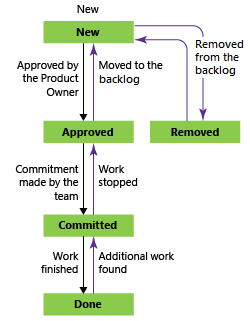
The following diagrams show the main progression and regression states for PBI, Bug, and Task work item types.
| Product Backlog Item | Bug | Task |
|---|---|---|
|
|
|
Typical PBI and bug lifecycle:
- New: A product owner or tester creates the item. The default reason varies by work item type and process configuration (for example, New backlog item).
- Approved: The item is defined enough for the team to estimate and prepare for sprint planning. Higher-priority items usually move to this state first.
- Committed: The team agrees to deliver the item in the sprint.
- Done: All related tasks are complete and the product owner confirms the item meets acceptance criteria.
Use Removed for items intentionally taken out of scope and not planned for delivery. Keeping these items out of Done helps preserve reporting accuracy.
Update status from boards and taskboards
Use boards to keep status current as work moves through the sprint:
- Use the board to update PBI and bug status.
- Use the sprint Taskboard to update task status.
- Drag an item to a new column to update both State and Reason.
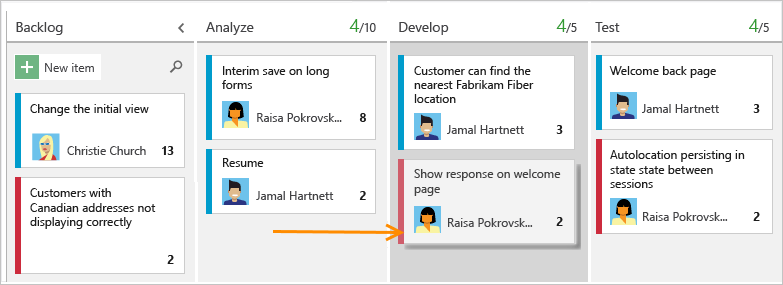
You can customize the board with swim lanes and columns. For more options, see Customize your work tracking experience.
Map PBIs to features
Map PBIs to features to track scope and progress across products, scenarios, or teams.
Use this approach:
- Use portfolio backlogs to drill down between backlog levels.
- Use team hierarchy rollups after you set up a hierarchy of teams.
Validation check: Confirm each feature shows linked child PBIs and that rollup values match child item progress.
Define tasks
When your team works in sprints, break PBIs and bugs into tasks from the sprint backlog page.
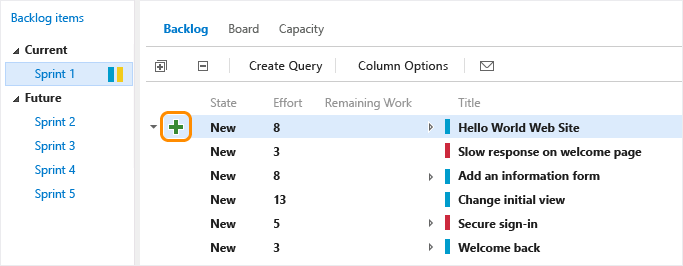
Name each task and estimate the effort.
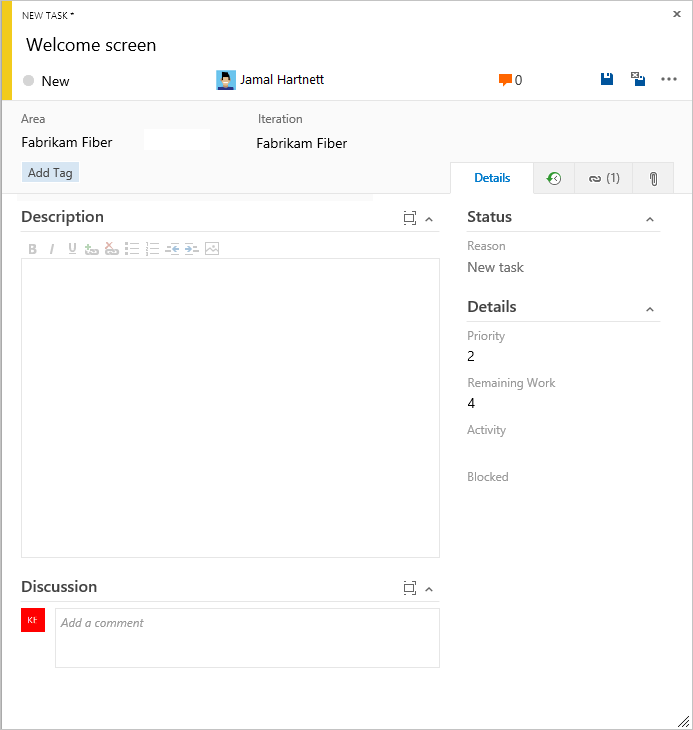
Teams usually define tasks at the start of each sprint. Team members complete subsets of work such as development, testing, or documentation.
Use this pattern:
- Create tasks for each delivery step needed to complete the PBI or bug.
- Assign tasks to team members based on ownership.
- Update task values daily so capacity and burndown stay accurate.
When your team estimates in hours or days, use Remaining Work and optional Activity.
| Field | How to use it |
|---|---|
| Remaining Work | Enter how many hours or days are left, and update the value as work progresses. This field drives capacity charts, sprint burndown, and related reports. If you split work into subtasks, track Remaining Work on the subtasks only. |
| Activity | Select the activity category that best describes the task so your team can estimate and review sprint capacity by activity type. |
Track test progress
Use the following guidance to connect test coverage and defect tracking to your sprint backlog items.
Create and link test cases to PBIs
Use this pattern to connect testing work to backlog items:
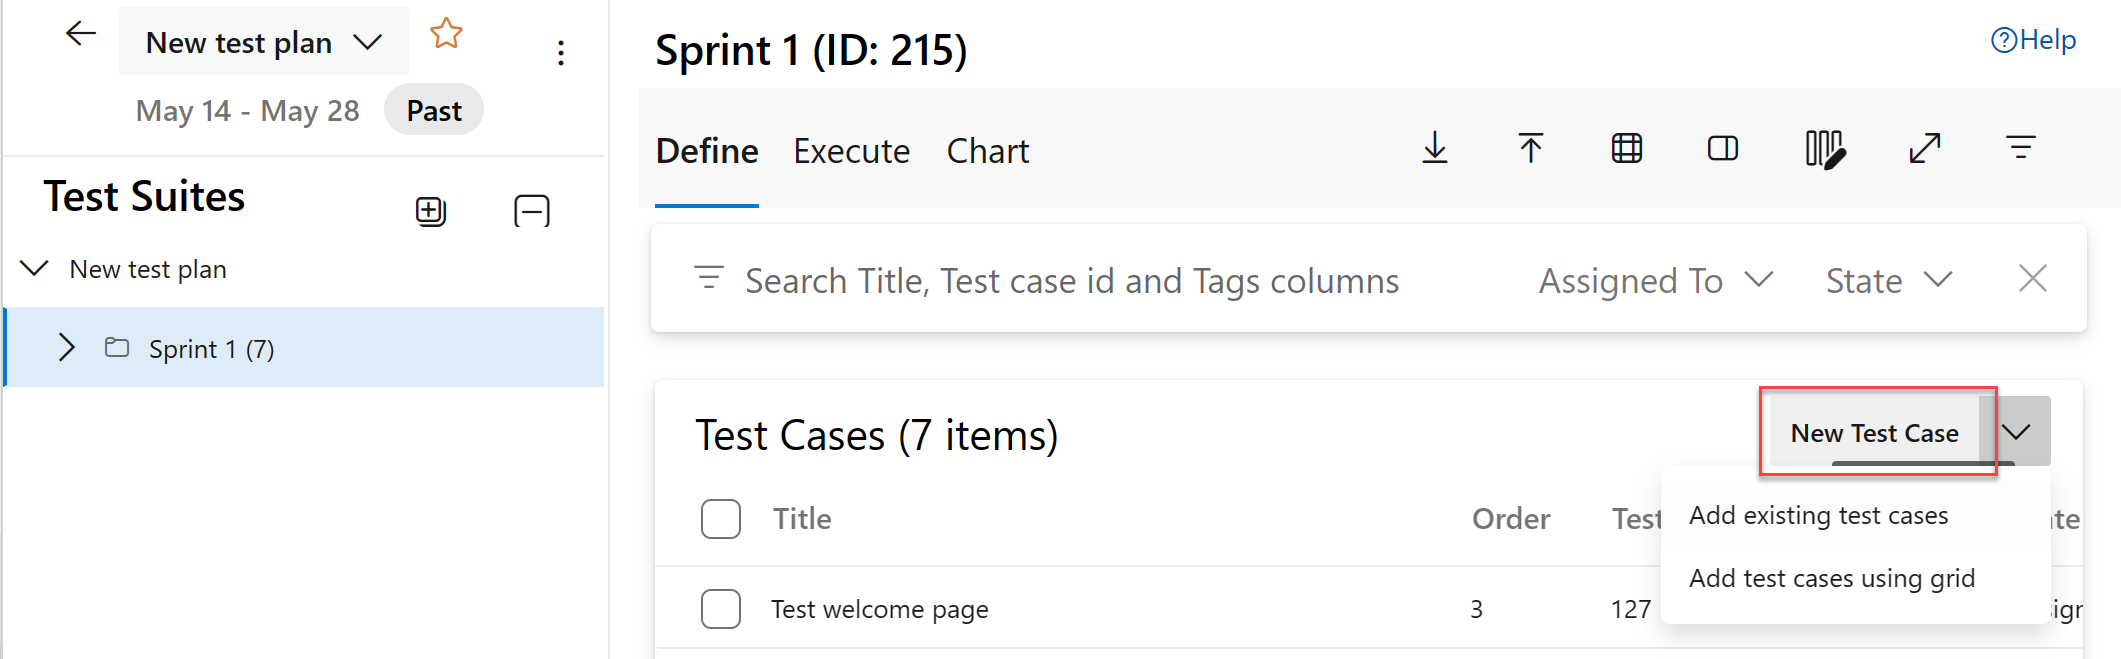
- Create test cases from the web portal so they link to a PBI or bug.
- If needed, open the Links tab and add the relationship manually.
For Azure DevOps Server 2022, you can also use Microsoft Test Manager 2017.
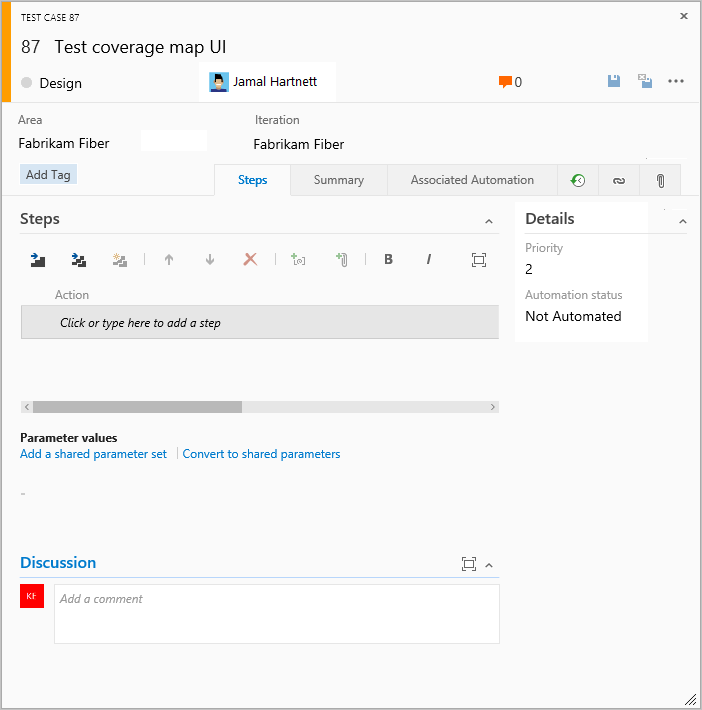
Test cases include fields that integrate with build and test workflows. For details, see Query based on build and test integration fields.
The Links tab lists PBIs and bugs linked to each test case.
Validation check: Confirm each test case shows its linked PBI or bug on the Links tab.
Track code defects
Create bugs from the web portal or Visual Studio. For details, see Manage bugs.
For Azure DevOps Server 2022, you can also create bugs through Microsoft Test Manager 2017.
Definitions for common work tracking fields
The following fields and tabs appear in most work items. Common tabs include  History,
  Links, and
  Attachments.
For all work item types, Title is the only universally required field. When you save a work item, Azure DevOps assigns a unique ID. Required fields are highlighted in yellow. For more fields, see Work item field index.
Note
Other fields might be required based on process and project customizations.
| Field or tab | Usage |
|---|---|
| Title | Enter a short description (up to 255 characters). You can edit the Title later. |
| Assigned To | Assign the work item to the person responsible for completing it, or leave it unassigned until ownership is clear. |
| State | On creation, State defaults to the first workflow state (such as New or Unassigned). Update it as work progresses. |
| Reason | Reason explains why the item is in the current State. Default values vary by work item type and process. |
| Area | Select the area path for the product or team. For details, see Define area paths and assign to a team. |
| Iteration | Select the sprint/iteration for planned completion. For details, see Define iteration paths (sprints) and configure team iterations. |
|
History tab |
View the full change log for the work item, including author, date, and updated fields. You can also add formatted text in History. |
|
Links tab |
Add relationships to other artifacts (for example, parent/child work items, changesets, source files, or test results). |
|
Attachments tab |
Add supporting files such as documents, images, logs, or email threads. |
Customize work item types
For most work item types, you can add fields, update the workflow, define custom rules, add custom pages, and create custom work item types. For more information, see Customize an inheritance process.
For most work item types, you can add fields, update the workflow, define custom rules, add custom pages, and create custom work item types. For more information, see Customize an inheritance process or Customize the On-premises XML process model, depending on your process model.
Track impediments
Use the Impediment work item type to track blockers. Use Bug only for code defects.
You can add an impediment from:
- The New work item widget on a team dashboard
- The New menu on the Queries page
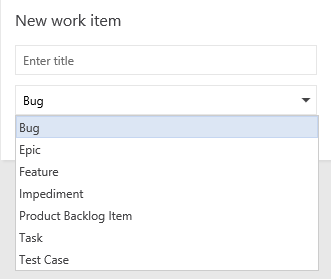
Work items you add from the widget automatically scope to your team's default area and iteration paths. To use a different team context, see Switch team context.
Backlog list order
Use Backlog Priority to manage relative ranking for PBIs, bugs, features, and epics.
Use this pattern:
- Reorder items directly on the backlog page (see Create your backlog).
- Drag items to reflect current business priority.
- Let Azure DevOps update Backlog Priority in the background.
Validation check: Confirm backlog order matches business priority after reordering.
Troubleshoot common issues
| Issue | Cause | Resolution |
|---|---|---|
| Can't move a work item to the expected state | Workflow rules or process customization limit transitions | Review process customization and allowed transitions. See Customize an inheritance process. |
| Required field blocks saving a work item | Project-specific custom rules require extra fields | Check the validation message and complete required fields for your process. See Set rules for work items. |
| Can't create or edit test cases | Missing test permissions or access level | Verify your access and permissions for test artifacts. See Set permissions and access for work tracking. |
| Linked test case doesn't appear on a backlog item | Link wasn't created as a work item link, or was added to a different item | Open the test case and backlog item, then verify links on the Links tab for both items. |
| You can't resolve the issue after applying these fixes | Organization-level policy or permissions still block the action | Contact your Project Administrator first. If the issue is organization-wide, contact your Project Collection Administrator or Azure DevOps administrator. |