Note
Access to this page requires authorization. You can try signing in or changing directories.
Access to this page requires authorization. You can try changing directories.
Applies to: Azure Logic Apps (Standard)
Important
This preview feature is subject to the Supplemental Terms of Use for Microsoft Azure Previews.
To programmatically build Standard workflows in Azure Logic Apps with the Visual Studio Code tools for code development, source control, unit testing, IntelliSense, debugging, and refactoring, use the Azure Logic Apps Standard SDK. This SDK lets you define workflows entirely in C# and .NET by using an imperative coding style. Not only do you get more control over your workflow design, you get full access to the Azure Logic Apps ecosystem for Azure-hosted connectors and built-in operations. Organize, develop, and test your workflows by using the project structure, debugging experience, and development patterns that you might already know in Visual Studio Code.
This guide shows how to complete the following tasks:
- Create your workspace and code-first workflow project.
- Enable Azure-hosted connectors and set up connections.
- Locally run and debug workflows.
- Add more workflows to your project.
By default, the SDK generates a logic app project that includes sample code that you can review and then replace with your own.
Prerequisites
An Azure account and subscription that can create resources in Azure. Get a free Azure account.
Visual Studio Code and the Azure Logic Apps (Standard) extension.
Familiarity with C# and .NET development in Visual Studio Code.
Known issues and limitations
During preview release, the following limitations apply:
| Area | Limitation |
|---|---|
| Built-in service provider-based operations | Currently unavailable, but planned for a future release. During preview, only Azure-hosted and -managed connectors are available for code-first workflows. |
| Dynamic schemas | Currently unavailable during preview. |
| Custom code | Only callback methods are currently supported. Inline lambda functions are unsupported during preview. |
| Actions | Before you can use and reference these operations in workflows, you must add and name them. |
| Managed identity authentication | Support is in development. For now, use connection string or API key authentication. |
Create your workspace for your project
Before you can build workflows, you need to create a workspace for your Standard logic app project.
In Visual Studio Code, on the Activity Bar, select the Azure icon.
In the Azure window, on the Workspace toolbar, select the Azure Logic Apps menu, select Create new logic app workspace.
If Windows Defender Firewall prompts you to give network access for Code.exe, which is Visual Studio Code. For func.exe, which is the Azure Functions Core Tools, select Private networks, such as my home or work network > Allow access.
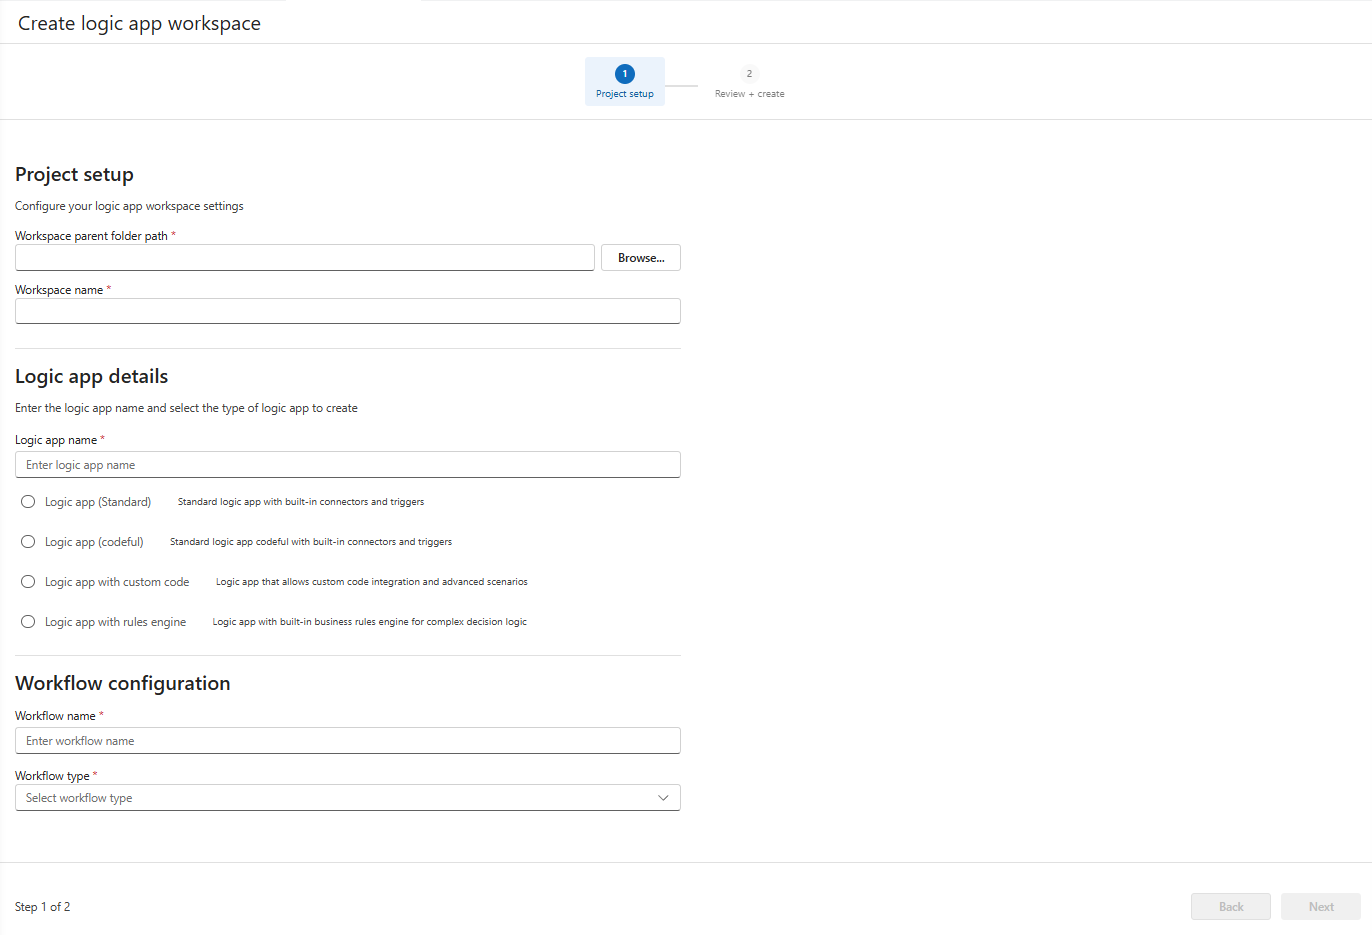
The Create logic app workspace tab opens so you can provide details about your project and logic app.
On this tab, provide the following information:
Property Description Workspace parent folder path The path and folder name for your local workspace. This workspace name is used for the folder and project files.
To create this folder, follow these steps:
1. Select Browse to open the Select Folder window.
2. Browse to the location for creating the workspace folder.
3. Create your folder, and then select the folder only once.
4. Choose Select workspace parent folder (don't double-select the folder).Workspace name The name for your workspace in Visual Studio Code. Logic app name The name for your logic app project. Logic app project and workflow type This list shows the possible flavors for a Standard logic app project.
For Standard SDK projects, select Logic app (codeful) for code-first workflows.Workflow name The name for the first workflow in the Standard logic app project. Workflow type - Stateful: A non-AI workflow that includes run history.
- Conversational agents: An AI-driven workflow that supports human interactions through chat and includes run history.
- Autonomous agents: An AI-driven workflow that supports human-independent automation and includes run history.When you're ready, select Next.
On the Review + create tab, confirm your inputs, and select Create workspace.
Visual Studio Code prompts you to confirm whether to trust the files' authors in your workspace.
To confirm, select Yes, I trust the authors.
Visual Studio Code creates and opens your workspace and your logic app project, which appear in the Explorer window.
After your workspace opens, you're prompted to enable the Azure connectors that are hosted and run in global, multitenant Azure.
Continue with the next steps to enable these connectors.

Enable Azure-hosted connectors
For this preview release, you can use only the Azure-hosted, managed connectors in your code-first workflows.
When Visual Studio Code prompts you to activate these connectors, select Use connectors from Azure.
Select the Azure subscription to use for these connectors.
Select a resource group to manage your connector resources.
Select the authentication type to use:
Authentication Description Connection keys During preview, use connection strings and access keys because managed identity is currently unavailable. Managed identity Recommended for better security through Microsoft Entra so you don't handle, store, and manage credentials, keys, or secrets locally or in the cloud.
Review project and workflow code
In Visual Studio Code, on the Activity Bar, select Explorer (files icon) to view your project.
In the Explorer window, review the following key project files and their sample code.
Files Description Program.csDefines how the host runs your workflows by building, configuring, and starting the host. <workflow_name>.csDefines your workflow with the trigger and actions in code. For example:
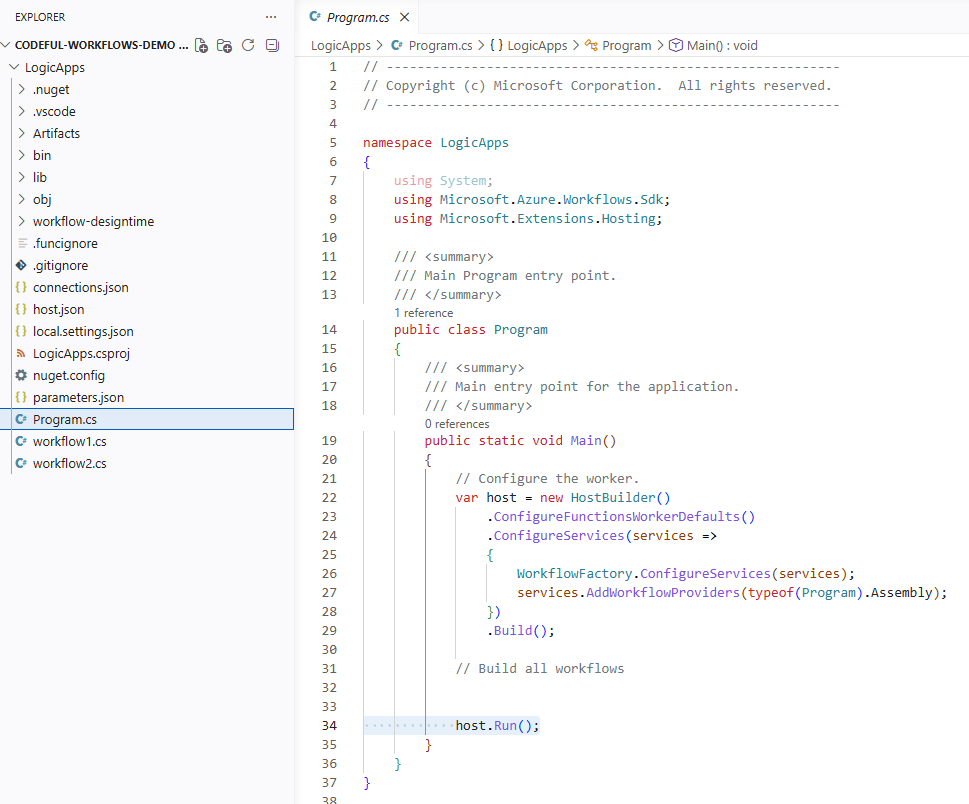
In your codeful logic app project, a workflow file uses code to define the steps in your automation, starting with a single trigger that's followed by actions. The structure for these steps appears similar to the sequence in the workflow designer but is expressed in C#.
The SDK compiles your workflow definition, which then executes on the Azure Logic Apps runtime.

Set up connections for triggers and actions
To set up any connections that the trigger or actions in your workflow need to function, follow these steps:
In Visual Studio Code, in the Explorer window, open your logic app project and a workflow code file, for example,
<workflow_name.cs.In the code file, find the action definition associated with an Azure-managed connector, for example:
var getCurrentWeatherAction = WorkflowActions.Managed.Msnweather("msnweather").CurrentWeather(
    location: () => "98058",
    units: () => unitsInput.Imperial);
Move your mouse pointer over the action call. From the tooltip that appears, select Manage connector.
For example:
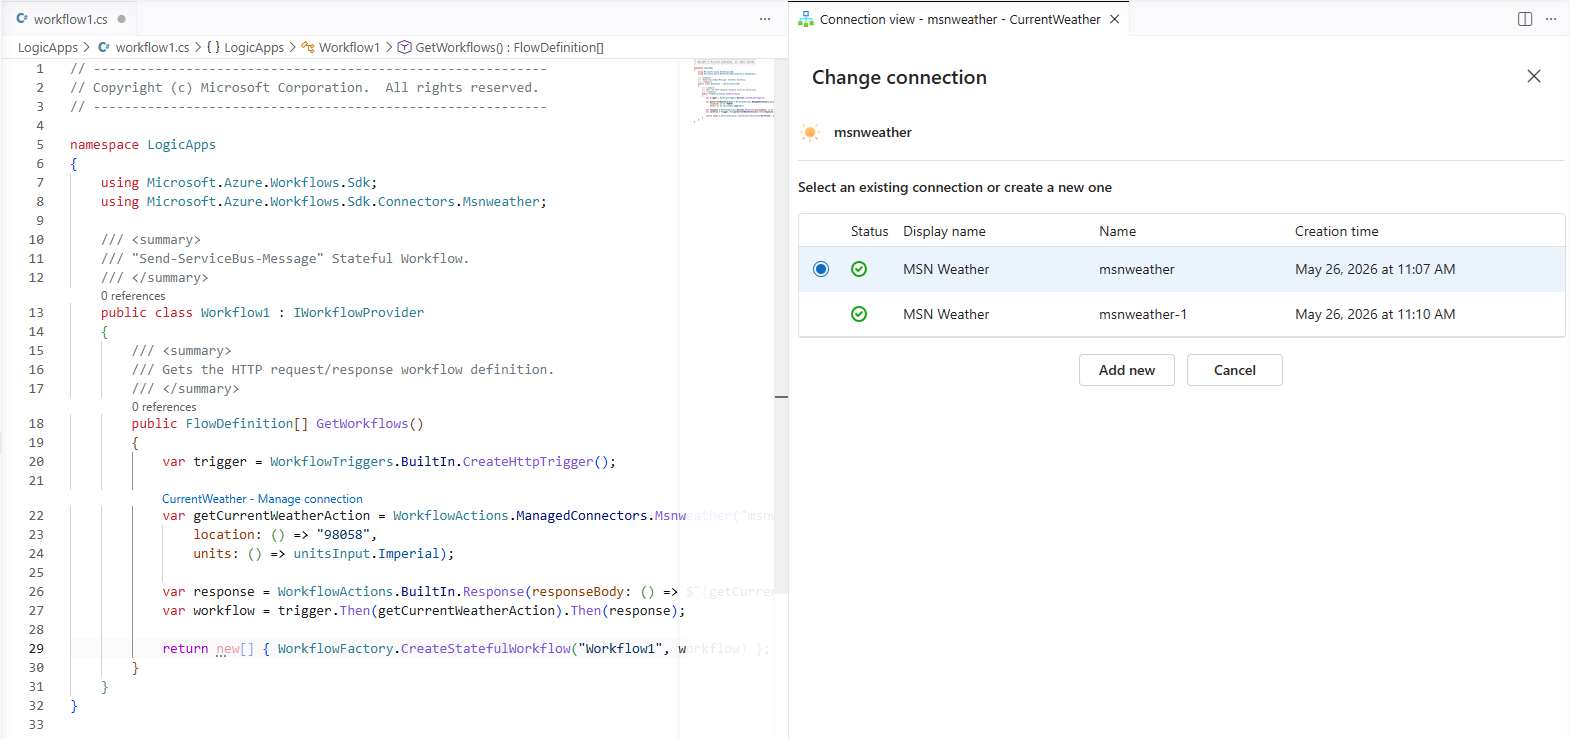
The connection view opens and shows any existing connections in your resource group for that connector.
Select a connection.
-or-
To create a connection, select Add new, and provide a unique identifier for the connection.
Visual Studio Code creates and records the connection in the
connections.jsonfile.Important
The project uses the
local.settings.jsonfile to securely store connection strings and other credentials. Make sure that you don't commit this file to source control.

Run and debug your workflow
In Visual Studio Code, on the Activity Bar, open the Explorer window (files icon) to view your project.
On the Visual Studio Code titlebar, open the Run menu, and select Start debugging. (Keyboard: F5)
-or-
Open the
Program.csfile's shortcut menu, and select Overview to start debugging. (Keyboard: F5)When the project starts to compile, the Azure Logic Apps runtime starts locally running your logic app. When the app starts, the Overview page opens.
- If your project has a single workflow, the Overview page directly opens the workflow run history.
- If your project has multiple workflows, select a workflow first.
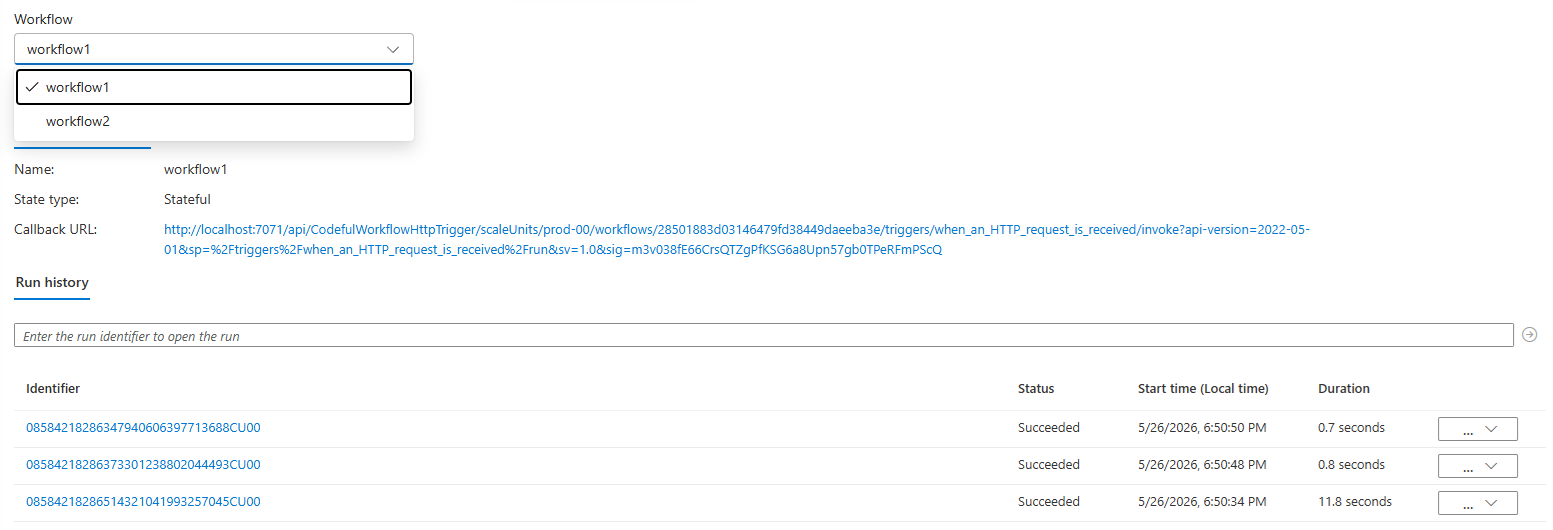
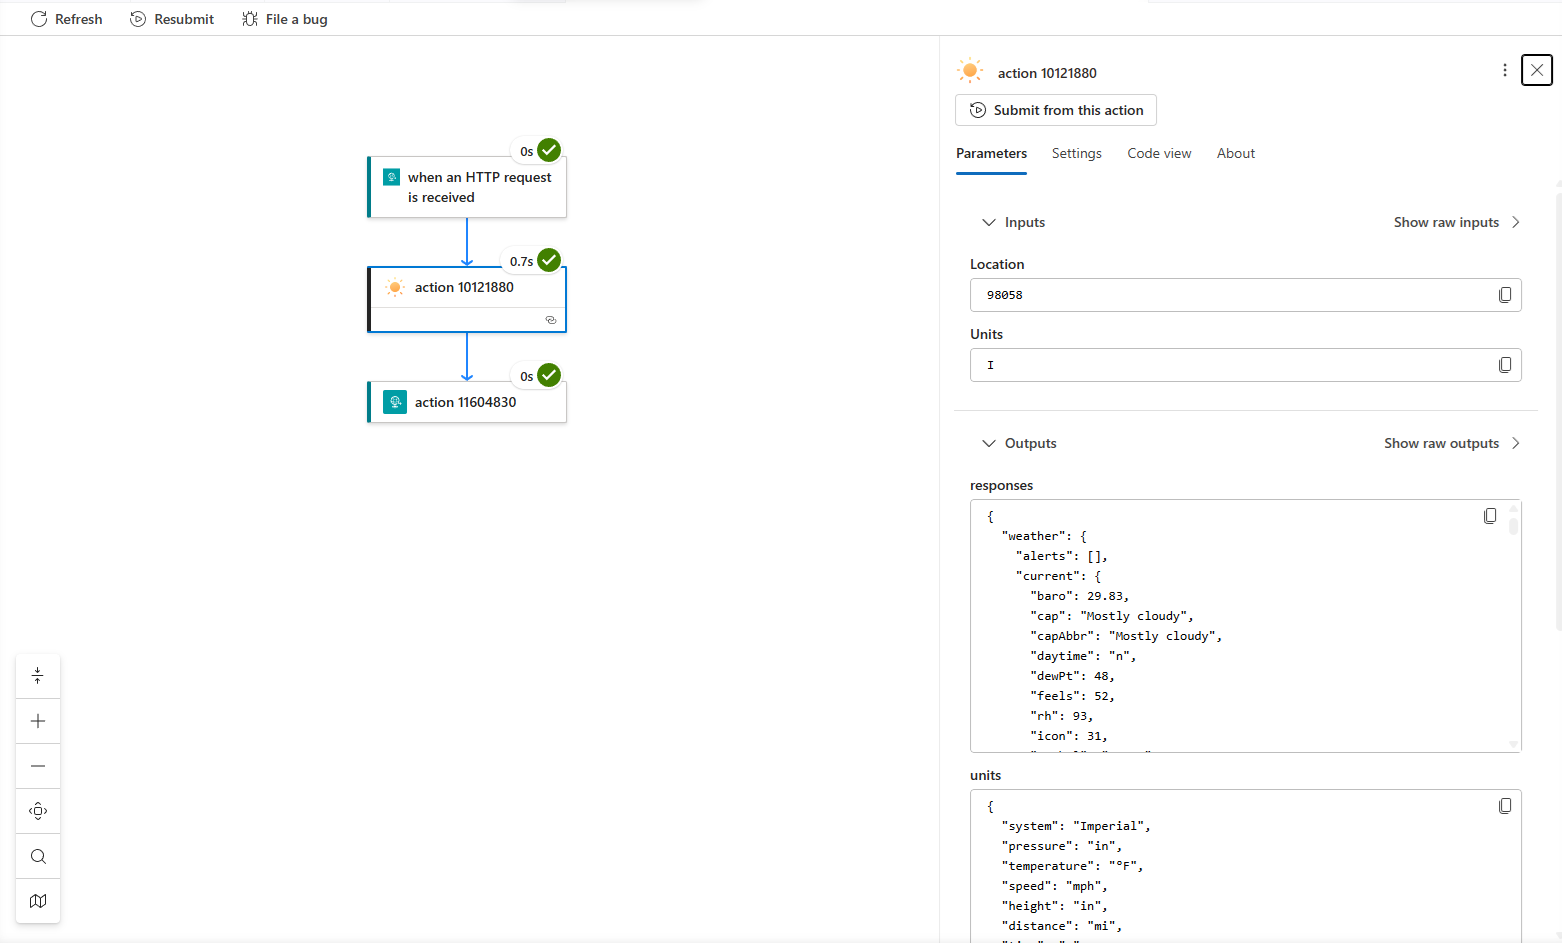
You can use the Overview page to execute triggers, review the workflow run history, and examine inputs and outputs.
Note
For workflows created with the Azure Logic Apps Standard SDK, the run history uses the same rich, visual representation as workflows created with the visual designer. You can monitor and troubleshoot your workflows the same way, no matter how you created them.


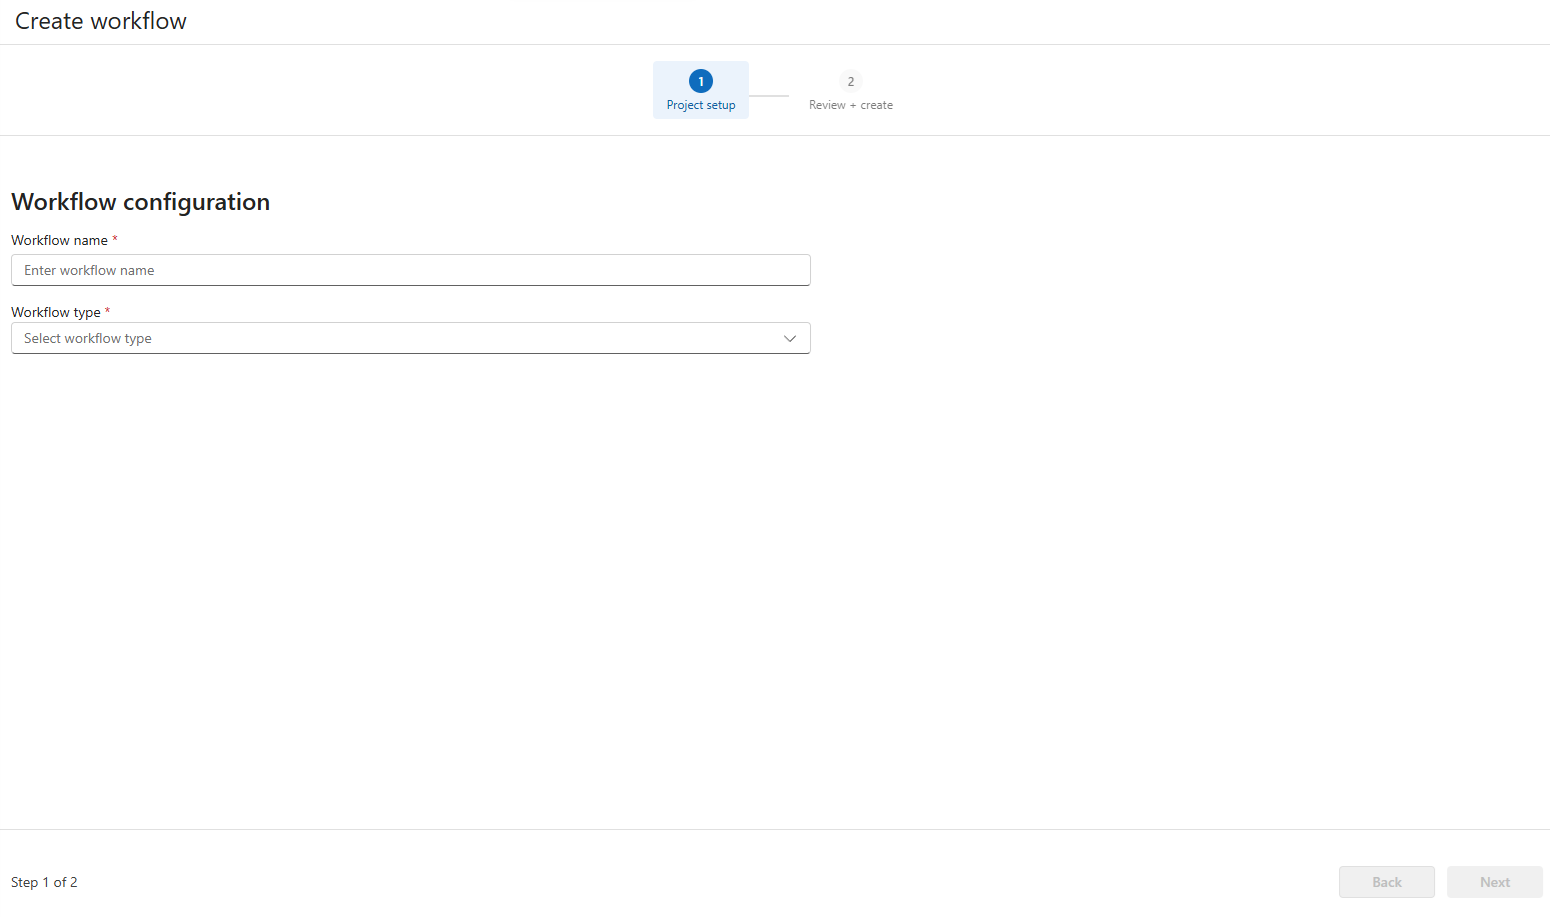
Add a new workflow to your project
In Visual Studio Code, on the Activity Bar, select Explorer (files icon) to view your project.
At the project level, open the shortcut menu, and select Create workflow.
On the Create workflow tab, enter the following information:
Property Description Workflow name The name for your workflow in your Standard logic app project. Workflow type - Stateful: A non-AI workflow that includes run history.
- Conversational agents: An AI-driven workflow that supports human interactions through chat and includes run history.
- Autonomous agents: An AI-driven workflow that supports human-independent automation and includes run history.When you finish, select Next, and then select Create workflow.
After creation completes, the new workflow appears in the workflows list.
To start editing the workflow and its operations, open the new workflow code file.
The file opens and shows sample workflow code.