Migrate Azure Scheduler jobs to Azure Logic Apps
Important
Azure Logic Apps has replaced Azure Scheduler, which is fully retired since January 31, 2022. Please migrate your Azure Scheduler jobs by recreating them as workflows in Azure Logic Apps following the steps in this article. Azure Scheduler is longer available in the Azure portal. The Azure Scheduler REST API and Azure Scheduler PowerShell cmdlets no longer work.
This guide shows how to schedule one-time and recurring jobs by creating automated workflows with Azure Logic Apps, rather than with Azure Scheduler. When you create scheduled jobs with Azure Logic Apps, you get the following benefits:
Build your job by using a visual designer and select from 1000+ ready-to-use connectors, such as Azure Blob Storage, Azure Service Bus, Office 365 Outlook, SAP, and more.
Manage each scheduled workflow as a first-class Azure resource. You don't have to worry about the concept of a job collection because each logic app is an individual Azure resource.
Run multiple one-time jobs by using a single logic app workflow.
Set schedules that support time zones and automatically adjust to daylight savings time (DST).
For more information, see What is Azure Logic Apps? or try creating your first logic app workflow by following either of the following steps:
Create an example Consumption logic app workflow in multitenant Azure Logic Apps
Create an example Standard logic app workflow in single-tenant Azure Logic Apps
Prerequisites
- An Azure account and subscription. If you don't have an Azure subscription, sign up for a free Azure account.
Install or use a tool that can send HTTP requests to test your solution, for example:
- Visual Studio Code with an extension from Visual Studio Marketplace
- PowerShell Invoke-RestMethod
- Microsoft Edge - Network Console tool
- Bruno
- Curl
Caution
For scenarios where you have sensitive data, such as credentials, secrets, access tokens, API keys, and other similar information, make sure to use a tool that protects your data with the necessary security features, works offline or locally, doesn't sync your data to the cloud, and doesn't require that you sign in to an online account. This way, you reduce the risk around exposing sensitive data to the public.
Migrate by using a script
Each Scheduler job is unique, so no one-size-fits-all tool exists for migrating Azure Scheduler jobs to Azure Logic Apps. However, you can edit this script to meet your needs.
Schedule a one-time job
You can run multiple one-time jobs by creating just a single logic app workflow.
In the Azure portal, create a logic app resource and blank workflow.
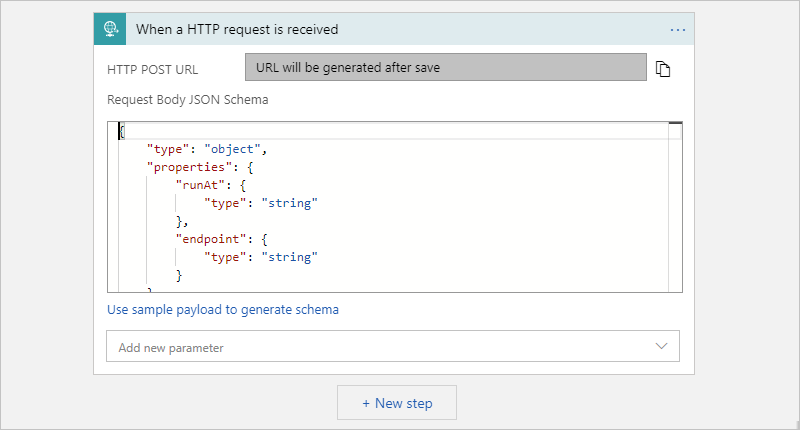
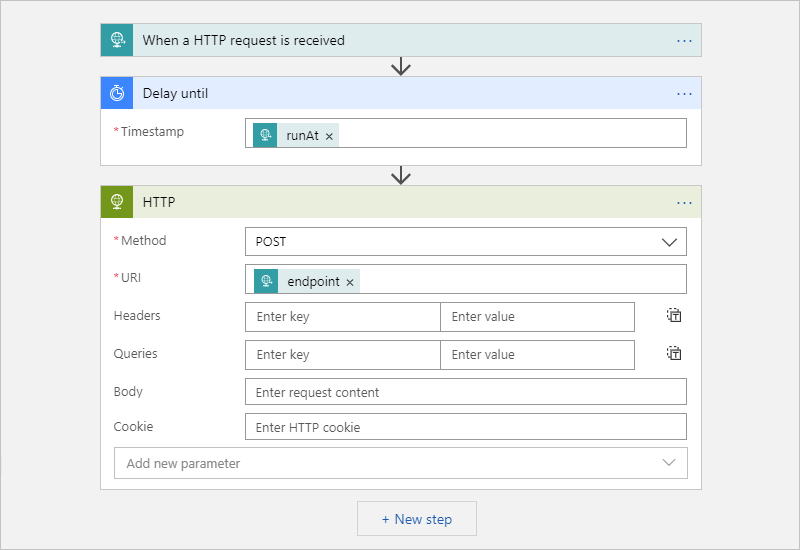
Follow these general steps to add the Request trigger named When a HTTP request is received.
In the Request trigger, you can optionally provide a JSON schema, which helps the workflow designer understand the structure for the inputs included in the inbound call to the Request trigger and makes the outputs easier for you to select later in your workflow.
In the Request Body JSON Schema box, enter the schema, for example:
If you don't have a schema, but you have a sample payload in JSON format, you can generate a schema from that payload.
In the Request trigger, select Use sample payload to generate schema.
Under Enter or paste a sample JSON payload, provide your sample payload, and select Done, for example:
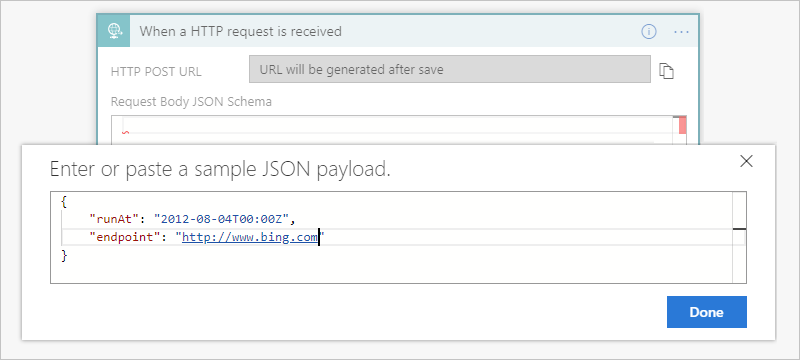
{
   "runat": "2012-08-04T00:00Z",
   "endpoint": "https://www.bing.com"
}
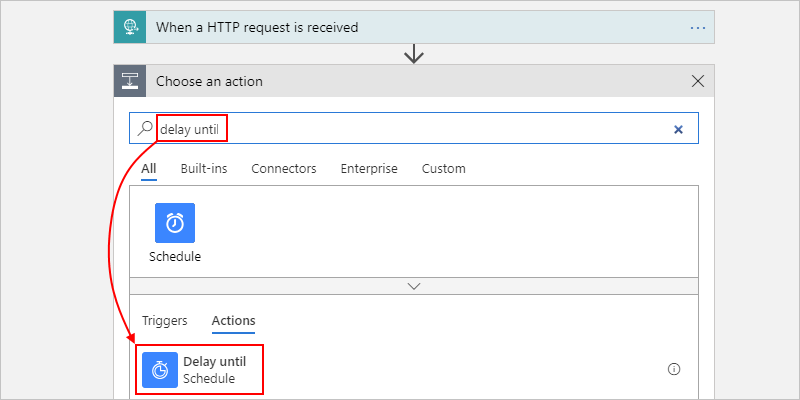
Under the trigger, add the Schedule action named Delay until
This action pauses workflow execution until a specified date and time, for example:
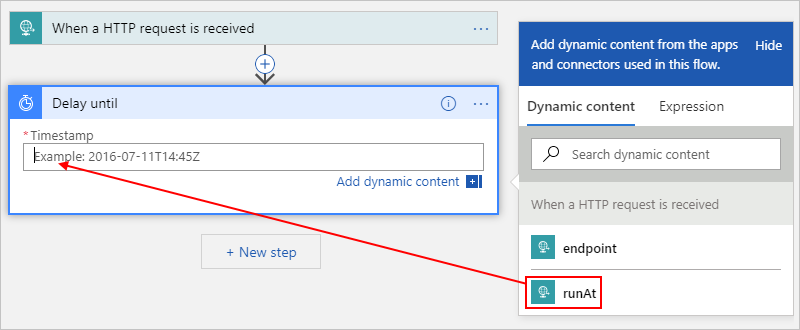
Enter the timestamp for when you want to start the workflow.
- Select inside the Timestamp box, and then select the dynamic content list option (lightning icon), which lets you select an output from the previous operation, which is the Request trigger in this example.
Add any other actions you want to run by selecting from the 1000+ ready-to-use connectors.
For example, you can include an HTTP action that sends a request to a URL or actions that work with Storage Queues, Service Bus queues, or Service Bus topics:
When you're done, on the designer toolbar, select Save.
When you save your workflow for the first time, the endpoint URL for your workflow's Request trigger is generated and appears in the HTTP POST URL box, for example:
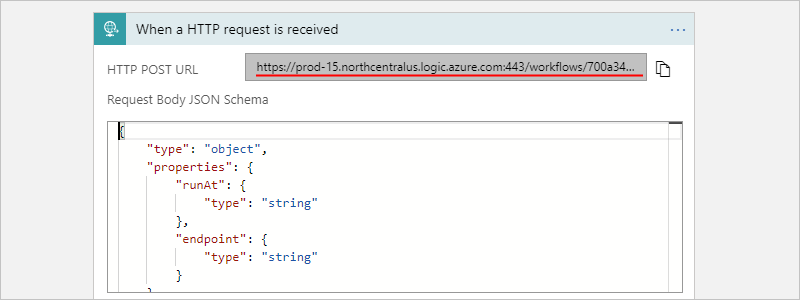
To manually trigger your workflow with the inputs that you want the workflow to process, you can send an HTTP request to the endpoint URL.
Copy and save the endpoint URL so that you can test your workflow.
Test your workflow
To manually trigger your workflow, send an HTTP request to the endpoint URL in your workflow's Request trigger. With this request, include the input or payload to send, which you might have described earlier by specifying a schema. You can send this request by using your HTTP request tool and its instructions.
For example, you can create and send an HTTP request that uses the method expected by the Request trigger, for example:
| Request method | URL | Body | Headers |
|---|---|---|---|
| POST | <endpoint-URL> | raw JSON(application/json) |
Key: Content-Type Value: application/json |
Cancel a one-time job
In Azure Logic Apps, each one-time job executes as a single workflow run instance. To manually cancel a one-time job, you can find and copy the x-ms-workflow-run-id header value returned in the workflow's response, and send another HTTP request with this workflow run ID to the workflow's endpoint URL by using the following REST APIs, based on your logic app:
Consumption workflows: Workflow Runs - Cancel
Standard workflows: Workflow Runs - Cancel
Schedule recurring jobs
In the Azure portal, create a logic app resource and blank workflow.
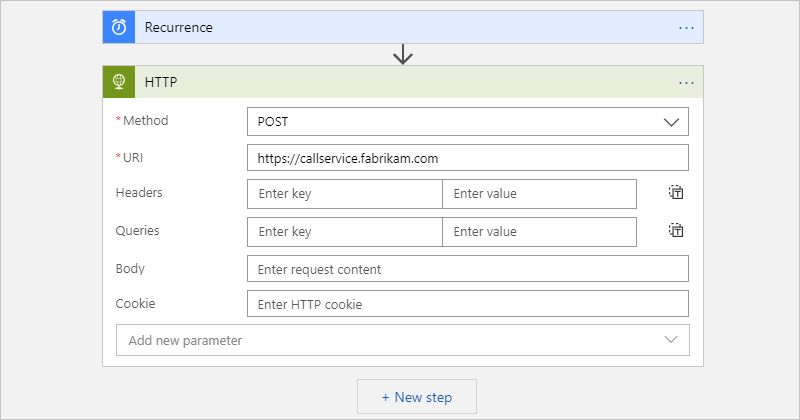
Follow these general steps to add the Schedule trigger named Recurrence.
If you want, set up a more advanced schedule.
For more information about advanced scheduling options, see Create and run recurring tasks and workflows with Azure Logic Apps.
Add any other actions you want to run by selecting from the 1000+ ready-to-use connectors.
For example, you can include an HTTP action that sends a request to a URL or actions that work with Storage Queues, Service Bus queues, or Service Bus topics:
When you're done, on the designer toolbar, select Save.
Advanced setup
The following sections describe other ways that you can customize your jobs.
Retry policy
To control the way that an action tries to rerun in your workflow when intermittent failures happen, you can set the retry policy in each action's settings.
Handle exceptions and errors
In Azure Scheduler, if the default action fails to run, you can run an alterative action that addresses the error condition. In Azure Logic Apps, you can also perform the same task. For more information about exception handling in Azure Logic Apps, see Handle errors and exceptions - RunAfter property.
In the designer, above the action that you want to handle, add a parallel branch.
Find and select the action you want to run instead as the alternative action.
On the alternative action, find and select the Configure run after option.
Clear the box for the is successful property. Select the properties named has failed, is skipped, and has timed out.
When you're finished, select Done.
FAQ
Q: When did Azure Scheduler retire?
A: Azure Scheduler fully retired on January 31, 2022. For general updates, see Azure updates - Scheduler.
Q: What happens to my job collections and jobs after Azure Scheduler retires?
A: All Azure Scheduler job collections and jobs stop running and are deleted from the system.
Q: Do I have to back up or perform any other tasks before migrating my Azure Scheduler jobs to Azure Logic Apps?
A: As a best practice, always back up your work. Check that the workflows you created are running as expected before deleting or disabling your Azure Scheduler jobs.
Q: What happens to my scheduled Azure Web Jobs from Azure Scheduler?
A: Web Jobs that use this way of Scheduling Web Jobs aren't internally using Azure Scheduler: "For the schedule to work it requires the website to be configured as Always On and is not an Azure Scheduler but an internal implementation of a scheduler." The only affected Web Jobs are those that specifically use Azure Scheduler to run the Web Job using the Web Jobs API. You can trigger these WebJobs from a logic app workflow by using the HTTP action.
Q: Is there a tool that can help me migrate my jobs from Azure Scheduler to Azure Logic Apps?
A: Each Azure Scheduler job is unique, so no one-size-fits-all tool exists. However, based on your needs, you can edit this script to migrate Azure Scheduler jobs to Azure Logic Apps.
Q: Where can I get support for migrating my Azure Scheduler jobs?
A: Here are some ways to get support:
Azure portal
If your Azure subscription has a paid support plan, you can create a technical support request in the Azure portal. Otherwise, you can select a different support option.
On the Azure portal main menu, select Help + support.
From the Support menu, select New support request. Provide the following information about your request:
Property Value Issue type Technical Subscription <your-Azure-subscription> Service Under Monitoring & Management, select Scheduler. If you can't find Scheduler, select All services first. Select the support option that you want. If you have a paid support plan, select Next.
Next steps
Feedback
Coming soon: Throughout 2024 we will be phasing out GitHub Issues as the feedback mechanism for content and replacing it with a new feedback system. For more information see: https://aka.ms/ContentUserFeedback.
Submit and view feedback for