Configure a custom response for Azure Web Application Firewall
This article describes how to configure a custom response page when Azure Web Application Firewall blocks a request.
By default, when Azure Web Application Firewall blocks a request because of a matched rule, it returns a 403 status code with the message "The request is blocked." The default message also includes the tracking reference string that's used to link to log entries for the request. You can configure a custom response status code and a custom message with a reference string for your use case.
Configure a custom response status code and message by using the portal
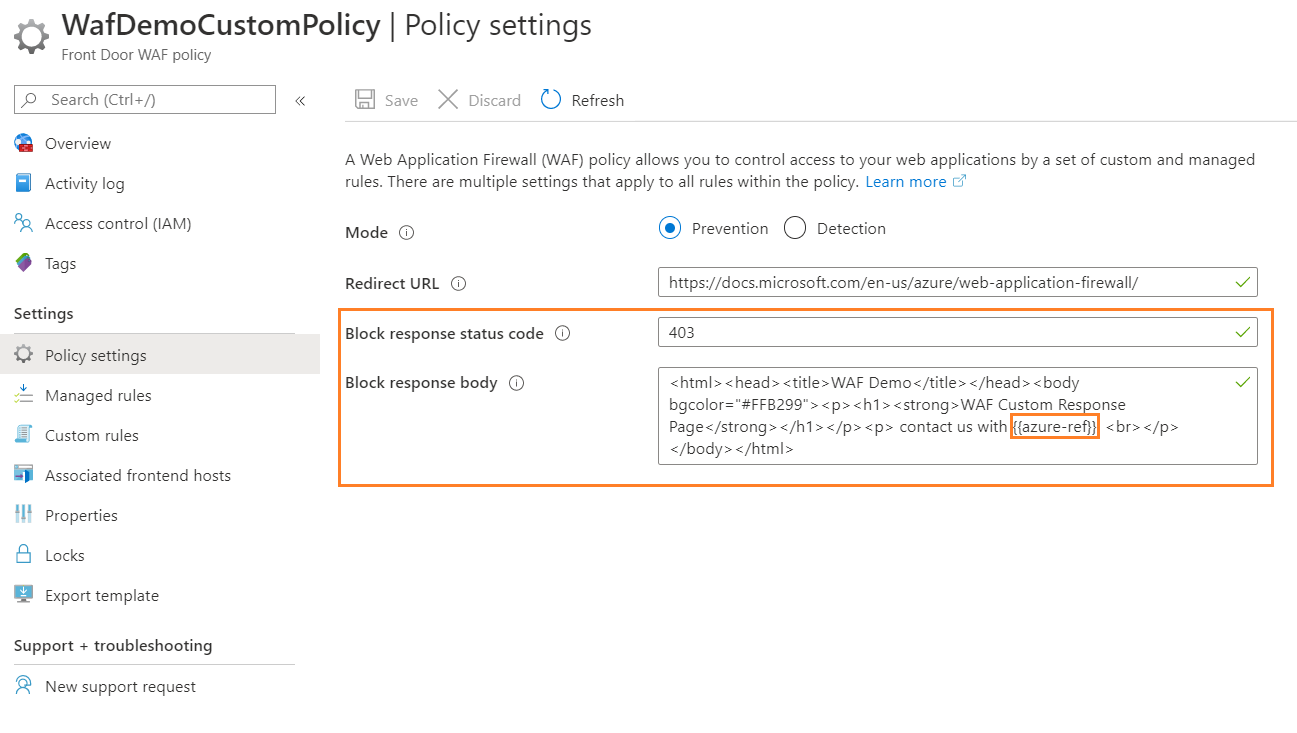
You can configure a custom response status code and body under Policy settings on the Azure Web Application Firewall portal.

In the preceding example, we kept the response code as 403 and configured a short "Please contact us" message, as shown in the following image:

"{{azure-ref}}" inserts the unique reference string in the response body. The value matches the TrackingReference field in the FrontDoorAccessLog and FrontDoorWebApplicationFirewallLog logs.
"{{azure-ref}}" inserts the unique reference string in the response body. The value matches the TrackingReference field in the FrontdoorAccessLog and FrontdoorWebApplicationFirewallLog logs.
Configure a custom response status code and message by using PowerShell
Follow these steps to configure a custom response status code and message by using PowerShell.
Set up your PowerShell environment
Azure PowerShell provides a set of cmdlets that use the Azure Resource Manager model for managing your Azure resources.
You can install Azure PowerShell on your local machine and use it in any PowerShell session. Follow the instructions on the page to sign in with your Azure credentials. Then install the Az PowerShell module.
Connect to Azure with an interactive dialog for sign-in
Connect-AzAccount
Install-Module -Name Az
Make sure you have the current version of PowerShellGet installed. Run the following command and reopen PowerShell.
Install-Module PowerShellGet -Force -AllowClobber
Install the Az.FrontDoor module
Install-Module -Name Az.FrontDoor
Create a resource group
In Azure, you allocate related resources to a resource group. Here, we create a resource group by using New-AzResourceGroup.
New-AzResourceGroup -Name myResourceGroupWAF
Create a new WAF policy with a custom response
The following example shows how to create a new web application firewall (WAF) policy with a custom response status code set to 405 and a message of "You are blocked" by using New-AzFrontDoorWafPolicy.
# WAF policy setting
New-AzFrontDoorWafPolicy `
-Name myWAFPolicy `
-ResourceGroupName myResourceGroupWAF `
-EnabledState enabled `
-Mode Detection `
-CustomBlockResponseStatusCode 405 `
-CustomBlockResponseBody "<html><head><title>You are blocked.</title></head><body></body></html>"
Modify the custom response code or response body settings of an existing WAF policy by using Update-AzFrontDoorFireWallPolicy.
# modify WAF response code
Update-AzFrontDoorFireWallPolicy `
-Name myWAFPolicy `
-ResourceGroupName myResourceGroupWAF `
-EnabledState enabled `
-Mode Detection `
-CustomBlockResponseStatusCode 403
# modify WAF response body
Update-AzFrontDoorFireWallPolicy `
-Name myWAFPolicy `
-ResourceGroupName myResourceGroupWAF `
-CustomBlockResponseBody "<html><head><title>Forbidden</title></head><body>{{azure-ref}}</body></html>"
Next steps
Learn more about Azure Web Application Firewall on Azure Front Door.