Note
Access to this page requires authorization. You can try signing in or changing directories.
Access to this page requires authorization. You can try changing directories.
Important
This article explains the creation of the example project. If you already have a project, you can skip ahead to the Code coverage tooling section.
Unit tests help to ensure functionality and provide a means of verification for refactoring efforts. Code coverage is a measurement of the amount of code that is run by unit tests - either lines, branches, or methods. As an example, if you have a simple application with only two conditional branches of code (branch a, and branch b), a unit test that verifies conditional branch a will report branch code coverage of 50%.
This article discusses the usage of code coverage for unit testing with Coverlet and report generation using ReportGenerator. While this article focuses on C# and xUnit as the test framework, both MSTest and NUnit would also work. Coverlet is an open source project on GitHub that provides a cross-platform code coverage framework for C#. Coverlet is part of the .NET Foundation. Coverlet collects Cobertura coverage test run data, which is used for report generation.
Additionally, this article details how to use the code coverage information collected from a Coverlet test run to generate a report. The report generation is possible using another open source project on GitHub - ReportGenerator. ReportGenerator converts coverage reports generated by Cobertura among many others, into human-readable reports in various formats.
This article is based on the sample source code project, available on samples browser.
System under test
The "system under test" refers to the code that you're writing unit tests against, this could be an object, service, or anything else that exposes testable functionality. For this article, you'll create a class library that is the system under test, and two corresponding unit test projects.
Create a class library
From a command prompt in a new directory named UnitTestingCodeCoverage, create a new .NET standard class library using the dotnet new classlib command:
dotnet new classlib -n Numbers
The snippet below defines a simple PrimeService class that provides functionality to check if a number is prime. Copy the snippet below and replace the contents of the Class1.cs file that was automatically created in the Numbers directory. Rename the Class1.cs file to PrimeService.cs.
namespace System.Numbers
{
    public class PrimeService
    {
        public bool IsPrime(int candidate)
        {
            if (candidate < 2)
            {
                return false;
            }

            for (int divisor = 2; divisor <= Math.Sqrt(candidate); ++divisor)
            {
                if (candidate % divisor == 0)
                {
                    return false;
                }
            }
            return true;
        }
    }
}
Tip
It is worth mentioning that the Numbers class library was intentionally added to the System namespace. This allows for System.Math to be accessible without a using System; namespace declaration. For more information, see namespace (C# Reference).
Create test projects
Create two new xUnit Test Project (.NET Core) templates from the same command prompt using the dotnet new xunit command:
dotnet new xunit -n XUnit.Coverlet.Collector
dotnet new xunit -n XUnit.Coverlet.MSBuild
Both of the newly created xUnit test projects need to add a project reference of the Numbers class library. This is so that the test projects have access to the PrimeService for testing. From the command prompt, use the dotnet add command:
dotnet add XUnit.Coverlet.Collector\XUnit.Coverlet.Collector.csproj reference Numbers\Numbers.csproj
dotnet add XUnit.Coverlet.MSBuild\XUnit.Coverlet.MSBuild.csproj reference Numbers\Numbers.csproj
The MSBuild project is named appropriately, as it will depend on the coverlet.msbuild NuGet package. Add this package dependency by running the dotnet package add command. (If you're using an SDK version of .NET 9 or earlier, use the dotnet add package form instead.)
cd XUnit.Coverlet.MSBuild && dotnet package add coverlet.msbuild && cd ..
The previous command changed directories effectively scoping to the MSBuild test project, then added the NuGet package. When that was done, it then changed directories, stepping up one level.
Open both of the UnitTest1.cs files, and replace their contents with the following snippet. Rename the UnitTest1.cs files to PrimeServiceTests.cs.
using System.Numbers;
using Xunit;

namespace XUnit.Coverlet
{
    public class PrimeServiceTests
    {
        readonly PrimeService _primeService;

        public PrimeServiceTests() => _primeService = new PrimeService();

        [Theory]
        [InlineData(-1), InlineData(0), InlineData(1)]
        public void IsPrime_ValuesLessThan2_ReturnFalse(int value) =>
            Assert.False(_primeService.IsPrime(value), $"{value} shouldn't be prime");

        [Theory]
        [InlineData(2), InlineData(3), InlineData(5), InlineData(7)]
        public void IsPrime_PrimesLessThan10_ReturnTrue(int value) =>
            Assert.True(_primeService.IsPrime(value), $"{value} should be prime");

        [Theory]
        [InlineData(4), InlineData(6), InlineData(8), InlineData(9)]
        public void IsPrime_NonPrimesLessThan10_ReturnFalse(int value) =>
            Assert.False(_primeService.IsPrime(value), $"{value} shouldn't be prime");
    }
}
Create a solution
From the command prompt, create a new solution to encapsulate the class library and the two test projects. Using the dotnet sln command:
dotnet new sln -n XUnit.Coverage
This creates a new solution file name XUnit.Coverage in the UnitTestingCodeCoverage directory. Add the projects to the root of the solution.
Build the solution using the dotnet build command:
dotnet build XUnit.Coverage.sln
If the build is successful, you've created the three projects, appropriately referenced projects and packages, and updated the source code correctly. Well done!
Code coverage tooling
There are two types of code coverage tools:
- DataCollectors: DataCollectors monitor test execution and collect information about test runs. They report the collected information in various output formats, such as XML and JSON. For more information, see your first DataCollector.
- Report generators: Use data collected from test runs to generate reports, often as styled HTML.
In this section, the focus is on data collector tools.
Code coverage approaches
.NET provides two different testing platforms, each with its own code coverage approach:
- VSTest (MSTest, NUnit, xUnit) - Use either the built-in .NET code coverage collector or Coverlet, an open-source alternative.
- Microsoft.Testing.Platform (MTP) (MSTest, NUnit, and xUnit.net runners, and TUnit) - Use the Microsoft code coverage extension or
coverlet.MTP.
The built-in .NET code coverage data collector generates a binary .coverage file that can be used to generate reports in Visual Studio. The binary file isn't human-readable, and it must be converted to a human-readable format before it can be used to generate reports outside of Visual Studio.
Tip
The dotnet-coverage tool is a cross-platform tool that can be used to convert the binary coverage test results file to a human-readable format. For more information, see dotnet-coverage.
Coverlet generates test results as human-readable Cobertura XML files, which can then be used to generate HTML reports. To use Coverlet for code coverage, an existing unit test project must have the appropriate package dependencies, or alternatively rely on .NET global tooling and the corresponding coverlet.console NuGet package.
Code coverage with VSTest
VSTest is a testing platform used by MSTest, NUnit, and xUnit. For VSTest-based projects, you can use either Coverlet or the built-in .NET code coverage collector.
Using Coverlet with VSTest
The xUnit test project template already integrates with coverlet.collector by default.
From the command prompt, change directories to the XUnit.Coverlet.Collector project, and run the dotnet test command:
cd XUnit.Coverlet.Collector && dotnet test --collect:"XPlat Code Coverage"
Note
The "XPlat Code Coverage" argument is a friendly name that corresponds to the data collectors from Coverlet. This name is required but is case insensitive. To use .NET's built-in Code Coverage data collector, use "Code Coverage".
As part of the dotnet test run, a resulting coverage.cobertura.xml file is output to the TestResults directory. The XML file contains the results. This is a cross-platform option that relies on the .NET CLI, and it is great for build systems where MSBuild isn't available.
Below is the example coverage.cobertura.xml file.
<?xml version="1.0" encoding="utf-8"?>
<coverage line-rate="1" branch-rate="1" version="1.9" timestamp="1592248008"
          lines-covered="12" lines-valid="12" branches-covered="6" branches-valid="6">
  <sources>
    <source>C:\</source>
  </sources>
  <packages>
    <package name="Numbers" line-rate="1" branch-rate="1" complexity="6">
      <classes>
        <class name="Numbers.PrimeService" line-rate="1" branch-rate="1" complexity="6"
               filename="Numbers\PrimeService.cs">
          <methods>
            <method name="IsPrime" signature="(System.Int32)" line-rate="1"
                    branch-rate="1" complexity="6">
              <lines>
                <line number="8" hits="11" branch="False" />
                <line number="9" hits="11" branch="True" condition-coverage="100% (2/2)">
                  <conditions>
                    <condition number="7" type="jump" coverage="100%" />
                  </conditions>
                </line>
                <line number="10" hits="3" branch="False" />
                <line number="11" hits="3" branch="False" />
                <line number="14" hits="22" branch="True" condition-coverage="100% (2/2)">
                  <conditions>
                    <condition number="57" type="jump" coverage="100%" />
                  </conditions>
                </line>
                <line number="15" hits="7" branch="False" />
                <line number="16" hits="7" branch="True" condition-coverage="100% (2/2)">
                  <conditions>
                    <condition number="27" type="jump" coverage="100%" />
                  </conditions>
                </line>
                <line number="17" hits="4" branch="False" />
                <line number="18" hits="4" branch="False" />
                <line number="20" hits="3" branch="False" />
                <line number="21" hits="4" branch="False" />
                <line number="23" hits="11" branch="False" />
              </lines>
            </method>
          </methods>
          <lines>
            <line number="8" hits="11" branch="False" />
            <line number="9" hits="11" branch="True" condition-coverage="100% (2/2)">
              <conditions>
                <condition number="7" type="jump" coverage="100%" />
              </conditions>
            </line>
            <line number="10" hits="3" branch="False" />
            <line number="11" hits="3" branch="False" />
            <line number="14" hits="22" branch="True" condition-coverage="100% (2/2)">
              <conditions>
                <condition number="57" type="jump" coverage="100%" />
              </conditions>
            </line>
            <line number="15" hits="7" branch="False" />
            <line number="16" hits="7" branch="True" condition-coverage="100% (2/2)">
              <conditions>
                <condition number="27" type="jump" coverage="100%" />
              </conditions>
            </line>
            <line number="17" hits="4" branch="False" />
            <line number="18" hits="4" branch="False" />
            <line number="20" hits="3" branch="False" />
            <line number="21" hits="4" branch="False" />
            <line number="23" hits="11" branch="False" />
          </lines>
        </class>
      </classes>
    </package>
  </packages>
</coverage>
Tip
As an alternative, you could use the MSBuild package if your build system already makes use of MSBuild. From the command prompt, change directories to the XUnit.Coverlet.MSBuild project, and run the dotnet test command:
dotnet test /p:CollectCoverage=true /p:CoverletOutputFormat=cobertura
The resulting coverage.cobertura.xml file is output. For more information, see Coverlet integration with MSBuild
Generate reports
Now that you're able to collect data from unit test runs, you can generate reports using ReportGenerator. To install the ReportGenerator NuGet package as a .NET global tool, use the dotnet tool install command:
dotnet tool install -g dotnet-reportgenerator-globaltool
Run the tool and provide the desired options, given the output coverage.cobertura.xml file from the previous test run.
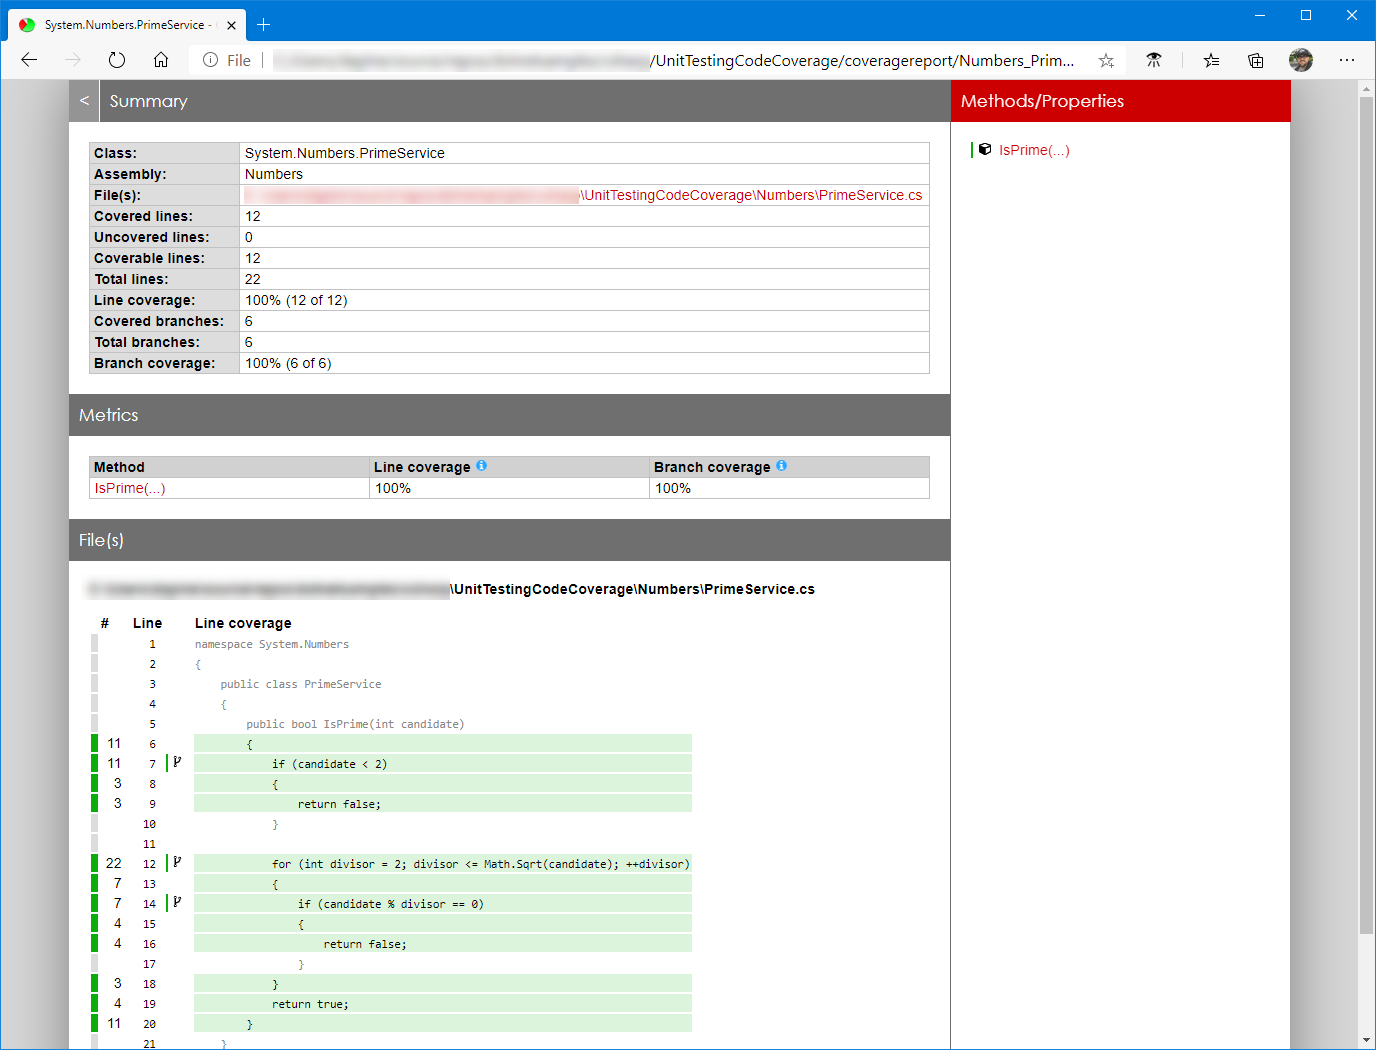
reportgenerator -reports:"Path\To\TestProject\TestResults\{guid}\coverage.cobertura.xml" -targetdir:"coveragereport" -reporttypes:Html
After running this command, an HTML file represents the generated report.
Code coverage with Microsoft.Testing.Platform
Microsoft.Testing.Platform (MTP) is a lightweight and portable alternative to VSTest for running tests. MSTest, NUnit, and xUnit.net support MTP through their runners, and TUnit supports only MTP. Projects that run on MTP collect code coverage with an MTP extension instead of a VSTest data collector. This section uses the Microsoft code coverage extension. For Coverlet, see Code coverage.
Add the code coverage extension
Add the Microsoft.Testing.Extensions.CodeCoverage package to your test project:
dotnet add package Microsoft.Testing.Extensions.CodeCoverage
Note
The TUnit package already references Microsoft.Testing.Extensions.CodeCoverage, so TUnit projects can skip this step.
Enable the MTP mode of dotnet test
The --coverage option is an MTP option, so dotnet test must run in its MTP mode. With the .NET 10 SDK or later, add the following configuration to the global.json file in your solution root:
{
    "test": {
        "runner": "Microsoft.Testing.Platform"
    }
}
This configuration applies to every MTP-based framework, not only TUnit. Without it, dotnet test runs in VSTest mode and doesn't recognize --coverage. For more information, including how to run MTP projects with earlier SDKs, see Testing with dotnet test.
Collect code coverage
Run the tests with the --coverage option:
dotnet test --coverage
The extension writes a binary .coverage file to the TestResults directory. To produce a different format, use the --coverage-output-format option. Supported values are coverage (default), xml, and cobertura. For example, the following command produces a Cobertura XML file that you can pass to ReportGenerator, as described in Generate reports:
dotnet test --coverage --coverage-output-format cobertura
For all options, see Code coverage.
See also
- Visual Studio unit test code coverage
- GitHub - Coverlet repository
- GitHub - ReportGenerator repository
- ReportGenerator project site
- Azure: Publish code coverage results
- Azure: Review code coverage results
- .NET CLI test command
- dotnet-coverage
- Sample source code
Next Steps
Collaborate with us on GitHub
The source for this content can be found on GitHub, where you can also create and review issues and pull requests. For more information, see our contributor guide.