Add the local language to your Power BI visual
Power BI supports a range of local languages. You can retrieve the Power BI locale language, and use it to display content in your visual.
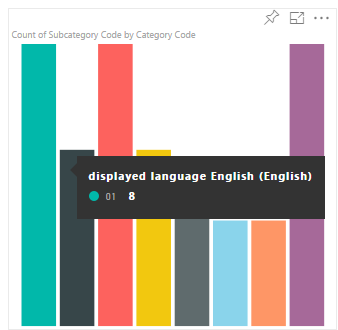
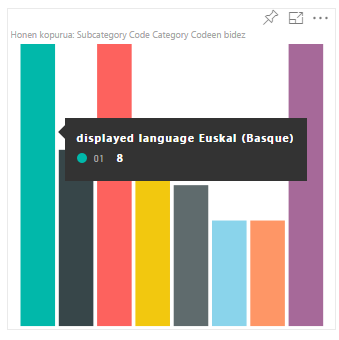
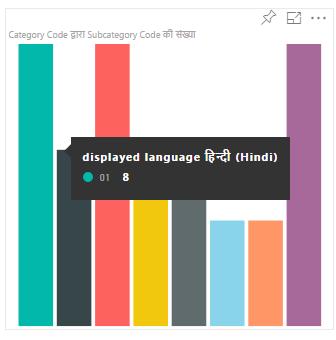
The following tabs show examples of the same sample bar chart visual displaying content in different languages. Each of these bar charts was created using a different locale language (English, Basque, and Hindi) which is displayed in the tooltip.
Note
- The localization manager in the visual's code is supported from API 1.10.0 and higher.
- Localization is not supported for debugging the visual while in development.
How to add the local Power BI language to your visual
To add the local Power BI language to your visual, follow these steps:
Step 1 - Set up your environment to display a language that isn't English
To test your visual, set Power BI to a language that isn't English. This section shows how to change the settings of Power BI Desktop and Power BI service, so that they use a local language that isn't English.
Power BI Desktop - Download the localized version of Power BI desktop from https://powerbi.microsoft.com
Power BI service - If you're using Power BI service (web portal), change your language in settings:
Sign in to PowerBI.com.
Navigate to Settings > Settings > Settings.
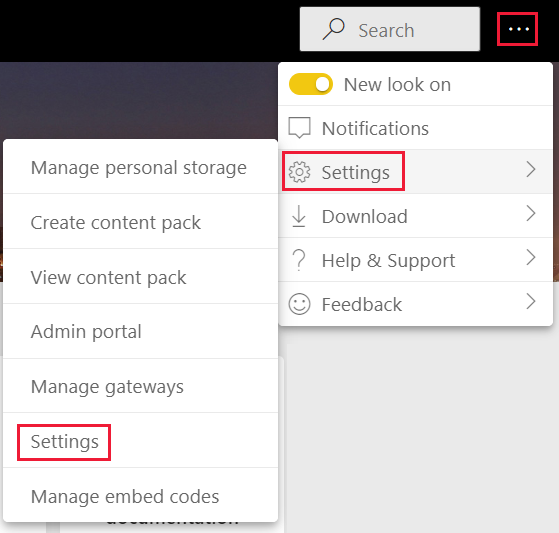
From the General tab, select Language. In the Language Settings, select the language you want Power BI to use, and then select Apply.

Step 2 - Get the locale Power BI language
The local Power BI language is passed as a string called locale during the initialization of the visual. If a locale language is changed in Power BI, the visual is generated again in the new language.
private locale: string;
...
this.locale = options.host.locale;
Note
In Power BI Desktop, the locale property contains the language of the installed Power BI Desktop.
Step 3 - Set the visual display names
Every visual displays information in the property pane. For example, a nonlocalized custom visual created by using the pbiviz new command, will show the Category Data and Measure Data fields in the property pane.
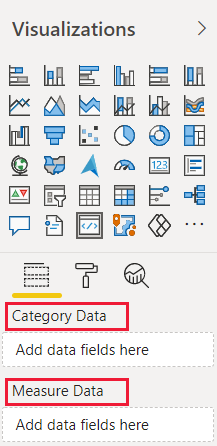
The property pane display fields are defined in the capabilities.json file. Every display field is defined using a displayName property. Add a displayNameKey to every display name you want to localize.
{
    "dataRoles": [
        {
            "displayName": "Category Data",
            "displayNameKey": "VisualCategoryDataNameKey1",
            "name": "category",
            "kind": "Grouping"
        },
        {
            "displayName": "Measure Data",
            "displayNameKey": "VisualMeasureDataNameKey2",
            "name": "measure",
            "kind": "Measure"
        }
    ]
}
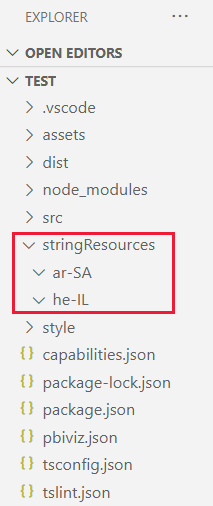
Step 4 - Create a language folder
To create localized visuals, your project needs to have a language folder. In your project, create a folder called stringResources. The folder contains one sub folder for each local language you want your visual to support. For example, to support Arabic and Hebrew, add two folders in the following way:
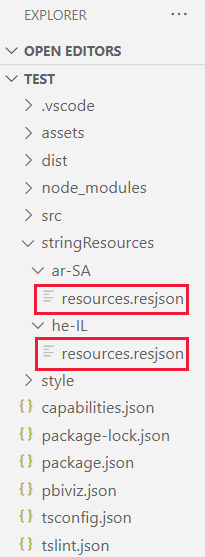
Step 5 - Add a resources file for each language
For each language you want your visual to support, add a resources.resjson JSON file in the appropriate stringResources sub folder. These files contain the locale language information, and the localized string values for every displayNameKey you want to replace.
Every JSON file defines a single supported locale language. Add all the localization strings you're going to use into each resources.resjson file.
Examples
resources.resjson file with Russian strings for each
displayNameKey.{ ... "Role_Legend": "Обозначения", "Role_task": "Задача", "Role_StartDate": "Дата начала", "Role_Duration": "Длительность" ... }resources.resjson file with Hebrew strings for each
displayNameKey.{ ... "Role_Legend": "מקרא", "Role_task": "משימה", "Role_StartDate": "תאריך התחלה", "Role_Duration": "משך זמן" ... }
Step 6 - Create a new localizationManager instance
Create a new localizationManager instance in your visual's code.
private localizationManager: ILocalizationManager;

constructor(options: VisualConstructorOptions) {
    this.localizationManager = options.host.createLocalizationManager();
}
Step 7 - Call the getDisplayName function
After creating a new localizationManager instance, you can call the localization manager's getDisplayName function with the string key argument you defined in resources.resjson.
For example, the following code returns Legend for en-US, and Обозначения for ru-RU.
let legend: string = this.localization.getDisplayName("Role_Legend");
Format pane and analytics pane localization
Note
Relevant to API version 5.1+
To support localization on format pane and analytics pane components, set localized string as the following:
displayName: this.localization.getDisplayName("Font_Color_DisplayNameKey");
description: this.localization.getDisplayName("Font_Color_DescriptionKey");
For localize formatting model see format pane localization.
For localize formatting model utils see formatting model utils - localization.
Supported languages
The following table contains a list of all the languages supported in Power BI, and the string that the locale variable returns for each one.
| Locale string | Language |
|---|---|
| ar-SA | العربية (Arabic) |
| bg-BG | български (Bulgarian) |
| ca-ES | català (Catalan) |
| cs-CZ | čeština (Czech) |
| da-DK | dansk (Danish) |
| de-DE | Deutsche (German) |
| el-GR | ελληνικά (Greek) |
| en-US | English (English) |
| es-ES | español service (Spanish) |
| et-EE | eesti (Estonian) |
| eU-ES | Euskal (Basque) |
| fi-FI | suomi (Finnish) |
| fr-FR | français (French) |
| gl-ES | galego (Galician) |
| he-IL | עברית (Hebrew) |
| hi-IN | हिन्दी (Hindi) |
| hr-HR | hrvatski (Croatian) |
| hu-HU | magyar (Hungarian) |
| id-ID | Bahasa Indonesia (Indonesian) |
| it-IT | italiano (Italian) |
| ja-JP | 日本の (Japanese) |
| kk-KZ | Қазақ (Kazakh) |
| ko-KR | 한국의 (Korean) |
| lt-LT | Lietuvos (Lithuanian) |
| lv-LV | Latvijas (Latvian) |
| ms-MY | Bahasa Melayu (Malay) |
| nb-NO | norsk (Norwegian) |
| nl-NL | Nederlands (Dutch) |
| pl-PL | polski (Polish) |
| pt-BR | português (Portuguese) |
| pt-PT | português (Portuguese) |
| ro-RO | românesc (Romanian) |
| ru-RU | русский (Russian) |
| sk-SK | slovenský (Slovak) |
| sl-SI | slovenski (Slovenian) |
| sr-Cyrl-RS | српски (Serbian) |
| sr-Latn-RS | srpski (Serbian) |
| sv-SE | svenska (Swedish) |
| th-TH | ไทย (Thai) |
| tr-TR | Türk (Turkish) |
| uk-UA | український (Ukrainian) |
| vi-VN | tiếng Việt (Vietnamese) |
| zh-CN | 中国 (Chinese-Simplified) |
| zh-TW | 中國 (Chinese-Tranditional) |
Related content
Questions? Ask the Power BI community
Feedback
Coming soon: Throughout 2024 we will be phasing out GitHub Issues as the feedback mechanism for content and replacing it with a new feedback system. For more information see: https://aka.ms/ContentUserFeedback.
Submit and view feedback for