Relate and Unrelate functions
Applies to:
Canvas apps
Model-driven apps
Relate and unrelate records of two tables through a one-to-many or many-to-many relationship.
Description
The Relate function links two records through a one-to-many or many-to-many relationship in Microsoft Dataverse. The Unrelate function reverses the process and removes the link.
For one-to-many relationships, the Many table has a foreign-key field that points to a record of the One table. Relate sets this field to point to a specific record of the One table, while Unrelate sets this field to blank. If the field is already set when Relate is called, the existing link is lost in favor of the new link. You can also set this field by using the Patch function or an Edit form control; you need not use the Relate function.
For many-to-many relationships, the system that links the records maintains a hidden join table. You can't access this join table directly; it can be read only through a one-to-many projection and set through the Relate and Unrelate functions. Neither related table has a foreign key.
The data for the table that you specify in the first argument will be refreshed to reflect the change, but the data for the table that you specify in the second argument won't. That data must be manually refreshed with the Refresh function to show the result of the operation.
These functions never create or delete a record. They only relate or unrelate two records that already exist.
You can use these functions only in behavior formulas.
Note
These functions are part of a preview feature, and their behavior is available only when the Relational data, option sets, and other new features for CDS feature is enabled. This is an app-level setting that's enabled by default for new apps. To find this feature switch, select Settings, and then select Upcoming features. Your feedback is very valuable to us - please let us know what you think in the Power Apps community forums.
Syntax
Relate( Table1RelatedTable, Table2Record )
- Table1RelatedTable - Required. For a record of Table1, the table of Table2 records related through a one-to-many or many-to-many relationship.
- Table2Record - Required. The Table2 record to add to the relationship.
Unrelate( Table1RelatedTable, Table2Record )
- Table1RelatedTable - Required. For a record of Table1, the table of Table2 records related through a one-to-many or many-to-many relationship.
- Table2Record - Required. The Table2 record to remove from the relationship.
Examples
Consider a Products table with the following relationships as seen in the Power Apps portal's table viewer:
| Relationship display name | Related table | Relationship type |
|---|---|---|
| Product Reservation | Reservation | One-to-many |
| Product ↔ Contact | Contact | Many-to-many |
Products and Reservations are related through a One-to-Many relationship. To relate the first record of the Reservations table with the first record of the Products table:
Relate( First( Products ).Reservations, First( Reservations ) )
To remove the relationship between these records:
Unrelate( First( Products ).Reservations, First( Reservations ) )
At no time did we create or remove or a record, only the relationship between records was modified.
Products and Contacts are related through a Many-to-Many relationship. To relate the first record of the Contacts table with the first record of the Products table:
Relate( First( Products ).Contacts, First( Contacts ) )
As Many-to-Many relationships are symmetric, we could also have done this in the opposite direction:
Relate( First( Contacts ).Products, First( Products ) )
To remove the relationship between these records:
Unrelate( First( Products ).Contacts, First( Contacts ) )
or:
Unrelate( First( Contacts ).Products, First( Products ) )
The walk through that follows does exactly these operations on these tables using an app with Gallery and Combo box controls for selecting the records involved.
These examples depend on the sample data being installed in your environment. Either create a trial environment including sample data or add sample data to an existing environment.
One-to-many
Relate function
You'll first create a simple app to view and reassign the reservations that are associated with a product.
Create a tablet app from blank.
On the View tab, select Data sources.
In the Data pane, select Add data > select Products.
The Products table is part of the sample data loaded above.On the Insert tab, add a blank vertical Gallery control.
Ensure that the control that you just added is named Gallery1, and then move and resize it to fill the left-hand side of the screen.
On the Properties tab, set Gallery1's Items property to Products and its Layout to Image and title.

In Gallery1, ensure that the Label control is named Title1, and then set its Text property to ThisItem.Name.

Select the screen to avoid inserting the next item into Gallery1. Add a second blank vertical Gallery control, and ensure that it's named Gallery2.
Gallery2 will show the reservations for whatever product the user selects in Gallery1.
Move and resize Gallery2 to fill the upper-right quadrant of the screen.
(optional) Add the blue Label control above Gallery2, as the next graphic shows.
In the formula bar, set the Items property of Gallery2 to Gallery1.Selected.Reservations.

In the properties pane, set Gallery2's Layout to Title.

In Gallery2, add a Combo box control, ensure that it's named ComboBox1, and then move and resize it to avoid blocking the other controls in Gallery2.
On the Properties tab, set ComboBox1's Items property to Products.
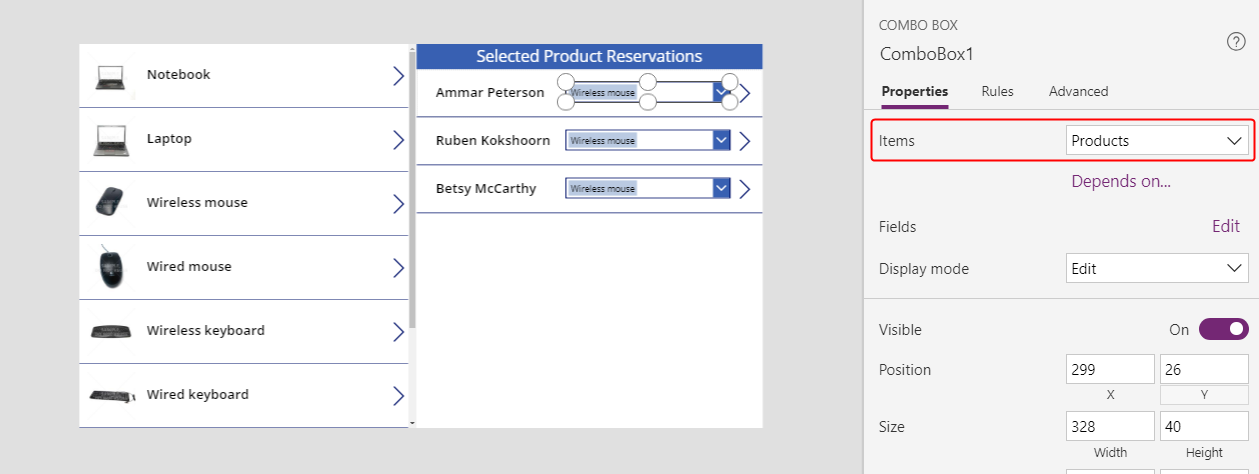
Scroll down in the Properties tab and set ComboBox1's Allow multiple selection property to Off.

In the formula bar, set ComboBox1's DefaultSelectedItems property to ThisItem.'Product Reservation'.

In Gallery2, set NextArrow2's OnSelect property to this formula:
Relate( ComboBox1.Selected.Reservations, ThisItem )When the user selects this icon, the current reservation changes to the product that the user selected in ComboBox1.

Press F5 to test the app in Preview mode.
With this app, the user can move a reservation from one product to another. For a reservation on one product, the user can select a different product in ComboBox1 and then select NextArrow2 to change that reservation.

Unrelate function
At this point, you can move the relationship from one record to another, but you can't remove the relationship altogether. You can use the Unrelate function to disconnect a reservation record from any product.
On the View tab, select Data sources.
In the Data pane, select Add data source > Microsoft Dataverse > Reservations > Connect.
In Gallery2, set the OnSelect formula for NextArrow2 to this formula:
If( IsBlank( ComboBox1.Selected ),
    Unrelate( Gallery1.Selected.Reservations, ThisItem ),
    Relate( ComboBox1.Selected.Reservations, ThisItem )
);
Refresh( Reservations )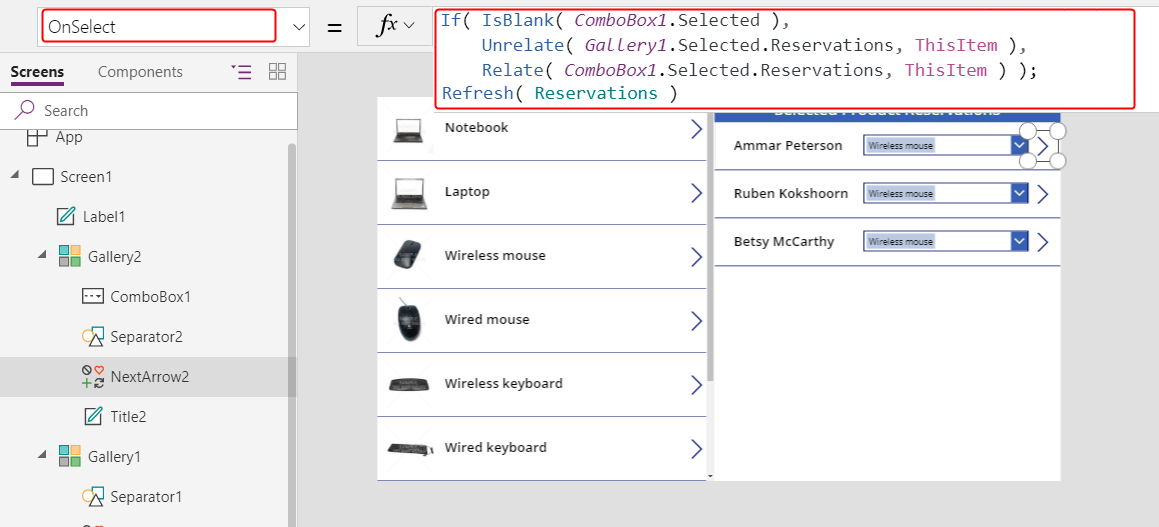
Copy Gallery2 to the Clipboard by selecting it and then pressing Ctrl-C.
Paste a duplicate of Gallery2 to the same screen by pressing Ctrl-V, and then move it to the lower-right quadrant of the screen.
(optional) If you added a label above Gallery2, repeat the previous two steps for that label.
Ensure that the duplicate of Gallery2 is named Gallery2_1, and then set its Items property to this formula:
Filter( Reservations, IsBlank( 'Product Reservation' ) )A delegation warning appears, but it won't matter with the small amount of data in this example.

With these changes, users can clear the selection in ComboBox1 for a contact if that person hasn't reserved a product. Contacts who haven't reserved a product appear in Gallery2_1 where users can assign each contact to a product.

Many-to-many
Create a many-to-many relationship
The sample data doesn't include a many-to-many relationship, but you'll create one between the Products table and the Contacts table. Users can relate each product to more than one contact and each contact to more than one product.
From this page, select Data in the left navigation bar, and then select Tables.

Change the table filter to include all tables.
By default, sample tables don't appear.

Scroll down, open the Product table, and select Relationships.
Select Add relationship > Many-to-many.
Select the Contact table for the relationship.
Select Done > Save table.
Relate and unrelate contacts with one or more products
You'll create another app that resembles the one you created earlier in this topic, but the new app will offer a many-to-many relationship. Each contact will be able to reserve multiple products instead of only one.
In a blank app for tablets, create Gallery1 as the first procedure in this topic describes.
Add another blank vertical Gallery control, ensure that it's named Gallery2, and then move it into the upper-right corner of the screen.
Later in this topic, you'll add a Combo box control under Gallery2.
In the formula bar, set Gallery2's Items property to Gallery1.Selected.Contacts.

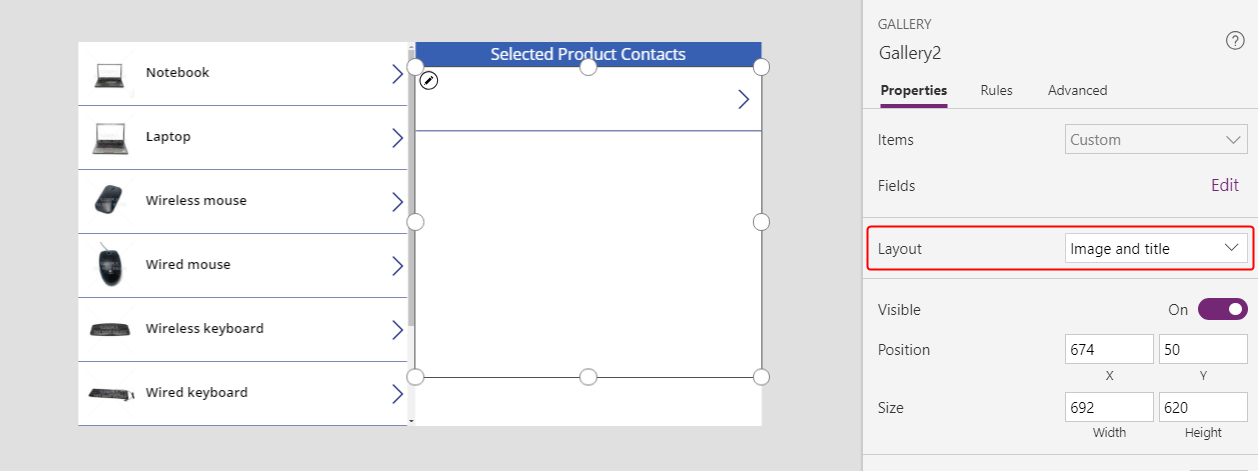
On the Properties tab, set Layout to Image and title.
In Gallery2, ensure that the Label control is named Title2, and then set its Text property to ThisItem.'Full Name'.
No text will appear in that control until you finish this procedure and assign a contact to a product.

Delete NextArrow2, insert a Cancel icon, and ensure that it's named icon1.
Set the Cancel icon's OnSelect property to this formula:
Unrelate( Gallery1.Selected.Contacts, ThisItem )
On the View tab, select Data sources.
In the Data pane, select Add data source > Microsoft Dataverse > Contacts > Connect.
Under Gallery2, add a Combo box control, ensure that it's named ComboBox1, and then set its Items property to Contacts.

On the Properties tab, set Allow multiple selection to Off.

Insert an Add icon, and set its OnSelect property to this formula:
Relate( Gallery1.Selected.Contacts, ComboBox1.Selected )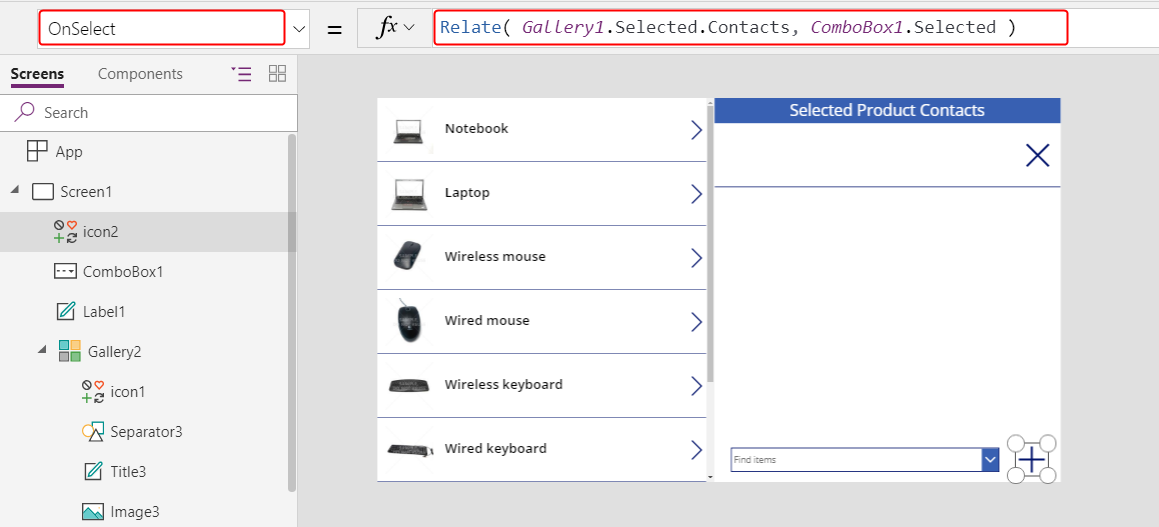
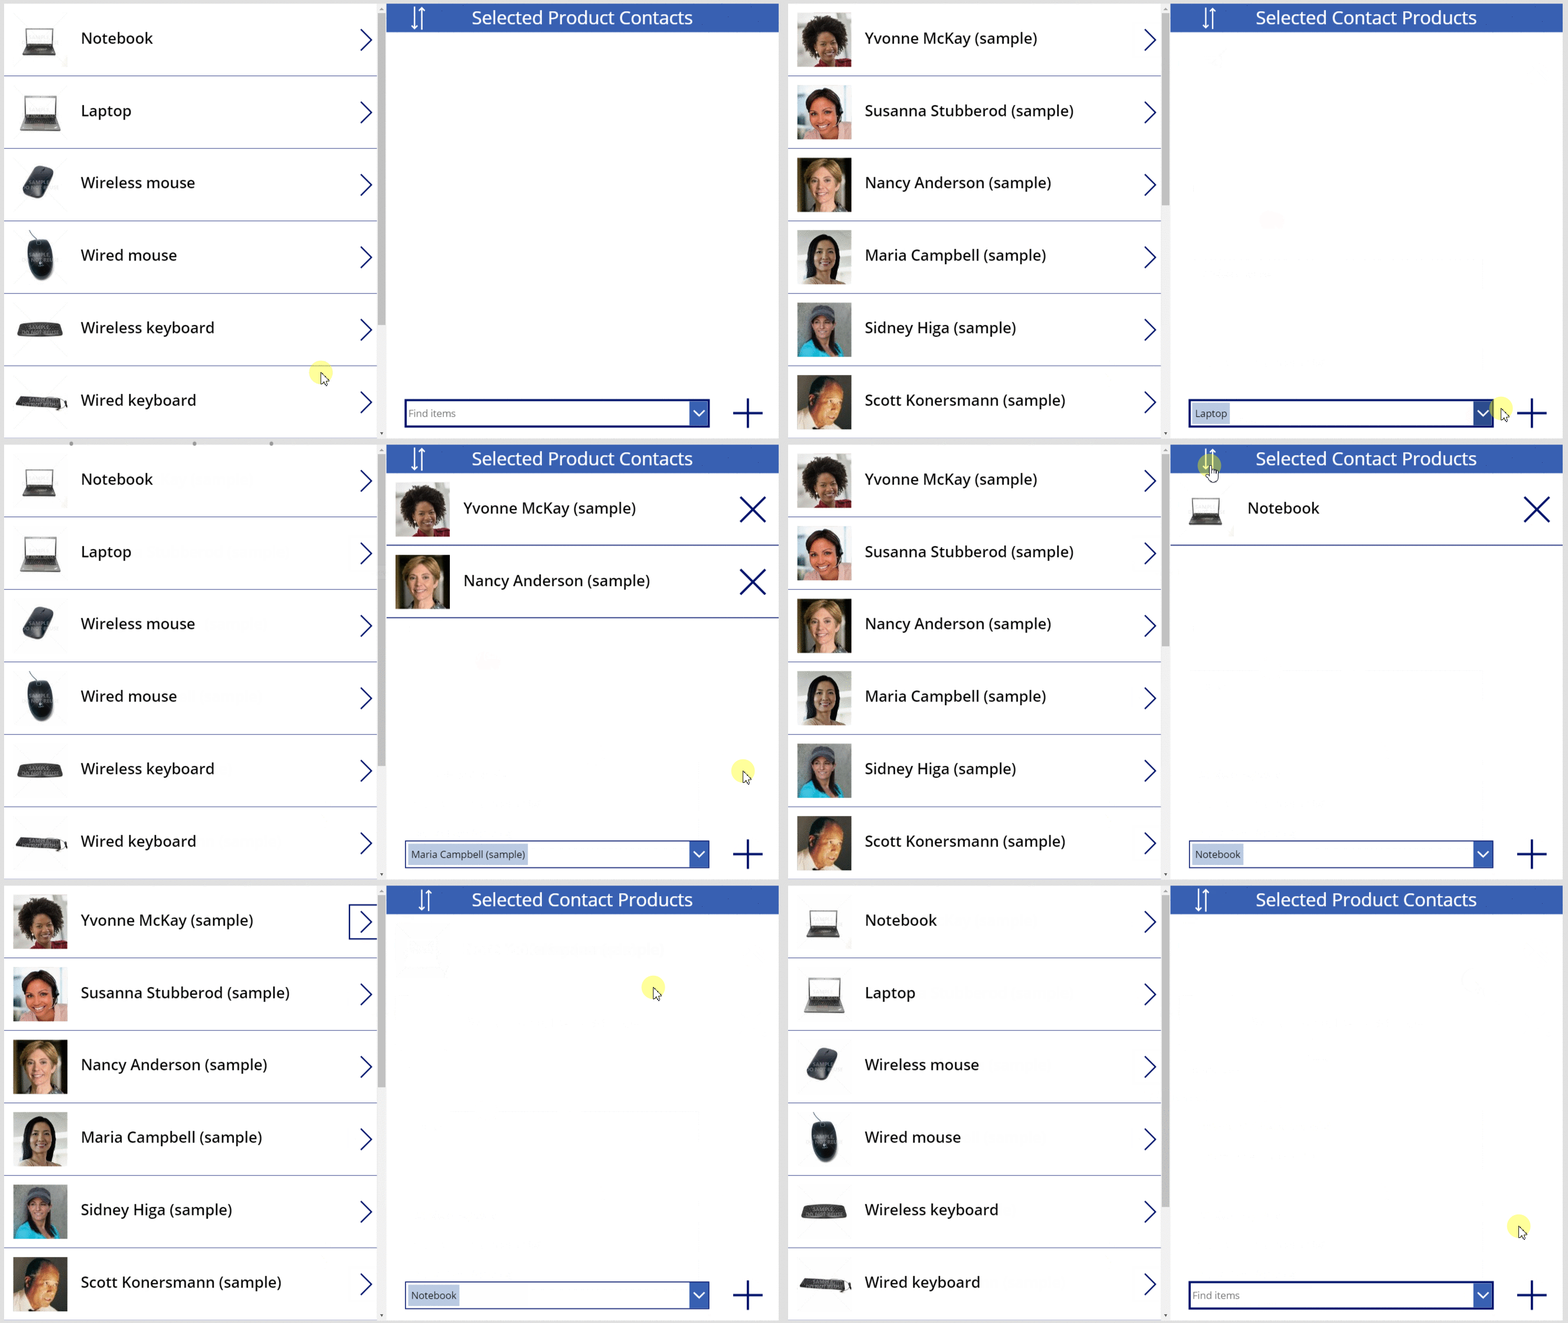
With this app, users can now freely relate and unrelate a set of contacts to each product.
To add a contact to a product, select the contact in the combo box at the bottom of the screen, and then select the Add icon.
To remove a contact from a product, select the Cancel icon for that contact.
Unlike one-to-many, a many-to-many relationship allows users to associate the same contact with multiple products.

In reverse: relate and unrelate products with multiple contacts
Many-to-many relationships are symmetric. You can extend the example to add products to a contact and then flip between the two screens to show how the relationship appears from either direction.
Set the OnVisible property of Screen1 to Refresh( Products ).
When you update a one-to-many or many-to-many relationship, only the data of the first argument table of the Relate or Unrelate call is refreshed. The second must be refreshed manually if you want to flip between the screens of this app.

Duplicate Screen1.
The duplicate will be named Screen1_1 and form the basis for looking at the relationships from the contacts side.

To create the reverse view, change these formulas on the controls of Screen1_1:
- Screen1_1.OnVisible =
Refresh( Contacts ) - Gallery1_1.Items =
Contacts - Title1_1.Text =
ThisItem.'Full Name' - Label1_1.Text =
"Selected Contact Products" - Gallery2_1.Items =
Gallery1_1.Selected.Products - Title2_1.Text =
ThisItem.Name - Icon1_1.OnSelect =
Unrelate( Gallery1_1.Selected.Products, ThisItem ) - ComboBox1_1.Items =
Products - Icon2_1.OnSelect =
Relate( Gallery1_1.Selected.Products, ComboBox1_1.Selected )
The result will look very similar to the previous screen but comes at the relationship from the Contacts side.

- Screen1_1.OnVisible =
Insert an Arrows up down icon and set its OnSelect property to Navigate( Screen1, None ). Do the same thing on Screen1 with the formula Navigate( Screen1_1, None ).

With this new screen, users can add a contact to a product and then flip to a view of contacts and see the associated product. The relationships are symmetric and shared between the two screens.
