Note
Access to this page requires authorization. You can try signing in or changing directories.
Access to this page requires authorization. You can try changing directories.
To assess virtual machine (VM) vulnerabilities by using your existing licensed solution, deploy a Bring Your Own License (BYOL) vulnerability assessment solution on Azure VMs (deprecated). Use this guidance to review existing setup and plan migration alternatives.
The Defender for Servers plan in Microsoft Defender for Cloud provides vulnerability scanning for protected machines. Vulnerability scanning uses integrated Microsoft Defender Vulnerability Management as its scanner.
Warning
Bring your own license (BYOL) capability is being deprecated. Starting February 3rd, you can no longer add new BYOL security solutions or onboard new machines to existing ones. By May 1st, the deprecation is complete and no data is available. If you use BYOL, migrate to Microsoft Defender Vulnerability Management or use a Microsoft Security Exposure Management connector.
As an alternative to Defender for Vulnerability Management, you can use your own privately licensed vulnerability assessment solution. This article shows how to deploy a partner solution on Azure VMs.
Prerequisites
Before you deploy a bring your own license (BYOL) vulnerability scanning solution, make sure you meet the following requirements:
| Requirement | Details |
|---|---|
| Supported non-Microsoft scanners | Qualys and Rapid7 solutions are supported. If you don't have a non-Microsoft vulnerability scanner configured, you see an option to deploy it in Defender for Cloud. |
| Plan | You don't need a Defender for Servers plan turned on to use BYOL vulnerability scanning. |
| Machine support | BYOL solution support is available only for Azure VMs. Azure Arc VMs aren't supported. |
| Permissions | You need Resource Owner permissions to deploy the scanner. |
- You need Security Reader to view findings.
Deploy a BYOL solution
To deploy a BYOL vulnerability assessment solution through the Azure portal, complete the following steps:
From the Azure portal, open Defender for Cloud.
From Defender for Cloud's menu, open the Recommendations page.
Select the recommendation Machines should have a vulnerability assessment solution.
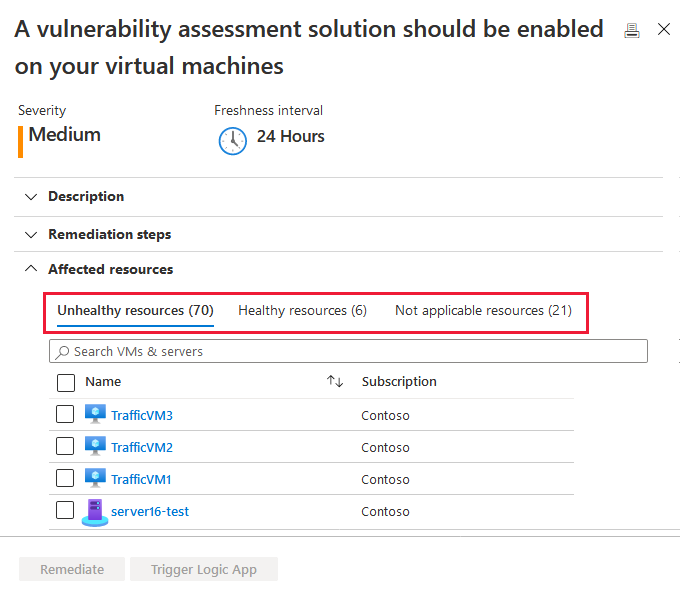
The VMs appear in one or more of these groups:
- Healthy resources - Defender for Cloud detected a vulnerability assessment solution on these VMs.
- Unhealthy resources - A vulnerability scanner extension can be deployed to these VMs.
- Not applicable resources - These VMs can't have a vulnerability scanner extension deployed.
From the list of unhealthy machines, select the ones that need a vulnerability assessment solution, and then select Remediate. Depending on your configuration, you might only see part of the list.
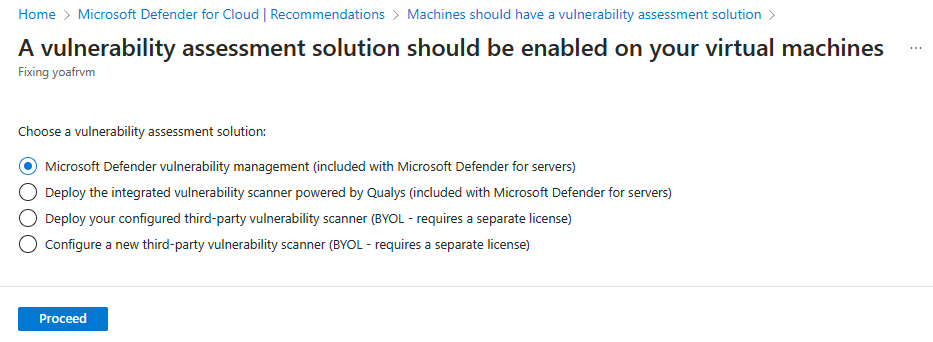
If you're setting up a new BYOL configuration, select Configure a new third-party vulnerability scanner. Select the relevant extension, select Proceed, and enter the details from the provider as follows:
- For Resource group, select Use existing. If you later delete this resource group, the BYOL solution isn't available.
- For Location, select where the solution is geographically located.
- For Qualys, enter the license provided by Qualys into the License code field.
- For Rapid7, upload the Rapid7 Configuration File.
- In the Public key box, enter the public key information provided by the partner.
- To automatically install this vulnerability assessment agent on all discovered VMs in the subscription of this solution, select Auto deploy.
- Select OK.
If you already set up the BYOL solution, select Deploy your configured third-party vulnerability scanner, select the relevant extension, and select Proceed.

After installation, Defender for Cloud runs a scan to detect system and application vulnerabilities. The first scan might take a couple of hours. After that, scans run hourly.
Deploy using PowerShell and the REST API
Before you run the script, install these required PowerShell modules:
- Install the Az PowerShell module.
- Install the Az.Security PowerShell module.
To programmatically deploy your own privately licensed vulnerability assessment solution from Qualys or Rapid7, use the supplied script PowerShell > Vulnerability Solution.
- Use the REST API script to create a new security solution in Defender for Cloud. You need a license and a key provided by your service provider (Qualys or Rapid7).
- Learn more about obtaining the Qualys Virtual Scanner Appliance in Azure Marketplace.
- You can create only one solution per license. Attempting to create another solution with the same name, license, and key fails.
Run the script
To run the script, you need the relevant information for the following parameters:
| Parameter | Required | Notes |
|---|---|---|
| SubscriptionId | ✔ | The subscriptionID of the Azure Subscription that contains the resources you want to analyze. |
| ResourceGroupName | ✔ | Name of the resource group. Use any existing resource group including the default ("DefaultResourceGroup-xxx"). Since the solution isn't an Azure resource, it isn't listed under the resource group, but it's still attached to it. If you later delete the resource group, the BYOL solution is unavailable. |
| vaSolutionName | ✔ | The name of the new solution. |
| vaType | ✔ | Qualys or Rapid7. |
| licenseCode | ✔ | Vendor provided license string. |
| publicKey | ✔ | Vendor provided public key. |
| AutoUpdate | - | Enable (true) or disable (false) auto deploy for this VA solution. When enabled, every new VM on the subscription automatically attempts to link to the solution. (Default: False) |
Syntax:
.\New-ASCVASolution.ps1 -subscriptionId <Subscription Id> -resourceGroupName <RG Name>
-vaSolutionName <New solution name> -vaType <Qualys / Rapid7> -autoUpdate <true/false>
-licenseCode <License code from vendor> -publicKey <Public Key received from vendor>
Example
This example doesn't include valid license details.
.\New-ASCVASolution.ps1 -subscriptionId 'f4cx1b69-dtgb-4ch6-6y6f-ea2e95373d3b' -resourceGroupName 'DefaultResourceGroup-WEU' -vaSolutionName 'QualysVa001' -vaType 'Qualys' -autoUpdate 'false' `
-licenseCode 'eyJjaWQiOiJkZDg5OTYzXe4iMTMzLWM4NTAtODM5FD2mZWM1N2Q3ZGU5MjgiLCJgbTYuOiIyMmM5NDg3MS1lNTVkLTQ1OGItYjhlMC03OTRhMmM3YWM1ZGQiLCJwd3NVcmwiOiJodHRwczovL3FhZ3B1YmxpYy1wMDEuaW50LnF1YWx5cy5jb20vQ2xvdSKJY6VudC8iLCJwd3NQb3J0IjoiNDQzIn0=' `
-publicKey 'MIGfMA0GCSqGSIb3DQEBAQUAA4GNADCBiQKBgQCOiOLXjOywMfLZIBGPZLwSocf1Q64GASLK9OHFEmanBl1nkJhZDrZ4YD5lM98fThYbAx1Rde2iYV1ze/wDlX4cIvFAyXuN7HbdkeIlBl6vWXEBZpUU17bOdJOUGolzEzNBhtxi/elEZLghq9Chmah82me/okGMIhJJsCiTtglVQIDAQAB'