Create a dual-protocol volume for Azure NetApp Files
Article
Azure NetApp Files supports creating volumes using NFS (NFSv3 or NFSv4.1), SMB3, or dual protocol (NFSv3 and SMB, or NFSv4.1 and SMB). This article shows you how to create a volume that uses dual protocol with support for LDAP user mapping.
If you're using a custom RBAC/IAM role, you must have the Microsoft.Network/virtualNetworks/subnets/read permission configured to create or update a volume.
Create a reverse lookup zone on the DNS server and then add a pointer (PTR) record of the AD host machine in that reverse lookup zone. Otherwise, the dual-protocol volume creation fails.
The Allow local NFS users with LDAP option in Active Directory connections intends to provide occasional and temporary access to local users. When this option is enabled, user authentication and lookup from the LDAP server stop working, and the number of group memberships that Azure NetApp Files supports is limited to 16. As such, you should keep this option disabled on Active Directory connections, except for the occasion when a local user needs to access LDAP-enabled volumes. In that case, you should disable this option as soon as local user access is no longer required for the volume. See Allow local NFS users with LDAP to access a dual-protocol volume about managing local user access.
Ensure that the NFS client is up to date and running the latest updates for the operating system.
Dual-protocol volumes support both Active Directory Domain Services (AD DS) and Microsoft Entra Domain Services.
The NFS version used by a dual-protocol volume can be NFSv3 or NFSv4.1. The following considerations apply:
Dual protocol does not support the Windows ACLS extended attributes set/get from NFS clients.
NFS clients cannot change permissions for the NTFS security style, and Windows clients cannot change permissions for UNIX-style dual-protocol volumes.
The following table describes the security styles and their effects:
Security style
Clients that can modify permissions
Permissions that clients can use
Resulting effective security style
Clients that can access files
Unix
NFS
NFSv3 or NFSv4.1 mode bits
UNIX
NFS and Windows
Ntfs
Windows
NTFS ACLs
NTFS
NFS and Windows
The direction in which the name mapping occurs (Windows to UNIX, or UNIX to Windows) depends on which protocol is used and which security style is applied to a volume. A Windows client always requires a Windows-to-UNIX name mapping. Whether a user is applied to review permissions depends on the security style. Conversely, an NFS client only needs to use a UNIX-to-Windows name mapping if the NTFS security style is in use.
The following table describes the name mappings and security styles:
Protocol
Security style
Name-mapping direction
Permissions applied
SMB
Unix
Windows to UNIX
UNIX (mode bits or NFSv4.x ACLs)
SMB
Ntfs
Windows to UNIX
NTFS ACLs (based on Windows SID accessing share)
NFSv3
Unix
None
UNIX (mode bits or NFSv4.x ACLs)
NFSv4.x ACLs can be applied using an NFSv4.x administrative client and honored by NFSv3 clients.
If you have large topologies, and you use the Unix security style with a dual-protocol volume or LDAP with extended groups, you should use the LDAP Search Scope option on the Active Directory Connections page to avoid "access denied" errors on Linux clients for Azure NetApp Files. See Configure AD DS LDAP with extended groups for NFS volume access for more information.
You don't need a server root CA certificate for creating a dual-protocol volume. It is required only if LDAP over TLS is enabled.
Capacity pool
Specify the capacity pool where you want the volume to be created.
Quota
Specify the amount of logical storage that is allocated to the volume.
The Available quota field shows the amount of unused space in the chosen capacity pool that you can use towards creating a new volume. The size of the new volume must not exceed the available quota.
Large Volume
Regular volumes quotas are between 50 GiB and 100 TiB. Large volume quotas range from 50 TiB to 1 PiB in size. If you intend for the volume quota to fall in the large volume range, select Yes. Volume quotas are entered in GiB.
Regular volumes cannot be converted to large volumes. Large volumes can't be resized to less than 50 TiB. To understand the requirements and considerations of large volumes, see Requirements and considerations for large volumes. For other limits, see Resource limits.
Throughput (MiB/S)
If the volume is created in a manual QoS capacity pool, specify the throughput you want for the volume.
If the volume is created in an auto QoS capacity pool, the value displayed in this field is (quota x service level throughput).
Virtual network
Specify the Azure virtual network (VNet) from which you want to access the volume.
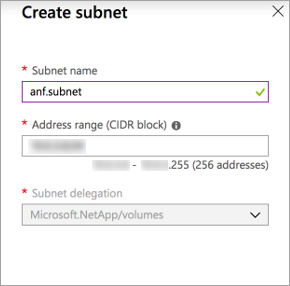
The VNet you specify must have a subnet delegated to Azure NetApp Files. Azure NetApp Files can be accessed only from the same VNet or from a VNet that is in the same region as the volume through VNet peering. You can also access the volume from your on-premises network through Express Route.
Subnet
Specify the subnet that you want to use for the volume.
The subnet you specify must be delegated to Azure NetApp Files.
If you haven't delegated a subnet, you can select Create new on the Create a Volume page. Then in the Create Subnet page, specify the subnet information, and select Microsoft.NetApp/volumes to delegate the subnet for Azure NetApp Files. In each VNet, only one subnet can be delegated to Azure NetApp Files.
Availability zone
This option lets you deploy the new volume in the logical availability zone that you specify. Select an availability zone where Azure NetApp Files resources are present. For details, see Manage availability zone volume placement.
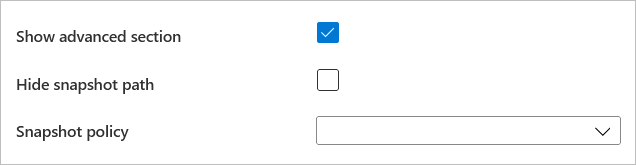
If you want to apply an existing snapshot policy to the volume, select Show advanced section to expand it, specify whether you want to hide the snapshot path, and select a snapshot policy in the pull-down menu.
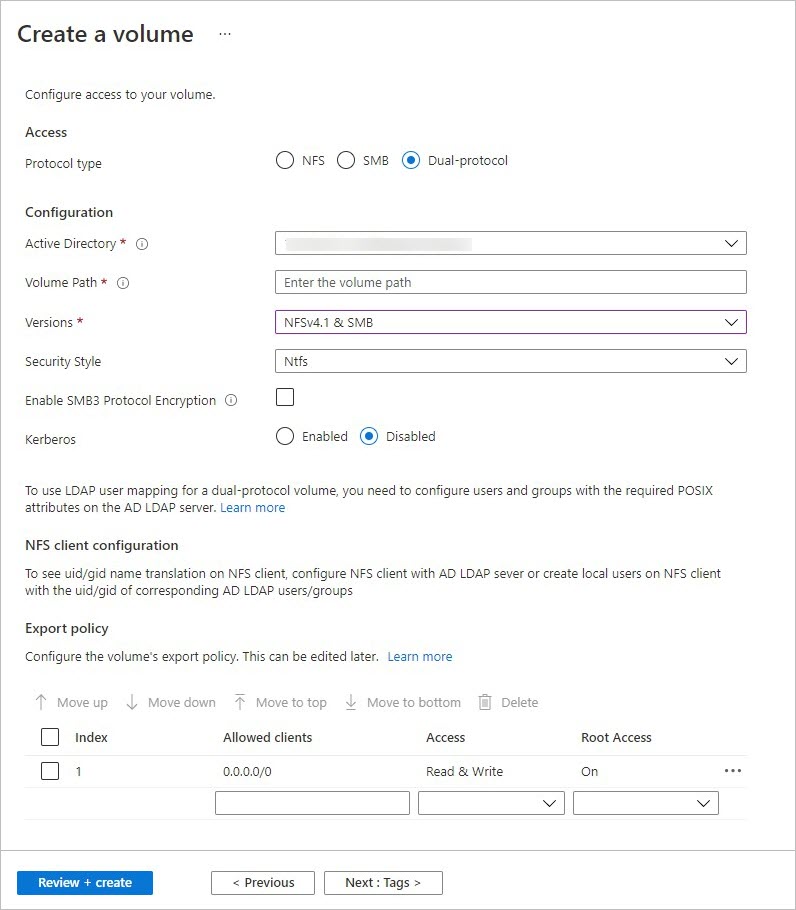
Select the Protocol tab, and then complete the following actions:
Select Dual-protocol as the protocol type for the volume.
Specify the Active Directory connection to use.
Specify a unique Volume Path. This path is used when you create mount targets. The requirements for the path are as follows:
For volumes not in an availability zone or volumes in the same availability zone, the volume path must be unique within each subnet in the region.
For volumes in availability zones, the volume path must be unique within each availability zone. For more information, see Manage availability zone volume placement.
It must start with an alphabetical character.
It can contain only letters, numbers, or dashes (-).
The length must not exceed 80 characters.
Specify the versions to use for dual protocol: NFSv4.1 and SMB, or NFSv3 and SMB.
Specify the Security Style to use: NTFS (default) or UNIX.
If you want to enable SMB3 protocol encryption for the dual-protocol volume, select Enable SMB3 Protocol Encryption.
This feature enables encryption for only in-flight SMB3 data. It does not encrypt NFSv3 in-flight data. SMB clients not using SMB3 encryption aren't able to access this volume. Data at rest is encrypted regardless of this setting. See SMB encryption for more information.
If you selected NFSv4.1 and SMB for the dual-protocol volume versions, indicate whether you want to enable Kerberos encryption for the volume.
If you want to enable access-based enumeration, select Enable Access Based Enumeration.
Access-based enumeration hides directories and files created under a share from users who do not have access permissions. You can still view the share. You can only enable access-based enumeration if the dual-protocol volume uses NTFS security style.
You can enable the non-browsable-share feature.
This feature prevents the Windows client from browsing the share. The share does not show up in the Windows File Browser or in the list of shares when you run the net view \\server /all command.
Customize Unix Permissions as needed to specify change permissions for the mount path. The setting does not apply to the files under the mount path. The default setting is 0770. This default setting grants read, write, and execute permissions to the owner and the group, but no permissions are granted to other users.
Registration requirement and considerations apply for setting Unix Permissions. Follow instructions in Configure Unix permissions and change ownership mode.
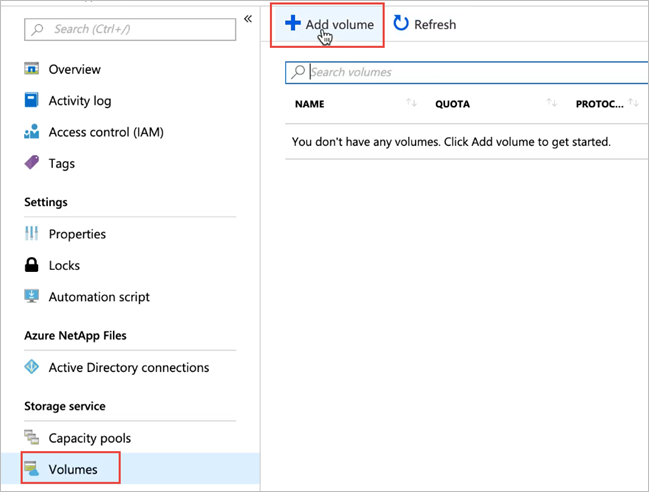
Select Review + Create to review the volume details. Then select Create to create the volume.
The volume you created appears in the Volumes page.
A volume inherits subscription, resource group, location attributes from its capacity pool. To monitor the volume deployment status, you can use the Notifications tab.
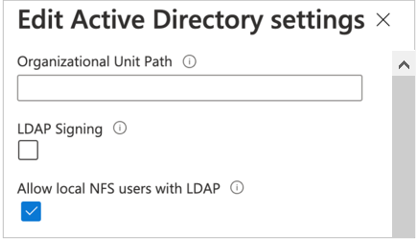
Allow local NFS users with LDAP to access a dual-protocol volume
The Allow local NFS users with LDAP option in Active Directory connections enables local NFS client users not present on the Windows LDAP server to access a dual-protocol volume that has LDAP with extended groups enabled.
Select Active Directory connections. On an existing Active Directory connection, select the context menu (the three dots …) then Edit.
On the Edit Active Directory settings window that appears, select the Allow local NFS users with LDAP option.
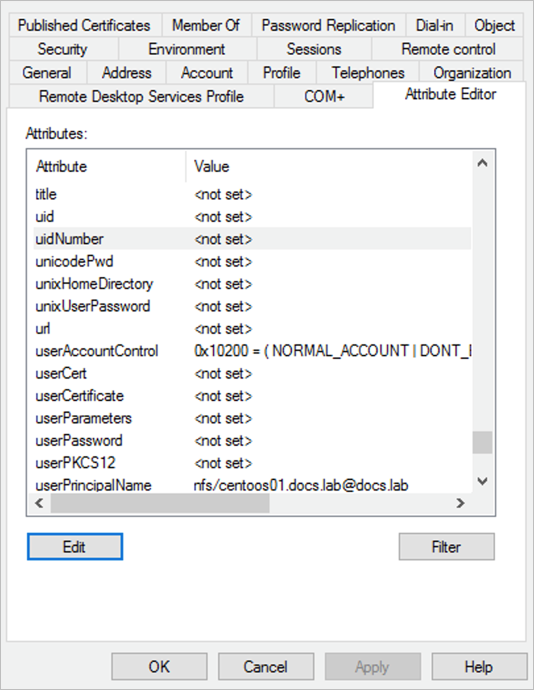
Manage LDAP POSIX Attributes
You can manage POSIX attributes such as UID, Home Directory, and other values by using the Active Directory Users and Computers MMC snap-in. The following example shows the Active Directory Attribute Editor:
You need to set the following attributes for LDAP users and LDAP groups:
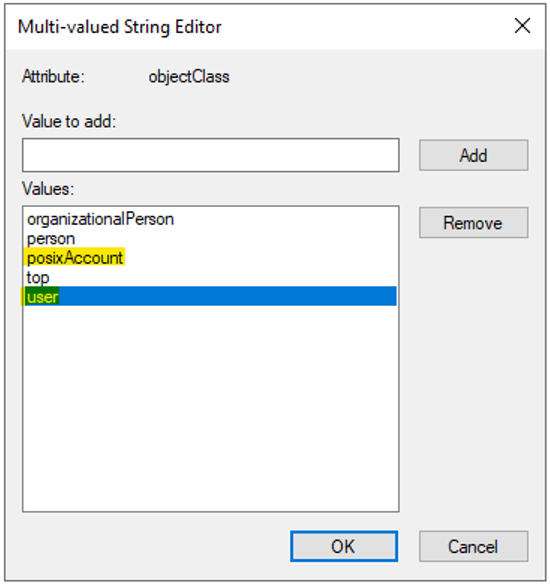
Required attributes for LDAP groups: objectClass: group, posixGroup, gidNumber: 555
All users and groups must have unique uidNumber and gidNumber, respectively.
The values specified for objectClass are separate entries. For example, in Multi-valued String Editor, objectClass would have separate values (user and posixAccount) specified as follows for LDAP users:
Microsoft Entra Domain Services doesn’t allow you to modify the objectClass POSIX attribute on users and groups created in the organizational AADDC Users OU. As a workaround, you can create a custom OU and create users and groups in the custom OU.
If you are synchronizing the users and groups in your Microsoft Entra tenancy to users and groups in the AADDC Users OU, you can't move users and groups into a custom OU. Users and groups created in the custom OU aren't synchronized to your AD tenancy. For more information, see the Microsoft Entra Domain Services Custom OU considerations and limitations.
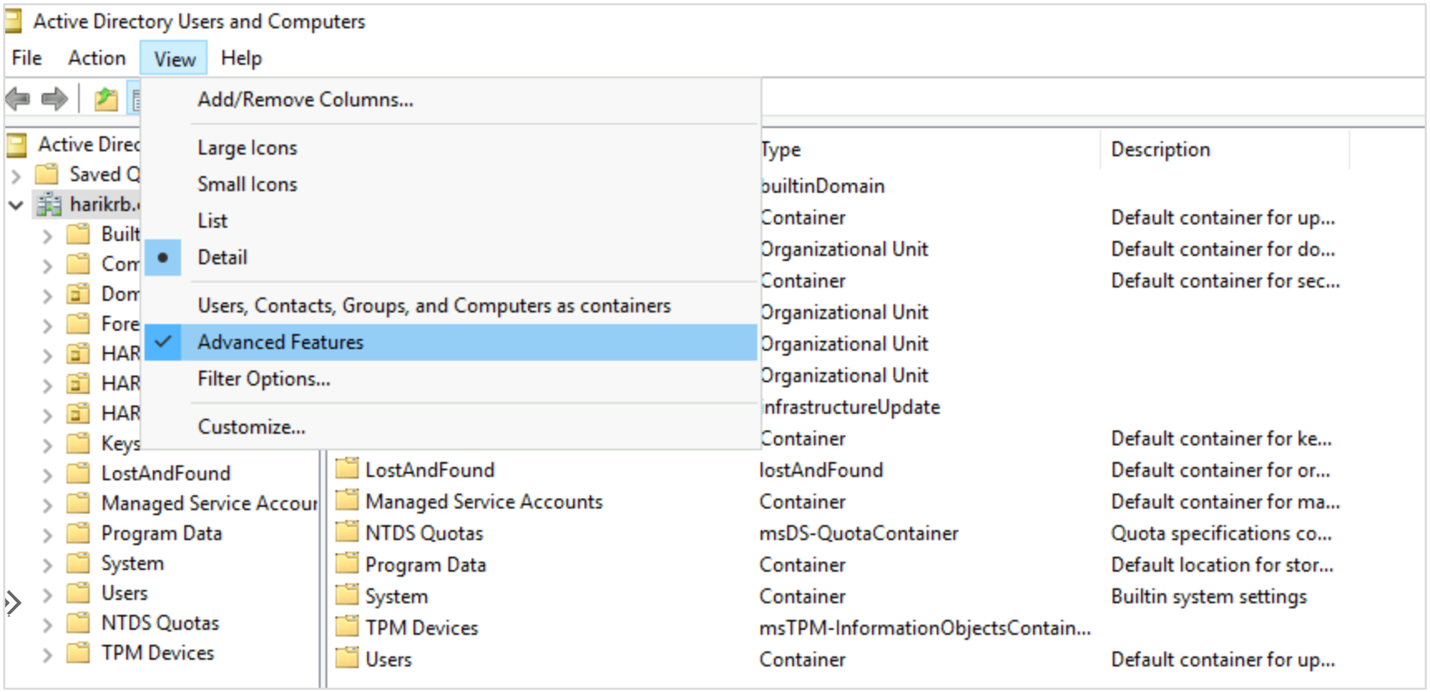
Access Active Directory Attribute Editor
On a Windows system, you can access the Active Directory Attribute Editor as follows:
Select Start, navigate to Windows Administrative Tools. Then select Active Directory Users and Computers to open the Active Directory Users and Computers window.
Select the domain name that you want to view, and then expand the contents.
To display the advanced Attribute Editor, enable the Advanced Features option in the Active Directory Users Computers View menu.
Select Users on the left pane to see the list of users.
Select a particular user to see its Attribute Editor tab.