To create a single database in the Azure portal, this quickstart starts at the Azure SQL page.
Browse to the Select SQL Deployment option page.
Under SQL databases, leave Resource type set to Single database, and select Create.

On the Basics tab of the Create SQL Database form, under Project details, select the desired Azure Subscription.
For Resource group, select Create new, enter myResourceGroup, and select OK.
For Database name, enter mySampleDatabase.
For Server, select Create new, and fill out the New server form with the following values:
- Server name: Enter mysqlserver, and add some characters for uniqueness. We can't provide an exact server name to use because server names must be globally unique for all servers in Azure, not just unique within a subscription. Enter a name such as mysqlserver12345, and the portal will let you know if it's available.
- Server admin login: Enter azureuser.
- Password: Enter a password that meets requirements, and enter it again in the Confirm password field.
- Location: Select a location from the dropdown list.
Select OK.
Under Compute + storage, select Configure database.
This quickstart creates a Hyperscale database. For Service tier, select Hyperscale.

Under Compute Hardware, select Change configuration. Review the available hardware configurations and select the most appropriate configuration for your database. For this example, we will select the Standard-series (Gen5) configuration.
Select OK to confirm the hardware generation.
Optionally, adjust the vCores slider if you would like to increase the number of vCores for your database. For this example, we will select 2 vCores.
Adjust the High-Availability Secondary Replicas slider to create one High Availability (HA) replica.
Select Apply.
Carefully consider the configuration option for Backup storage redundancy when creating a Hyperscale database. Storage redundancy can only be specified during the database creation process for Hyperscale databases. You can choose locally redundant, zone-redundant, or geo-redundant storage. The selected storage redundancy option will be used for the lifetime of the database for both data storage redundancy and backup storage redundancy. Existing databases can migrate to different storage redundancy using database copy or point in time restore.

Select Next: Networking at the bottom of the page.
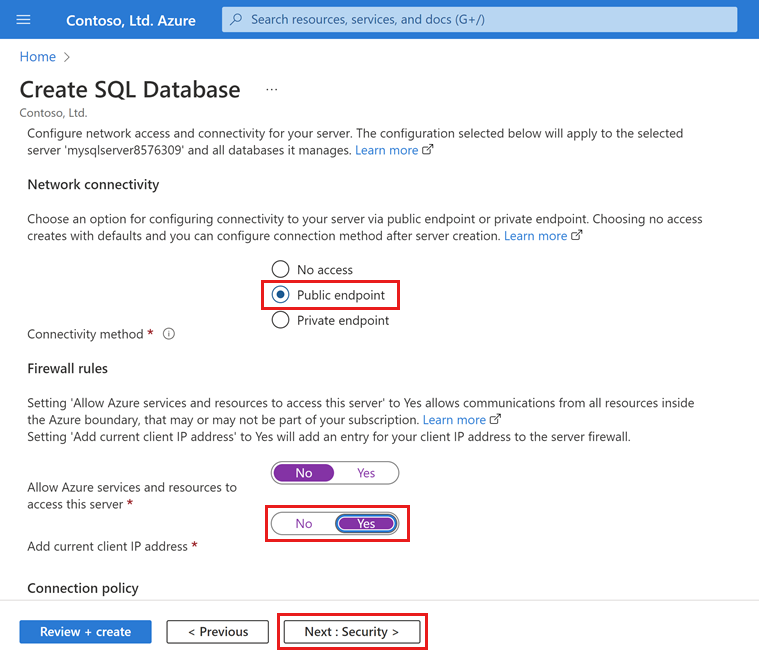
On the Networking tab, for Connectivity method, select Public endpoint.
For Firewall rules, set Add current client IP address to Yes. Leave Allow Azure services and resources to access this server set to No.
Select Next: Security at the bottom of the page.
Optionally, enable Microsoft Defender for SQL.
Select Next: Additional settings at the bottom of the page.
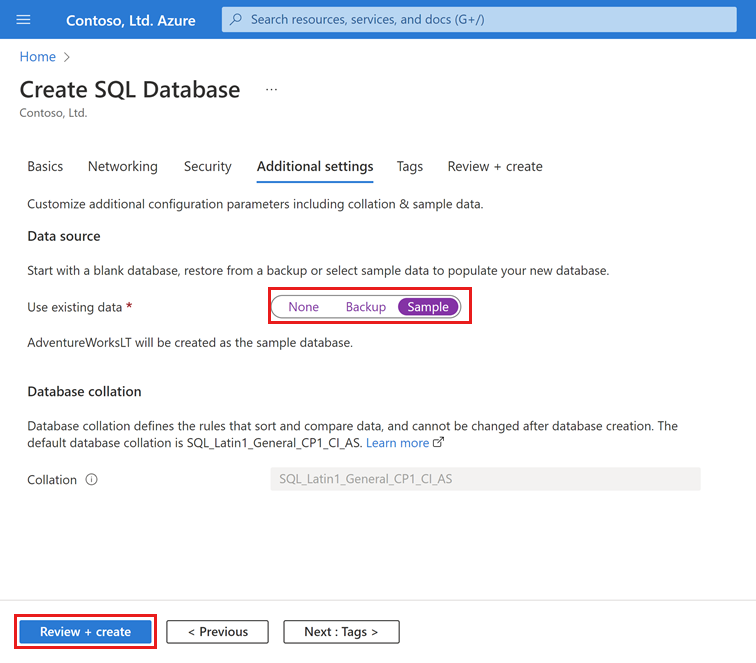
On the Additional settings tab, in the Data source section, for Use existing data, select Sample. This creates an AdventureWorksLT sample database so there's some tables and data to query and experiment with, as opposed to an empty blank database.
Select Review + create at the bottom of the page:
On the Review + create page, after reviewing, select Create.
The Azure CLI code blocks in this section create a resource group, server, single database, and server-level IP firewall rule for access to the server. Make sure to record the generated resource group and server names, so you can manage these resources later.
If you don't have an Azure subscription, create an Azure free account before you begin.
Prepare your environment for the Azure CLI
Use the Bash environment in Azure Cloud Shell. For more information, see Quickstart for Bash in Azure Cloud Shell.

If you prefer to run CLI reference commands locally, install the Azure CLI. If you're running on Windows or macOS, consider running Azure CLI in a Docker container. For more information, see How to run the Azure CLI in a Docker container.
If you're using a local installation, sign in to the Azure CLI by using the az login command. To finish the authentication process, follow the steps displayed in your terminal. For other sign-in options, see Sign in with the Azure CLI.
When you're prompted, install the Azure CLI extension on first use. For more information about extensions, see Use extensions with the Azure CLI.
Run az version to find the version and dependent libraries that are installed. To upgrade to the latest version, run az upgrade.
Launch Azure Cloud Shell
The Azure Cloud Shell is a free interactive shell that you can use to run the steps in this article. It has common Azure tools preinstalled and configured to use with your account.
To open the Cloud Shell, select Try it from the upper right corner of a code block. You can also launch Cloud Shell in a separate browser tab by going to https://shell.azure.com.
When Cloud Shell opens, verify that Bash is selected for your environment. Subsequent sessions will use Azure CLI in a Bash environment. Select Copy to copy the blocks of code, paste it into the Cloud Shell, and press Enter to run it.
Sign in to Azure
Cloud Shell is automatically authenticated under the initial account signed-in with. Use the following script to sign in using a different subscription, replacing <Subscription ID> with your Azure Subscription ID. If you don't have an Azure subscription, create an Azure free account before you begin.
subscription="<subscriptionId>" # add subscription here

az account set -s $subscription # ...or use 'az login'
For more information, see set active subscription or log in interactively
Set parameter values
The following values are used in subsequent commands to create the database and required resources. Server names need to be globally unique across all of Azure so the $RANDOM function is used to create the server name.
Before running the sample code, change the location as appropriate for your environment. Replace 0.0.0.0 with the IP address range to match your specific environment. Use the public IP address of the computer you're using to restrict access to the server to only your IP address.
# <FullScript>
# Create a single database and configure a firewall rule
# <SetParameterValues>
# Variable block
let "randomIdentifier=$RANDOM*$RANDOM"
location="East US"
resourceGroup="msdocs-azuresql-rg-$randomIdentifier"
tag="create-and-configure-database"
server="msdocs-azuresql-server-$randomIdentifier"
database="msdocsazuresqldb$randomIdentifier"
login="azureuser"
password="Pa$$w0rD-$randomIdentifier"
# Specify appropriate IP address values for your environment
# to limit access to the SQL Database server
startIp=0.0.0.0
let "randomIdentifier=$RANDOM*$RANDOM"
location="East US"
resourceGroupName="myResourceGroup"
tag="create-and-configure-database"
serverName="mysqlserver-$randomIdentifier"
databaseName="mySampleDatabase"
login="azureuser"
password="Pa$$w0rD-$randomIdentifier"
# Specify appropriate IP address values for your environment
# to limit access to the SQL Database server
startIp=0.0.0.0
endIp=0.0.0.0

echo "Using resource group $resourceGroupName with login: $login, password: $password..."
Create a resource group
Create a resource group with the az group create command. An Azure resource group is a logical container into which Azure resources are deployed and managed. The following example creates a resource group in the location specified for the location parameter in the prior step:
echo "Creating $resourceGroupName in $location..."
az group create --name $resourceGroupName --location "$location" --tag $tag
Create a server
Create a logical server with the az sql server create command.
echo "Creating $serverName in $location..."
az sql server create --name $serverName --resource-group $resourceGroupName --location "$location" --admin-user $login --admin-password $password
Create a firewall rule with the az sql server firewall-rule create command.
echo "Configuring firewall..."
az sql server firewall-rule create --resource-group $resourceGroupName --server $serverName -n AllowYourIp --start-ip-address $startIp --end-ip-address $endIp
Create a single database
Create a database in the Hyperscale service tier with the az sql db create command.
When creating a Hyperscale database, carefully consider the setting for backup-storage-redundancy. Storage redundancy can only be specified during the database creation process for Hyperscale databases. You can choose locally redundant, zone-redundant, or geo-redundant storage. The selected storage redundancy option will be used for the lifetime of the database for both data storage redundancy and backup storage redundancy. Existing databases can migrate to different storage redundancy using database copy or point in time restore. Allowed values for the backup-storage-redundancy parameter are: Local, Zone, Geo. Unless explicitly specified, databases will be configured to use geo-redundant backup storage.
Run the following command to create a Hyperscale database populated with AdventureWorksLT sample data. The database uses standard-series (Gen5) hardware with 2 vCores. Geo-redundant backup storage is used for the database. The command also creates one High Availability (HA) replica.
az sql db create \
    --resource-group $resourceGroupName \
    --server $serverName \
    --name $databaseName \3
    --sample-name AdventureWorksLT \
    --edition Hyperscale \
    --compute-model Provisioned \
    --family Gen5 \
    --capacity 2 \
    --backup-storage-redundancy Geo \
    --ha-replicas 1
You can create a resource group, server, and single database using Azure PowerShell.
Launch Azure Cloud Shell
The Azure Cloud Shell is a free interactive shell that you can use to run the steps in this article. It has common Azure tools preinstalled and configured to use with your account.
To open the Cloud Shell, select Try it from the upper right corner of a code block. You can also launch Cloud Shell in a separate browser tab by going to https://shell.azure.com.
When Cloud Shell opens, verify that PowerShell is selected for your environment. Subsequent sessions will use Azure CLI in a PowerShell environment. Select Copy to copy the blocks of code, paste it into the Cloud Shell, and press Enter to run it.
Set parameter values
The following values are used in subsequent commands to create the database and required resources. Server names need to be globally unique across all of Azure so the Get-Random cmdlet is used to create the server name.
Before running the sample code, change the location as appropriate for your environment. Replace 0.0.0.0 with the IP address range to match your specific environment. Use the public IP address of the computer you're using to restrict access to the server to only your IP address.
   # Set variables for your server and database
   $resourceGroupName = "myResourceGroup"
   $location = "eastus"
   $adminLogin = "azureuser"
   $password = "Pa$$w0rD-$(Get-Random)"
   $serverName = "mysqlserver-$(Get-Random)"
   $databaseName = "mySampleDatabase"

   # The ip address range that you want to allow to access your server
   $startIp = "0.0.0.0"
   $endIp = "0.0.0.0"

   # Show randomized variables
   Write-host "Resource group name is" $resourceGroupName
   Write-host "Server name is" $serverName
   Write-host "Password is" $password
Create resource group
Create an Azure resource group with New-AzResourceGroup. A resource group is a logical container into which Azure resources are deployed and managed.
   Write-host "Creating resource group..."
   $resourceGroup = New-AzResourceGroup -Name $resourceGroupName -Location $location -Tag @{Owner="SQLDB-Samples"}
   $resourceGroup
Create a server
Create a server with the New-AzSqlServer cmdlet.
  Write-host "Creating primary server..."
   $server = New-AzSqlServer -ResourceGroupName $resourceGroupName `
      -ServerName $serverName `
      -Location $location `
      -SqlAdministratorCredentials $(New-Object -TypeName System.Management.Automation.PSCredential `
      -ArgumentList $adminLogin, $(ConvertTo-SecureString -String $password -AsPlainText -Force))
   $server
Create a firewall rule
Create a server firewall rule with the New-AzSqlServerFirewallRule cmdlet.
   Write-host "Configuring server firewall rule..."
   $serverFirewallRule = New-AzSqlServerFirewallRule -ResourceGroupName $resourceGroupName `
      -ServerName $serverName `
      -FirewallRuleName "AllowedIPs" -StartIpAddress $startIp -EndIpAddress $endIp
   $serverFirewallRule
Create a single database
Create a single database with the New-AzSqlDatabase cmdlet.
When creating a Hyperscale database, carefully consider the setting for BackupStorageRedundancy. Storage redundancy can only be specified during the database creation process for Hyperscale databases. You can choose locally redundant, zone-redundant, or geo-redundant storage. The selected storage redundancy option will be used for the lifetime of the database for both data storage redundancy and backup storage redundancy. Existing databases can migrate to different storage redundancy using database copy or point in time restore. Allowed values for the BackupStorageRedundancy parameter are: Local, Zone, Geo. Unless explicitly specified, databases will be configured to use geo-redundant backup storage.
Run the following command to create a Hyperscale database populated with AdventureWorksLT sample data. The database uses standard-series (Gen5) hardware with 2 vCores. Geo-redundant backup storage is used for the database. The command also creates one High Availability (HA) replica.
   Write-host "Creating a standard-series (Gen5) 2 vCore Hyperscale database..."
   $database = New-AzSqlDatabase  -ResourceGroupName $resourceGroupName `
      -ServerName $serverName `
      -DatabaseName $databaseName `
      -Edition Hyperscale `
      -ComputeModel Provisioned `
      -ComputeGeneration Gen5 `
      -VCore 2 `
      -MinimumCapacity 2 `
      -SampleName "AdventureWorksLT" `
      -BackupStorageRedundancy Geo `
      -HighAvailabilityReplicaCount 1
   $database
To create a Hyperscale database with Transact-SQL, you must first create or identify connection information for an existing logical server in Azure.
Connect to the master database using SQL Server Management Studio (SSMS), Azure Data Studio, or the client of your choice to run Transact-SQL commands (sqlcmd, etc.).
When creating a Hyperscale database, carefully consider the setting for BACKUP_STORAGE_REDUNDANCY. Storage redundancy can only be specified during the database creation process for Hyperscale databases. You can choose locally redundant, zone-redundant, or geo-redundant storage. The selected storage redundancy option will be used for the lifetime of the database for both data storage redundancy and backup storage redundancy. Existing databases can migrate to different storage redundancy using database copy or point in time restore. Allowed values for the BackupStorageRedundancy parameter are: LOCAL, ZONE, GEO. Unless explicitly specified, databases will be configured to use geo-redundant backup storage.
Run the following Transact-SQL command to create a new Hyperscale database with Gen 5 hardware, 2 vCores, and geo-redundant backup storage. You must specify both the edition and service objective in the CREATE DATABASE statement. Refer to the resource limits for a list of valid service objectives, such as HS_Gen5_2.
This example code creates an empty database. If you would like to create a database with sample data, use the Azure portal, Azure CLI, or PowerShell examples in this quickstart.
CREATE DATABASE [myHyperscaleDatabase]
    (EDITION = 'Hyperscale', SERVICE_OBJECTIVE = 'HS_Gen5_2') WITH BACKUP_STORAGE_REDUNDANCY= 'LOCAL';
GO
Refer to CREATE DATABASE (Transact-SQL) for more parameters and options.
To add one or more High Availability (HA) replicas to your database, use the Compute and storage pane for the database in the Azure portal, the Set-AzSqlDatabase PowerShell command, or the az sql db update Azure CLI command.
Keep the resource group, server, and single database to go on to the next steps, and learn how to connect and query your database with different methods.
When you're finished using these resources, you can delete the resource group you created, which will also delete the server and single database within it.


