Use distributed AG to migrate databases from a standalone instance
Use a distributed availability group (AG) to migrate a database (or multiple databases) from a standalone instance of SQL Server to SQL Server on Azure Virtual Machines (VMs).
Once you've validated your source SQL Server instance meets the prerequisites, follow the steps in this article to create an availability group on your standalone SQL Server instance and migrate your database (or group of databases) to your SQL Server VM in Azure.
This article is intended for databases on a standalone instance of SQL Server. This solution does not require a Windows Server Failover Cluster (WSFC) or an availability group listener. It's also possible to migrate databases in an availability group.
Initial setup
The first step is to create your SQL Server VM in Azure. You can do so by using the Azure portal, Azure PowerShell, or an ARM template.
Be sure to configure your SQL Server VM according to the prerequisites.
For simplicity, join your target SQL Server VM to the same domain as your source SQL Server. Otherwise, join your target SQL Server VM to a domain that's federated with the domain of your source SQL Server.
To use automatic seeding to create your distributed availability group (DAG), the instance name for the global primary (source) of the DAG must match the instance name of the forwarder (target) of the DAG. If there is an instance name mismatch between the global primary and forwarder, then you must use manual seeding to create the DAG, and manually add any additional database files in the future.
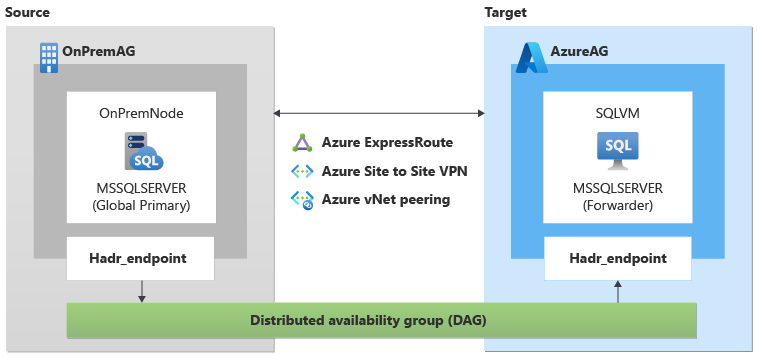
This article uses the following example parameters:
- Database name: Adventureworks
- Source machine name (global primary in DAG): OnPremNode
- Source SQL Server instance name: MSSQLSERVER
- Source availability group name: OnPremAg
- Target SQL Server VM name (forwarder in DAG): SQLVM
- Target SQL Server on Azure VM instance name: MSSQLSERVER
- Target availability group name: AzureAG
- Endpoint name: Hadr_endpoint
- Distributed availability group name: DAG
- Domain name: Contoso
Create endpoints
Use Transact-SQL (T-SQL) to create endpoints on both your source (OnPremNode) and target (SQLVM) SQL Server instances.
To create your endpoints, run this T-SQL script on both source and target servers:
CREATE ENDPOINT [Hadr_endpoint]
   STATE=STARTED
   AS TCP (LISTENER_PORT = 5022, LISTENER_IP = ALL)
FOR DATA_MIRRORING (
   ROLE = ALL,
   AUTHENTICATION = WINDOWS NEGOTIATE,
   ENCRYPTION = REQUIRED ALGORITHM AES
)
GO
Domain accounts automatically have access to endpoints, but service accounts may not automatically be part of the sysadmin group and may not have connect permission. To manually grant the SQL Server service account connect permission to the endpoint, run the following T-SQL script on both servers:
GRANT CONNECT ON ENDPOINT::[Hadr_endpoint] TO [<your account>]
Create source AG
Since a distributed availability group is a special availability group that spans across two individual availability groups, you first need to create an availability group on the source SQL Server instance. If you already have an availability group that you would like to maintain in Azure, then migrate your availability group instead.
Use Transact-SQL (T-SQL) to create an availability group (OnPremAg) on the source (OnPremNode) instance for the example Adventureworks database.
To create the availability group, run this script on the source:
CREATE AVAILABILITY GROUP [OnPremAG]
   WITH (AUTOMATED_BACKUP_PREFERENCE = PRIMARY,
   DB_FAILOVER = OFF,
   DTC_SUPPORT = NONE,
   CLUSTER_TYPE=NONE )
   FOR DATABASE [Adventureworks]

REPLICA ON N'OnPremNode'
WITH (ENDPOINT_URL = N'TCP://OnPremNode.contoso.com:5022', FAILOVER_MODE = MANUAL,
AVAILABILITY_MODE = SYNCHRONOUS_COMMIT,
SEEDING_MODE = AUTOMATIC, SECONDARY_ROLE(ALLOW_CONNECTIONS = NO));

GO
Create target AG
You also need to create an availability group on the target SQL Server VM as well.
Use Transact-SQL (T-SQL) to create an availability group (AzureAG) on the target (SQLVM) instance.
To create the availability group, run this script on the target:
CREATE AVAILABILITY GROUP [AzureAG]
   WITH (AUTOMATED_BACKUP_PREFERENCE = PRIMARY,
   DB_FAILOVER = OFF,
   DTC_SUPPORT = NONE,
   CLUSTER_TYPE=NONE,
   REQUIRED_SYNCHRONIZED_SECONDARIES_TO_COMMIT = 0)
FOR REPLICA ON N'SQLVM'
WITH (ENDPOINT_URL = N'TCP://SQLVM.contoso.com:5022', FAILOVER_MODE = MANUAL,
AVAILABILITY_MODE = SYNCHRONOUS_COMMIT,
SEEDING_MODE = AUTOMATIC,SECONDARY_ROLE(ALLOW_CONNECTIONS = NO));
GO
Create distributed AG
After you have your source (OnPremAG) and target (AzureAG) availability groups configured, create your distributed availability group to span both individual availability groups.
Use Transact-SQL on the source SQL Server instance (OnPremNode) and AG (OnPremAG) to create the distributed availability group (DAG).
To create the distributed AG, run this script on the source:
CREATE AVAILABILITY GROUP [DAG]
   WITH (DISTRIBUTED)
   AVAILABILITY GROUP ON
      'OnPremAG' WITH
      (
         LISTENER_URL = 'tcp://OnPremNode.contoso.com:5022',
         AVAILABILITY_MODE = ASYNCHRONOUS_COMMIT,
         FAILOVER_MODE = MANUAL,
         SEEDING_MODE = AUTOMATIC
      ),
      'AzureAG' WITH
      (
         LISTENER_URL = 'tcp://SQLVM.contoso.com:5022',
         AVAILABILITY_MODE = ASYNCHRONOUS_COMMIT,
         FAILOVER_MODE = MANUAL,
         SEEDING_MODE = AUTOMATIC
      );
GO
Note
The seeding mode is set to AUTOMATIC as the version of SQL Server on the target and source is the same. If your SQL Server target is a higher version, or if your global primary and forwarder have different instance names, then create the distributed ag, and join the secondary AG to the distributed ag with SEEDING_MODE set to MANUAL. Then manually restore your databases from the source to the target SQL Server instance. Review upgrading versions during migration to learn more.
After your distributed AG is created, join the target AG (AzureAG) on the target instance (SQLVM) to the distributed AG (DAG).
To join the target AG to the distributed AG, run this script on the target:
ALTER AVAILABILITY GROUP [DAG]
JOIN
AVAILABILITY GROUP ON
   'OnPremAG' WITH
 	(LISTENER_URL = 'tcp://OnPremNode.contoso.com:5022',
    AVAILABILITY_MODE = ASYNCHRONOUS_COMMIT,
    FAILOVER_MODE = MANUAL,
    SEEDING_MODE = AUTOMATIC
 	),
   'AzureAG' WITH
 	(LISTENER_URL = 'tcp://SQLVM.contoso.com:5022',
    AVAILABILITY_MODE = ASYNCHRONOUS_COMMIT,
    FAILOVER_MODE = MANUAL,
    SEEDING_MODE = AUTOMATIC
 	);
GO
If you need to cancel, pause, or delay synchronization between the source and target availability groups (such as, for example, performance issues), run this script on the source global primary instance (OnPremNode):
ALTER AVAILABILITY GROUP [DAG]
   MODIFY
   AVAILABILITY GROUP ON
   'AzureAG' WITH
   (  SEEDING_MODE = MANUAL  );
To learn more, review cancel automatic seeding to forwarder.
Next steps
After your distributed availability group is created, you are ready to complete the migration.
Feedback
Coming soon: Throughout 2024 we will be phasing out GitHub Issues as the feedback mechanism for content and replacing it with a new feedback system. For more information see: https://aka.ms/ContentUserFeedback.
Submit and view feedback for