Configure log shipping for SQL Server on Azure VMs
Applies to: ![]() SQL Server on Azure VM
SQL Server on Azure VM
This article teaches you to configure log shipping between two SQL Server on Azure Virtual Machines (VMs).
Overview
Log shipping allows you to automatically send transaction log backups from a primary database on a primary server to one or more secondary databases on a separate secondary server. Transaction log backups are applied to each of the secondary databases individually. An optional third server, known as the monitor server, records the history and status of backup and restore operations and, optionally, raises alerts if these operations fail to occur as scheduled.
Log shipping is primarily used as a disaster recovery solution and can be combined with other high availability and disaster recovery options, including Always On availability groups.
Prerequisites
To configure log shipping for SQL Server on Azure VMs, you must have the following prerequisites:
At least two domain-joined Azure virtual machines with SQL Server in the same resource group as an Azure storage account for transaction log backups. The secondary server must be on the same or higher version of SQL Server as the primary SQL Server.
The primary database must use the full or bulk-logged recovery model. Log shipping stops functioning if the primary database is switched to a simple recovery model.
The account configuring log shipping must be a member of the sysadmin fixed server role.
Create Azure File Share
Transaction log backups from the primary server are stored in a file share. Before you configure log shipping, you must create an Azure File Share inside of an Azure storage account that can be accessed by both the primary and secondary servers.
To create your Azure file share in the Azure portal, follow these steps:
Go to your resource group in the Azure portal and select the storage account you intend to use for transaction log backups.
Under Data Storage, select File Shares, and then choose +File share to create a new file share.
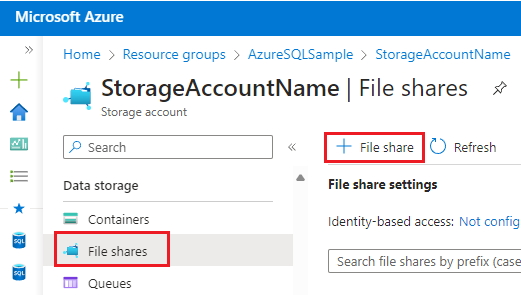
On the Basics tab, provide the name of the file share, such as log-shipping. You can leave the Tier at the default of Transaction optimized.
(Optional) On the Backup tab, use the checkbox to enable backups of your file share to Azure Backup.
Select Review + create to review your file share settings, and then select Create to create your new file share.
Create backup directories
After the file share is created, you should create the following two directories:
- A directory for the primary to write the log backups to
- A directory for the secondary to copy and restore the log backup
To create the directories, follow these steps:
After Azure creates the file share, the portal returns you to the Overview page for your new SMB File.
Under Browse, select + Add directory. Provide the name of the new directory, such as log-backups. Select OK.
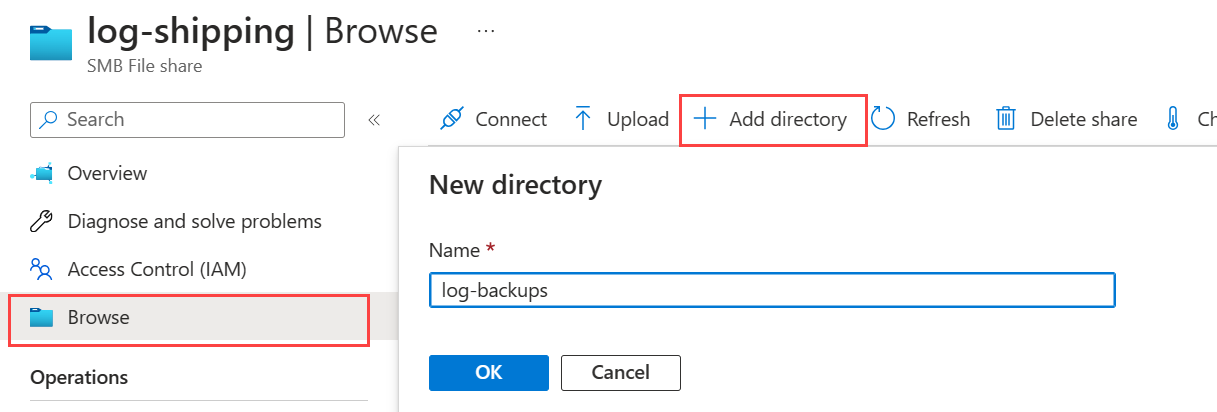
Repeat the previous step to add a second directory, such as restore-backups. Select OK.

Connect VMs to file share
After the directories are created, connect the virtual machines to the file share.
To determine connection details, select Connect from either the Browse or Overview page of the file share to open the Connect window.
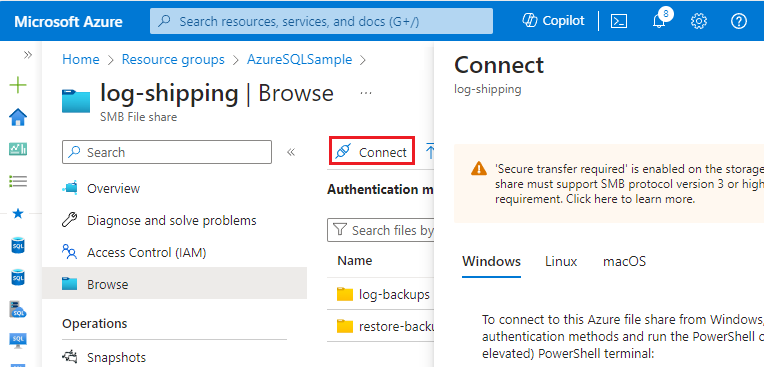
The Connect window provides a script to allow a resource to access the file share. Optionally, change the Drive letter to mount the file share to the virtual machine. This guide uses a storage account key for a Windows virtual machine.
Select Show script to view the script, copy it, and then run it on each SQL Server VM where you plan to configure log shipping.
After running the Connect script, you can use the following PowerShell cmdlet to verify connectivity to port 445:
Test-NetConnection -ComputerName yourstorageaccount.file.core.windows.net -Port 445
If the connection test succeeds, you see an output of TcpTestSucceeded : True.
Grant SQL Server access to file share
After the SQL Server VMs can successfully connect to the file share, grant the SQL Server service account permission to access the file share by creating a credential in SQL Server using the URL, username, and password from the Connect script.
To create the credential, enable xp_cmdshell, and use it to create the credential before disabling xp_cmdshell once more.
To grant the SQL Server service account access to the file share, follow these steps on every SQL Server instance that you plan to use for log shipping:
Connect to the SQL Server VM with an account that is part of the sysadmin role.
Open SQL Server Management Studio (SSMS) and connect to your SQL Server instance.
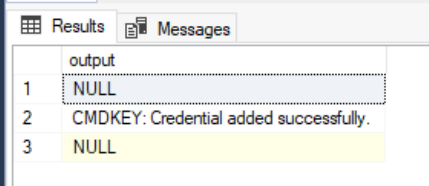
Open a new query window and run the following Transact-SQL code containing the storage key details obtained from the Azure portal:
EXEC sp_configure 'show advanced options', 1;
RECONFIGURE;
exec sp_configure 'xp_cmdshell', 1;
RECONFIGURE;
GO
EXEC xp_cmdshell 'cmdkey /add:"yourstorageaccount.file.core.windows.net" /user:"localhost\yourstorageaccount" /pass:"<yourpasskey>"';
GO
EXEC sp_configure 'xp_cmdshell', 0;
RECONFIGURE;
GO
After executing the command, SSMS confirms that your credential is added successfully:
Configure log shipping
After the SQL Server instances can access the file share, use SQL Server Management Studio (SSMS) to configure log shipping.
To configure log shipping, follow these steps:
Connect to your primary SQL Server instance.
Right-click the database you want to use as your primary database in the log shipping configuration, and then select Properties.
Under Select a page, select Transaction Log Shipping.
Check the box next to Enable this as a primary database in a log shipping configuration.
Under Transaction log backups, select Backup Settings.
In the Network path to the backup folder box, type the network path to the share and directory you created for the transaction log backup folder.
For example:
\\yourstorageaccount.file.core.windows.net\log-shipping\log-backupsConfigure the Delete files older than and Alert if no backup occurs within parameters to suit your business needs.
Note the backup schedule listed in the Schedule box under Backup job. If you want to customize the schedule for your installation, then select Schedule and adjust the SQL Server Agent schedule as needed.
SQL Server supports backup compression. When creating a log shipping configuration, you can control the backup compression behavior of log backups by choosing one of the following options: Use the default server setting, Compress backup, or Do not compress backup. For more information, see Log Shipping Transaction Log Backup Settings.
Select OK to save your settings.
Under Secondary server instances and databases, select Add.
Use Connect to connect to the instance of SQL Server that you want to use as your secondary server.
In the Secondary Database box, choose a database from the list or type the name of the database you want to create.
On the Initialize Secondary database tab, choose the option that you want to use to initialize the secondary database.
Note
If you choose to have SSMS initialize the secondary database from a database backup, the data and log files of the secondary database are placed in the same location as the data and log files of the
masterdatabase. This location is likely to be different than the location of the data and log files of the primary database.On the Copy Files tab, in the Destination folder for copied files box, type the path of the folder where you want to copy the transaction logs backups, such as the restore-backups directory you created for your file share:
\\yourstorageaccount.file.core.windows.net\log-shipping\restore-backups- Note the copy schedule listed in the Schedule box under Copy job. If you want to customize the schedule for your installation, select Schedule and then adjust the SQL Server Agent schedule as needed. This schedule should approximate the backup schedule.
On the Restore tab, under Database state when restoring backups, choose the No recovery mode or Standby mode option.
Important
Standby mode is only an option when the version of the primary and secondary server are the same. When the major version of the secondary server is higher than the primary, only No recovery mode is allowed.
If you select Standby mode, choose if you want to disconnect users from the secondary database while the restore operation is underway.
If you want to delay the restore process on the secondary server, choose a delay time under Delay restoring backups at least.
Choose an alert threshold under Alert if no restore occurs within.
Note the restore schedule listed in the Schedule box under Restore job. If you want to customize the schedule for your installation, select Schedule and then adjust the SQL Server Agent schedule as needed. This schedule should approximate the backup schedule.
Select OK to save your settings.
(Optional) Under Monitor server instance, select the Use a monitor server instance check box, and then select Settings.
Important
To monitor this log shipping configuration, you must add the monitor server now. To add the monitor server later, the log shipping configuration has to be removed, and replaced with a new configuration that includes a monitor server.
Use Connect to connect to the instance of SQL Server that you want to use as your monitor server.
Under Monitor connections, choose the connection method to be used by the backup, copy, and restore jobs to connect to the monitor server.
Under History retention, choose the length of time you want to retain a record of your log shipping history.
Select OK to save your settings.
On the Database Properties dialog box, use OK to begin the configuration process.
Related content
- Monitor log shipping
- Upgrading Log Shipping to SQL Server 2016 (Transact-SQL)
- Add a Secondary Database to a Log Shipping Configuration (SQL Server)
- Remove a Secondary Database from a Log Shipping Configuration (SQL Server)
- Remove Log Shipping (SQL Server)
- View the Log Shipping Report (SQL Server Management Studio)
- Fail Over to a Log Shipping Secondary (SQL Server)
Feedback
Coming soon: Throughout 2024 we will be phasing out GitHub Issues as the feedback mechanism for content and replacing it with a new feedback system. For more information see: https://aka.ms/ContentUserFeedback.
Submit and view feedback for