Event notifications from clients
In the first three articles of "quickstarts", we learned two useful communication patterns using Web PubSub for real-time messaging at scale (million+).
- Pub/Sub among clients that free your application server from the complexity of managing persistent connections
- Push messages to clients from your application server as soon as new data is available
In this quickstart guide, we learn about the event system of Web PubSub so that your application server can react to events like when
- a client is
connected - a client sends a
message, which requires further processing
Prerequisites
- A Web PubSub resource. If you haven't created one, you can follow the guidance: Create a Web PubSub resource
- A code editor, such as Visual Studio Code
- Install the dependencies for the language you plan to use
Create the application
Web PubSub is a standalone service to your application server. While your application retains its role as a traditional HTTP server, Web PubSub takes care of the real-time message passing between your application server and the clients. We first create the client program and then the server program.
Create the client
1. Create a directory for the client app
mkdir eventHandlerDemo
cd eventHandlerDemo

# The SDK is available as an NPM module.
npm install @azure/web-pubsub-client
2. Connect to Web PubSub
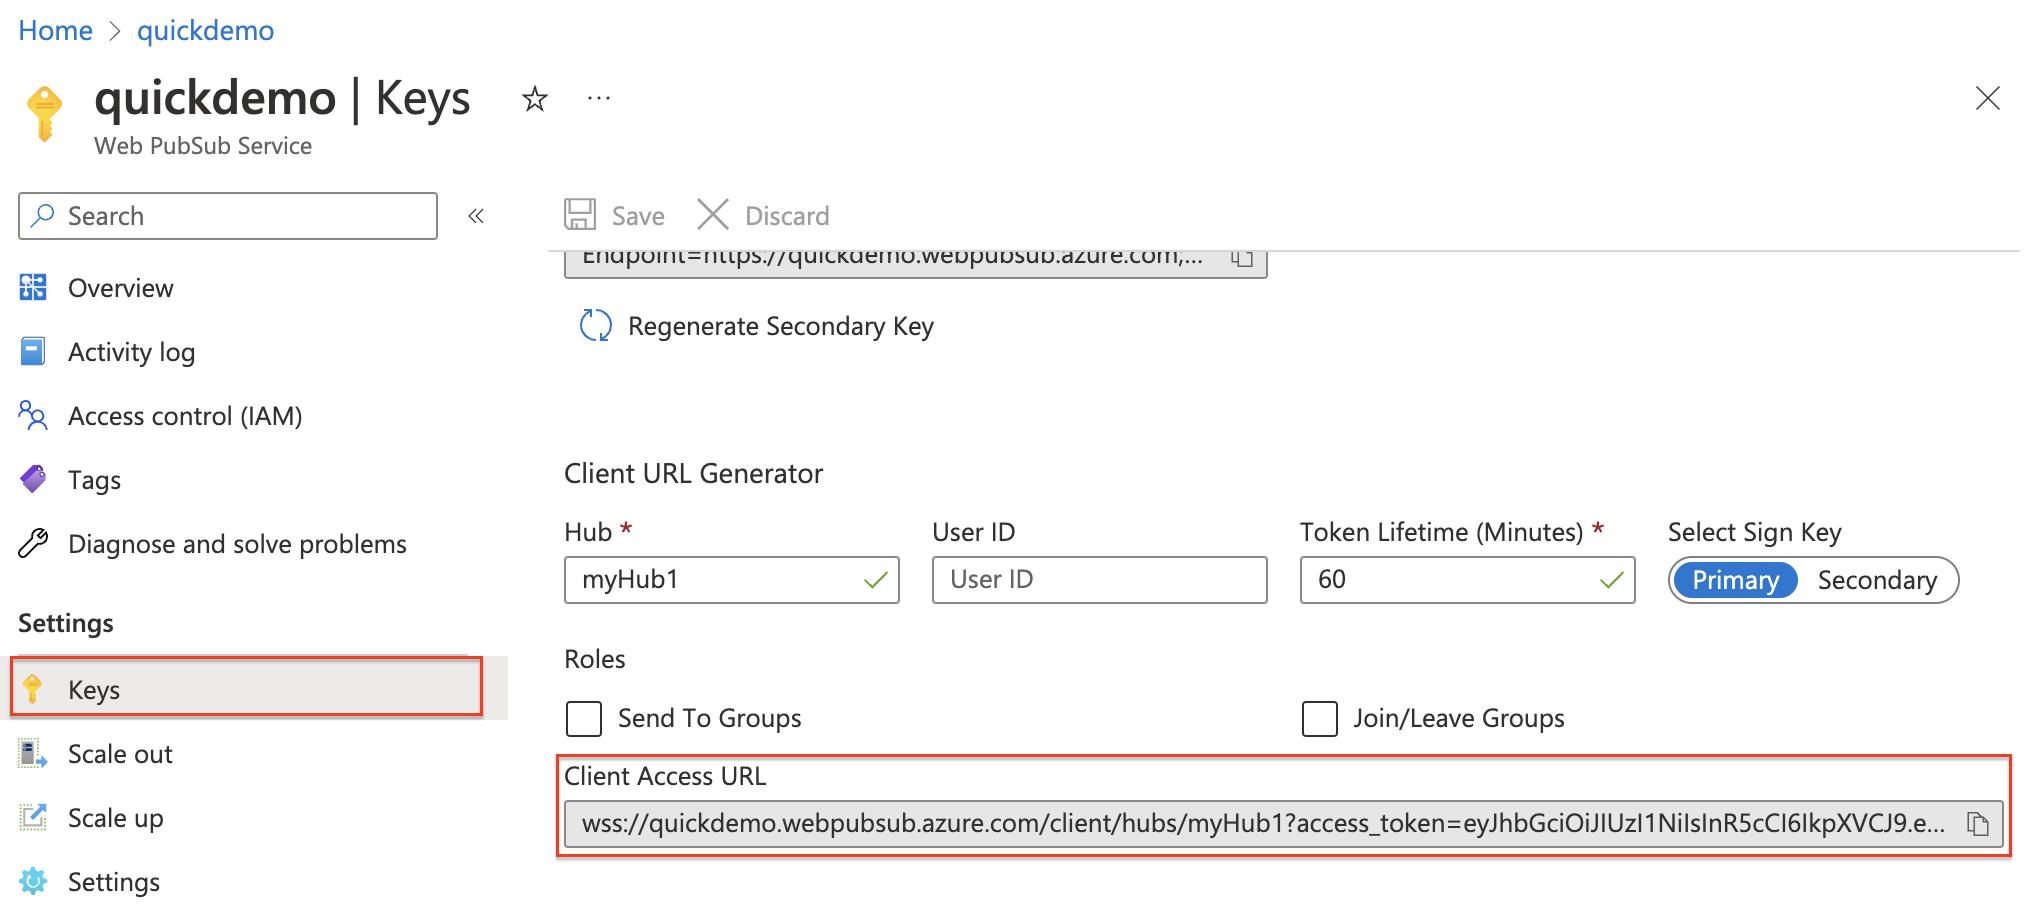
A client, be it a browser, a mobile app, or an IoT device, uses a Client Access URL to connect and authenticate with your resource.
This URL follows a pattern of wss://<service_name>.webpubsub.azure.com/client/hubs/<hub_name>?access_token=<token>.
A client can have a few ways to obtain the Client Access URL. For this quick start, you can copy and paste one from Azure portal shown in the following diagram. It's best practice to not hard code the Client Access URL in your code. In the production world, we usually set up an app server to return this URL on demand. Generate Client Access URL describes the practice in detail.
Create a file with name client.js and add the following code
const { WebPubSubClient } = require("@azure/web-pubsub-client");
// Instantiates the client object
// <client-access-url> is copied from Azure portal mentioned above.
const client = new WebPubSubClient("<client-access-url>");

// Registers a handler to the "connected" event
client.on("connected", (e) => {
  console.log(`Connection ${e.connectionId} is connected.`);
});

// You must invoke start() on the client object
// to establish connection with your Web PubSub resource
client.start();
Create the application server
1. Install express.js and the Web PubSub server SDK
npm init -y
npm install --save express

# Installs the middleware from Web PubSub. This middleware will set up an endpoint for you.
npm install --save @azure/web-pubsub-express
2. Create a new file named "server.js" that sets up an empty express app
const express = require("express");

const app = express();

app.listen(8080, () => console.log('Server started, listening on port 8080'));
3. Handle events
With Web PubSub, when there are certain activities happening at the client side (for example, when a client is connected or disconnected with your Web PubSub resource), your application server can set up handlers to react to these events.
Here are two notable use cases:
- when a client is connected, you can broadcast this status to all connected clients
- when a client sends a message to your Web PubSub resource, you can persist the message in a database of your choice
const express = require("express");
const { WebPubSubEventHandler } = require("@azure/web-pubsub-express");

const app = express();

const HUB_NAME = "myHub1";

let handler = new WebPubSubEventHandler(HUB_NAME, {
  path: '/eventhandler', // Exposes an endpoint
  onConnected: async (req) => {
    console.log(`${req.context.userId} connected`);
  },
});

// Registers the middleware with the express app
app.use(handler.getMiddleware());

app.listen(8080, () => console.log('Server started, listening on port 8080'));
As configured in the code above, when a client connects with your Web PubSub resource, Web PubSub invokes the Webhook served by your application server at the path /eventhandler. Here, we simply print the userId to the console when a user is connected.
Expose localhost
Run the program, it should be running on localhost at port 8080. For our purposes, it means your local express app can't be reached on the internet. So, Web PubSub can't invoke the Webhook served at the path /eventhandler.
There are two ways to route the traffic to your localhost, one is to expose localhost to be accessible on the internet using tools such as ngrok and TunnelRelay. Another way, and also the recommended way is to use awps-tunnel to tunnel the traffic from Web PubSub service through the tool to your local server.
1. Download and install awps-tunnel
The tool runs on Node.js version 16 or higher.
npm install -g @azure/web-pubsub-tunnel-tool
2. Use the service connection string and run
export WebPubSubConnectionString="<your connection string>"
awps-tunnel run --hub myHub1 --upstream http://localhost:8080
Set event handler on your Web PubSub resource
Now, we need to let your Web PubSub resource know about this Webhook URL. You can set the event handlers either from Azure portal or Azure CLI.
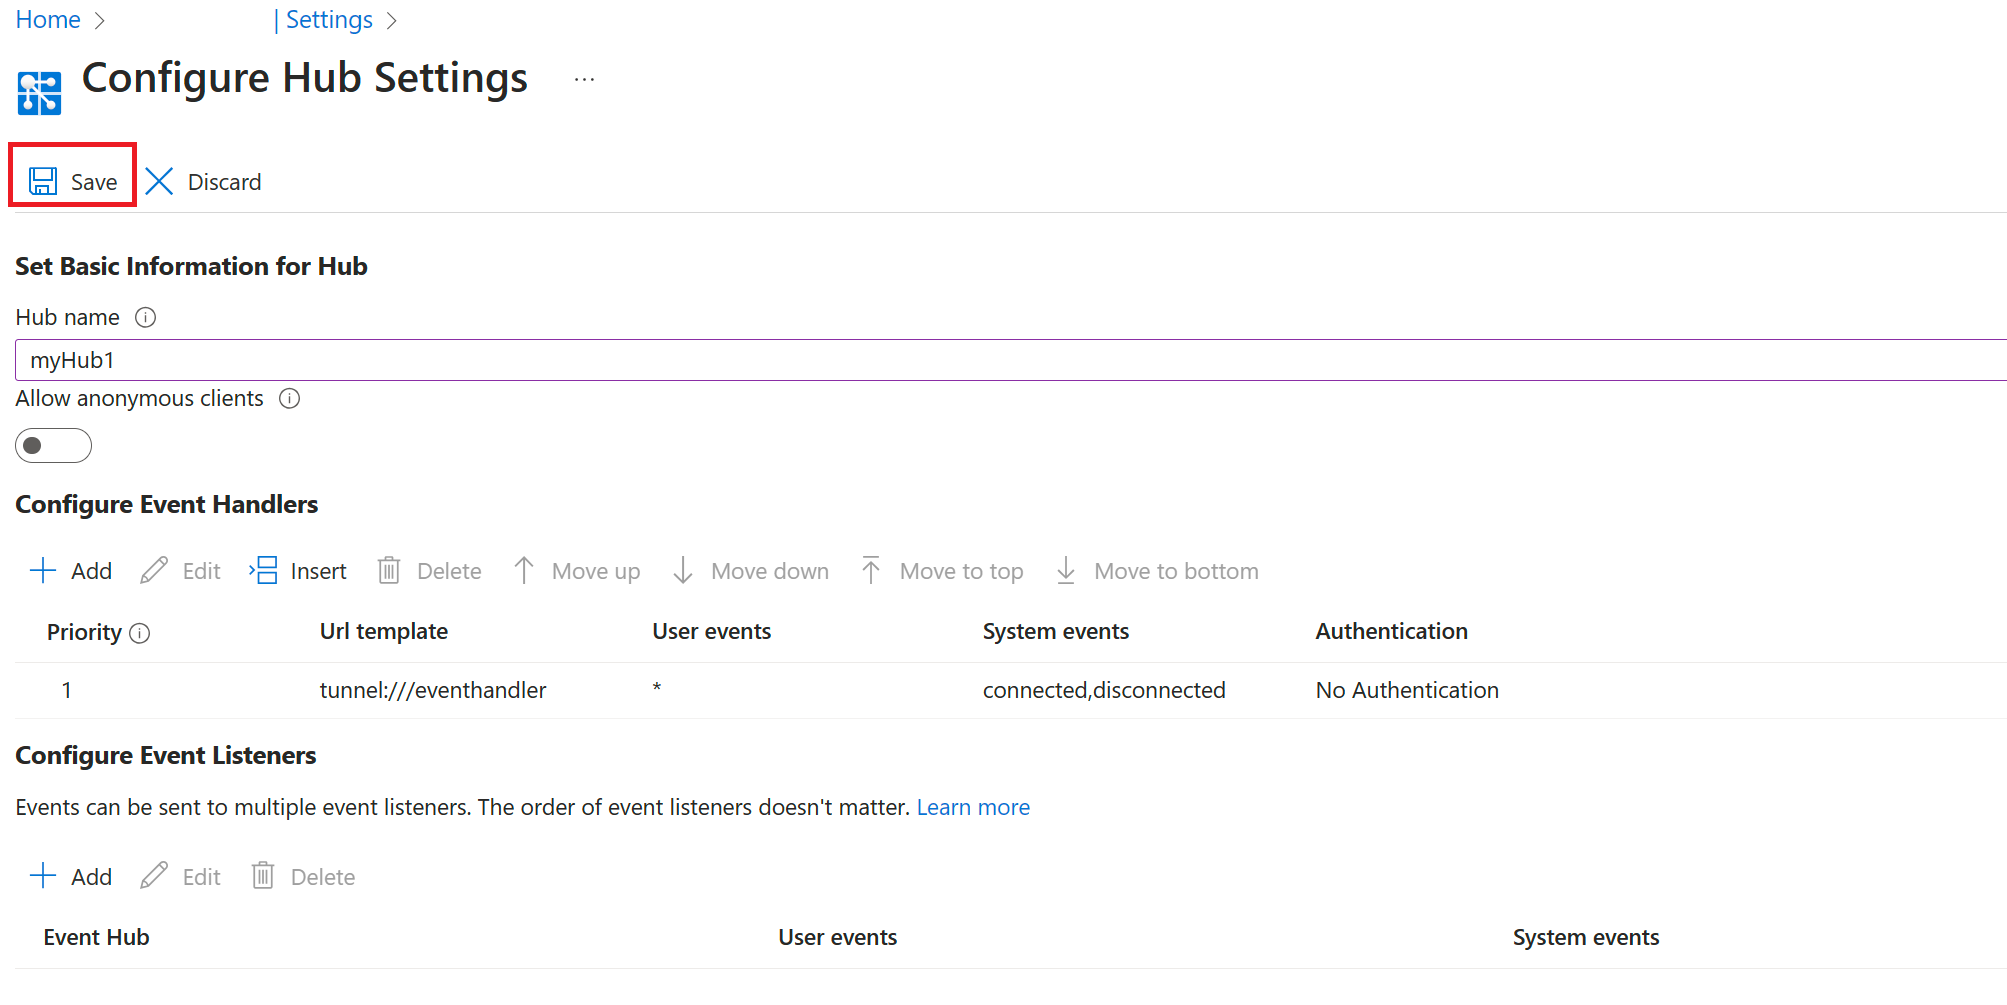
Select "Settings" from the menu and select "Add"
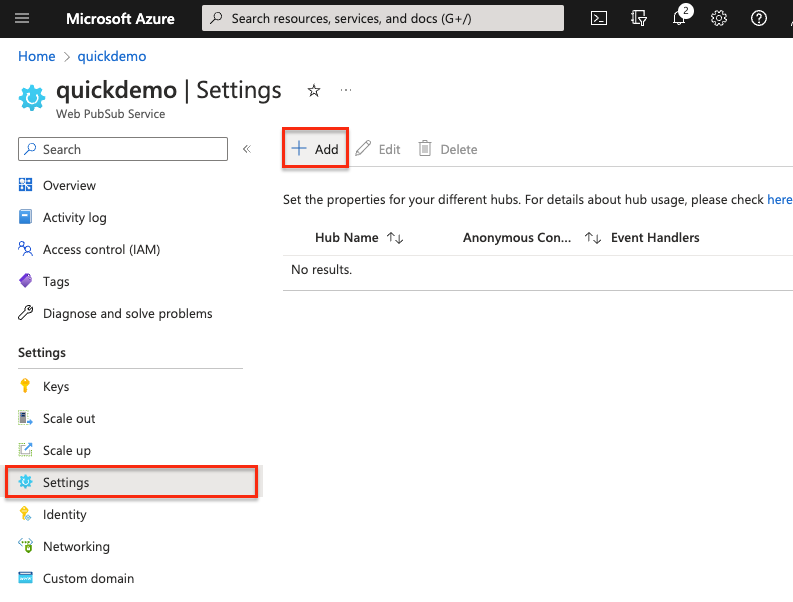
Enter a hub name. For our purposes, enter "myHub1" and select "Add"
In the event handler page, configure the following fields, when using
awps-tunneltool, the URL template usestunnelscheme followed by the path:tunnel:///eventhandler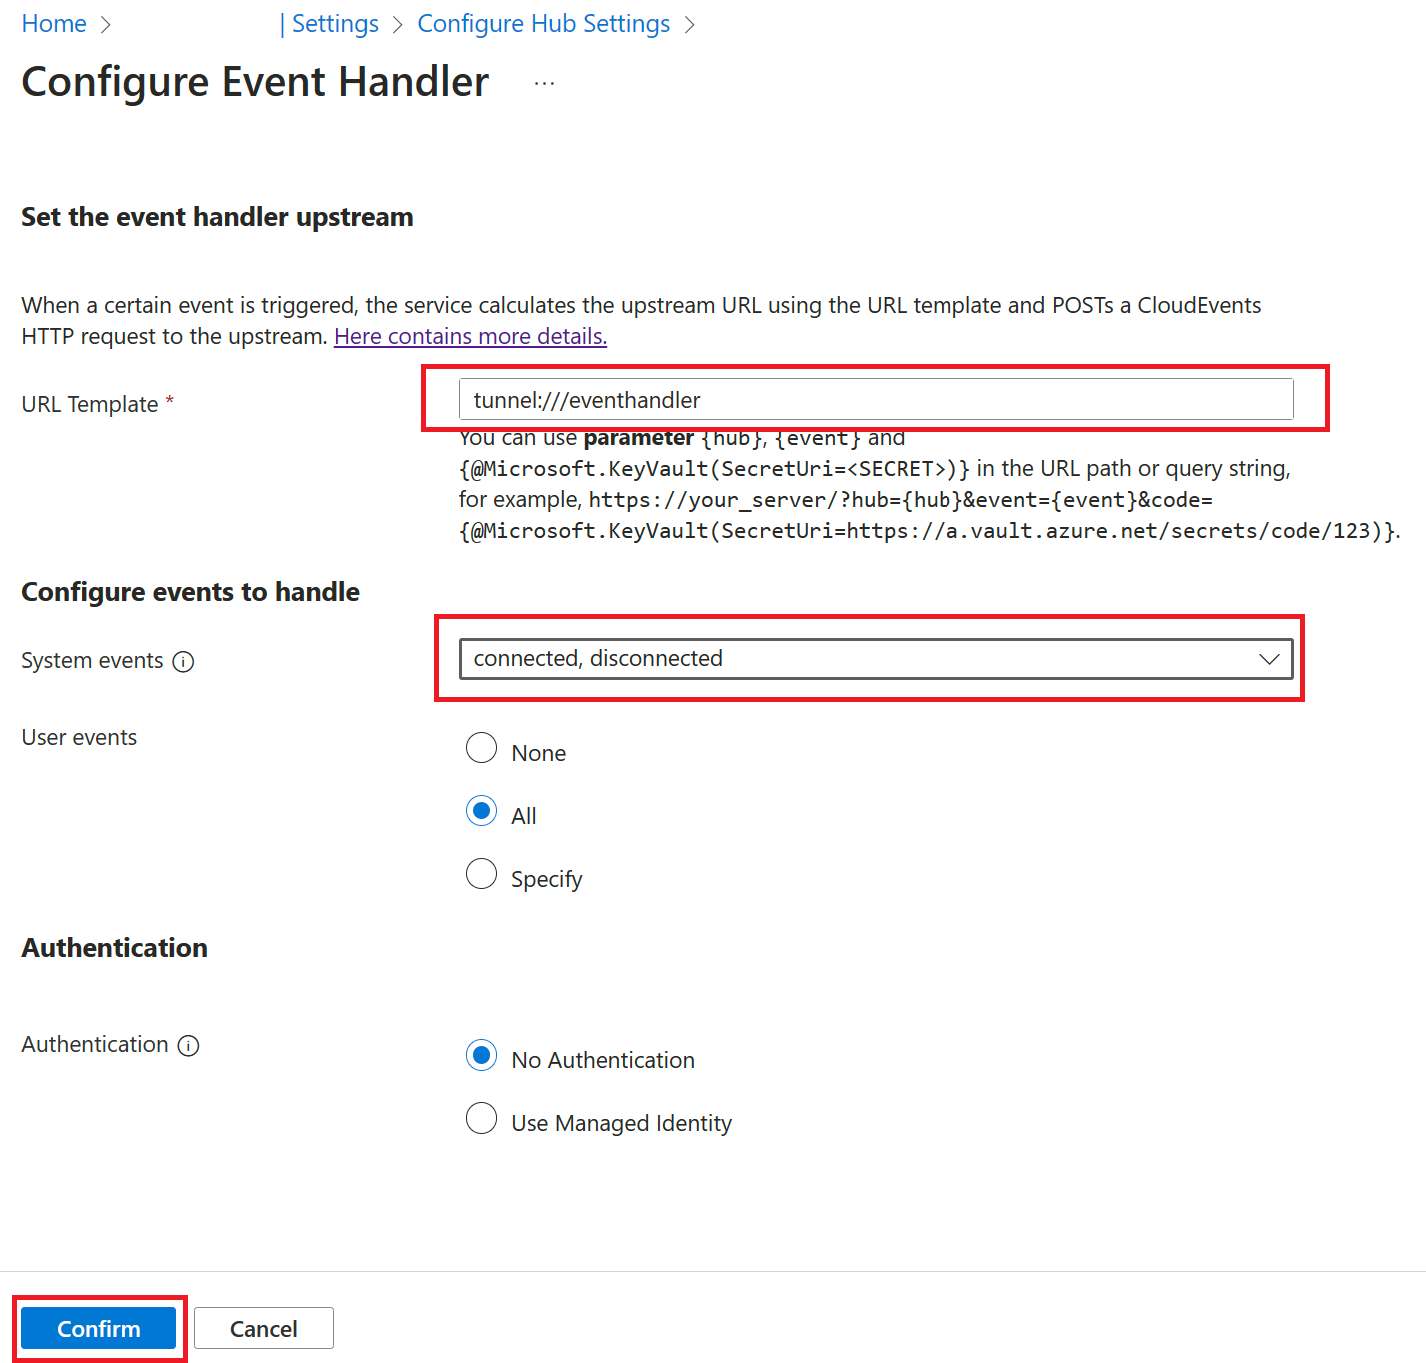
Save configuration
Run the programs
Start the application server
node server.js
Start the client program
node client.js
Observe the result
You should see the userId printed to the console.
Handle message event
Besides system events like connect, connected, disconnected, a client can also send custom events.
Modify the client program
Stop your client program and add the following code to client.js
// ...code from before

client.start();

// The name of the event is message and the content is in text format.
client.sendEvent("message", "sending custom event!", "text");
Modify the server program
Stop your client program and add the following code to server.js
// ... code from before

let handler = new WebPubSubEventHandler(HUB_NAME, {
  path: "/eventhandler",
  onConnected: async (req) => {
    console.log(`"${req.context.userId}" is connected.`);
  },
  // This handler function will handle user system
  handleUserEvent: async (req, res) => {
    if (req.context.eventName === "message") {
      console.log(`Received message: ${req.data}`);
      // Additional logic to process the data,
      // e.g save message content to database
      // or broadcast the message to selected clients.
    }
  },
});

//... code from before
Start the client program and server program again
You should see both the userId and the Received message: sending custom event! printed to the console.
Summary
This tutorial provides you with a basic idea of how the event system works in Web PubSub. In real-world applications, the event system can help you implement more logic to process system and user generated events.
Next steps
Feedback
Coming soon: Throughout 2024 we will be phasing out GitHub Issues as the feedback mechanism for content and replacing it with a new feedback system. For more information see: https://aka.ms/ContentUserFeedback.
Submit and view feedback for