Add and manage information banners in Azure Devops
Azure DevOps Services | Azure DevOps Server 2022 - Azure DevOps Server 2019
A quick and effective way to communicate with your Azure DevOps users is through information banners. Use banners to alert users to upcoming changes or events without sending out mass emails.
You can specify one of three types of banners: error, information, and warning. Only one banner, the last one added or updated, is displayed at a time. Banners remain in effect until their expiration date.
The following image shows how an information message is displayed. Users can cancel the message by selecting Close ![]() .
.
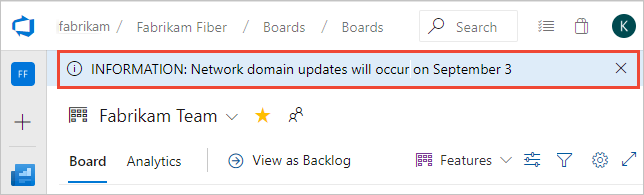
Banners are restricted to a length of thirty words. Banners are prioritized by level. For example, if you posted a warning message and an info message, the info message only shows after a user closes the warning message, or you delete the warning message.
Prerequisites
- To add or manage banners, you must be a member of the Project Collection Administrators security group. To get added, see Change permissions at the organization or collection-level.
- To manage banners using the Banner Settings extension, you must first install it. See Banner Settings and Install extensions
- To manage banners using the command line, you must install the Azure DevOps CLI extension as described in Get started with Azure DevOps CLI.
- Sign into Azure DevOps using
az login. - For the examples in this article, set the default organization using
az devops configure --defaults organization=YourOrganizationURL.
- Sign into Azure DevOps using
- To add or manage banners, you must be a member of the Project Collection Administrators security group. To get added, see Change permissions at the organization or collection-level.
- You must install the free Banner Settings marketplace extension on the project collection where you want to manage banners. See also Install extensions for on-premises servers.
Manage banners using the Banner Settings extension
The Banner Settings extension provides a settings pane under Organization Settings to add and manage sitewide banners. The extension supports the following features:
The Banner Settings extension provides a settings pane under Collection Settings to add and manage sitewide banners. The extension supports the following features:
- Show banners on any page in Azure DevOps
- Choose between three levels of messages: Info, Warning, and Error
- Choose an expiration date for a message
- Include hyperlinks in banners using markdown syntax.
Open Organization settings
To add or delete a banner, open Organization settings, scroll down to the Extensions section, and choose Banner.
Organization settings configure resources for all projects respectively for the entire organization. For an overview of all organization settings, see Project collection administrator role and managing collections of projects.
Choose the
 Azure DevOps logo to open Projects, and then choose Organization settings.
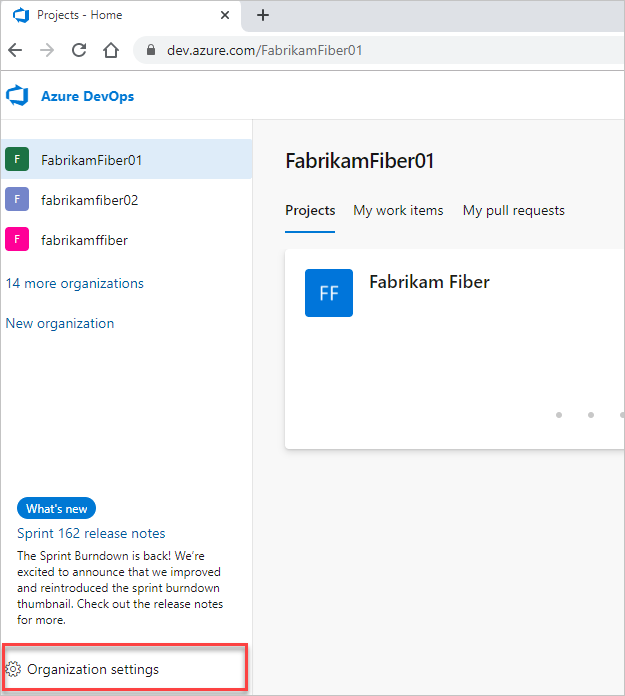
Open Admin settings
To add or delete a banner, open Admin settings, scroll down to the Extensions section, and choose Banner.
Admin settings configure resources for all projects in a project collection. For an overview of all collection settings, see Project collection administrator role and managing collections of projects.
Choose the
Azure DevOps logo to open Collections, and then choose Admin settings.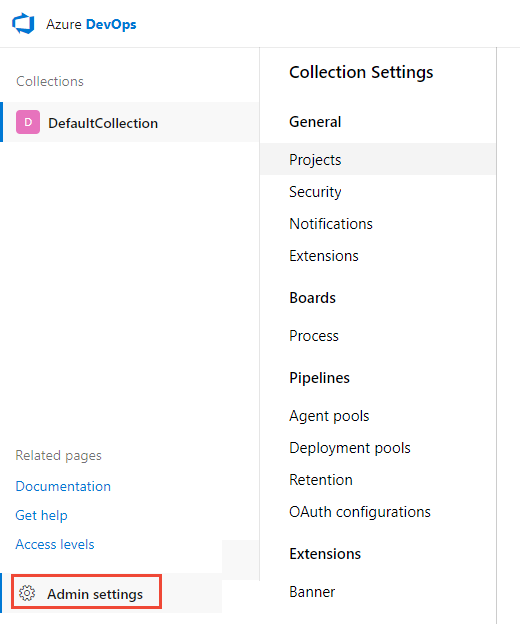
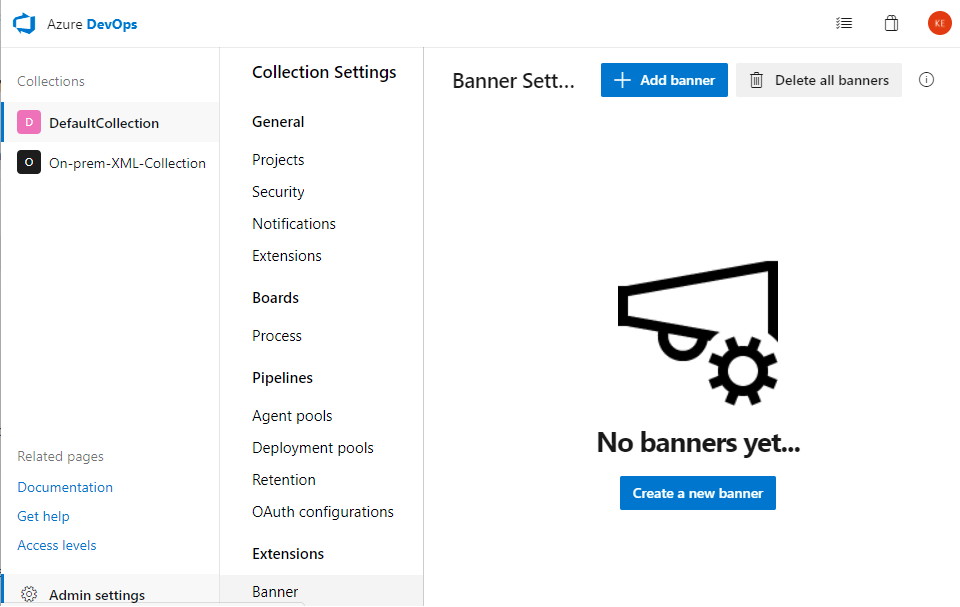
Add and manage banners
If no banners are defined, choose Create a new banner.

Enter the banner text into the text box. Choose Edit more to change the message level and set the expiration date.
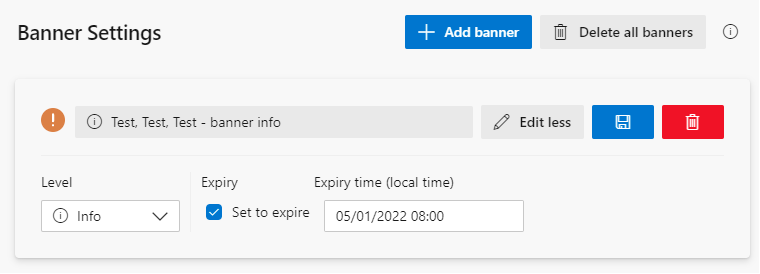
Choose
 Save to save your changes.
Azure CLI admin banner commands
| Command | Description |
|---|---|
az devops admin banner add |
Add a new banner and immediately show it. |
az devops admin banner list |
List banners. |
az devops admin banner remove |
Remove a banner. |
az devops admin banner show |
Show details for a banner. |
az devops admin banner update |
Update the message, level, or expiration date for a banner. |
The following parameters are optional for all commands, and not listed in the examples provided in this article.
- detect: Automatically detect organization. Accepted values: false, true. Default is true.
- org: Azure DevOps organization URL. You can configure the default organization using az devops configure -d organization=ORG_URL. Required if not configured as default or picked up via git config. Example:
--org https://dev.azure.com/MyOrganizationName/.
Add a banner
To add a banner, enter the az devops admin banner add command.
az devops admin banner add --message
                           [--expiration]
                           [--id]
                           [--type {error, info, warning}]
Parameters
message: Required. Text string that specifies the banner message to display. Text strings are limited to a maximum of thirty words.
The message might contain links in HTML format (
<a href='https://example.org'>Link text</a>). Any ampersand in the url, for example in the query string, must be escaped in the xml entity format (&).expiration: Optional. Date/time when the banner should no longer be displayed to users. For example, "2019-06-10 17:21:00 UTC", "2019-06-10".
ID: Optional. ID of the banner to update. This identifier is needed to change or remove the message later. A unique identifier is automatically created if one isn't specified.
type: Optional. Type of banner to display. Valid values: error, info, warning. Default is info.
Example
For example, the following command adds an information banner, which expires on September 4, 2019. When an ID isn't specified, a unique ID is automatically assigned.
az devops admin banner add --message "INFORMATION: Network domain updates will occur on September 3. <a href='https://example.org?page=network-updates&anchor=september-3-2019'>More information</a>" --expiration 2019-09-04 --type info
{
"3d584103-6a94-4f46-8696-f424278da072": {
"expirationDate": "2019-09-04T00:00:00-07:00",
"level": "info",
"message": "INFORMATION: Network domain updates will occur on September 3"
}
}
List banners
To determine which banners are defined, enter the az devops admin banner list command.
az devops admin banner list
Example: Default json output
If you don't specify the output, the list displays in json format. For other output format options, see Output formats for Azure CLI commands.
For example, the following command indicates that two banners are defined.
az devops admin banner list
{
  "04c4d27f-1fee-4f23-9c44-57ed6a9efef8": {
    "level": "info",
    "message": "BANNER-MESSAGE-BANNER-MESSAGE"
  },
  "27f016aa-be13-4e3b-a1da-8b98d239e074": {
    "level": "warning",
    "message": "WARNING - This is a test warning message."
  }
}
Example: Table output
To list the banners in table format, use the --output table command option.
az devops admin banner list
ID                                    Message                            Type     Expiration Date
------------------------------------  ---------------------------------  -------  -----------------
04c4d27f-1fee-4f23-9c44-57ed6a9efef8  BANNER-MESSAGE-BANNER-MESSAGE      Info
27f016aa-be13-4e3b-a1da-8b98d239e074  WARNING - This is a test warning message.
Remove a banner
To delete a banner, use the az devops admin banner remove command. Specify the banner ID, which you can find by listing the banners.
az devops admin banner remove --id
Parameters
- ID: Required. ID of the banner to remove.
Example
For example, the following command removes the banner with id=e090e7b0-4499-4b8f-a09b-1eddf7fdeb44. No response is returned.
az devops admin banner remove --id e090e7b0-4499-4b8f-a09b-1eddf7fdeb44
List banner details
To list information about a single banner, use the az devops admin banner show command. Specify the banner ID, which you can find by listing the banners.
az devops admin banner show --id
Parameters
- ID: Required. ID of the banner to list details.
Example
Here we list the details for banner with id=7653f414-3c01-424f-8f84-e51aa99b797c.
az devops admin banner show --id 7653f414-3c01-424f-8f84-e51aa99b797c
{
  "7653f414-3c01-424f-8f84-e51aa99b797c": {
    "expirationDate": "2019-09-04T07:00:00+00:00",
    "level": "info",
    "message": "Lorem ipsum dolor sit amet, consectetur adipiscing elit. Fusce ac lectus eget erat porttitor dapibus vulputate in ipsum. Etiam id faucibus nisi, at ornare tellus. Curabitur faucibus pharetra orci, id finibus leo iaculis et. Morbi nec felis facilisis, ultricies magna nec, convallis sem. Sed pharetra porta mi eu venenatis. Cras consectetur et dui a accumsan. Maecenas non dolor eu lacus mollis pulvinar. Fusce gravida id lacus sed consequat. Cras tempus ante tincidunt purus rhoncus, at consectetur tellus sollicitudin. Proin sed tellus vel libero maximus ornare. Nullam facilisis, nibh sit amet faucibus rutrum, diam massa ullamcorper purus, sed tempor est erat in sapien. Sed sit amet lectus vel massa facilisis interdum id sit amet nisi. Vestibulum eu purus et mi ultricies consequat. Lorem ipsum dolor sit amet, consectetur adipiscing elit. Vestibulum fermentum mattis rutrum. Nulla hendrerit nibh ut sapien viverra faucibus."
  }
}
Update a banner
You can change the message, type, and expiration of a banner using the az devops admin banner update command.
az devops admin banner update --id
                              [--expiration]
                              [--message]
                              [--type {error, info, warning}]
Parameters
- ID: Required. ID of the banner to update.
- expiration: Optional. Date/time when the banner should no longer be displayed to users. To unset the expiration for the banner, supply an empty value to this argument, for example, "2019-06-10 17:21:00 UTC", "2019-06-10".
- message: Text string that specifies the banner message to display.
- type: Optional. Type of banner to display. Valid values: error, info, warning. Default is info.
Example
For example, the following command updates the message string for the banner and updates the expiration date to the end of the year.
az devops admin banner update --id 7653f414-3c01-424f-8f84-e51aa99b797c --message "Lorem ipsum dolor sit amet, consectetur adipiscing elit. Fusce ac lectus eget erat porttitor dapibus vulputate in ipsum. Etiam id faucibus nisi, at ornare tellus. Curabitur faucibus pharetra orci, id finibus leo iaculis et. Morbi nec felis facilisis, ultricies magna nec, convallis sem. Sed pharetra porta mi eu venenatis. Cras consectetur et dui a accumsan. Maecenas non dolor eu lacus mollis pulvinar. Fusce gravida id lacus sed consequat. Cras tempus ante tincidunt purus rhoncus, at consectetur tellus sollicitudin. Proin sed tellus vel libero maximus ornare. Nullam facilisis, nibh sit amet faucibus rutrum, diam massa ullamcorper purus, sed tempor est erat in sapien. Sed sit amet lectus vel massa facilisis interdum id sit amet nisi. Vestibulum eu purus et mi ultricies consequat. Lorem ipsum dolor sit amet, consectetur adipiscing elit. Vestibulum fermentum mattis rutrum. Nulla hendrerit nibh ut sapien viverra faucibus.   " --expiration  2019-12-31
{
  "7653f414-3c01-424f-8f84-e51aa99b797c": {
    "expirationDate": "2019-12-31T00:00:00-08:00",
    "level": "info",
    "message": "Lorem ipsum dolor sit amet, consectetur adipiscing elit. Fusce ac lectus eget erat porttitor dapibus vulputate in ipsum. Etiam id faucibus nisi, at ornare tellus. Curabitur faucibus pharetra orci, id finibus leo iaculis et. Morbi nec felis facilisis, ultricies magna nec, convallis sem. Sed pharetra porta mi eu venenatis. Cras consectetur et dui a accumsan. Maecenas non dolor eu lacus mollis pulvinar. Fusce gravida id lacus sed consequat. Cras tempus ante tincidunt purus rhoncus, at consectetur tellus sollicitudin. Proin sed tellus vel libero maximus ornare. Nullam facilisis, nibh sit amet faucibus rutrum, diam massa ullamcorper purus, sed tempor est erat in sapien. Sed sit amet lectus vel massa facilisis interdum id sit amet nisi. Vestibulum eu purus et mi ultricies consequat. Lorem ipsum dolor sit amet, consectetur adipiscing elit. Vestibulum fermentum mattis rutrum. Nulla hendrerit nibh ut sapien viverra faucibus.   "
  }
}
Related articles
Feedback
Coming soon: Throughout 2024 we will be phasing out GitHub Issues as the feedback mechanism for content and replacing it with a new feedback system. For more information see: https://aka.ms/ContentUserFeedback.
Submit and view feedback for