Note
Access to this page requires authorization. You can try signing in or changing directories.
Access to this page requires authorization. You can try changing directories.
To build the end-to-end solution, you use the IoT Central in-store analytics checkout application template. This template lets you connect to and monitor a store's environment through various sensor devices. These devices generate telemetry that you can convert into business insights to help reduce operating costs and create a great experience for your customers.
In this tutorial, you learn how to:
- Use the Azure IoT Central In-store analytics - checkout template to create a retail store application
- Customize the application settings
- Create and customize IoT device templates
- Connect devices to your application
- Add rules and actions to monitor conditions
If you don't have an Azure subscription, create a free account before you begin.
Prerequisites
To complete this tutorial, you need to install the dmr-client command-line tool on your local machine:
dotnet tool install --global Microsoft.IoT.ModelsRepository.CommandLine --version 1.0.0-beta.9
Application architecture
For many retailers, environmental conditions are a key way to differentiate their stores from their competitors' stores. The most successful retailers make every effort to maintain pleasant conditions within their stores for the comfort of their customers.
The application template comes with a set of device templates and uses a set of simulated devices to populate the dashboard:
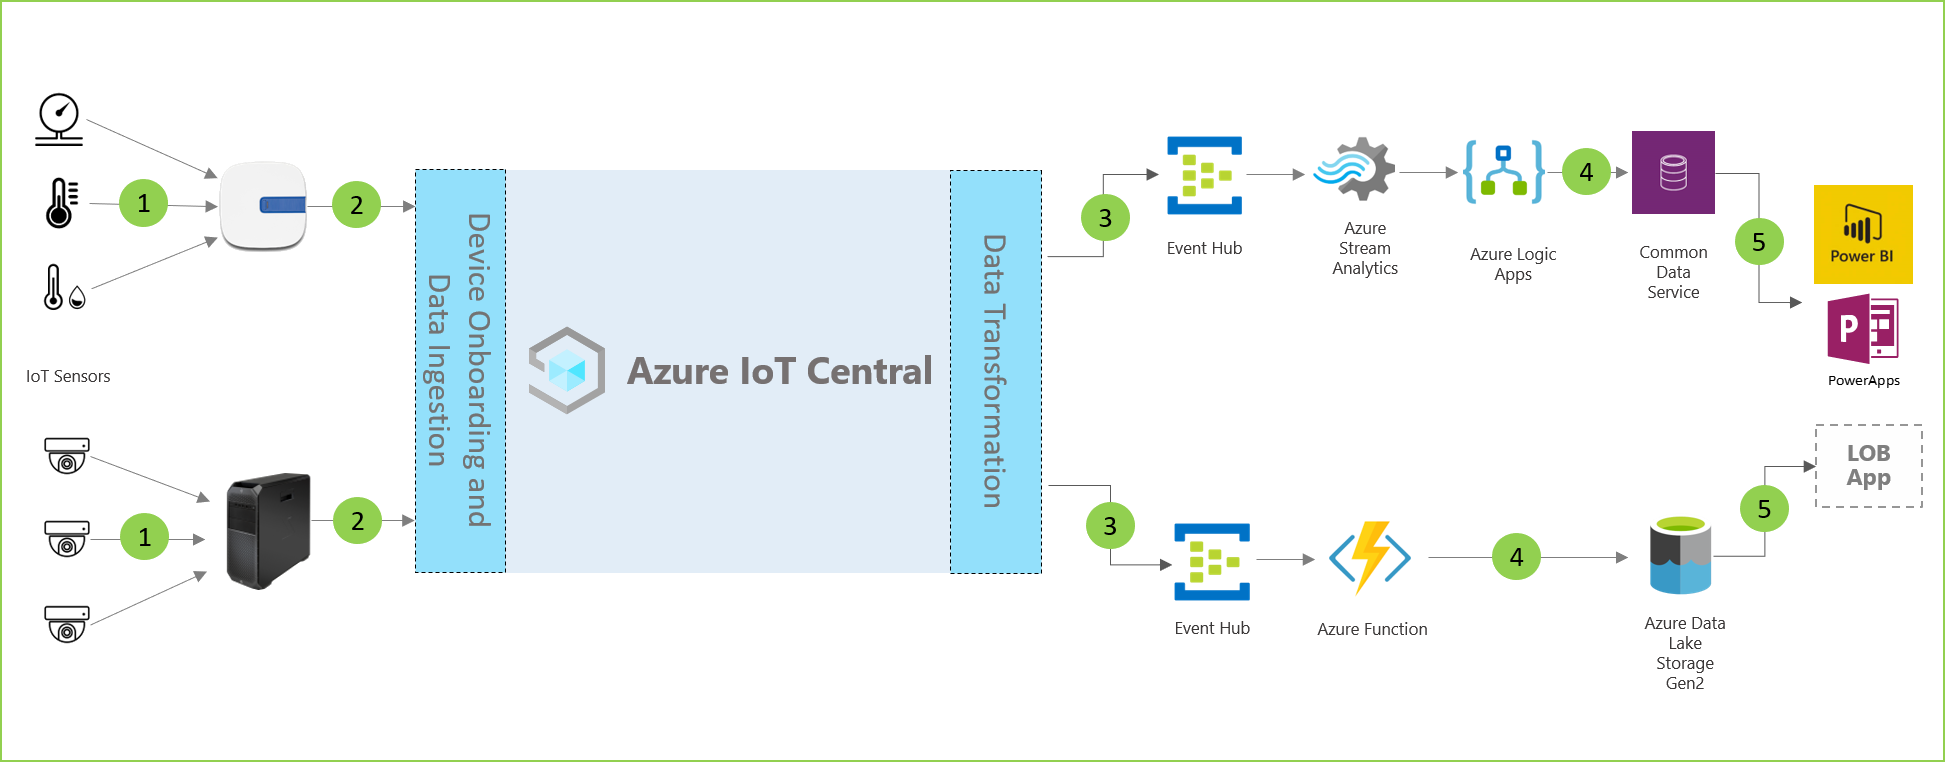
As shown in the previous application architecture diagram, you can use the application template to:
(1) Connect various IoT sensors to an IoT Central application instance.
An IoT solution starts with a set of sensors that capture meaningful signals from within a retail store environment. The various icons at the far left of the architecture diagram represent the sensors.
(2) Monitor and manage the health of the sensor network and any gateway devices in the environment.
Many IoT sensors can feed raw signals directly to the cloud or to a gateway device located near them. The gateway device aggregates data at the edge before it sends summary insights to an IoT Central application. The gateway device is also responsible for relaying command and control operations to the sensor devices when applicable.
(3) Create custom rules that use environmental conditions within a store to trigger alerts for store managers.
The Azure IoT Central application ingests data from the various IoT sensors and gateway devices within the retail store environment and then generates a set of meaningful insights.
Azure IoT Central also provides a tailored experience for store operators that lets them remotely monitor and manage the infrastructure devices.
(4) Transform the environmental conditions within the stores into insights that the store team can use to improve the customer experience.
You can configure an Azure IoT Central application within a solution to export raw or aggregated insights to a set of Azure platform as a service (PaaS) services. PaaS services can perform data manipulation and enrich these insights before landing them in a business application.
(5) Export the aggregated insights into existing or new business applications to provide useful and timely information to retail staff.
The IoT data can power different kinds of business applications deployed within a retail environment. A retail store manager or staff member can use these applications to visualize business insights and take meaningful action in real time. You learn how to build a real-time Power BI dashboard in the Export data from Azure IoT Central and visualize insights in Power BI tutorial.
Create an in-store analytics application
To create your IoT Central application:
Navigate to the Create IoT Central Application page in the Azure portal. If prompted, sign in with your Azure account.
Enter the following information:
Field Description Subscription The Azure subscription you want to use. Resource group The resource group you want to use. You can create a new resource group or use an existing one. Resource name A valid Azure resource name. Application URL The URL subdomain for your application. The URL for an IoT Central application looks like https://yoursubdomain.azureiotcentral.com.Template In-store Analytics - Checkout Region The Azure region you want to use. Pricing plan The pricing plan you want to use. Select Review + create. Then select Create.
When the app is ready, you can navigate to it from the Azure portal:
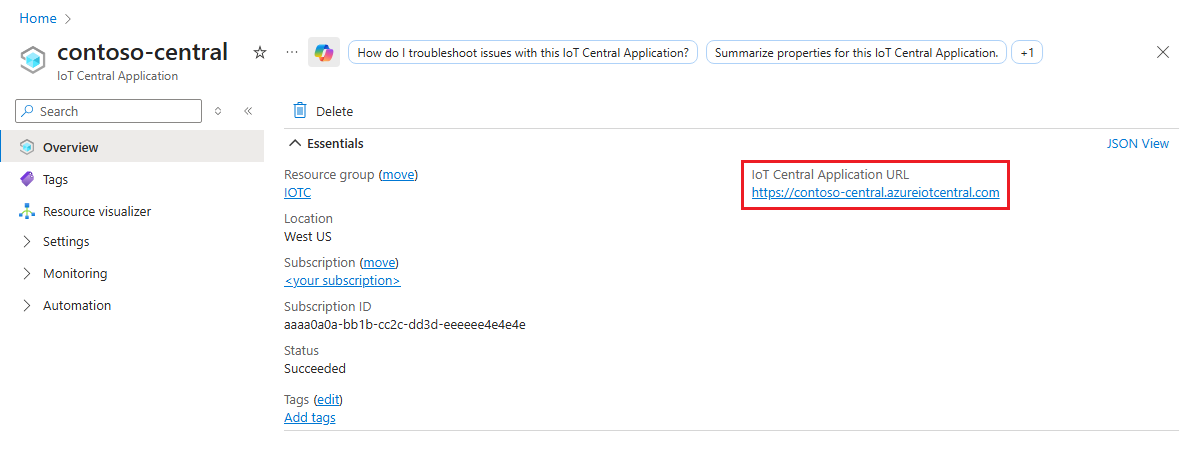
To learn more, see Create an Azure IoT Central application.
Walk through the application
The following sections describe the key features of the application.
Customize the application settings
You can change several settings to customize the user experience in your application. A custom theme enables you to set the application browser colors, the browser icon, and the application logo that appears in the masthead.
To create a custom theme, use the sample images to customize the application. Download the four Contoso sample images from GitHub.
To create a custom theme:
On the left pane, select Customization > Appearance.
To change the masthead logo, select Change, and then select the contoso_wht_mast.png image to upload. Optionally, enter a value for Logo alt text.
To change the browser icon, select Change, and then select the contoso_favicon.png image to appear on browser tabs.
Replace the default Browser colors by adding HTML hexadecimal color codes:
- For Header, enter #008575.
- For Accent, enter #A1F3EA.
Select Save. After you save your changes, the application updates the browser colors, the logo in the masthead, and the browser icon.
To update the application image that appears on the application tile on the My Apps page of the Azure IoT Central My apps site:
Select Application > Management.
Select Change, and then select the contoso_main_lg.png image to upload as the application image.
Select Save.
Create the device templates
Device templates let you configure and manage devices. You can build a custom template, import an existing template file, or import a template from the list of featured device templates. After you create and customize a device template, use it to connect real devices to your application.
Optionally, you can use a device template to generate simulated devices for testing.
The In-store analytics - checkout application template has several preinstalled device templates. The RuuviTag device template isn't included in the In-store analytics - checkout application template.
In this section, you add a device template for RuuviTag sensors to your application. To do so:
To download a copy of the RuuviTag device template from the model repository, run the following command:
dmr-client export --dtmi "dtmi:rigado:RuuviTag;2" --repo https://raw.githubusercontent.com/Azure/iot-plugandplay-models/main > ruuvitag.jsonOn the left pane, select Device Templates.
Select + New to create a new device template.
Select the IoT device tile and then select Next: Customize.
On the Customize page, enter RuuviTag as the device template name.
Select Next: Review.
Select Create.
Select the Import a model tile. Then browse for and import the ruuvitag.json file that you downloaded previously.
After the import completes, select Publish to publish the device template.
On the left pane, select Device templates.
The page displays all the device templates in the application template and the RuuviTag device template you just added.

Customize the device templates
You can customize the device templates in your application in three ways:
Customize the native built-in interfaces in your devices by changing the device capabilities.
For example, with a temperature sensor, you can change details such as the display name and the units of measurement.
Customize your device templates by adding cloud properties.
Cloud properties are custom data that your Azure IoT Central application creates, stores, and associates with your devices. Examples of cloud properties include:
- A calculated value.
- Metadata, such as a location that you want to associate with a set of devices.
Customize device templates by building custom views.
Views provide a way for operators to visualize telemetry and metadata for your devices, such as device metrics and health.
In this section, you use the first two methods to customize the device template for your RuuviTag sensors.
To customize the built-in interfaces of the RuuviTag device template:
On the left pane, select Device Templates.
Select RuuviTag.
Hide the left pane. The summary view of the template displays the device capabilities.
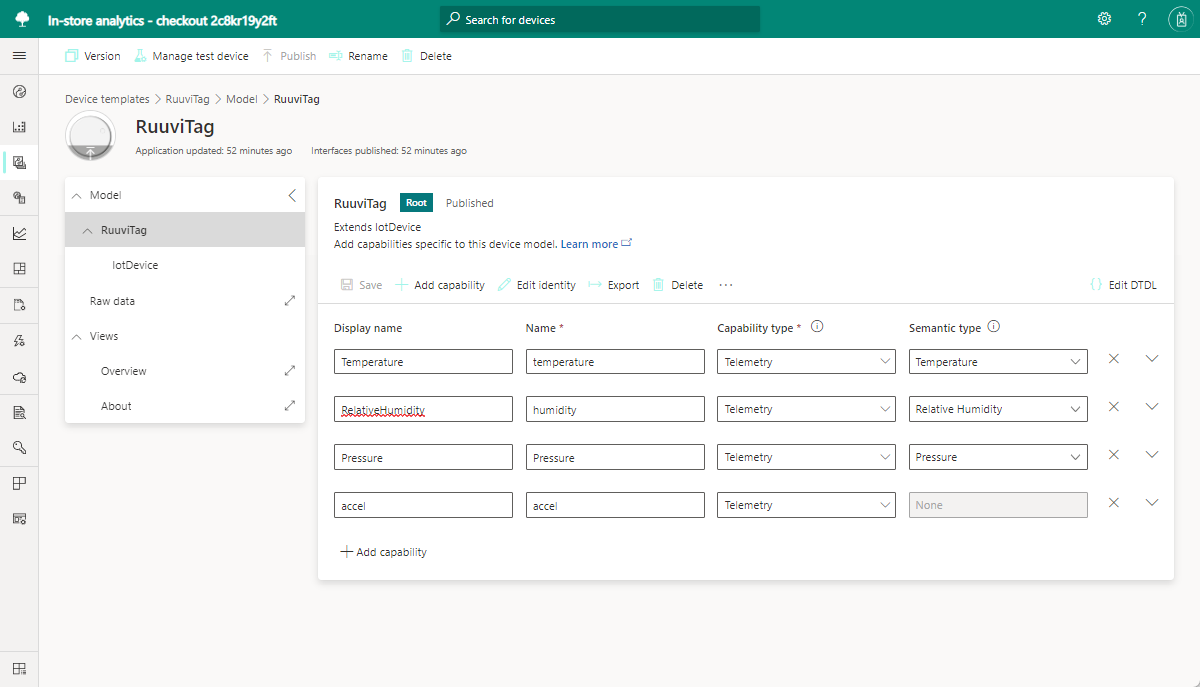
Select the RuuviTag model in the RuuviTag device template menu.
In the list of capabilities, scroll for the RelativeHumidity telemetry type. It's the row item with the editable Display name value of RelativeHumidity.

In the following steps, you customize the RelativeHumidity telemetry type for the RuuviTag sensors. Optionally, you can customize some of the other telemetry types.
For the RelativeHumidity telemetry type, make the following changes:
Update the Display Name value from RelativeHumidity to a custom value such as Humidity.
Change the Semantic Type option from Relative humidity to Humidity.
Optionally, set schema values for the humidity telemetry type in the expanded schema view. By setting schema values, you can create detailed validation requirements for the data that your sensors track. For example, you could set minimum and maximum operating range values for a specified interface.
Select Save to save your changes.
To add a cloud property to a device template in your application:
Select Add capability.
For Display Name, enter Location.
This value, which is a friendly name for the property, is automatically copied to the Name. You can use the copied value or change it.
For Capability Type, select Cloud Property.
Select Expand.
In the Schema dropdown list, select String.
This option lets you associate a location name with any device based on the template. For example, you could associate a named area in a store with each device.
Set Minimum Length to 2.
Set Trim Whitespace to On.
Select Save to save your custom cloud property.
Select Publish.
Publishing a device template makes the updates visible to application operators. After you publish a template, use it to generate simulated devices for testing or to connect real devices to your application. If you already have devices connected to your application, publishing a customized template pushes the changes to the devices.
Add devices
After you create and customize the device templates, it's time to add devices. For this tutorial, you use the following set of simulated devices to build the application:
- A Rigado C500 gateway.
- Two RuuviTag sensors.
- An Occupancy sensor. This simulated sensor is included in the application template, so you don't need to create it.
To add a simulated Rigado Cascade 500 gateway device to your application:
On the left pane, select Devices.
Select C500 in the list of available device templates and then select New.
Enter C500 gateway as the device name and gateway-001 as the device ID.
Make sure that C500 is the selected device template and then set Simulate this device? to Yes.
Select Create. Your application now contains a simulated Rigado Cascade 500 gateway device.
To add a simulated RuuviTag sensor device to your application:
On the left pane, select Devices.
Select RuuviTag in the list of available device templates and then select New.
Enter RuuviTag 001 as the device name and ruuvitag-001 as the device ID.
Make sure that RuuviTag is the selected device template and then set Simulate this device? to Yes.
Select Create. Your application now contains a simulated RuuviTag sensor device.
Repeat the previous steps to add a second simulated RuuviTag sensor device to your application. Enter RuuviTag 002 as the device name and ruuvitag-002 as the device ID.
To connect the two RuuviTag sensor and Occupancy devices to the gateway device:
On the left pane, select Devices.
In the list of devices, select RuuviTag 001, RuuviTag 002, and Occupancy. Then in the command bar, select Attach to gateway.
In the Attach to gateway pane, select C500 as the device template, and C500 - gateway as the device. Then select Attach.
If you navigate to the C500 - gateway device and select the Downstream Devices tab, you now see three devices attached to the gateway.
Add rules and actions
As part of using sensors in your Azure IoT Central application to monitor conditions, you can create rules to run actions when certain conditions are met.
A rule is associated with a device template and one or more devices, and it contains conditions that must be met based on device telemetry or events. A rule also has one or more associated actions. The actions might include sending email notifications, or triggering a webhook action to send data to other services. The In-store analytics - checkout application template includes some predefined rules for the devices in the application.
In this section, you create a new rule that checks the maximum relative humidity level based on the RuuviTag sensor telemetry. You add an action to the rule so that if the humidity exceeds the maximum, the application sends an email notification.
To create a rule:
On the left pane, select Rules.
Select New.
Enter Humidity level as the name of the rule.
For Device template, select the RuuviTag device template.
The rule that you define applies to all sensors, based on that template. Optionally, you could create a filter that would apply the rule to only a defined subset of the sensors.
For Telemetry, select RelativeHumidity. It's the device capability that you customized in an earlier step.
For Operator, select Is greater than.
For Value, enter a typical upper range indoor humidity level for your environment (for example, 65).
This condition applies when the relative humidity in any RuuviTag sensor exceeds the value. You might need to adjust the value up or down depending on the normal humidity range in your environment.
To add an action to the rule:
Select Email.
For a friendly Display name for the action, enter High humidity notification.
For To, enter the email address associated with your account.
If you use a different email address, the one you use must be for a user who has been added to the application. The user also needs to sign in and out at least once.
Optionally, enter a note to include in the text of the email.
Select Done to complete the action.
Select Save to save and activate the new rule.
Within a few minutes, the specified email account should begin to receive messages. The application sends email each time a sensor indicates that the humidity level exceeded the value in your condition.
Clean up resources
If you don't plan to complete any further IoT Central quickstarts or tutorials, you can delete your IoT Central application:
- In your IoT Central application, navigate to Application > Management.
- Select Delete and then confirm your action.