Manage Azure Machine Learning workspaces in the portal or with the Python SDK (v2)
APPLIES TO:  Python SDK azure-ai-ml v2 (current)
In this article, you create, view, and delete Azure Machine Learning workspaces for Azure Machine Learning, with the Azure portal or the SDK for Python.
As your needs change or your automation requirements increase, you can manage workspaces with the CLI, Azure PowerShell, or via the Visual Studio Code extension.
Prerequisites
- An Azure subscription. If you don't have an Azure subscription, create a free account before you begin. Try the free or paid version of Azure Machine Learning today.
- With the Python SDK:
Install azure-identity:
pip install azure-identity. If in a notebook cell, use%pip install azure-identity.Provide your subscription details:
APPLIES TO:
 Python SDK azure-ai-ml v2 (current)
# Enter details of your subscription
subscription_id = "<SUBSCRIPTION_ID>"
resource_group = "<RESOURCE_GROUP>"
Get a handle to the subscription. All the Python code in this article uses
ml_client:# get a handle to the subscription from azure.ai.ml import MLClient from azure.identity import DefaultAzureCredential ml_client = MLClient(DefaultAzureCredential(), subscription_id, resource_group)(Optional) If you have multiple accounts, add the tenant ID of the Microsoft Entra ID you wish to use into the
DefaultAzureCredential. Find your tenant ID from the Azure portal under Microsoft Entra ID, External Identities.DefaultAzureCredential(interactive_browser_tenant_id="<TENANT_ID>")(Optional) If you're working in the Azure Government - US or Azure China 21Vianet regions, you need to specify the cloud into which you want to authenticate. You can specify these regions in
DefaultAzureCredential.from azure.identity import AzureAuthorityHosts DefaultAzureCredential(authority=AzureAuthorityHosts.AZURE_GOVERNMENT))
Limitations
When you create a new workspace, you can either automatically create services needed by the workspace or use existing services. If you want to use existing services from a different Azure subscription than the workspace, you must register the Azure Machine Learning namespace in the subscription that contains those services. For example, if you create a workspace in subscription A that uses a storage account in subscription B, the Azure Machine Learning namespace must be registered in subscription B before the workspace can use the storage account.
The resource provider for Azure Machine Learning is Microsoft.MachineLearningServices. For information on seeing whether it's registered or registering it, see Azure resource providers and types.
Important
This information applies only to resources provided during workspace creation: Azure Storage Accounts, Azure Container Registry, Azure Key Vault, and Application Insights.
For network isolation with online endpoints, you can use workspace-associated resources (Azure Container Registry (ACR), Storage account, Key Vault, and Application Insights) from a resource group different from your workspace. However, these resources must belong to the same subscription and tenant as your workspace. For information about the limitations that apply to securing managed online endpoints, using a workspace's managed virtual network, see Network isolation with managed online endpoints.
Workspace creation also creates an Azure Container Registry (ACR) by default. Since ACR doesn't currently support unicode characters in resource group names, use a resource group that avoids these characters.
Azure Machine Learning doesn't support hierarchical namespace (Azure Data Lake Storage Gen2 feature) for the default storage account of the workspace.
Tip
An Azure Application Insights instance is created when you create the workspace. You can delete the Application Insights instance after cluster creation if you want. Deleting it limits the information gathered from the workspace, and might make it more difficult to troubleshoot problems. If you delete the Application Insights instance created by the workspace, the only way to recreate it is to delete and recreate the workspace.
For more information on using the Application Insights instance, see Monitor and collect data from Machine Learning web service endpoints.
Create a workspace
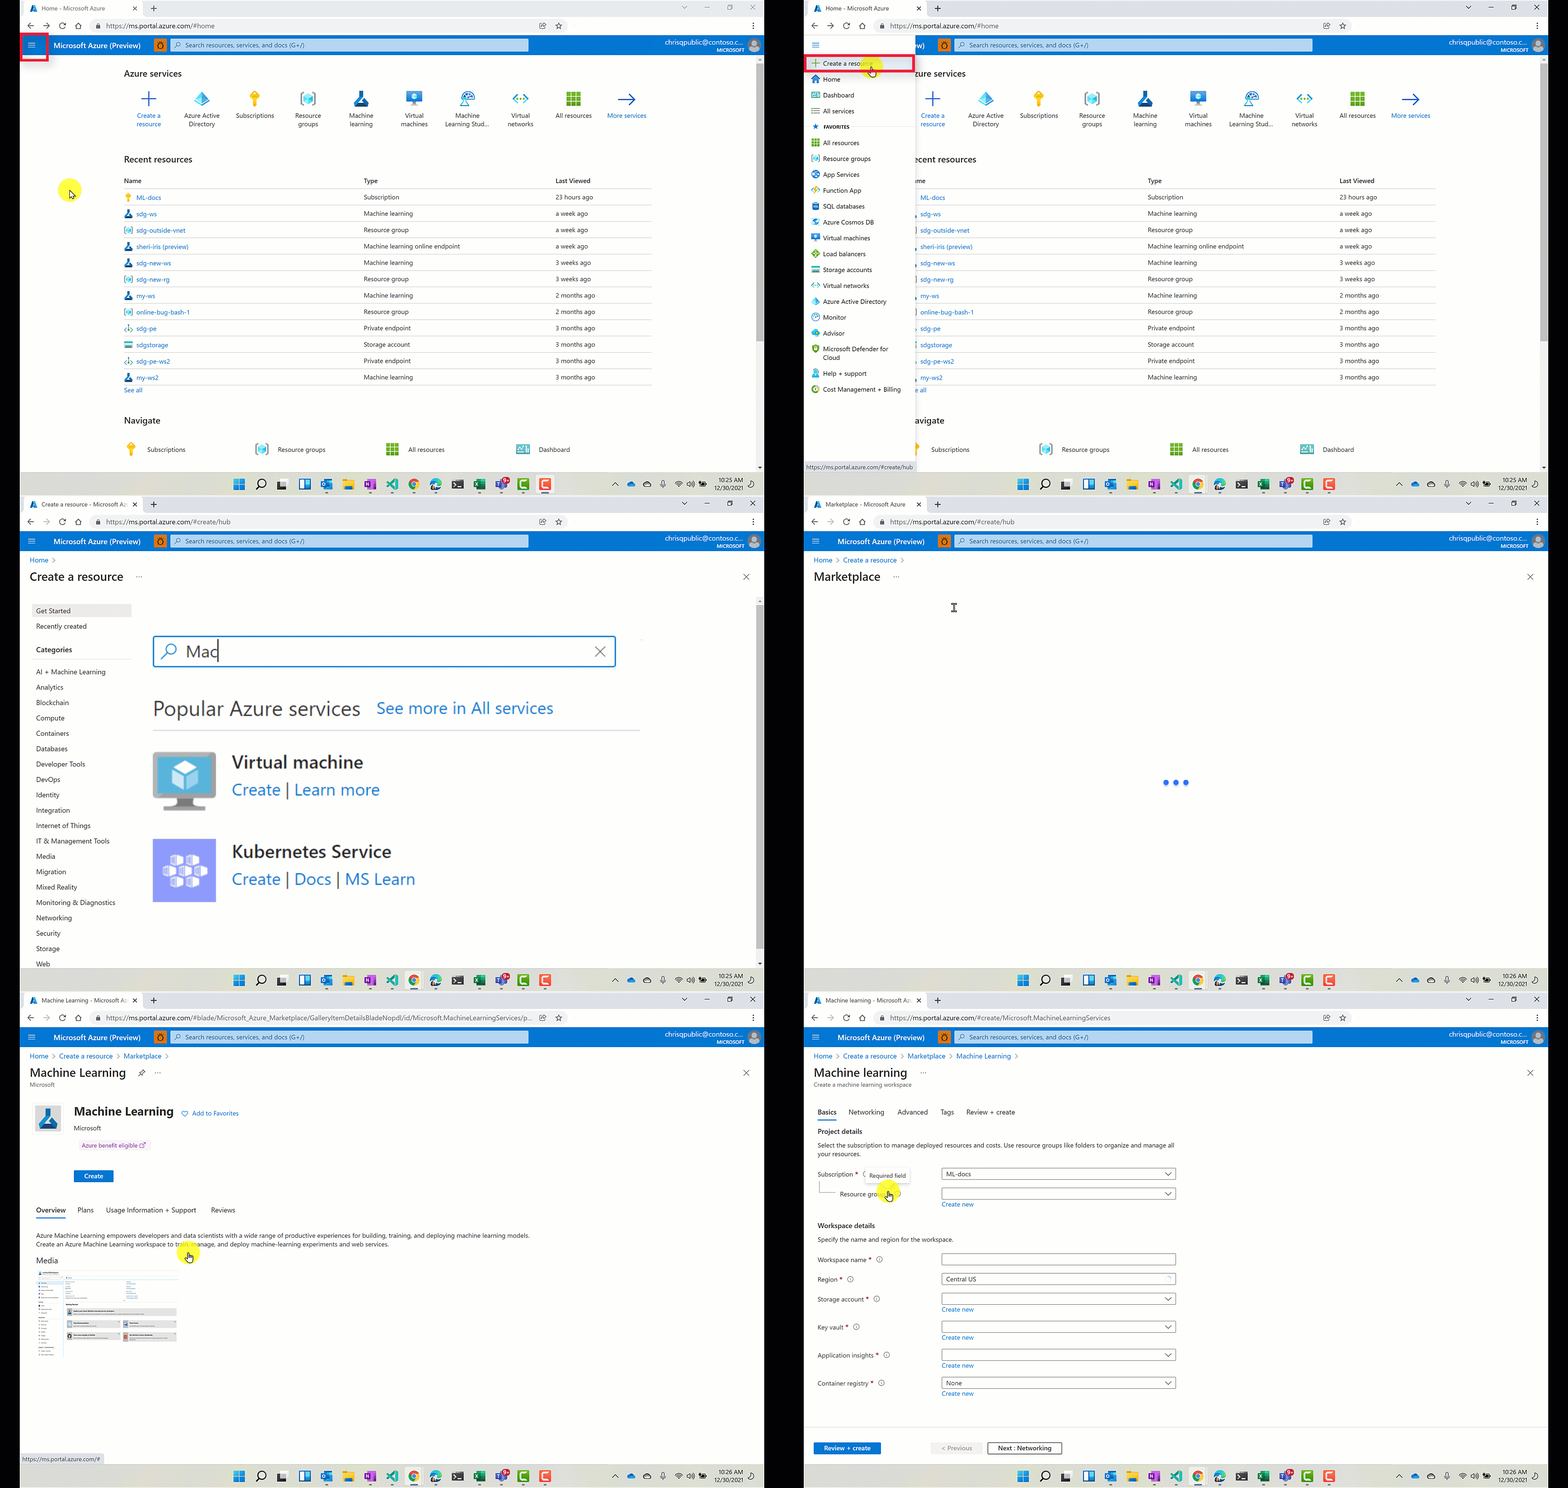
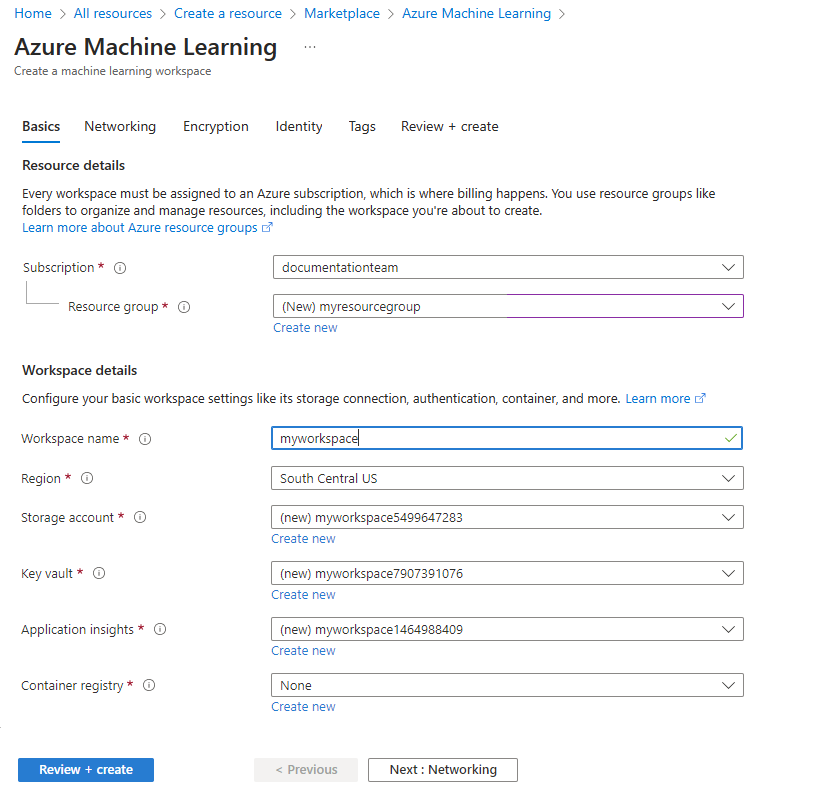
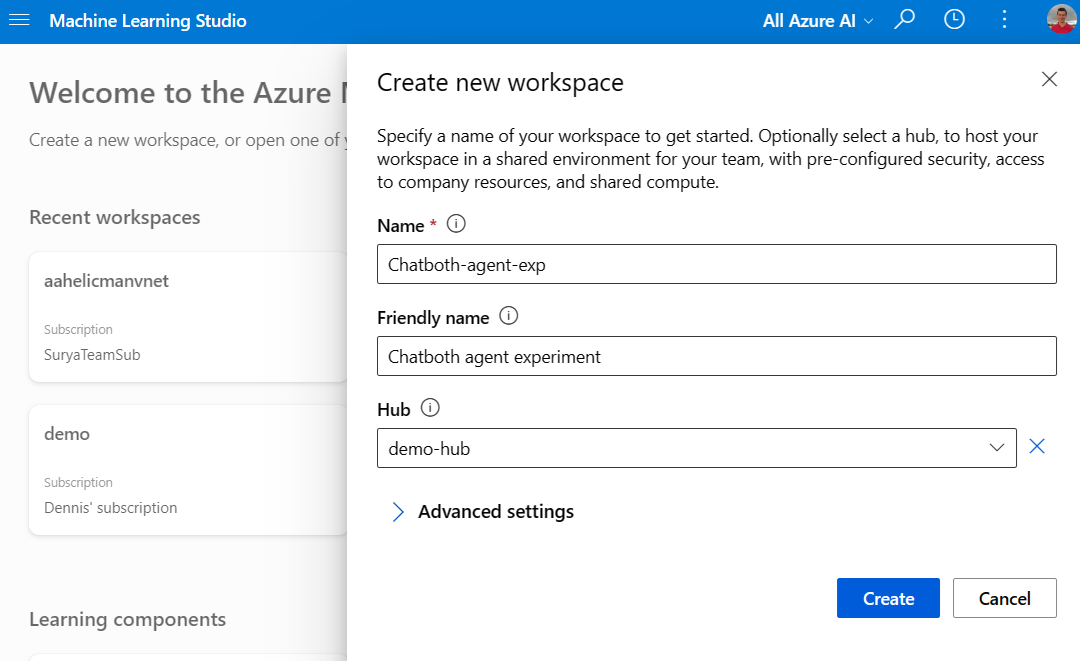
You can create a workspace directly in Azure Machine Learning studio, with limited options available. You can also use one of these methods for more control of options:
APPLIES TO:  Python SDK azure-ai-ml v2 (current)
Basic configuration for getting started Without specification, associated resources and the Azure resource group are created automatically. This code creates a workspace named
myworkspace, dependent Azure resources (Storage account, Key Vault, Container Registry, Application Insights), and a resource group namedmyresourcegroupineastus2.# Creating a unique workspace name with current datetime to avoid conflicts from azure.ai.ml.entities import Workspace import datetime basic_workspace_name = "mlw-basic-prod-" + datetime.datetime.now().strftime( "%Y%m%d%H%M" ) ws_basic = Workspace( name=basic_workspace_name, location="eastus", display_name="Basic workspace-example", description="This example shows how to create a basic workspace", hbi_workspace=False, tags=dict(purpose="demo"), ) ws_basic = ml_client.workspaces.begin_create(ws_basic).result() print(ws_basic)Use existing Azure resources. To bring existing Azure resources, reference them using the Azure resource ID format. Find the specific Azure resource IDs in the Azure portal, or with the SDK. This example assumes that the resource group, Storage account, Key Vault, Application Insights, and Container Registry already exist.
# Creating a unique workspace name with current datetime to avoid conflicts
import datetime
from azure.ai.ml.entities import Workspace

basic_ex_workspace_name = "mlw-basicex-prod-" + datetime.datetime.now().strftime(
    "%Y%m%d%H%M"
)

# Change the following variables to resource ids of your existing storage account, key vault, application insights
# and container registry. Here we reuse the ones we just created for the basic workspace
existing_storage_account = (
    # e.g. "/subscriptions/<SUBSCRIPTION_ID>/resourceGroups/<RESOURCE_GROUP>/providers/Microsoft.Storage/storageAccounts/<STORAGE_ACCOUNT>"
    ws_basic.storage_account
)
existing_container_registry = (
    # e.g. "/subscriptions/<SUBSCRIPTION_ID>/resourceGroups/<RESOURCE_GROUP>/providers/Microsoft.ContainerRegistry/registries/<CONTAINER_REGISTRY>"
    ws_basic.container_registry
)
existing_key_vault = (
    # e.g. "/subscriptions/<SUBSCRIPTION_ID>/resourceGroups/<RESOURCE_GROUP>/providers/Microsoft.KeyVault/vaults/<KEY_VAULT>"
    ws_basic.key_vault
)
existing_application_insights = (
    # e.g. "/subscriptions/<SUBSCRIPTION_ID>/resourceGroups/<RESOURCE_GROUP>/providers/Microsoft.insights/components/<APP_INSIGHTS>"
    ws_basic.application_insights
)

ws_with_existing_resources = Workspace(
    name=basic_ex_workspace_name,
    location="eastus",
    display_name="Bring your own dependent resources-example",
    description="This sample specifies a workspace configuration with existing dependent resources",
    storage_account=existing_storage_account,
    container_registry=existing_container_registry,
    key_vault=existing_key_vault,
    application_insights=existing_application_insights,
    tags=dict(purpose="demonstration"),
)

ws_with_existing_resources = ml_client.begin_create_or_update(
    ws_with_existing_resources
).result()

print(ws_with_existing_resources)
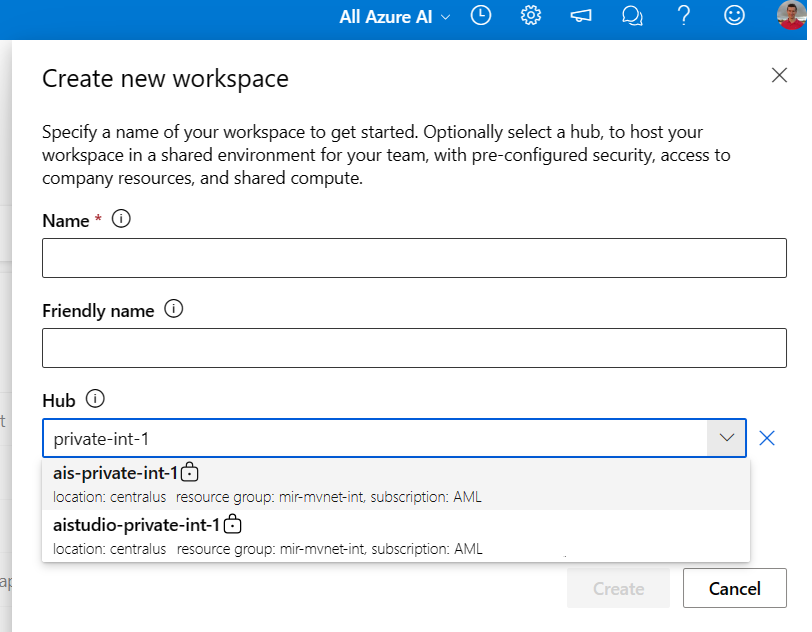
(Preview) Use existing hub workspace. Instead of creating a default workspace with its own security settings and associated resources, you can reuse a hub workspace's shared environment. Your new 'project' workspace will obtain security settings and shared configurations from the hub including compute and connections. This example assumes that the hub workspace already exists.
from azure.ai.ml.entities import Project

my_project_name = "myexampleproject"
my_location = "East US"
my_display_name = "My Example Project"

my_hub = Project(name=my_hub_name,
                 location=my_location,
                 display_name=my_display_name,
                 hub_id=created_hub.id)

created_project_workspace = ml_client.workspaces.begin_create(workspace=my_hub).result()
For more information, see Workspace SDK reference.
If you have problems in accessing your subscription, see Set up authentication for Azure Machine Learning resources and workflows, and the Authentication in Azure Machine Learning notebook.
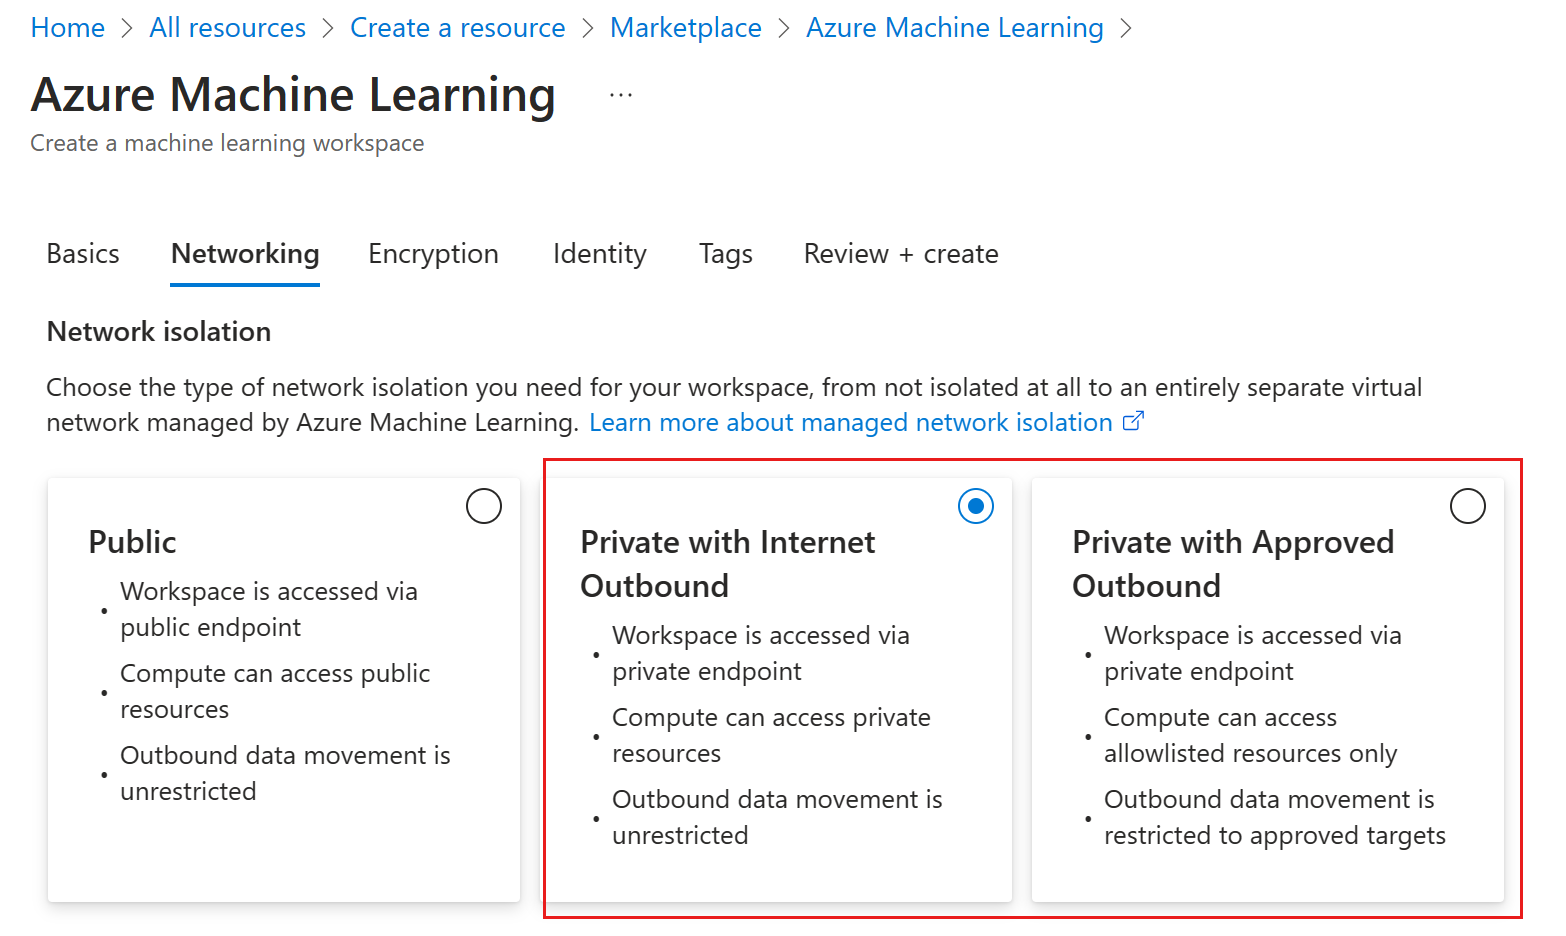
Networking
Important
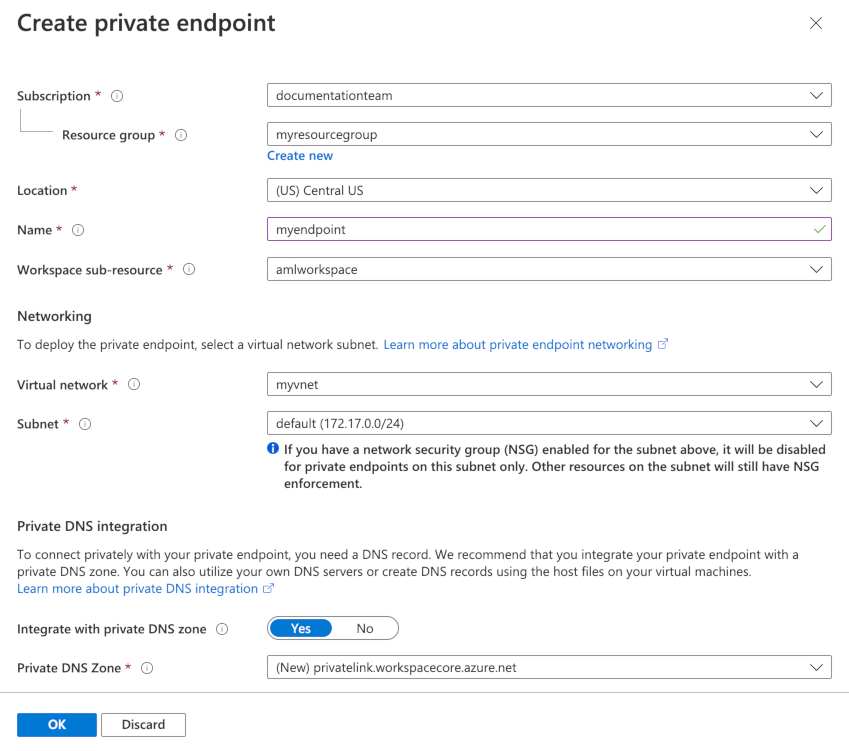
For more information about use of a private endpoint and virtual network with your workspace, see Network isolation and privacy.
APPLIES TO:  Python SDK azure-ai-ml v2 (current)
# Creating a unique workspace name with current datetime to avoid conflicts
import datetime
from azure.ai.ml.entities import Workspace

basic_private_link_workspace_name = (
    "mlw-privatelink-prod-" + datetime.datetime.now().strftime("%Y%m%d%H%M")
)

ws_private = Workspace(
    name=basic_private_link_workspace_name,
    location="eastus",
    display_name="Private Link endpoint workspace-example",
    description="When using private link, you must set the image_build_compute property to a cluster name to use for Docker image environment building. You can also specify whether the workspace should be accessible over the internet.",
    image_build_compute="cpu-compute",
    public_network_access="Disabled",
    tags=dict(purpose="demonstration"),
)

ml_client.workspaces.begin_create(ws_private).result()
This class requires an existing virtual network.
Encryption
By default, an Azure Cosmos DB instance stores the workspace metadata. Microsoft maintains this Cosmos DB instance. Microsoft-managed keys encrypt this data.
Use your own data encryption key
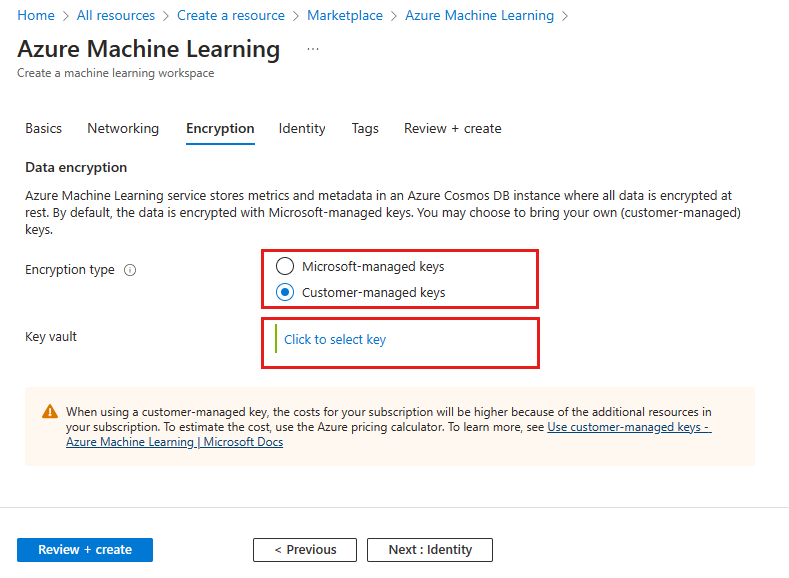
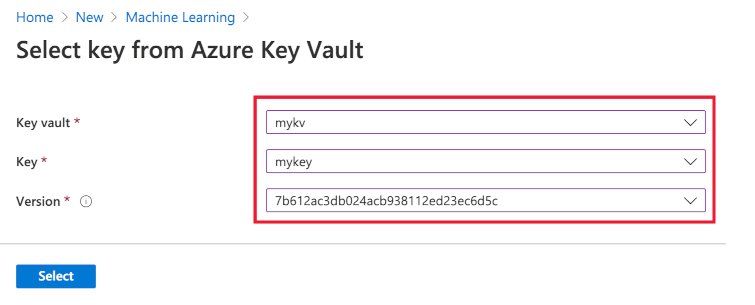
You can provide your own key for data encryption. Providing your own key creates the Azure Cosmos DB instance that stores metadata in your Azure subscription. For more information, see Customer-managed keys.
Use these steps to provide your own key:
Important
Before you follow these steps, you must first perform these actions:
Follow the steps in Configure customer-managed keys to:
- Register the Azure Cosmos DB provider
- Create and configure an Azure Key Vault
- Generate a key
APPLIES TO:  Python SDK azure-ai-ml v2 (current)
from azure.ai.ml.entities import Workspace, CustomerManagedKey

# specify the workspace details
ws = Workspace(
    name="my_workspace",
    location="eastus",
    display_name="My workspace",
    description="This example shows how to create a workspace",
    customer_managed_key=CustomerManagedKey(
        key_vault="/subscriptions/<SUBSCRIPTION_ID>/resourcegroups/<RESOURCE_GROUP>/providers/microsoft.keyvault/vaults/<VAULT_NAME>"
        key_uri="<KEY-IDENTIFIER>"
    )
    tags=dict(purpose="demo")
)

ml_client.workspaces.begin_create(ws)
Identity
In the portal, use the Identity page to configure managed identity, storage account access, and data impact. For the Python SDK, see the links in the following sections.
Managed identity
A workspace can be given either a system assigned identity or a user assigned identity. This identity is used to access resources in your subscription. For more information, see Set up authentication between Azure Machine Learning and other services.
Storage account access
Choose between Credential-based access or Identity-based access when connecting to the default storage account. For identity-based authentication, the Storage Blob Data Contributor role must be granted to the workspace managed identity on the storage account.
Data impact
To limit the data that Microsoft collects on your workspace, select High business impact workspace in the portal, or set hbi_workspace=true in Python. For more information on this setting, see Encryption at rest.
Important
Selecting high business impact can only happen when creating a workspace. You can't change this setting after workspace creation.
Tags
Tags are name/value pairs that enable you to categorize resources and view consolidated billing by applying the same tag to multiple resources and resource groups.
Assign tags for the workspace by entering the name/value pairs. For more information, see Use tags to organize your Azure resources.
Also use tags to [enforce workspace policies)(#enforce-policies).
Download a configuration file
If you run your code on a compute instance, skip this step. The compute instance creates and stores a copy of this file for you.
To use code on your local environment that references this workspace, download the file:
Select your workspace in Azure studio
At the top right, select the workspace name, then select Download config.json
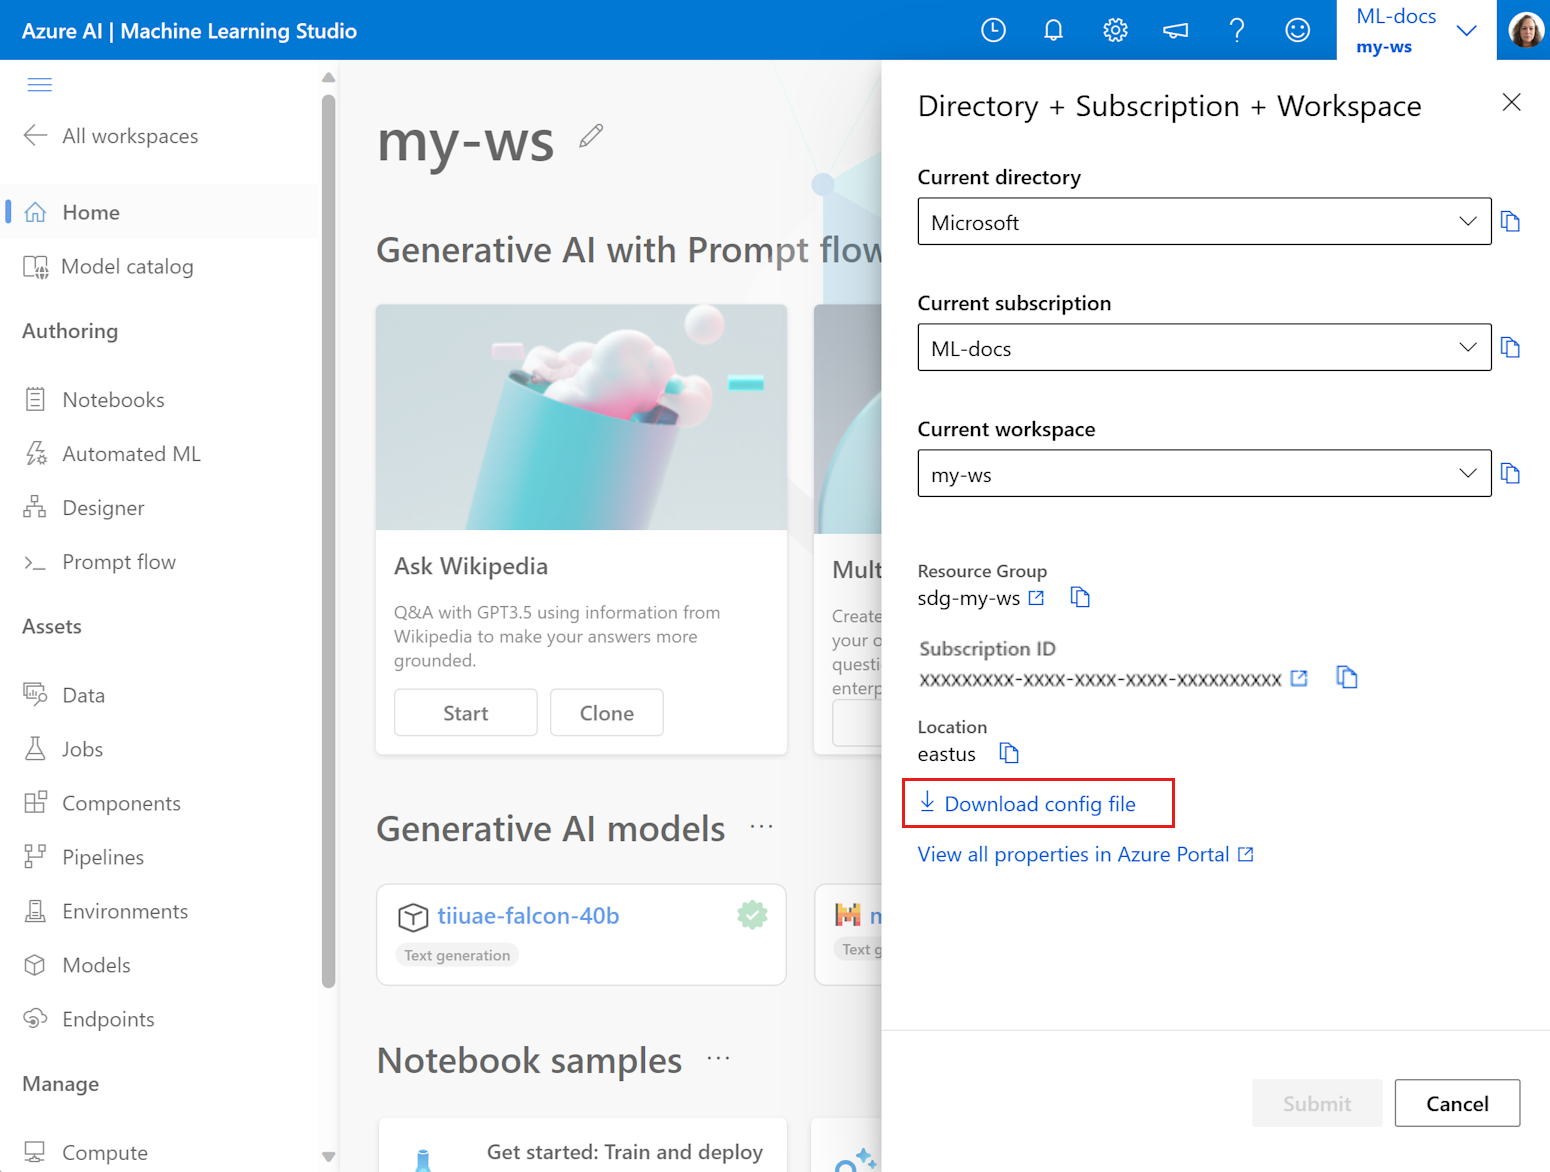
Place the file in the directory structure that holds your Python scripts or Jupyter Notebooks. The same directory, a subdirectory named .azureml, or a parent directory can hold this file. When you create a compute instance, this file is added to the correct directory on the VM for you.
Enforce policies
You can turn on/off these features of a workspace:
- Feedback opportunities in the workspace. Opportunities include occasional in-product surveys and the smile-frown feedback tool in the banner of the workspace.
- Ability to try out preview features in the workspace.
These features are on by default. To turn them off:
When creating the workspace, turn off features from the Tags section:
- Turn off feedback by adding the pair "ADMIN_HIDE_SURVEY: TRUE"
- Turn off previews by adding the pair "AZML_DISABLE_PREVIEW_FEATURE": "TRUE"
For an existing workspace, turn off features from the Tags section:
- Go to workspace resource in the Azure portal
- Open Tags from left navigation panel
- Turn off feedback by adding the pair "ADMIN_HIDE_SURVEY: TRUE"
- Turn off previews by adding the pair "AZML_DISABLE_PREVIEW_FEATURE: TRUE"
- Select Apply.

You can turn off previews at a subscription level, ensuring that it's off for all workspace in the subscription. In this case, users in the subscription also can't access the preview tool before selecting a workspace. This setting is useful for administrators who want to ensure that preview features aren't used in their organization.
If the preview setting is disabled at the subscription level, setting it on individual workspaces is ignored.
To disable preview features at the subscription level:
- Go to subscription resource in the Azure portal
- Open Tags from left navigation panel
- Turn off previews for all workspaces in the subscription by adding the pair "AZML_DISABLE_PREVIEW_FEATURE": "TRUE"
- Select Apply.
Connect to a workspace
When running machine learning tasks with the SDK, you require a MLClient object that specifies the connection to your workspace. You can create an MLClient object from parameters, or with a configuration file.
APPLIES TO:  Python SDK azure-ai-ml v2 (current)
With a configuration file: This code reads the contents of the configuration file to find your workspace. It opens a prompt to sign in if you didn't already authenticate.
from azure.ai.ml import MLClient

# read the config from the current directory
ws_from_config = MLClient.from_config(credential=DefaultAzureCredential())
From parameters: There's no need to have a config.json file available if you use this approach.
from azure.ai.ml import MLClient
from azure.ai.ml.entities import Workspace
from azure.identity import DefaultAzureCredential

ws = MLClient(
    DefaultAzureCredential(),
    subscription_id="<SUBSCRIPTION_ID>",
    resource_group_name="<RESOURCE_GROUP>",
    workspace_name="<AML_WORKSPACE_NAME>",
)
print(ws)
If you have problems in accessing your subscription, see Set up authentication for Azure Machine Learning resources and workflows, and the Authentication in Azure Machine Learning notebook.
Find a workspace
See a list of all the workspaces you have available. You can also search for a workspace inside Studio. See Search for Azure Machine Learning assets (preview).
APPLIES TO:  Python SDK azure-ai-ml v2 (current)
from azure.ai.ml import MLClient
from azure.ai.ml.entities import Workspace
from azure.identity import DefaultAzureCredential

# Enter details of your subscription
subscription_id = "<SUBSCRIPTION_ID>"
resource_group = "<RESOURCE_GROUP>"

my_ml_client = MLClient(DefaultAzureCredential(), subscription_id, resource_group)
for ws in my_ml_client.workspaces.list():
print(ws.name, ":", ws.location, ":", ws.description)To obtain specific workspace details:
ws = my_ml_client.workspaces.get("<AML_WORKSPACE_NAME>")
# uncomment this line after providing a workspace name above
# print(ws.location,":", ws.resource_group)Delete a workspace
When you no longer need a workspace, delete it.
Warning
If soft-delete is enabled for the workspace, it can be recovered after deletion. If soft-delete isn't enabled, or you select the option to permanently delete the workspace, it can't be recovered. For more information, see Recover a deleted workspace.
Tip
The default behavior for Azure Machine Learning is to soft delete the workspace. This means that the workspace is not immediately deleted, but instead is marked for deletion. For more information, see Soft delete.
APPLIES TO:  Python SDK azure-ai-ml v2 (current)
ml_client.workspaces.begin_delete(name=ws_basic.name, delete_dependent_resources=True)
The default action doesn't automatically delete resources associated with the workspace. Set delete_dependent_resources to True to delete these resources as well.
- container registry
- storage account
- key vault
- application insights
Clean up resources
Important
The resources that you created can be used as prerequisites to other Azure Machine Learning tutorials and how-to articles.
If you don't plan to use any of the resources that you created, delete them so you don't incur any charges:
In the Azure portal, in the search box, enter Resource groups and select it from the results.
From the list, select the resource group that you created.
In the Overview page, select Delete resource group.
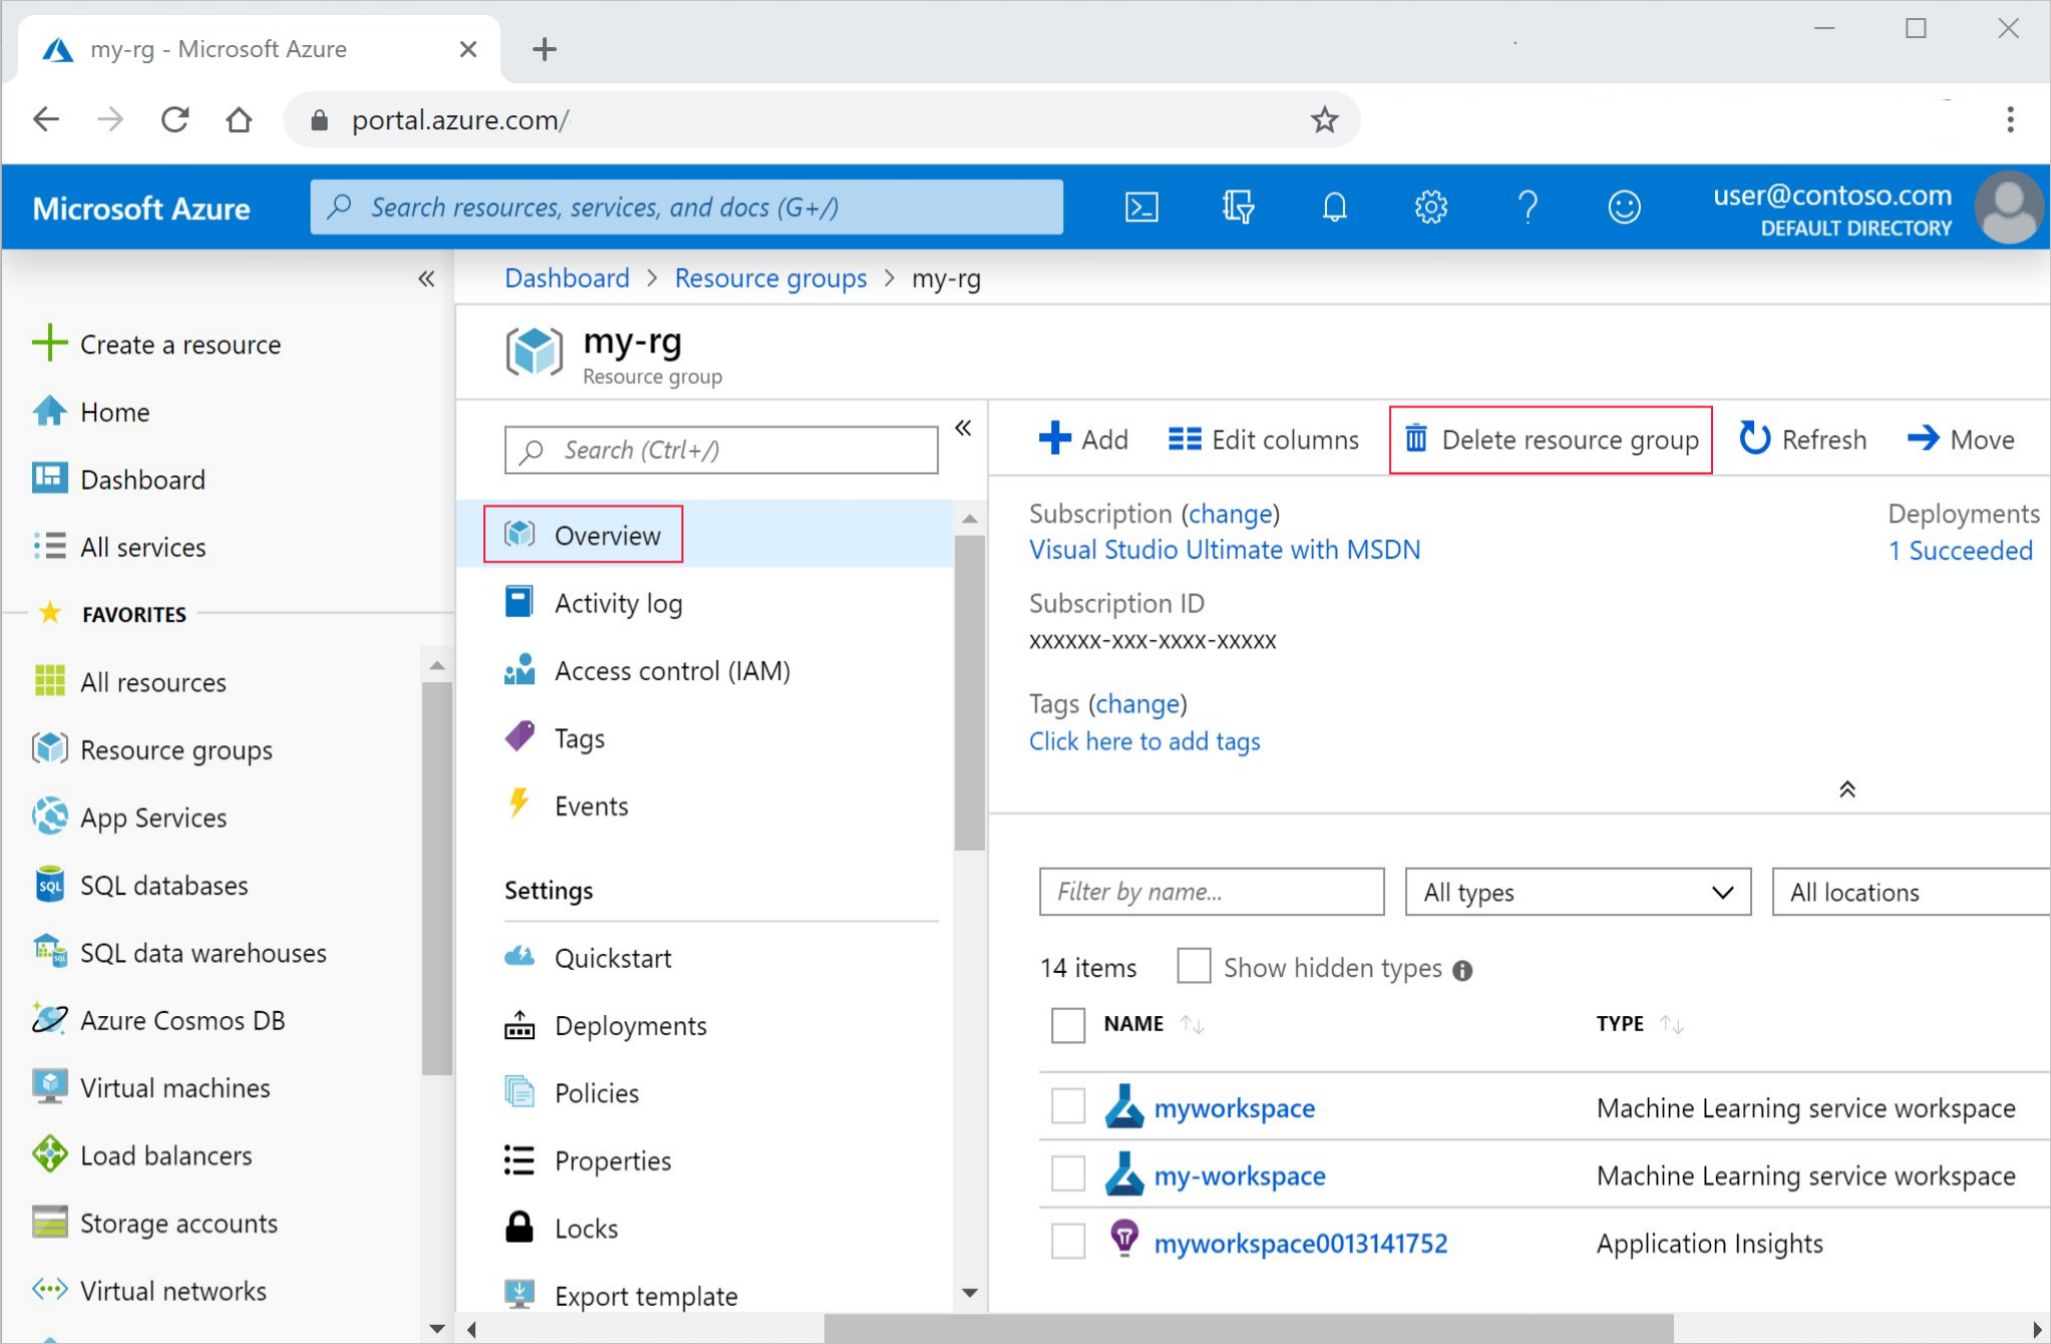
Enter the resource group name. Then select Delete.
Troubleshooting
Supported browsers in Azure Machine Learning studio: We suggest that you use the most up-to-date browser that's compatible with your operating system. These browsers are supported:
- Microsoft Edge (The new Microsoft Edge, latest version. Note: Microsoft Edge legacy isn't supported)
- Safari (latest version, Mac only)
- Chrome (latest version)
- Firefox (latest version)
Azure portal:
- If you go directly to your workspace from a share link from the SDK or the Azure portal, you can't view the standard Overview page that has subscription information in the extension. Additionally, in this scenario, you can't switch to another workspace. To view another workspace, go directly to Azure Machine Learning studio and search for the workspace name.
- All assets (Data, Experiments, Computes, and so on) are only available in Azure Machine Learning studio. The Azure portal doesn't* offer them.
- Attempting to export a template for a workspace from the Azure portal might return an error similar to this text:
Could not get resource of the type <type>. Resources of this type will not be exported.As a workaround, use one of the templates provided at https://github.com/Azure/azure-quickstart-templates/tree/master/quickstarts/microsoft.machinelearningservices as the basis for your template.
Workspace diagnostics
You can run diagnostics on your workspace from Azure Machine Learning studio or the Python SDK. After diagnostics run, a list of any detected problems is returned. This list includes links to possible solutions. For more information, see How to use workspace diagnostics.
Resource provider errors
When creating an Azure Machine Learning workspace, or a resource used by the workspace, you may receive an error similar to the following messages:
No registered resource provider found for location {location}The subscription is not registered to use namespace {resource-provider-namespace}
Most resource providers are automatically registered, but not all. If you receive this message, you need to register the provider mentioned.
The following table contains a list of the resource providers required by Azure Machine Learning:
| Resource provider | Why it's needed |
|---|---|
| Microsoft.MachineLearningServices | Creating the Azure Machine Learning workspace. |
| Microsoft.Storage | Azure Storage Account is used as the default storage for the workspace. |
| Microsoft.ContainerRegistry | Azure Container Registry is used by the workspace to build Docker images. |
| Microsoft.KeyVault | Azure Key Vault is used by the workspace to store secrets. |
| Microsoft.Notebooks | Integrated notebooks on Azure Machine Learning compute instance. |
| Microsoft.ContainerService | If you plan on deploying trained models to Azure Kubernetes Services. |
If you plan on using a customer-managed key with Azure Machine Learning, then the following service providers must be registered:
| Resource provider | Why it's needed |
|---|---|
| Microsoft.DocumentDB | Azure CosmosDB instance that logs metadata for the workspace. |
| Microsoft.Search | Azure Search provides indexing capabilities for the workspace. |
If you plan on using a managed virtual network with Azure Machine Learning, then the Microsoft.Network resource provider must be registered. This resource provider is used by the workspace when creating private endpoints for the managed virtual network.
For information on registering resource providers, see Resolve errors for resource provider registration.
Deleting the Azure Container Registry
The Azure Machine Learning workspace uses the Azure Container Registry (ACR) for some operations. It automatically creates an ACR instance when it first needs one.
Warning
Once an Azure Container Registry is created for a workspace, don't delete it. Doing so breaks your Azure Machine Learning workspace.
Examples
Examples in this article come from workspace.ipynb.
Next steps
Once you have a workspace, learn how to Train and deploy a model.
To learn more about planning a workspace for your organization's requirements, visit Organize and set up Azure Machine Learning.
- If you need to move a workspace to another Azure subscription, visit How to move a workspace.
For information on how to keep your Azure Machine Learning up to date with the latest security updates, visit Vulnerability management.
