Note
Access to this page requires authorization. You can try signing in or changing directories.
Access to this page requires authorization. You can try changing directories.
In this tutorial, you learn to write a basic quantum program in Q# that leverages the nature of quantum mechanics to produce a random number.
In this tutorial, you will:
- Create a Q# program.
- Review the main components of a Q# program.
- Define the logic of a problem.
- Combine classical and quantum operations to solve a problem.
- Work with qubits and superposition to build a quantum random number generator.
Tip
If you want to accelerate your quantum computing journey, check out Code with Azure Quantum, a unique feature of the Azure Quantum website. Here, you can run built-in Q# samples or your own Q# programs, generate new Q# code from your prompts, open and run your code in VS Code for the Web with one click, and ask Copilot any questions about quantum computing.
Prerequisites
To run the code sample in the Copilot in Azure Quantum:
- A Microsoft (MSA) email account.
To develop and run the code sample in Visual Studio Code:
The latest version of Visual Studio Code or open VS Code on the Web.
The latest version of the Azure Quantum Development Kit extension. For installation details, see Set up the QDK extension.
If you want to use Jupyter Notebooks, you also need to install Python, and Jupyter extensions, and the latest
qsharpPython package. To do so, open a terminal and run the following command:$ pip install --upgrade qsharp
Define the problem
Classical computers don't produce random numbers, but rather pseudorandom numbers. A pseudorandom number generator generates a deterministic sequence of numbers based on some initial value, called a seed. To better approximate random values, this seed is often the current time from the CPU's clock.
Quantum computers, on the other hand, can generate truly random numbers. This is because the measurement of a qubit in superposition is a probabilistic process. The result of the measurement is random, and there's no way to predict the outcome. This is the basic principle of quantum random number generators.
A qubit is a unit of quantum information that can be in superposition. When measured, a qubit can only be either in the 0 state or in the 1 state. However, before measurement, the state of the qubit represents the probability of reading either a 0 or a 1 with a measurement.
You start by taking a qubit in a basis state, for example zero. The first step of the random number generator is to use a Hadamard operation to put the qubit into an equal superposition. The measurement of this state results in a zero or a one with 50% probability of each outcome, a truly random bit.
There's no way of knowing what you will get after the measurement of the qubit in superposition, and the result is a different value each time the code is invoked. But how can you use this behavior to generate larger random numbers?
Let's say you repeat the process four times, generating this sequence of binary digits:
$${0, 1, 1, 0}$$
If you concatenate, or combine, these bits into a bit string, you can form a larger number. In this example, the bit sequence ${0110}$ is equivalent to six in decimal.
$${0110_{\ binary} \equiv 6_{\ decimal}}$$
If you repeat this process many times, you can combine multiple bits to form any large number. Using this method, you can create a number to use as a secure password, since you can be sure that no hacker could determine the results of the sequence of measurements.
Define the random number generator logic
Let's outline what the logic of a random number generator should be:
- Define
maxas the maximum number you want to generate. - Define the number of random bits that you need to generate. This is done by calculating how many bits,
nBits, you need to express integers up tomax. - Generate a random bit string that's
nBitsin length. - If the bit string represents a number greater than
max, go back to step three. - Otherwise, the process is complete. Return the generated number as an integer.
As an example, let's set max to 12. That is, 12 is the largest number you want to use as a password.
You need ${\lfloor ln(12) / ln(2) + 1 \rfloor}$, or 4 bits to represent a number between 0 and 12. We can use the built-in function BitSizeI, which takes any integer and returns the number of bits required to represent it.
Let's say you generate the bit string ${1101_{\ binary}}$, which is equivalent to ${13_{\ decimal}}$. Because 13 is greater than 12, you repeat the process.
Next, you generate the bit string ${0110_{\ binary}}$, which is equivalent to ${6_{\ decimal}}$. Because 6 is less than 12, the process is complete.
The quantum random number generator will return number 6 as your password. In practice, set a larger number as the maximum because lower numbers are easy to crack by just trying all possible passwords. In fact, to increase the difficulty of guessing or cracking your password, you could use ASCII code to convert binary to text and to generate a password by using numbers, symbols, and mixed-case letters.
Write a random bit generator
The first step is to write a Q# operation that generates a random bit. This operation will be one of the building blocks of the random number generator.
operation GenerateRandomBit() : Result {
    // Allocate a qubit.
    use q = Qubit();

    // Set the qubit into superposition of 0 and 1 using the Hadamard
    H(q);

    // At this point the qubit `q` has 50% chance of being measured in the
    // |0〉 state and 50% chance of being measured in the |1〉 state.
    // Measure the qubit value using the `M` operation, and store the
    // measurement value in the `result` variable.
    let result = M(q);

    // Reset qubit to the |0〉 state.
    // Qubits must be in the |0〉 state by the time they are released.
    Reset(q);

    // Return the result of the measurement.
    return result;
}
Now take a look at new code.
- You define the
GenerateRandomBitoperation, which takes no input and produces a value of typeResult. TheResulttype represents the result of a measurement and can have two possible values:ZeroorOne. - You allocate a single qubit with the
usekeyword. When it gets allocated, a qubit is always in the |0〉 state. - You use the
Hoperation to place the qubit in an equal superposition. - You use the
Moperation to measure the qubit, return the measured value (ZeroorOne). - You use the
Resetoperation to reset the qubit to the |0〉 state.
By putting the qubit in superposition with the H operation and measuring it with the M operation, the result is a different value each time the code is invoked.
Visualize the Q# code with the Bloch sphere
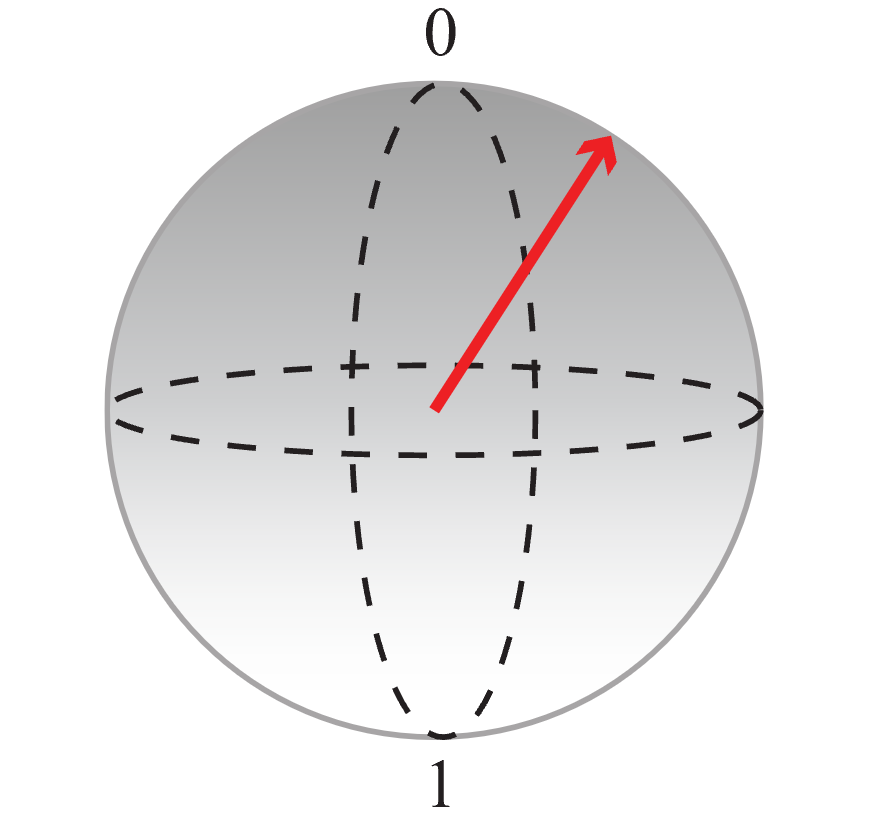
In the Bloch sphere, the north pole represents the classical value 0 and the south pole represents the classical value 1. Any superposition can be represented by a point on the sphere (represented by an arrow). The closer the end of the arrow to a pole the higher the probability the qubit collapses into the classical value assigned to that pole when measured. For example, the qubit state represented by the arrow in the following figure has a higher probability of giving the value 0 if you measure it.
You can use this representation to visualize what the code is doing:
First, start with a qubit initialized in the |0〉 state and apply an
Hoperation to create an equal superposition in which the probabilities for 0 and 1 are the same.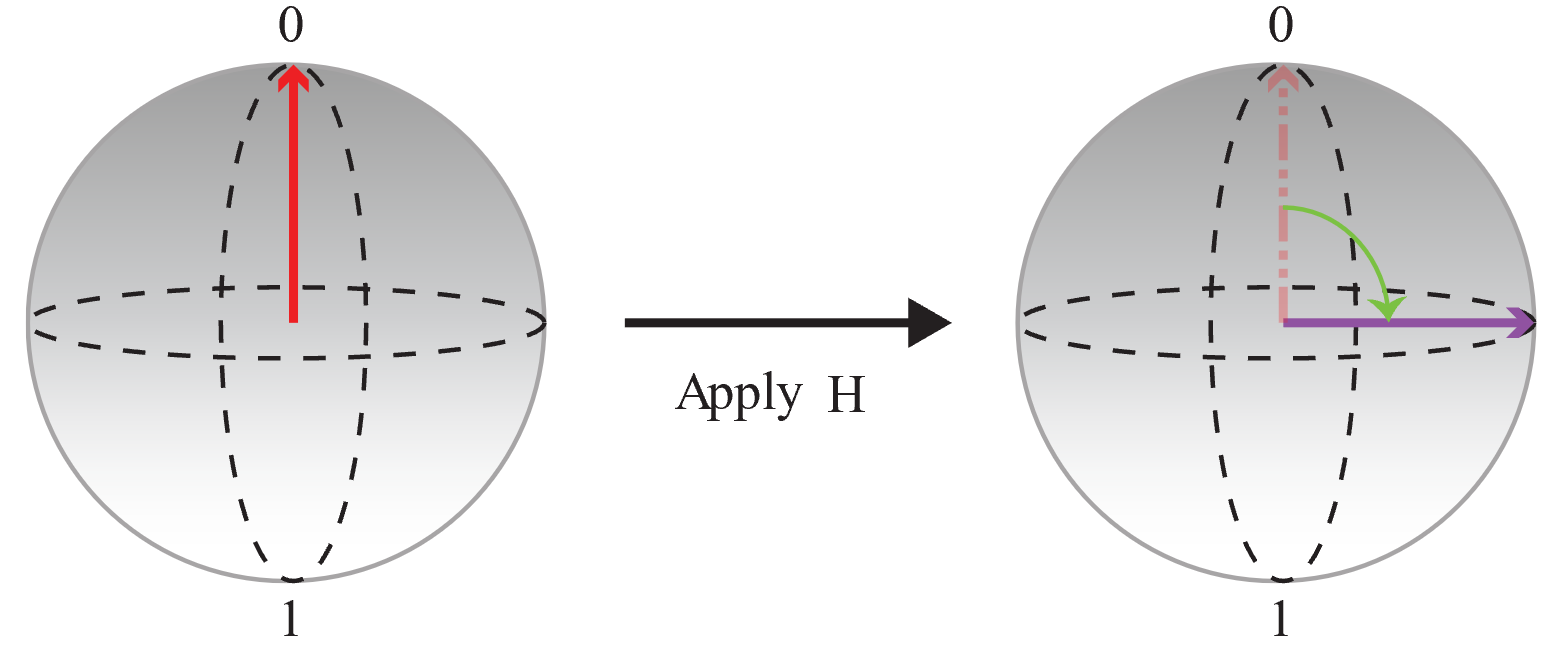
Then measure the qubit and save the output:
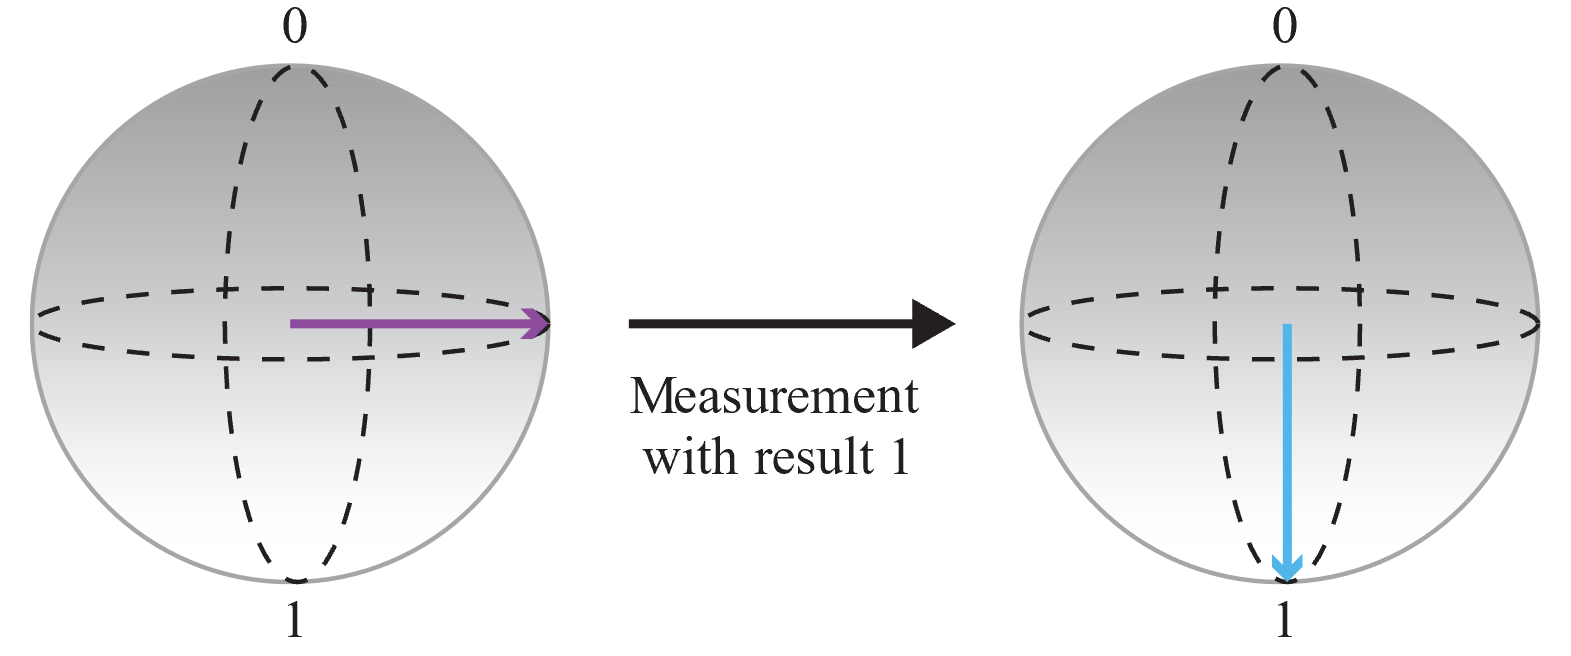
Since the outcome of the measurement is random and the probabilities of measuring 0 and 1 are the same, you have obtained a completely random bit. You can call this operation several times to create integers. For example, if you call the operation three times to obtain three random bits, you can build random 3-bit numbers (that is, a random number between 0 and 7).
Write a complete random number generator
First, you need to import the required namespaces from the Q# standard library to the program. The Q# compiler loads many common functions and operations automatically, however for the complete random number generator, you need some additional functions and operations from two Q# namespaces:
Microsoft.Quantum.MathandMicrosoft.Quantum.Convert.import Microsoft.Quantum.Convert.*; import Microsoft.Quantum.Math.*;Next, you define the
GenerateRandomNumberInRangeoperation. This operation repeatedly calls theGenerateRandomBitoperation to build a string of bits./// Generates a random number between 0 and `max`. operation GenerateRandomNumberInRange(max : Int) : Int { // Determine the number of bits needed to represent `max` and store it // in the `nBits` variable. Then generate `nBits` random bits which will // represent the generated random number. mutable bits = []; let nBits = BitSizeI(max); for idxBit in 1..nBits { bits += [GenerateRandomBit()]; } let sample = ResultArrayAsInt(bits); // Return random number if it is within the requested range. // Generate it again if it is outside the range. return sample > max ? GenerateRandomNumberInRange(max) | sample; }Let's take a moment to review the new code.
- You need to calculate the number of bits needed to express integers up to
max. TheBitSizeIfunction from theMicrosoft.Quantum.Mathnamespace converts an integer to the number of bits needed to represent it. - The
SampleRandomNumberInRangeoperation uses aforloop to generate random numbers until it generates one that's equal to or less thanmax. Theforloop works exactly the same as aforloop in other programming languages. - The variable
bitsis a mutable variable. A mutable variable is one that can change during the computation. You use thesetdirective to change a mutable variable's value. - The
ResultArrayAsIntfunction, from the defaultMicrosoft.Quantum.Convertnamespace, converts the bit string to a positive integer.
- You need to calculate the number of bits needed to express integers up to
Finally, you add an entry point to the program. By default, the Q# compiler looks for a
Mainoperation and starts processing there. It calls theGenerateRandomNumberInRangeoperation to generate a random number between 0 and 100.operation Main() : Int { let max = 100; Message($"Sampling a random number between 0 and {max}: "); // Generate random number in the 0..max range. return GenerateRandomNumberInRange(max); }The
letdirective declares variables that don't change during the computation. Here you define the maximum value as 100.For more information about the
Mainoperation, see Entry Points.The complete code for the random number generator is as follows:
import Microsoft.Quantum.Convert.*;
import Microsoft.Quantum.Math.*;
operation Main() : Int {
let max = 100;
Message($"Sampling a random number between 0 and {max}: ");
// Generate random number in the 0..max range.
return GenerateRandomNumberInRange(max);
}
/// Generates a random number between 0 and `max`.
operation GenerateRandomNumberInRange(max : Int) : Int {
    // Determine the number of bits needed to represent `max` and store it
    // in the `nBits` variable. Then generate `nBits` random bits which will
    // represent the generated random number.
    mutable bits = [];
    let nBits = BitSizeI(max);
    for idxBit in 1..nBits {
        bits += [GenerateRandomBit()];
    }
    let sample = ResultArrayAsInt(bits);

    // Return random number if it is within the requested range.
    // Generate it again if it is outside the range.
    return sample > max ? GenerateRandomNumberInRange(max) | sample;
}
operation GenerateRandomBit() : Result {
// Allocate a qubit.
use q = Qubit();
// Set the qubit into superposition of 0 and 1 using a Hadamard operation
H(q);
// At this point the qubit `q` has 50% chance of being measured in the
// |0〉 state and 50% chance of being measured in the |1〉 state.
// Measure the qubit value using the `M` operation, and store the
// measurement value in the `result` variable.
let result = M(q);
// Reset qubit to the |0〉 state.
// Qubits must be in the |0〉 state by the time they are released.
Reset(q);
// Return the result of the measurement.
return result;
}
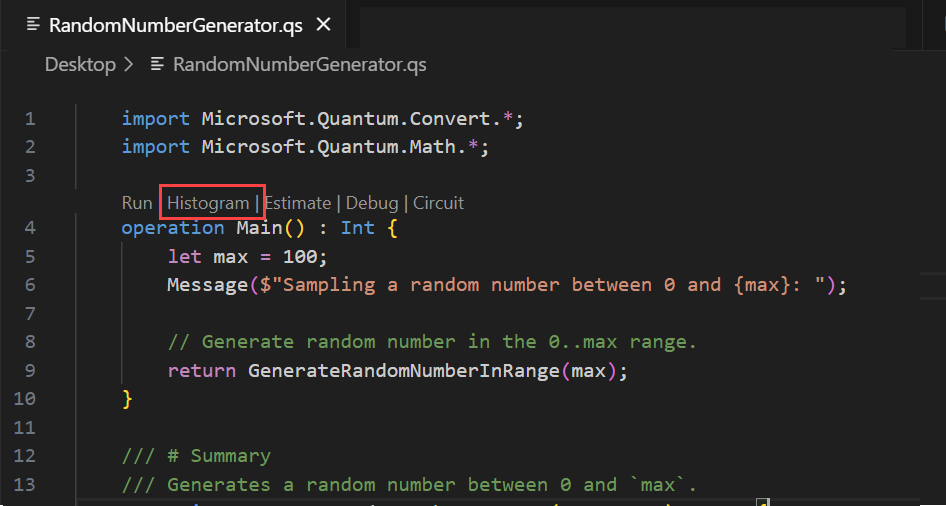
Run the random number generator program
You can run the program in the Copilot in Azure Quantum, and in Visual Studio Code as a standalone Q# application or using a Python host program.
You can test your Q# code with the Copilot in Azure Quantum free of charge - all you need is a Microsoft (MSA) email account. For more information about the Copilot in Azure Quantum, see Explore Azure Quantum.
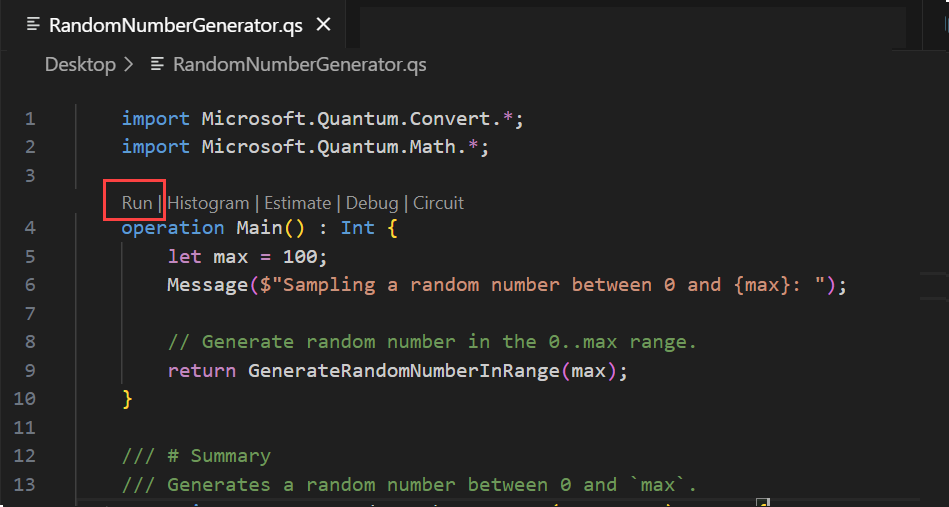
Open the Copilot in Azure Quantum in your browser.
Copy and paste the following code into the code editor.
import Microsoft.Quantum.Convert.*;
import Microsoft.Quantum.Math.*;

operation Main() : Int {
    let max = 100;
    Message($"Sampling a random number between 0 and {max}: ");

    // Generate random number in the 0..max range.
    return GenerateRandomNumberInRange(max);
}

/// # Summary
/// Generates a random number between 0 and `max`.
operation GenerateRandomNumberInRange(max : Int) : Int {
    // Determine the number of bits needed to represent `max` and store it
    // in the `nBits` variable. Then generate `nBits` random bits which will
    // represent the generated random number.
    mutable bits = [];
    let nBits = BitSizeI(max);
    for idxBit in 1..nBits {
        bits += [GenerateRandomBit()];
    }
    let sample = ResultArrayAsInt(bits);

    // Return random number if it is within the requested range.
    // Generate it again if it is outside the range.
    return sample > max ? GenerateRandomNumberInRange(max) | sample;
}

/// # Summary
/// Generates a random bit.
operation GenerateRandomBit() : Result {
    // Allocate a qubit.
    use q = Qubit();

    // Set the qubit into superposition of 0 and 1 using the Hadamard
    // operation `H`.
    H(q);

    // At this point the qubit `q` has 50% chance of being measured in the
    // |0〉 state and 50% chance of being measured in the |1〉 state.
    // Measure the qubit value using the `M` operation, and store the
    // measurement value in the `result` variable.
    let result = M(q);

    // Reset qubit to the |0〉 state.
    // Qubits must be in the |0〉 state by the time they are released.
    Reset(q);

    // Return the result of the measurement.
    return result;

    // Note that Qubit `q` is automatically released at the end of the block.
}
Select the number of shots to run, and select Run.
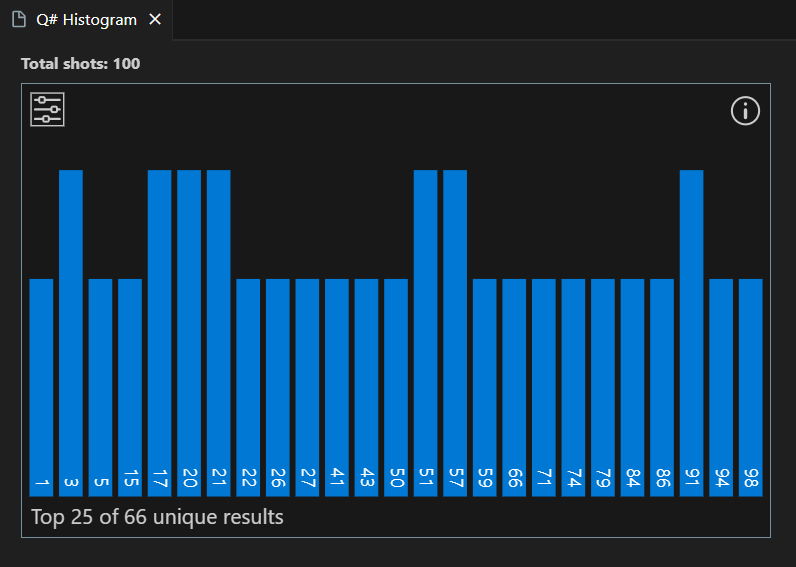
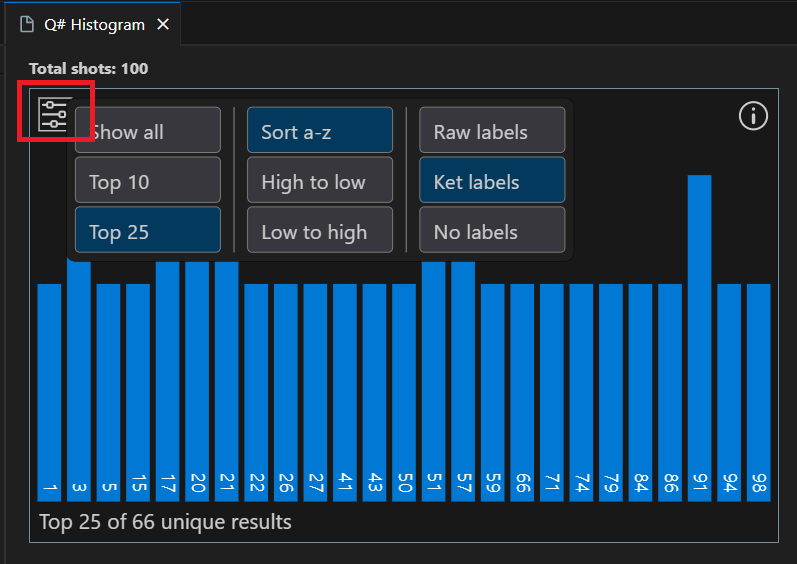
The results are displayed in the histogram and in the Results fields.
Select Explain code to prompt Copilot to explain the code to you.
Tip
From Copilot in Azure Quantum, you can open your program in VS Code for the Web by selecting the VS Code logo button in the right-hand corner of the code editor.
Note
This code snippet does not currently run on any available Azure Quantum hardware targets, as the callable ResultArrayAsInt requires a QPU with full computation profile.
Related content
Explore other Q# tutorials:
- Quantum entanglement shows how to write a Q# program that manipulates and measures qubits and demonstrates the effects of superposition and entanglement.
- Grover's search algorithm shows how to write a Q# program that uses Grover's search algorithm.
- Quantum Fourier Transforms explores how to write a Q# program that directly addresses specific qubits.
- The Quantum Katas are self-paced tutorials and programming exercises aimed at teaching the elements of quantum computing and Q# programming at the same time.