Authentication and authorization to Azure Spatial Anchors
In this article, you'll learn the various ways you can authenticate to Azure Spatial Anchors from your app or web service. You'll also learn about the ways you can use Azure role-based access control (Azure RBAC) in Microsoft Entra ID to control access to your Spatial Anchors accounts.
Warning
We recommend that you use account keys for quick onboarding, but only during development/prototyping. We don't recommend that you ship your application to production with an embedded account key in it. Instead, use the user-based or service-based Microsoft Entra authentication approaches described next.
Overview
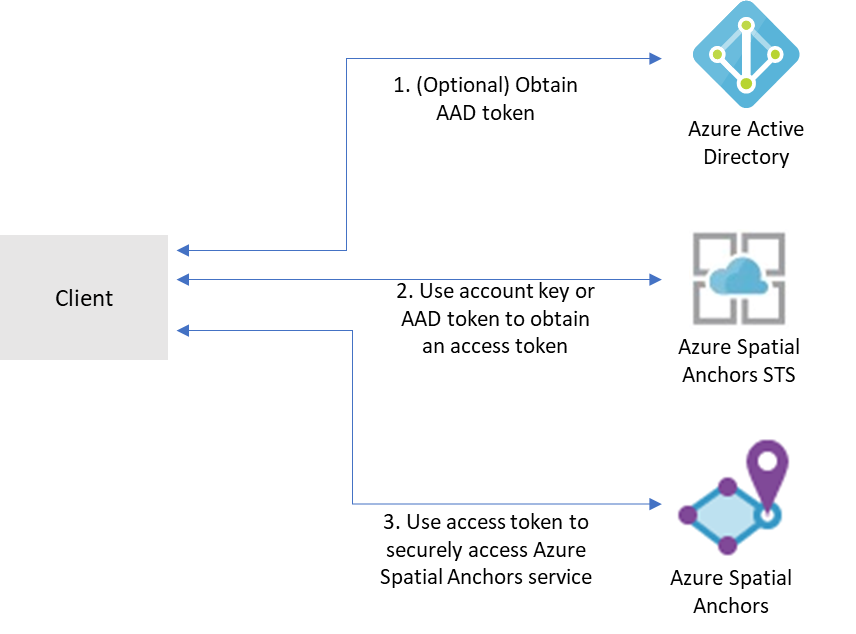
To access a given Azure Spatial Anchors account, clients need to first obtain an access token from Azure Mixed Reality Security Token Service (STS). Tokens obtained from STS have a lifetime of 24 hours. They contain information that Spatial Anchors services use to make authorization decisions on the account and ensure that only authorized principals can access the account.
Access tokens can be obtained in exchange for either account keys or tokens issued by Microsoft Entra ID.
Account keys enable you to get started quickly with using the Azure Spatial Anchors service. But before you deploy your application to production, we recommend that you update your app to use Microsoft Entra authentication.
You can obtain Microsoft Entra authentication tokens in two ways:
- If you're building an enterprise application and your company is using Microsoft Entra ID as its identity system, you can use user-based Microsoft Entra authentication in your app. You then grant access to your Spatial Anchors accounts by using your existing Microsoft Entra security groups. You can also grant access directly to users in your organization.
- Otherwise, we recommend that you obtain Microsoft Entra tokens from a web service that supports your app. We recommend this method for production applications because it allows you to avoid embedding the credentials for access to Azure Spatial Anchors in your client application.
Account keys
The easiest way to get started is to use account keys for access to your Azure Spatial Anchors account. You can get your account keys on the Azure portal. Go to your account and select the Keys tab:
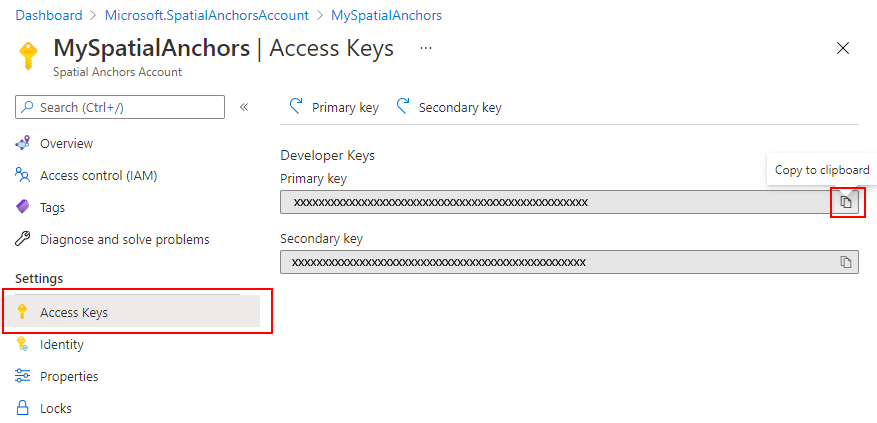
Two keys are available. Both are simultaneously valid for access to the Spatial Anchors account. We recommend that you regularly update the key you use to access the account. Having two separate valid keys enables these updates without downtime. You only have to update the primary key and the secondary key alternatively.
The SDK has built-in support for authentication via account keys. You just need to set the AccountKey property on your cloudSession object:
this.cloudSession.Configuration.AccountKey = @"MyAccountKey";
After you set that property, the SDK will handle the exchange of the account key for an access token and the necessary caching of tokens for your app.
Microsoft Entra user authentication
For applications that target Microsoft Entra users, we recommend that you use a Microsoft Entra token for the user. You can obtain this token by using the MSAL. Follow the steps in the quickstart on registering an app, which include:
In the Azure portal
Register your application in Microsoft Entra ID as a native application. As part of registering, you'll need to determine whether your application should be multitenant. You'll also need to provide the redirect URLs allowed for your application.
Go to the API permissions tab.
Select Add a permission.
- Select Mixed Reality Resource Provider on the APIs my organization uses tab.
- Select Delegated permissions.
- Select mixedreality.signin under mixedreality.
- Select Add permissions.
Select Grant admin consent.
Assign an ASA RBAC role to the application or users that you want to give access to your resource. If you want your application's users to have different roles against the ASA account, register multiple applications in Microsoft Entra ID and assign a separate role to each one. Then implement your authorization logic to use the right role for your users. For detailed role assignment steps, see Assign Azure roles using the Azure portal.
In your code
- Be sure to use the application ID and redirect URI of your own Microsoft Entra application for the client ID and RedirectUri parameters in MSAL.
- Set the tenant information:
- If your application supports My organization only, replace this value with your Tenant ID or Tenant name. For example, contoso.microsoft.com.
- If your application supports Accounts in any organizational directory, replace this value with Organizations.
- If your application supports All Microsoft account users, replace this value with Common.
- On your token request, set the scope to
https://sts.mixedreality.azure.com//.default. This scope will indicate to Microsoft Entra ID that your application is requesting a token for the Mixed Reality Security Token Service (STS).
After you complete these steps, your application should be able to obtain from MSAL a Microsoft Entra token. You can set that Microsoft Entra token as the authenticationToken on your cloud session configuration object:
this.cloudSession.Configuration.AuthenticationToken = @"MyAuthenticationToken";
Microsoft Entra service authentication
To deploy apps that use Azure Spatial Anchors to production, we recommend that you use a back-end service that will broker authentication requests. Here's an overview of the process:
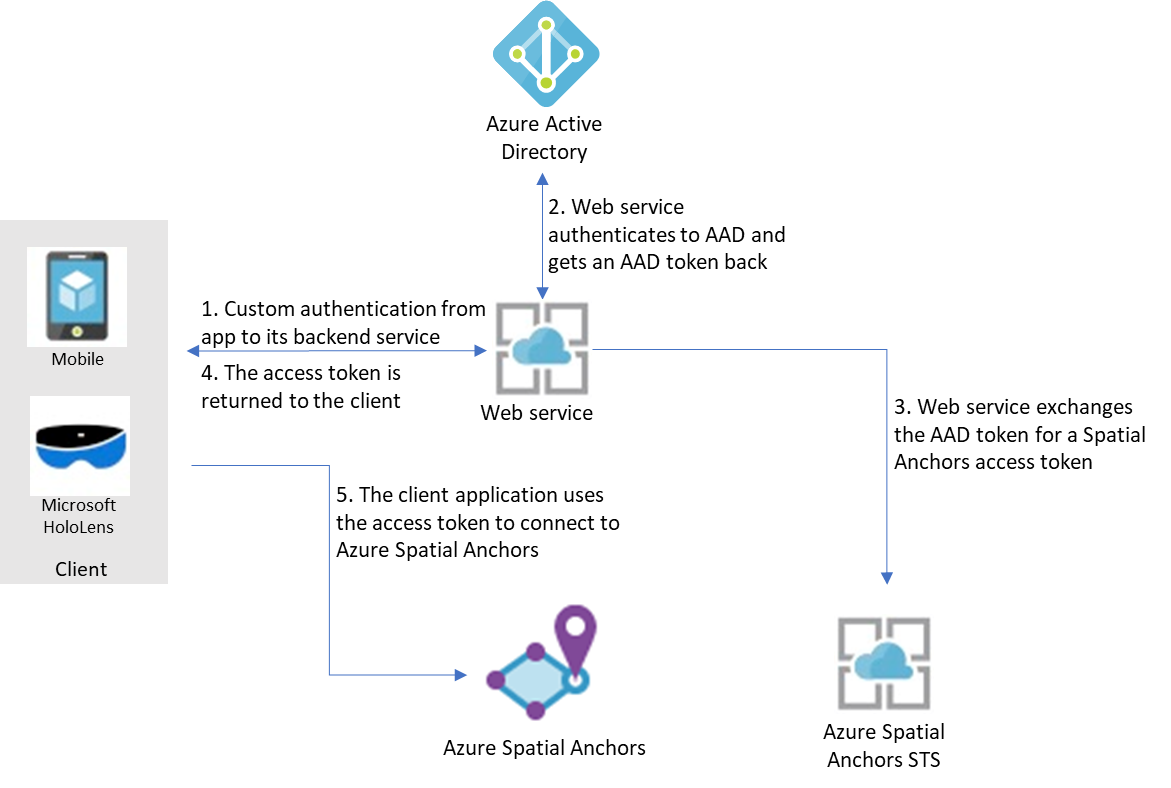
Here, it's assumed that your app uses its own mechanism to authenticate to its back-end service. (For example, a Microsoft account, PlayFab, Facebook, a Google ID, or a custom user name and password.) After your users are authenticated to your back-end service, that service can retrieve a Microsoft Entra token, exchange it for an access token for Azure Spatial Anchors, and return it back to your client application.
The Microsoft Entra access token is retrieved via the MSAL. Follow the steps in the register an app quickstart, which include:
In the Azure portal
- Register your application in Microsoft Entra ID:
- In the Azure portal, select Microsoft Entra ID, and then select App registrations.
- Select New registration.
- Enter the name of your application, select Web app / API as the application type, and enter the auth URL for your service. Select Create.
- On the application, select Settings, and then select the Certificates and secrets tab. Create a new client secret, select a duration, and then select Add. Be sure to save the secret value. You'll need to include it in your web service's code.
- Assign an ASA RBAC role to the application or users that you want to give access to your resource. If you want your application's users to have different roles against the ASA account, register multiple applications in Microsoft Entra ID and assign a separate role to each one. Then implement your authorization logic to use the right role for your users. For detailed role assignment steps, see Assign Azure roles using the Azure portal.
In your code
Note
You can use the service sample that is available as a part of the Spatial Anchors sample apps.
- Be sure to use the application ID, application secret, and redirect URI of your own Microsoft Entra application as the client ID, secret, and RedirectUri parameters in MSAL.
- Set the tenant ID to your own Microsoft Entra tenant ID in the authority parameter in MSAL.
- On your token request, set the scope to
https://sts.mixedreality.azure.com//.default.
After you complete these steps, your back-end service can retrieve a Microsoft Entra token. It can then exchange it for an MR token that it will return back to the client. Using a Microsoft Entra token to retrieve an MR token is done via a REST call. Here's a sample call:
GET https://sts.mixedreality.azure.com/Accounts/35d830cb-f062-4062-9792-d6316039df56/token HTTP/1.1
Authorization: Bearer eyJ0eXAiOiJKV1QiLCJhbGciOiJSUzI1Ni<truncated>FL8Hq5aaOqZQnJr1koaQ
Host: sts.mixedreality.azure.com
Connection: Keep-Alive

HTTP/1.1 200 OK
Date: Sun, 24 Feb 2019 08:00:00 GMT
Content-Type: application/json; charset=utf-8
Content-Length: 1153
Accept: application/json
MS-CV: 05JLqWeKFkWpbdY944yl7A.0
{"AccessToken":"eyJhbGciOiJSUzI1NiIsImtpZCI6IjI2MzYyMTk5ZTI2NjQxOGU4ZjE3MThlM2IyMThjZTIxIiwidHlwIjoiSldUIn0.eyJqdGkiOiJmMGFiNWIyMy0wMmUxLTQ1MTQtOWEzNC0xNzkzMTA1NTc4NzAiLCJjYWkiOiIzNWQ4MzBjYi1mMDYyLTQwNjItOTc5Mi1kNjMxNjAzOWRmNTYiLCJ0aWQiOiIwMDAwMDAwMC0wMDAwLTAwMDAtMDAwMC0wMDAwMDAwMDAwMDAiLCJhaWQiOiIzNWQ4MzBjYi1mMDYyLTQwNjItOTc5Mi1kNjMxNjAzOWRmNTYiLCJhYW8iOi0xLCJhcHIiOiJlYXN0dXMyIiwicmlkIjoiL3N1YnNjcmlwdGlvbnMvNzIzOTdlN2EtNzA4NC00ODJhLTg3MzktNjM5Y2RmNTMxNTI0L3Jlc291cmNlR3JvdXBzL3NhbXBsZV9yZXNvdXJjZV9ncm91cC9wcm92aWRlcnMvTWljcm9zb2Z0Lk1peGVkUmVhbGl0eS9TcGF0aWFsQW5jaG9yc0FjY291bnRzL2RlbW9fYWNjb3VudCIsIm5iZiI6MTU0NDU0NzkwMywiZXhwIjoxNTQ0NjM0MzAzLCJpYXQiOjE1NDQ1NDc5MDMsImlzcyI6Imh0dHBzOi8vbXJjLWF1dGgtcHJvZC50cmFmZmljbWFuYWdlci5uZXQvIiwiYXVkIjoiaHR0cHM6Ly9tcmMtYW5jaG9yLXByb2QudHJhZmZpY21hbmFnZXIubmV0LyJ9.BFdyCX9UJj0i4W3OudmNUiuaGgVrlPasNM-5VqXdNAExD8acFJnHdvSf6uLiVvPiQwY1atYyPbOnLYhEbIcxNX-YAfZ-xyxCKYb3g_dbxU2w8nX3zDz_X3XqLL8Uha-rkapKbnNgxq4GjM-EBMCill2Svluf9crDmO-SmJbxqIaWzLmlUufQMWg_r8JG7RLseK6ntUDRyDgkF4ex515l2RWqQx7cw874raKgUO4qlx0cpBAB8cRtGHC-3fA7rZPM7UQQpm-BC3suXqRgROTzrKqfn_g-qTW4jAKBIXYG7iDefV2rGMRgem06YH_bDnpkgUa1UgJRRTckkBuLkO2FvA"}
The Authorization header is formatted as follows: Bearer <Azure_AD_token>
The response contains the MR token in plain text.
That MR token is then returned to the client. Your client app can then set it as its access token in the cloud session configuration:
this.cloudSession.Configuration.AccessToken = @"MyAccessToken";
Azure role-based access control
To help you control the level of access granted to applications, services, or Microsoft Entra users of your service, you can assign these pre-existing roles as needed against your Azure Spatial Anchors accounts:
- Spatial Anchors Account Owner. Applications or users that have this role can create spatial anchors, query for them, and delete them. When you authenticate to your account by using account keys, the Spatial Anchors Account Owner role is assigned to the authenticated principal.
- Spatial Anchors Account Contributor. Applications or users that have this role can create spatial anchors and query for them, but they can't delete them.
- Spatial Anchors Account Reader. Applications or users that have this role can only query for spatial anchors. They can't create new ones, delete existing ones, or update metadata on them. This role is typically used for applications where some users curate the environment but others can only recall anchors previously placed in the environment.
Next steps
Create your first app with Azure Spatial Anchors: