Custom .NET deserializers for Azure Stream Analytics in Visual Studio (Preview)
Important
Custom .net deserializer for Azure Stream Analytics will be retired on 30th September 2024. After that date, it won't be possible to use the feature. Please transition to a JSON, AVRO, or CSV built-in deserializer by that date.
Azure Stream Analytics has built-in support for three data formats: JSON, CSV, and Avro. With custom .NET deserializers, you can read data from other formats such as Protocol Buffer, Bond and other user defined formats for both cloud and edge jobs.
This tutorial demonstrates how to create a custom .NET deserializer for an Azure Stream Analytics cloud job using Visual Studio. To learn how to create .NET deserializers in Visual Studio Code, see Create .NET deserializers for Azure Stream Analytics jobs in Visual Studio Code.
In this tutorial, you learn how to:
- Create a custom deserializer for protocol buffer.
- Create an Azure Stream Analytics job in Visual Studio.
- Configure your Stream Analytics job to use the custom deserializer.
- Run your Stream Analytics job locally to test and debug the custom deserializer.
Prerequisites
If you don't have an Azure subscription, create a free account.
Install Visual Studio 2019 (recommended) or Visual Studio 2017. Enterprise (Ultimate/Premium), Professional, and Community editions are supported. Express edition isn't supported.
Install the Stream Analytics tools for Visual Studio or update to the latest version.
Open Cloud Explorer in Visual Studio, and sign in to your Azure subscription.
Create a container in your Azure Storage Account. The container you create will be used to store assets related to your Stream Analytics job. If you already have a storage account with existing containers, you may use them. If not, you'll need to create a new container.
Create a custom deserializer
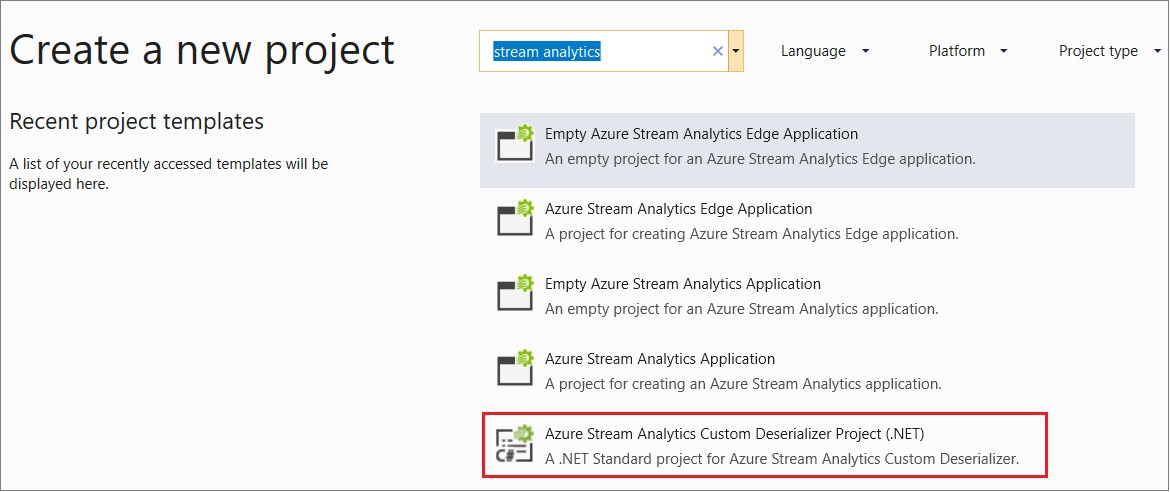
Open Visual Studio and select File > New > Project. Search for Stream Analytics and select Azure Stream Analytics Custom Deserializer Project (.NET). Give the project a name, like Protobuf Deserializer.
In Solution Explorer, right-click your Protobuf Deserializer project and select Manage NuGet Packages from the menu. Then install the Microsoft.Azure.StreamAnalytics and Google.Protobuf NuGet packages.
Add the MessageBodyProto class and the MessageBodyDeserializer class to your project.
Build the Protobuf Deserializer project.
Add an Azure Stream Analytics project
In Solution Explorer, right-click the Protobuf Deserializer solution and select Add > New Project. Under Azure Stream Analytics > Stream Analytics, choose Azure Stream Analytics Application. Name it ProtobufCloudDeserializer and select OK.
Right-click References under the ProtobufCloudDeserializer Azure Stream Analytics project. Under Projects, add Protobuf Deserializer. It should be automatically populated for you.
Configure a Stream Analytics job
Double-click JobConfig.json. Use the default configurations, except for the following settings:
Setting Suggested Value Global Storage Settings Resource Choose data source from current account Global Storage Settings Subscription < your subscription > Global Storage Settings Storage Account < your storage account > Custom Code Storage Settings Resource Choose data source from current account Custom Code Storage Settings Storage Account < your storage account > Custom Code Storage Settings Container < your storage container > Under Inputs, double-click Input.json. Use the default configurations, except for the following settings:
Setting Suggested Value Source Blob Storage Resource Choose data source from current account Subscription < your subscription > Storage Account < your storage account > Container < your storage container > Event Serialization Format Other (Protobuf, XML, proprietary...) Resource Load from ASA Project Reference or CodeBehind CSharp Assembly Name ProtobufDeserializer.dll Class Name MessageBodyProto.MessageBodyDeserializer Event Compression Type None Add the following query to the Script.asaql file.
SELECT * FROM InputDownload the sample protobuf input file. In the Inputs folder, right-click Input.json and select Add Local Input. Then, double-click local_Input.json and configure the following settings:
Setting Suggested Value Input Alias Input Source Type Data Stream Event Serialization Format Other (Protobuf, XML, proprietary...) CSharp Assembly Name ProtobufDeserializer.dll Class Name MessageBodyProto.MessageBodyDeserializer Local Input File Path < the file path for the downloaded sample protobuf input file>
Execute the Stream Analytics job
Open Script.asaql and select Run Locally.
Observe the results in Stream Analytics Local Run Results.
You have successfully implemented a custom deserializer for your Stream Analytics job! In this tutorial, you tested the custom deserializer locally. For your actual data, you would properly configure the input and output. Then submit the job to Azure from Visual Studio to run your job in the cloud using the custom deserializer you just implemented.
Debug your deserializer
You can debug your .NET deserializer locally the same way you debug standard .NET code.
Right click ProtobufCloudDeserializer project name and set it as startup project.
Add breakpoints in your function.
Press F5 to start debugging. The program will stop at your breakpoints as expected.
Clean up resources
When no longer needed, delete the resource group, the streaming job, and all related resources. Deleting the job avoids billing the streaming units consumed by the job. If you're planning to use the job in future, you can stop it and restart it later when you need. If you are not going to continue to use this job, delete all resources created by this tutorial by using the following steps:
From the left-hand menu in the Azure portal, select Resource groups and then select the name of the resource you created.
On your resource group page, select Delete, type the name of the resource to delete in the text box, and then select Delete.
Next steps
In this tutorial, you learned how to implement a custom .NET deserializer for the protocol buffer input serialization. To learn more about creating custom deserializers, continue to the following article:
Feedback
Coming soon: Throughout 2024 we will be phasing out GitHub Issues as the feedback mechanism for content and replacing it with a new feedback system. For more information see: https://aka.ms/ContentUserFeedback.
Submit and view feedback for