Using Azure Ultra Disks
Applies to: ✔️ Linux VMs ✔️ Windows VMs ✔️ Flexible scale sets ✔️ Uniform scale sets
This article explains how to deploy and use an Ultra Disk, for conceptual information about Ultra Disks, refer to What disk types are available in Azure?.
Azure Ultra Disks offer high throughput, high IOPS, and consistent low latency disk storage for Azure IaaS virtual machines (VMs). This new offering provides top of the line performance at the same availability levels as our existing disks offerings. One major benefit of Ultra Disks is the ability to dynamically change the performance of the SSD along with your workloads without the need to restart your VMs. Ultra Disks are suited for data-intensive workloads such as SAP HANA, top tier databases, and transaction-heavy workloads.
GA scope and limitations
The following list contains Ultra Disk's limitations:
- Ultra Disks can't be used as an OS disk.
- Ultra Disks can't be used with Azure Compute Gallery.
- Currently, Ultra Disks only support Single VM and Availability zone infrastructure options.
- Ultra Disks don't support availability sets.
- Existing disks currently can't change their type to an Ultra Disk. They must be migrated.
- Encrypting Ultra Disks with customer-managed keys using Azure Key Vaults stored in a different Microsoft Entra ID tenant isn't currently supported.
- Azure Disk Encryption isn't supported for VMs with Ultra Disks. Instead, you should use encryption at rest with platform-managed or customer-managed keys.
- Azure Site Recovery isn't supported for VMs with Ultra Disks.
- Ultra Disks don't support disk caching.
- Snapshots are supported with other limitations.
- Azure Backup support for VMs with Ultra Disks is generally available. Azure Backup has limitations when using Ultra Disks, see VM storage support for details.
Ultra Disks support a 4k physical sector size by default but also supports a 512E sector size. Most applications are compatible with 4k sector sizes, but some require 512-byte sector sizes. Oracle Database, for example, requires release 12.2 or later in order to support 4k native disks. For older versions of Oracle DB, 512-byte sector size is required.
The following table outlines the regions Ultra Disks are available in, and their corresponding availability options.
Note
If a region in the following list lacks availability zones that support Ultra disks, then a VM in that region must be deployed without infrastructure redundancy to attach an Ultra Disk.
| Redundancy options | Regions |
|---|---|
| Single VMs | Australia Central Brazil South Brazil Southeast Canada East Central India East Asia Germany West Central Korea Central Korea South UK West North Central US, South Central US, West US US Gov Arizona, US Gov Texas, US Gov Virginia |
| One availability zone | UAE North |
| Two availability zones | France Central Qatar Central South Africa North |
| Three availability zones | Australia East Canada Central China North 3 North Europe, West Europe Italy North Japan East Poland Central Southeast Asia Sweden Central Switzerland North UK South Central US, East US, East US 2, West US 2, West US 3 |
Not every VM size is available in every supported region with Ultra Disks. The following table lists VM series that are compatible with Ultra Disks.
| VM Type | Sizes | Description |
|---|---|---|
| General purpose | DSv3-series, Ddsv4-series, Dsv4-series, Dasv4-series, Dsv5-series, Ddsv5-series, Dasv5-series | Balanced CPU-to-memory ratio. Ideal for testing and development, small to medium databases, and low to medium traffic web servers. |
| Compute optimized | FSv2-series | High CPU-to-memory ratio. Good for medium traffic web servers, network appliances, batch processes, and application servers. |
| Memory optimized | ESv3-series, Easv4-series, Edsv4-series, Esv4-series, Esv5-series, Edsv5-series, Easv5-series, Ebsv5 series, Ebdsv5 series, M-series, Mv2-series, Msv2/Mdsv2-series | High memory-to-CPU ratio. Great for relational database servers, medium to large caches, and in-memory analytics. |
| Storage optimized | LSv2-series, Lsv3-series, Lasv3-series | High disk throughput and IO ideal for Big Data, SQL, NoSQL databases, data warehousing, and large transactional databases. |
| GPU optimized | NCv2-series, NCv3-series, NCasT4_v3-series, ND-series, NDv2-series, NVv3-series, NVv4-series, NVadsA10 v5-series | Specialized virtual machines targeted for heavy graphic rendering and video editing, as well as model training and inferencing (ND) with deep learning. Available with single or multiple GPUs. |
| HB-series, HC-series, HBv2-series | The fastest and most powerful CPU virtual machines with optional high-throughput network interfaces (RDMA). |
Determine VM size and region availability
VMs using availability zones
To use Ultra Disks, you need to determine which availability zone you are in. Not every region supports every VM size with Ultra Disks. To determine if your region, zone, and VM size support Ultra Disks, run either of the following commands, make sure to replace the region, vmSize, and subscriptionId values first:
CLI
subscriptionId="<yourSubID>"
# Example value is southeastasia
region="<yourLocation>"
# Example value is Standard_E64s_v3
vmSize="<yourVMSize>"

az vm list-skus --resource-type virtualMachines --location $region --query "[?name=='$vmSize'].locationInfo[0].zoneDetails[0].Name" --subscription $subscriptionId
PowerShell
# Example value is southeastasia
$region = "<yourLocation>"
# Example value is Standard_E64s_v3
$vmSize = "<yourVMSize>"
$sku = (Get-AzComputeResourceSku | where {$_.Locations -icontains($region) -and ($_.Name -eq $vmSize) -and $_.LocationInfo[0].ZoneDetails.Count -gt 0})
if($sku){$sku[0].LocationInfo[0].ZoneDetails} Else {Write-host "$vmSize is not supported with Ultra Disk in $region region"}
The response will be similar to the form below, where X is the zone to use for deploying in your chosen region. X could be either 1, 2, or 3.
Preserve the Zones value, it represents your availability zone and you'll need it in order to deploy an Ultra disk.
| ResourceType | Name | Location | Zones | Restriction | Capability | Value |
|---|---|---|---|---|---|---|
| disks | UltraSSD_LRS | eastus2 | X |
Note
If there was no response from the command, then the selected VM size is not supported with Ultra Disks in the selected region.
Now that you know which zone to deploy to, follow the deployment steps in this article to either deploy a VM with an Ultra Disk attached or attach an Ultra Disk to an existing VM.
VMs with no redundancy options
Ultra disks deployed in select regions must be deployed without any redundancy options, for now. However, not every VM size that supports Ultra Disks are necessarily in these regions. To determine which VM sizes support Ultra Disks, use either of the following code snippets. Make sure to replace the vmSize, region, and subscriptionId values first:
subscriptionId="<yourSubID>"
# Example value is westus
region="<yourLocation>"
# Example value is Standard_E64s_v3
vmSize="<yourVMSize>"

az vm list-skus --resource-type virtualMachines --location $region --query "[?name=='$vmSize'].capabilities" --subscription $subscriptionId
# Example value is westus
$region = "<yourLocation>"
# Example value is Standard_E64s_v3
$vmSize = "<yourVMSize>"
(Get-AzComputeResourceSku | where {$_.Locations -icontains($region) -and ($_.Name -eq $vmSize) })[0].Capabilities
The response will be similar to the following form, UltraSSDAvailable True indicates whether the VM size supports Ultra Disks in this region.
Name                                         Value
----                                         -----
MaxResourceVolumeMB                          884736
OSVhdSizeMB                                  1047552
vCPUs                                        64
HyperVGenerations                            V1,V2
MemoryGB                                     432
MaxDataDiskCount                             32
LowPriorityCapable                           True
PremiumIO                                    True
VMDeploymentTypes                            IaaS
vCPUsAvailable                               64
ACUs                                         160
vCPUsPerCore                                 2
CombinedTempDiskAndCachedIOPS                128000
CombinedTempDiskAndCachedReadBytesPerSecond  1073741824
CombinedTempDiskAndCachedWriteBytesPerSecond 1073741824
CachedDiskBytes                              1717986918400
UncachedDiskIOPS                             80000
UncachedDiskBytesPerSecond                   1258291200
EphemeralOSDiskSupported                     True
AcceleratedNetworkingEnabled                 True
RdmaEnabled                                  False
MaxNetworkInterfaces                         8
UltraSSDAvailable                            True
Deploy an Ultra Disk using Azure Resource Manager
First, determine the VM size to deploy. For a list of supported VM sizes, see the GA scope and limitations section.
If you would like to create a VM with multiple Ultra Disks, refer to the sample Create a VM with multiple Ultra Disks.
If you intend to use your own template, make sure that apiVersion for Microsoft.Compute/virtualMachines and Microsoft.Compute/Disks is set as 2018-06-01 (or later).
Set the disk sku to UltraSSD_LRS, then set the disk capacity, IOPS, availability zone, and throughput in MBps to create an Ultra Disk.
Once the VM is provisioned, you can partition and format the data disks and configure them for your workloads.
Deploy an Ultra Disk
This section covers deploying a virtual machine equipped with an Ultra Disk as a data disk. It assumes you have familiarity with deploying a virtual machine, if you don't, see our Quickstart: Create a Windows virtual machine in the Azure portal.
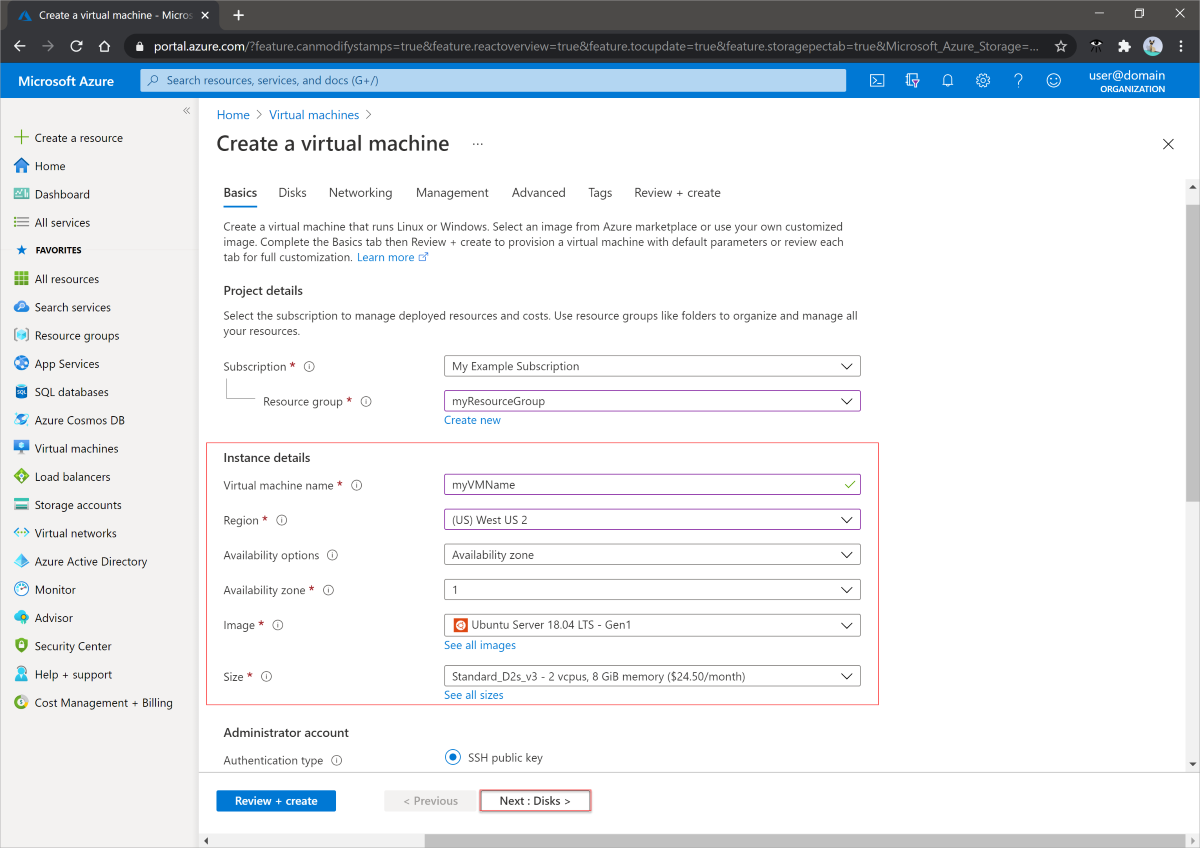
Sign in to the Azure portal and navigate to deploy a virtual machine (VM).
Make sure to choose a supported VM size and region.
Select Availability zone in Availability options.
Fill in the remaining entries with selections of your choice.
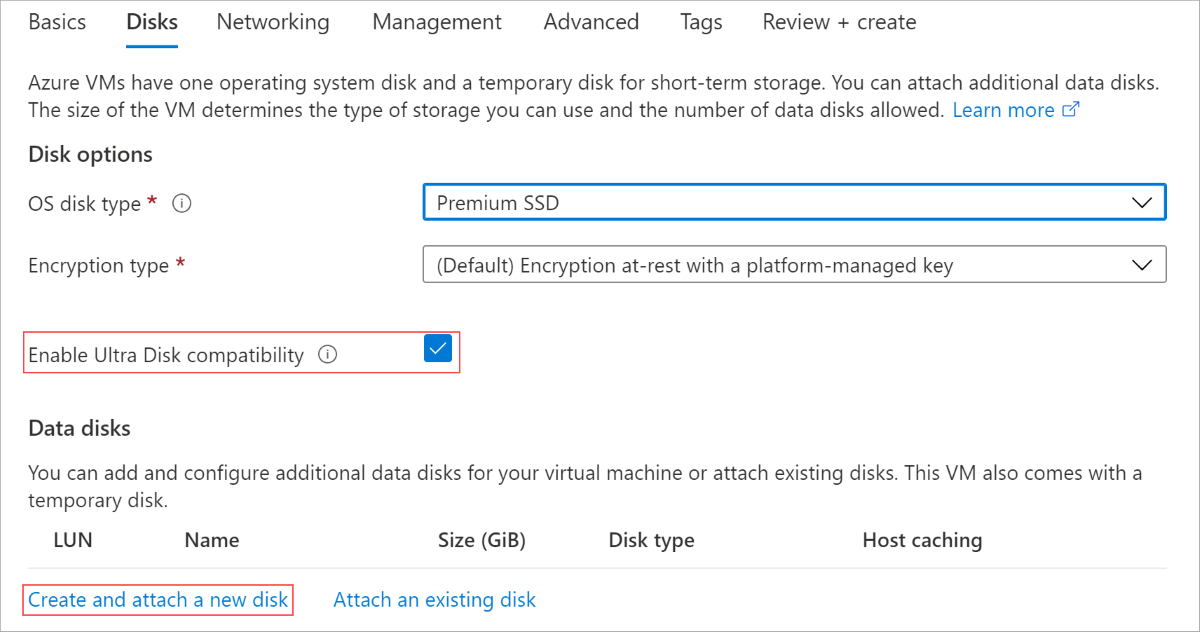
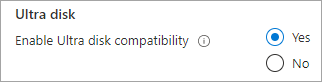
Select Disks.
On the Disks blade, select Yes for Enable Ultra Disk compatibility.
Select Create and attach a new disk to attach an Ultra disk now.
On the Create a new disk blade, enter a name, then select Change size.
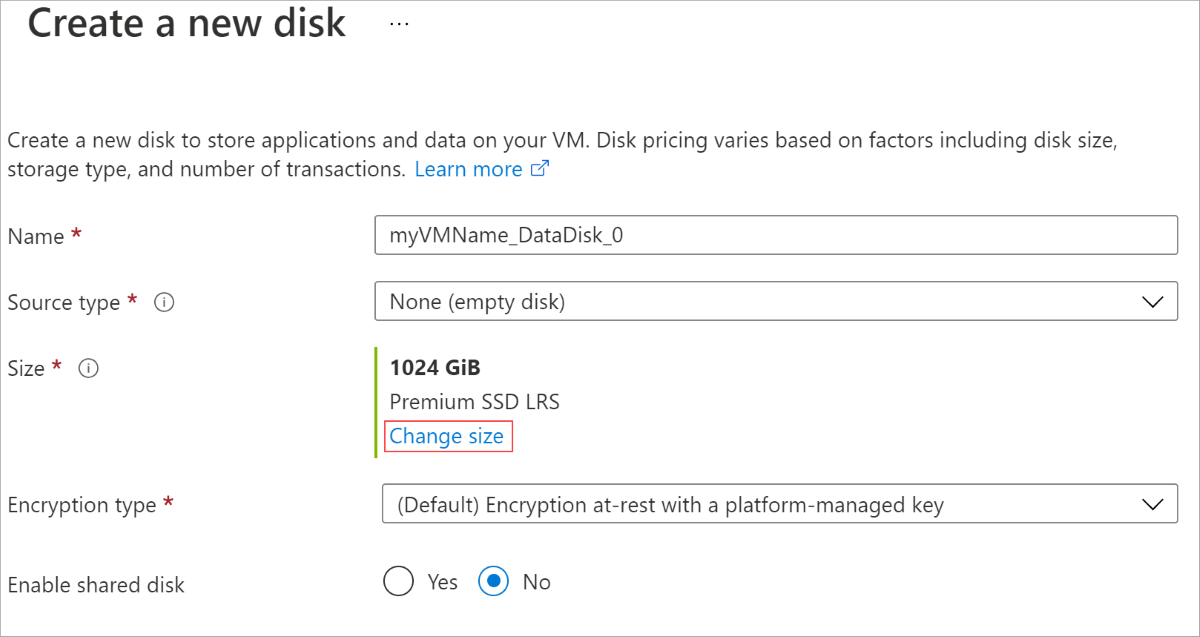
Change the Disk SKU to Ultra Disk.
Change the values of Custom disk size (GiB), Disk IOPS, and Disk throughput to ones of your choice.
Select OK in both blades.

Continue with the VM deployment, the same as you would deploy any other VM.


Deploy an Ultra Disk - 512-byte sector size
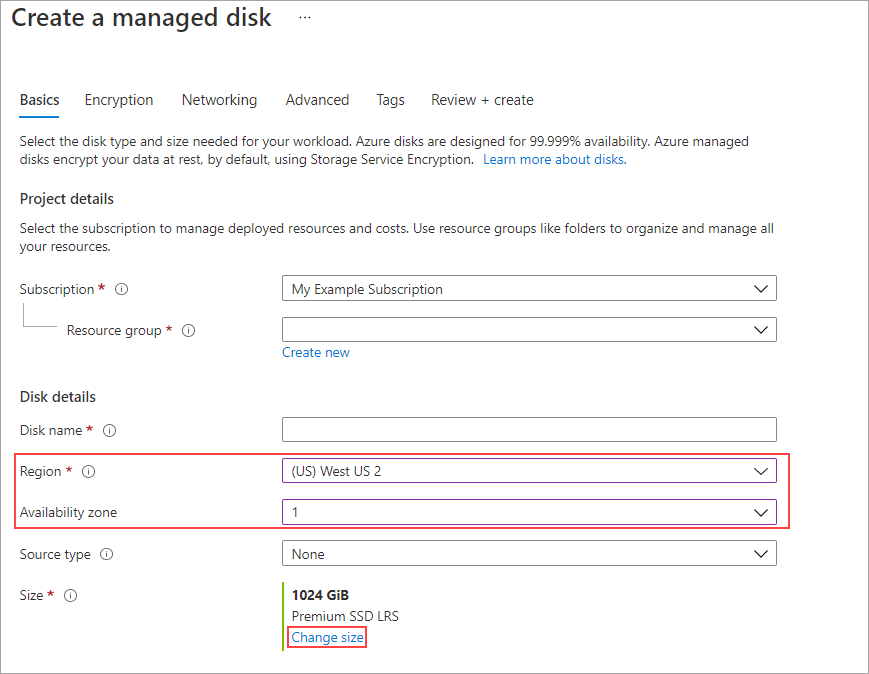
Sign in to the Azure portal, then search for and select Disks.
Select + New to create a new disk.
Select a region that supports Ultra Disks and select an availability zone, fill in the rest of the values as you desire.
Select Change size.
For Disk SKU select Ultra Disk, then fill in the values for the desired performance and select OK.

On the Basics blade, select the Advanced tab.
Select 512 for Logical sector size, then select Review + Create.


Attach an Ultra Disk
Alternatively, if your existing VM is in a region/availability zone that is capable of using Ultra Disks, you can make use of Ultra Disks without having to create a new VM. By enabling Ultra Disks on your existing VM, then attaching them as data disks. To enable Ultra Disk compatibility, you must stop the VM. After you stop the VM, you can enable compatibility, then restart the VM. Once compatibility is enabled, you can attach an Ultra Disk:
Navigate to your VM and stop it, wait for it to deallocate.
Once your VM has been deallocated, select Disks.
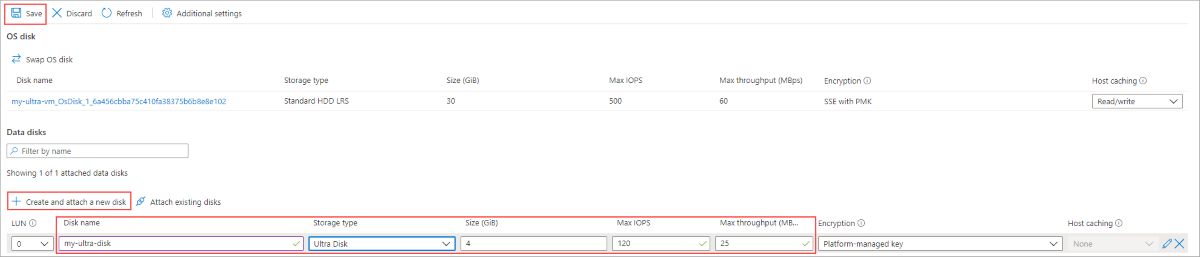
Select Additional settings.

Select Yes for Enable Ultra Disk compatibility.
Select Save.
Select Create and attach a new disk and fill in a name for your new disk.
For Storage type select Ultra Disk.
Change the values of Size (GiB), Max IOPS, and Max throughput to ones of your choice.
After you're returned to your disk's blade, select Save.
Start your VM again.


Adjust the performance of an Ultra Disk
Ultra Disks offer a unique capability that allows you to adjust their performance. You can adjust the performance of an Ultra Disk four times within a 24 hour period.
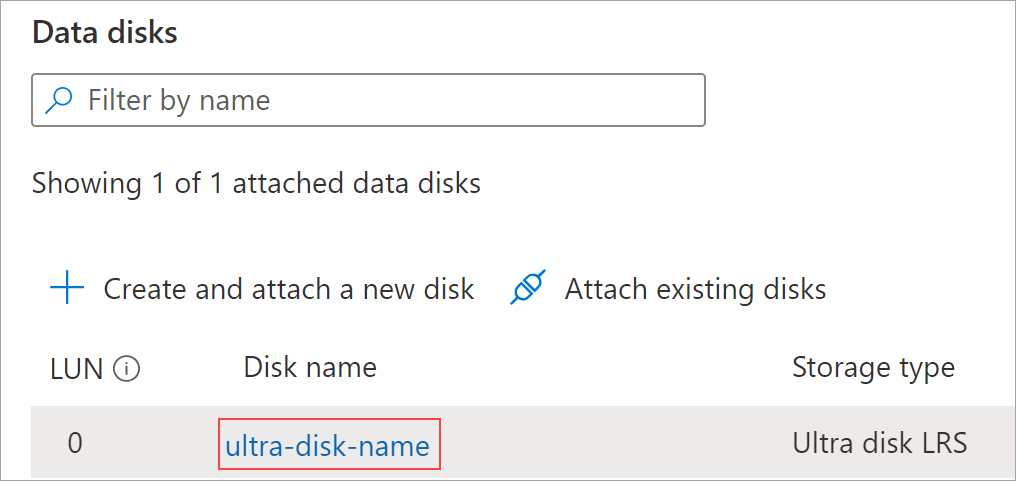
Navigate to your VM and select Disks.
Select the Ultra Disk you'd like to modify the performance of.
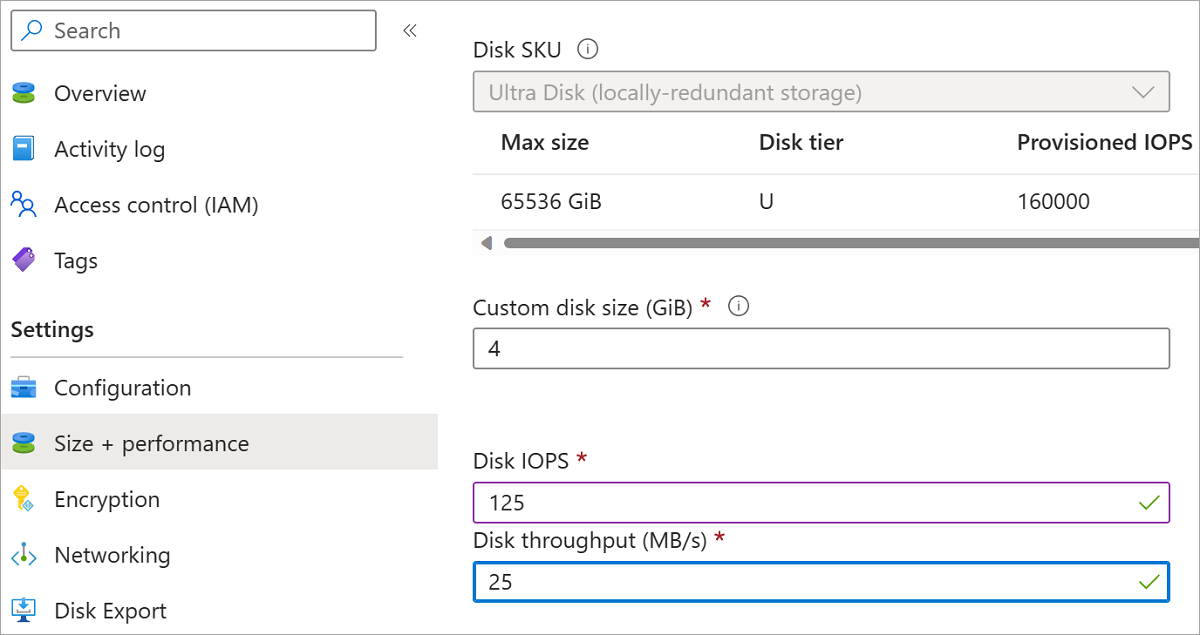
Select Size + performance and then make your modifications.
Select Save.


Next steps
- Use Azure Ultra Disks on Azure Kubernetes Service (preview).
- Migrate log disk to an Ultra Disk.
- For more questions on Ultra Disks, see the Ultra Disks section of the FAQ.