Move Azure single instance VMs from regional to zonal target availability zones
This article provides information on how to move Azure single instance Virtual Machines (VMs) from a regional to a zonal configuration within the same Azure region.
Prerequisites
Ensure the following before you begin:
Availability zone regions support: Ensure that the regions you want to move to are supported by Availability Zones. Learn more about the supported regions.
VM SKU availability: The availability of VM sizes, or SKUs, can differ based on the region and zone. Ensure to plan for the use of Availability Zones. Learn more about the available VM SKUs for each Azure region and zone.
Subscription permissions: Check that you have Owner access on the subscription containing the VMs that you want to move. The first time you add a VM to be moved to Zonal configuration, a system-assigned managed identity (formerly, Managed Service Identify (MSI)) that's trusted by the subscription is necessary. To create the identity, and to assign it the required role (Contributor or User Access administrator in the source subscription), the account you use to add resources needs Owner permissions on the subscription. Learn more about Azure roles.
VM support: Check that the VMs you want to move are supported. Learn more. Check supported VM settings.
Subscription quota: The subscription must have enough quota to create the new VM and associated networking resources in target zonal configuration (in same region). If the subscription doesn't have enough quota, you need to request additional limits.
VM health status: The VMs you want to move must be in a healthy state before attempting the zonal move. Ensure that all pending reboots and mandatory updates are complete.
Select and move VMs
To select the VMs you want to move from Regional to Zonal configuration within same region, follow these steps:
Select the VMs
To select the VMs for the move, follow these steps:
On the Azure portal, select the VM.
In the virtual machine resource pane, select Availability + scaling > edit.
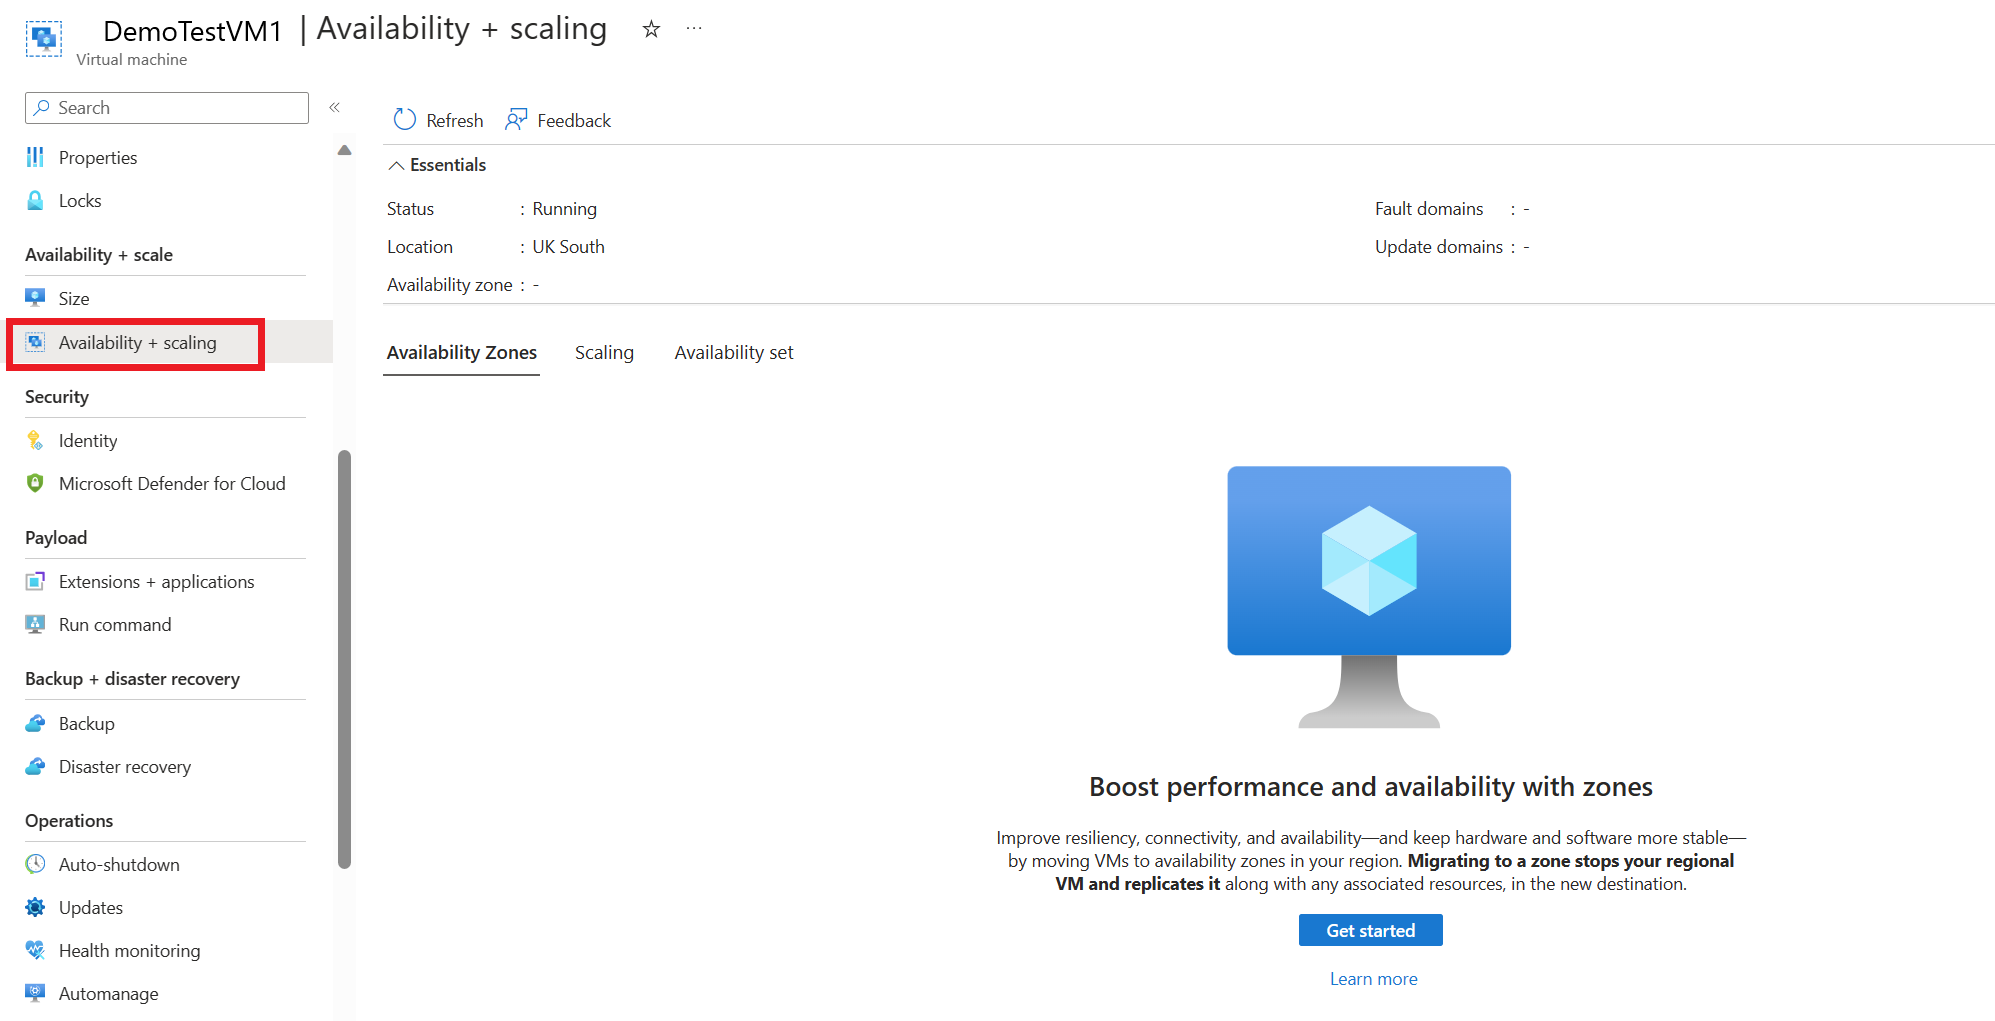
Alternatively, in the virtual machine overview plane, you can select Availability + scale > Availability + scaling.
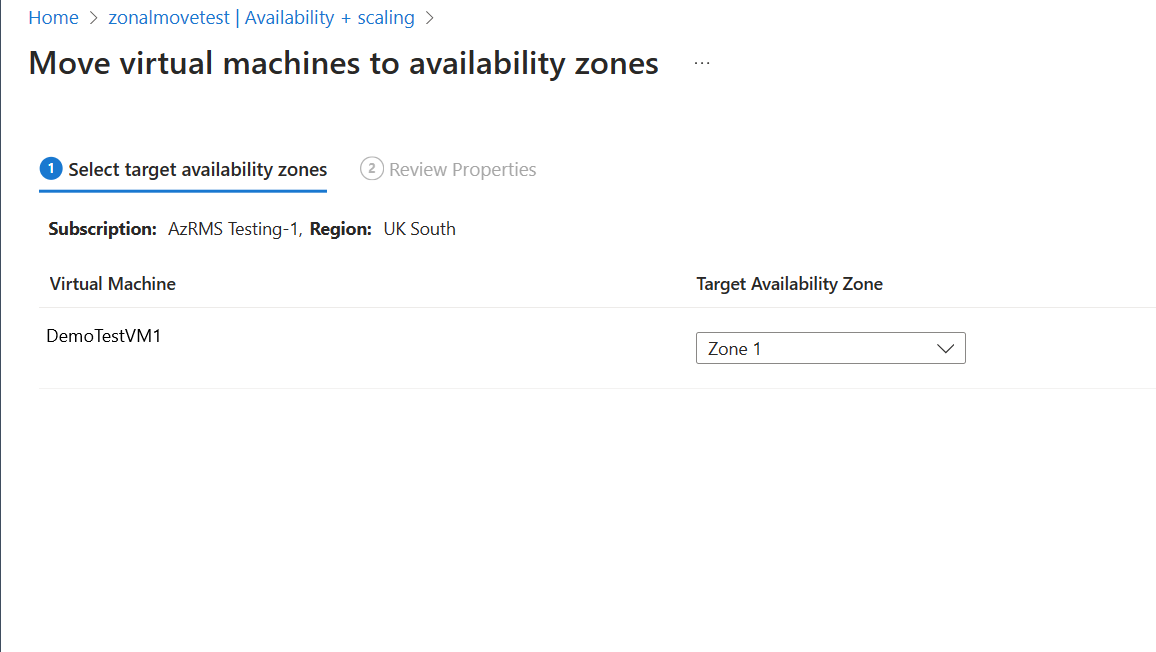
Select the target availability zones
To select the target availability zones, follow these steps:
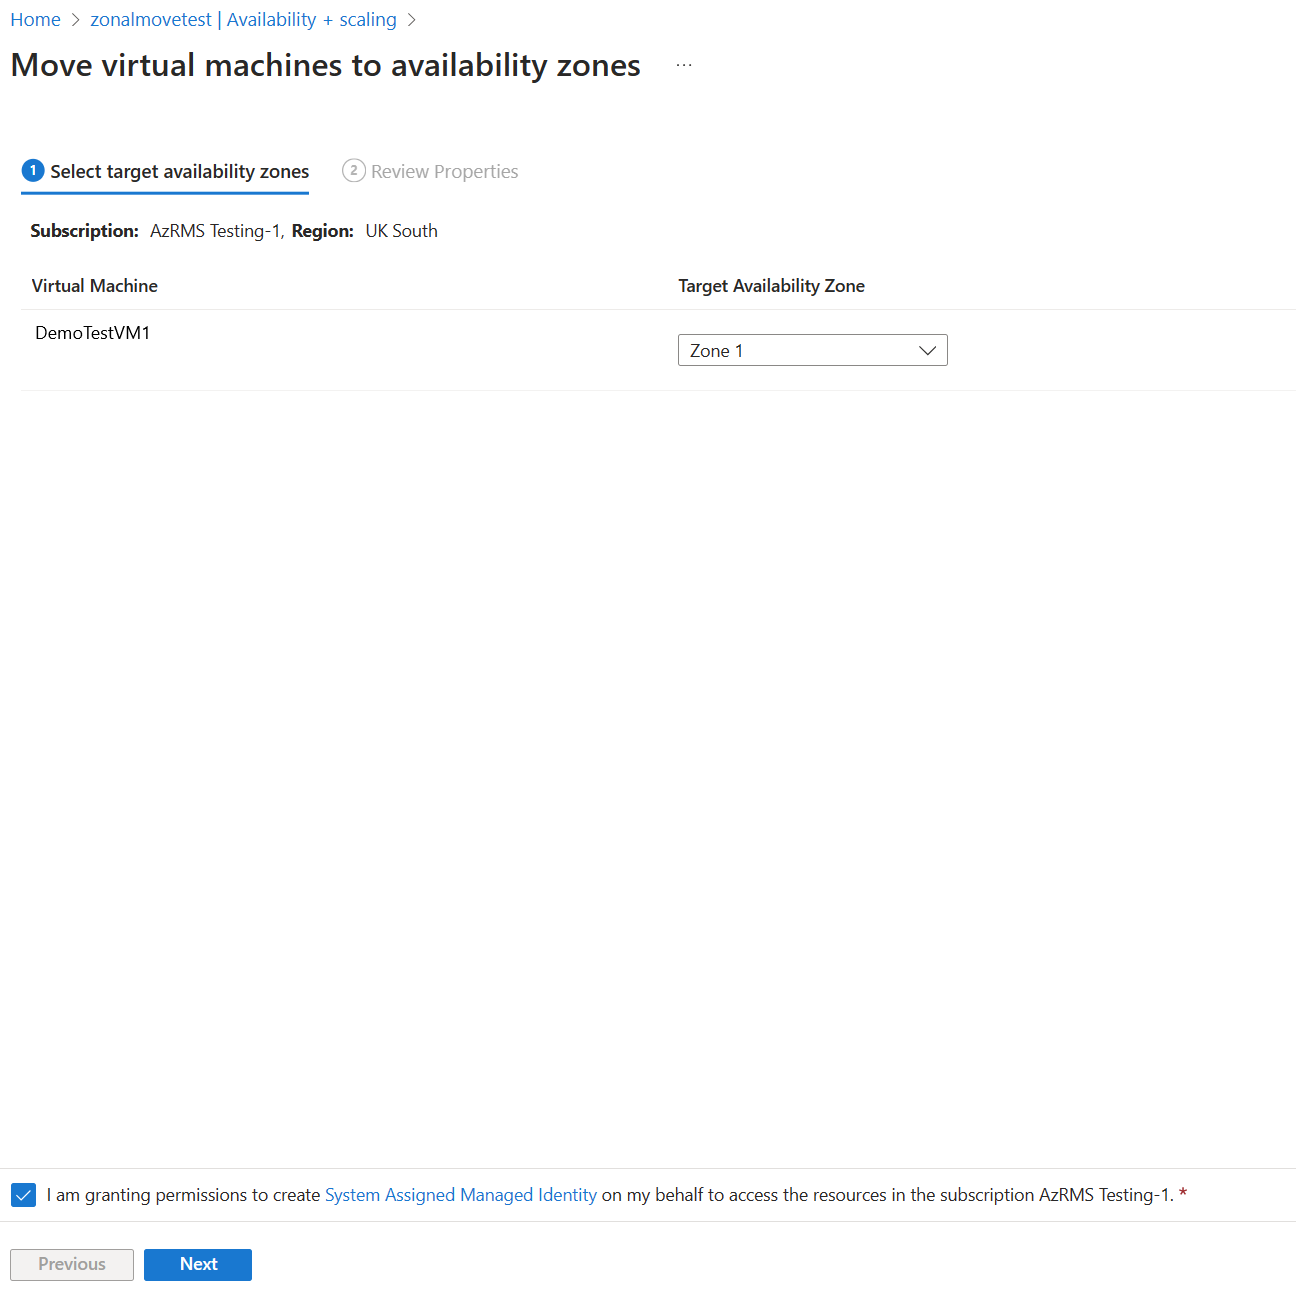
Under Target availability zone, select the desired target availability zones for the VM. For example, Zone 1.
Important
If you select an unsupported VM to move, the validation fails. In this case, you must restart the workflow with the correct selection of VM. Refer to the Support Matrix to learn more about unsupported VMs type.
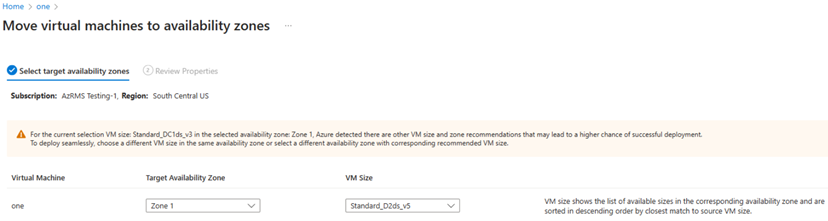
If Azure recommends optimizing the VM size, you must select the appropriate VM size that can increase the chances of successful deployment in the selected zone. Alternatively, you can also change the zone while keeping the same source VM size.
Select the consent statement for System Assigned Managed Identity process then select Next.
The MSI authentication process takes a few minutes to complete. During this time, the updates on the progress are displayed on the screen.
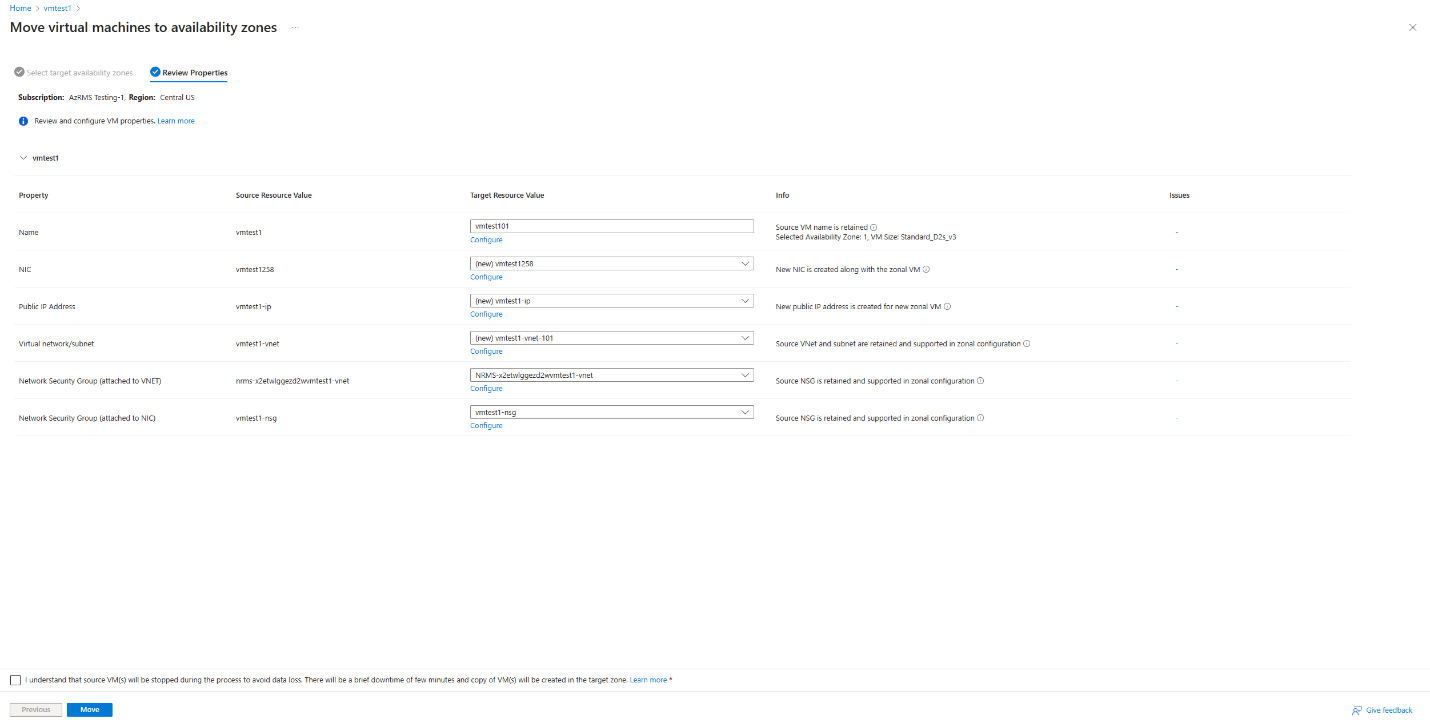
Review the properties of the VM
To review the properties of the VM before you commit the move, follow these steps:
On the Review properties pane, review the VM properties.
VM properties
Find more information on the impact of the move on the VM properties.
The following source VM properties are retained in the target zonal VM by default:
Property Description VM name Source VM name is retained in the target zonal VM by default. VNET By default, the source VNET is retained and target zonal VM is created within the same VNET. You can also create a new VNET or choose an existing from target zonal configuration. Subnet By default, the source subnet is retained, and the target zonal virtual machine is created within the same subnet. You can create a new subnet or choose an existing from target zonal configuration. NSG Source NSG is retained by default and target zonal VM are created within the same NSG. You can create a new NSG or choose an existing from target zonal configuration. Load balancer (Standard SKU) Standard SKU Load balance supports target zonal configuration and are retained. Public IP (Standard SKU) Standard SKU PIP supports target zonal configuration and are retained. The following source VM properties are created in the target zonal VM by default:
Property Description VM A copy of the source VM is created in the target zonal configuration. The source VM is left intact and stopped after the move.
Source VM ARM ID is not retained.Resource group By default, a new resource group is created as the source resource group can't be utilized. This is because we're using the same source VM name in the target zone, it is not possible to have two identical VMs in the same resource group.
However, you can move the VM to an existing resource group in the target zone.NIC A new NIC is created in the target zonal configuration. The source NIC is left intact and stopped after the move.
Source NIC ARM ID is not retained.Disks The disks attached to the source VM are recreated with a new disk name in the target zonal configuration and is attached to the newly created zonal VM. Load balancer (Basic SKU) Basic SKU Load balance won't support target zonal configuration and hence isn't retained.
A new Standard SKU Load balancer is created by default.
However, you can still edit the load balancer properties, or you can select an existing target load balancer as well.Public IP (Basic SKU) Basic SKU Public IPs won't be retained after the move as they don't support target zonal configurations.
By default, a new Standard SKU Public IP is created.
However, you can still edit the Public IP properties or you can select an existing target Public IP as well.Review and fix if there are any errors.
Select the consent statement at the bottom of the page before moving the resources.
Move the VMs
Select Move to complete the move to Availability zones.
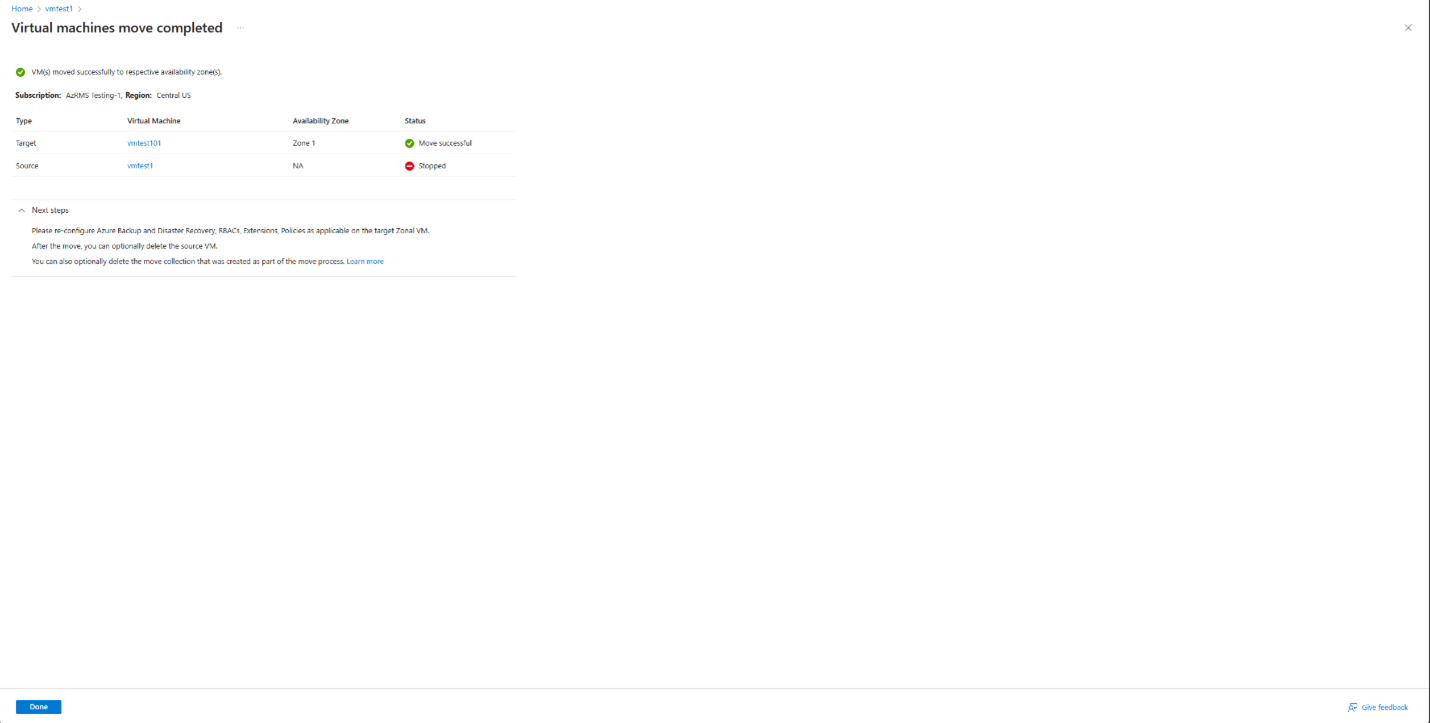
During this process:
- The source virtual machine is stopped hence, there's a brief downtime.
- A copy of the source VM is created in the target zonal configuration and the new virtual machine is up and running.
Configure settings post move
Review all the source VM settings and reconfigure extensions, RBACs, Public IPs, Backup/DR etc. as desired.
Delete source VM
The source VM remains in a stopped mode after the move is complete. You can choose to either delete it or use it for another purpose, based on your requirements.
Delete additional resources created for move
After the move, you can manually delete the move collection that was created.
To manually remove the move collection that was made, follow these steps:
- Ensure you can view hidden resources as the move collection is hidden by default.
- Select the Resource group of the move collection using the search string ZonalMove-MC-RG-SourceRegion.
- Delete the move collection. For example, ZonalMove-MC-RG-UKSouth.
Note
The move collection is hidden and must be turned on to view it.
Next steps
Learn how to move single instance Azure VMs from regional to zonal configuration using PowerShell or CLI.
Feedback
Coming soon: Throughout 2024 we will be phasing out GitHub Issues as the feedback mechanism for content and replacing it with a new feedback system. For more information see: https://aka.ms/ContentUserFeedback.
Submit and view feedback for