Note
Access to this page requires authorization. You can try signing in or changing directories.
Access to this page requires authorization. You can try changing directories.
The usual starting point for a C++ programmer is a "Hello, world!" application that runs on the command line. You start with that in this article, and then move on to something more challenging: a calculator app.
Prerequisites
- Visual Studio with the Desktop development with C++ workload installed and running on your computer. To install it, see Install C++ support in Visual Studio.
- This tutorial demonstrates a feature called edit and continue which allows you to make changes to your code while the app is running. To enable edit and continue, from the main menu select Tools > Options > Debugging > General and ensure that Require source files to exactly match the original version is checked.
Create your app project
Visual Studio uses projects to organize the code for an app, and solutions to organize one or more projects. A project contains all the options, configurations, and rules used to build an app. It also manages the relationship between all the project's files and any external files. To create your app, first, create a new project and solution.
Start Visual Studio--the Visual Studio Start dialog box appears. Select Create a new project to get started.
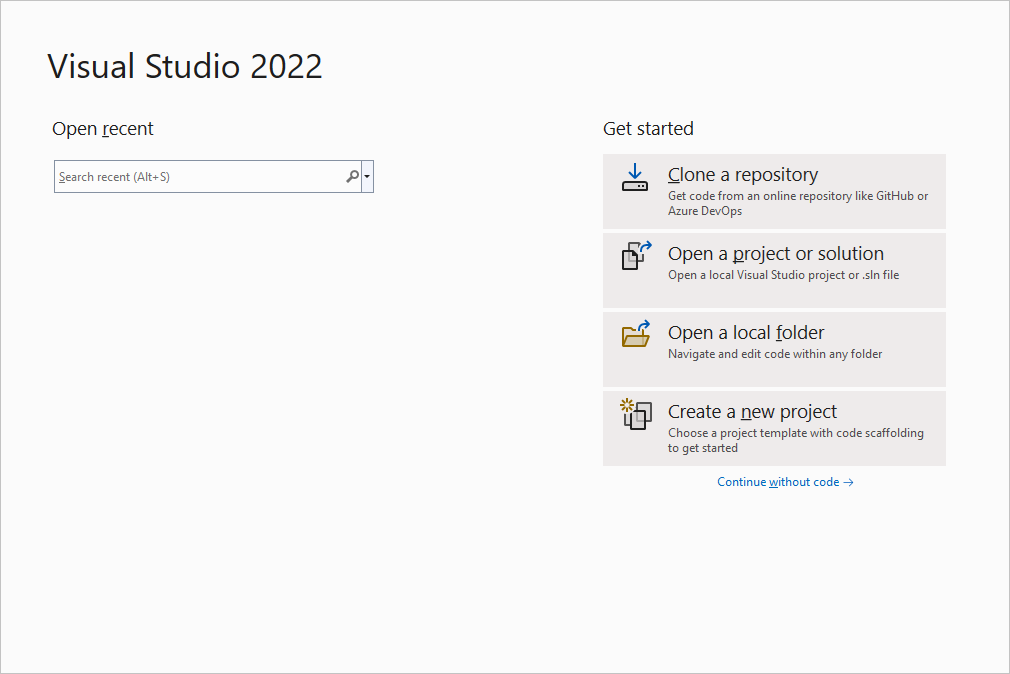
The dialog has options to clone a repository, open a project or solution, open a local folder, and create a new project."
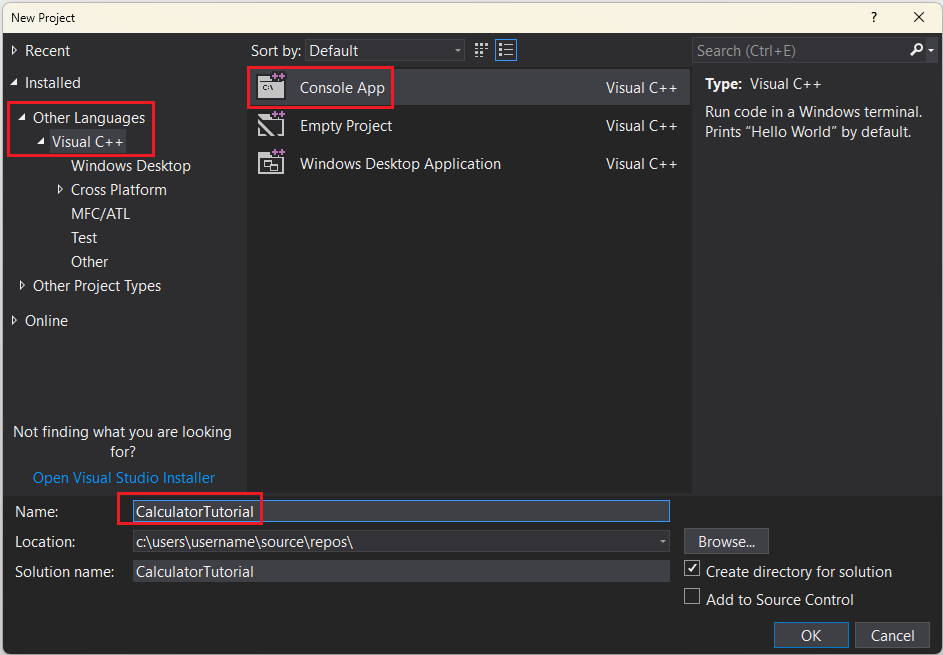
In the Create a new project dialog, set the language dropdown to C++, set the platform dropdown to Windows, select Console App from the list of project types, then select Next.
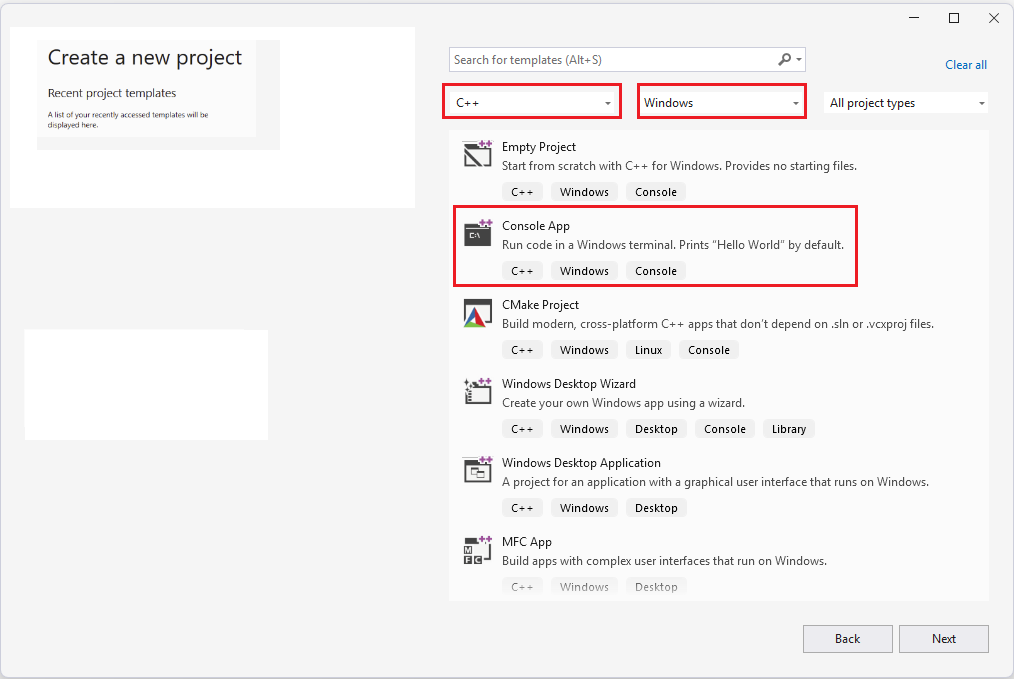
The language dropdown is set to C++, the platform dropdown is set to Windows, and project types like Empty Project, Console App, CMake Project, Windows Desktop Wizard, and so on, appear in the list of project types."
Important
Make sure you select the C++ version of the Console App template. It has the C++, Windows, and Console tags, and the icon has "++" in the corner.
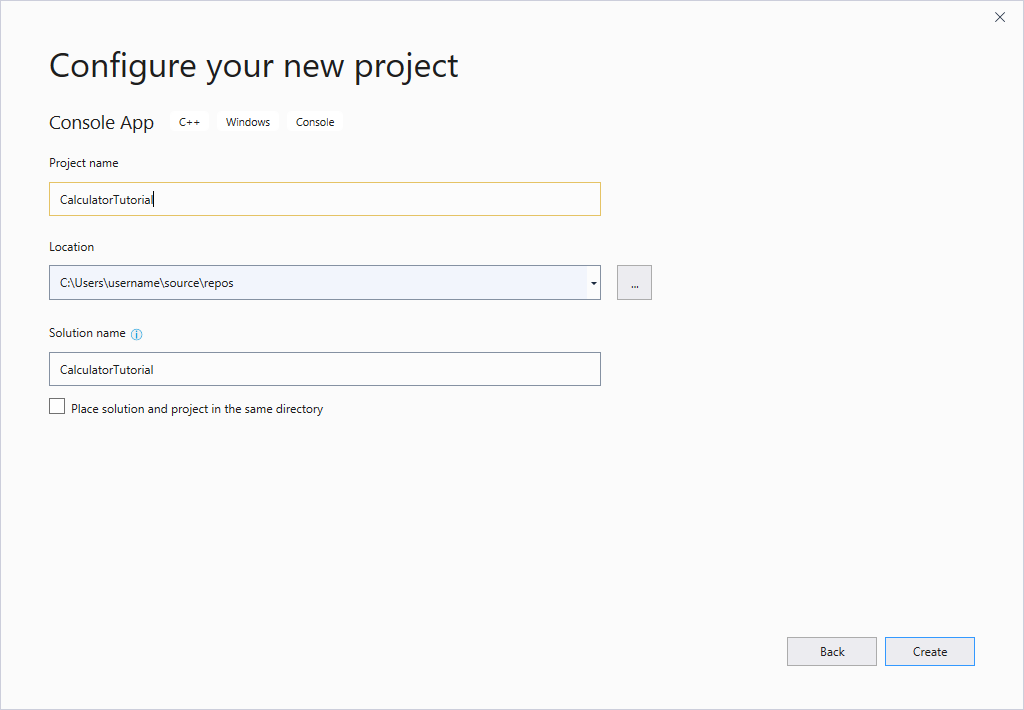
In the Configure your new project dialog box, select the Project name text box, name your new project CalculatorTutorial, then select Create.
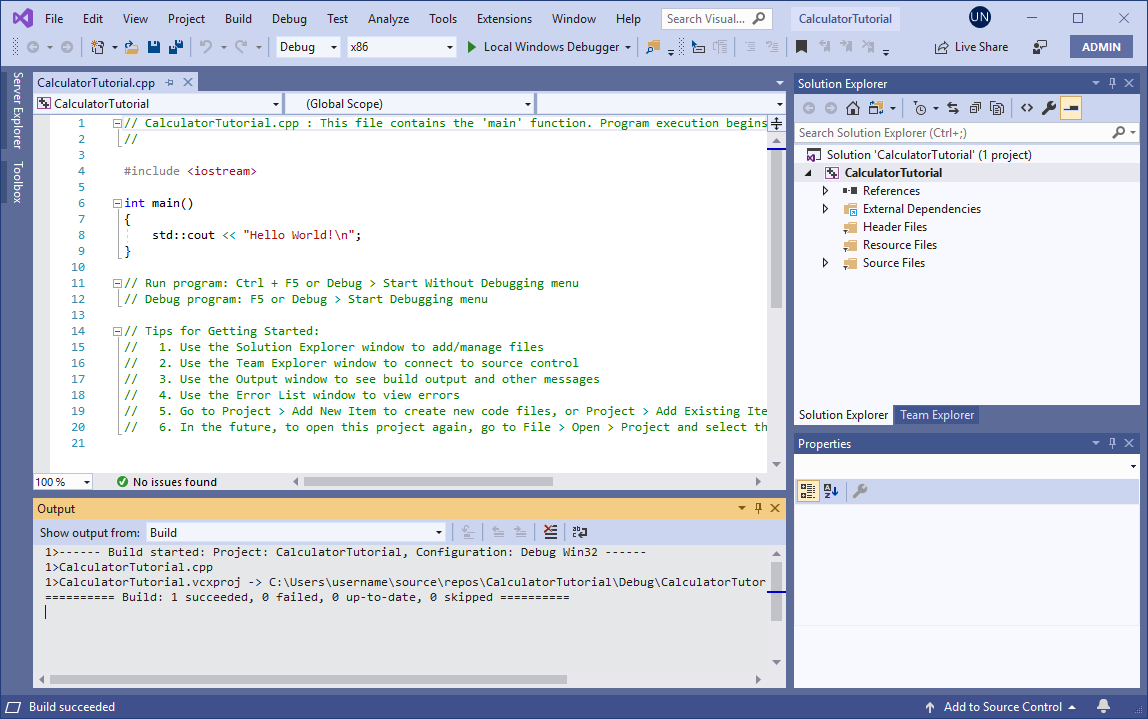
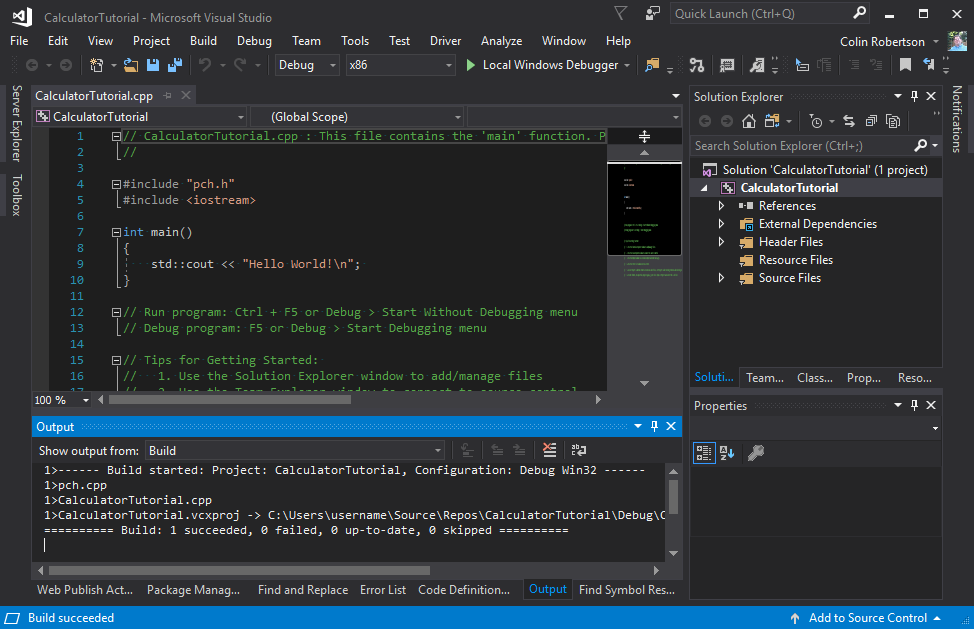
An empty C++ Windows console application 'Hello World' app is created. Console applications use a Windows console window to display output and accept user input. In Visual Studio, an editor window opens and shows the generated code:
// CalculatorTutorial.cpp : This file contains the 'main' function. Program execution begins and ends there.
//

#include <iostream>

int main()
{
    std::cout << "Hello World!\n";
}

// Run program: Ctrl + F5 or Debug > Start Without Debugging menu
// Debug program: F5 or Debug > Start Debugging menu

// Tips for Getting Started:
//   1. Use the Solution Explorer window to add/manage files
//   2. Use the Team Explorer window to connect to source control
//   3. Use the Output window to see build output and other messages
//   4. Use the Error List window to view errors
//   5. Go to Project > Add New Item to create new code files, or Project > Add Existing Item to add existing code files to the project
//   6. In the future, to open this project again, go to File > Open > Project and select the .sln file
Verify that your new app builds and runs
The template for a new Windows console application creates a simple C++ "Hello World" app. At this point, you can see how Visual Studio builds and runs the apps you create right from the IDE.
To build your project, select Build Solution from the Build menu. The Output window shows the results of the build process.
To run the code, on the menu bar, select Debug > Start without debugging (Ctrl+F5).
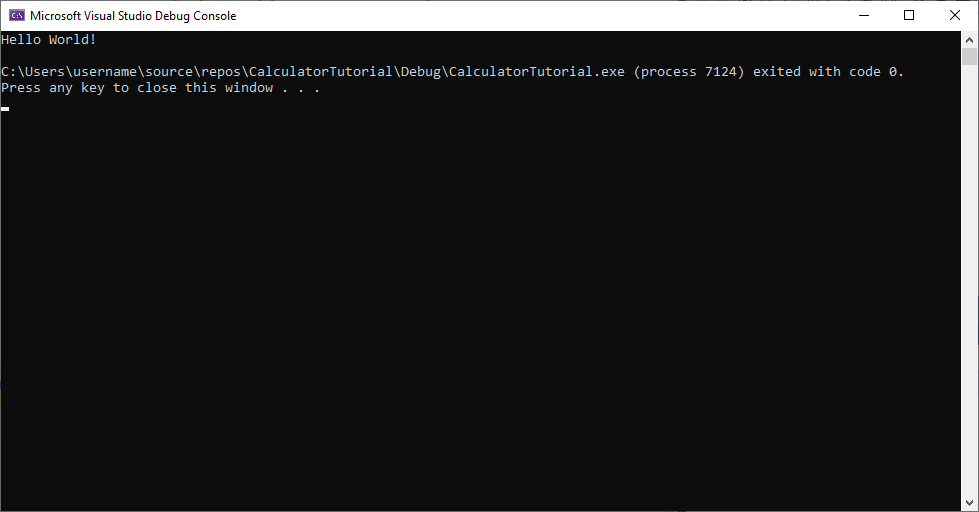
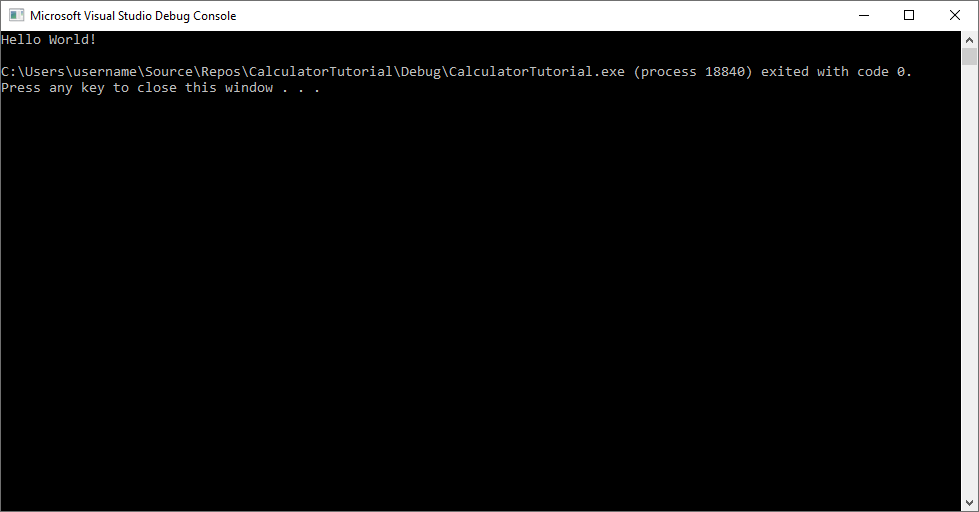
A console window opens and your app runs within it.
When you start a console app in Visual Studio, it runs your code, then prints "Press any key to close this window . . ." to give you a chance to see the output.
Congratulations! You created your first "Hello, world!" console app in Visual Studio!
Press a key to dismiss the console window and return to Visual Studio.
You now have the tools to build and run your app after every change, to verify that the code still works as you expect. Later, we show you how to debug it if it doesn't.
Edit the code
Now let's modify the code in this template to be a calculator app.
Replace the contents of the
CalculatorTutorial.cppfile with the following code so that it matches this example:// CalculatorTutorial.cpp : This file contains the 'main' function. Program execution begins and ends there. // #include <iostream> using namespace std; int main() { cout << "Calculator Console Application" << endl << endl; cout << "Please enter the operation to perform. Format: a+b | a-b | a*b | a/b" << endl; return 0; } // Run program: Ctrl + F5 or Debug > Start Without Debugging menu // Debug program: F5 or Debug > Start Debugging menu // Tips for Getting Started: // 1. Use the Solution Explorer window to add/manage files // 2. Use the Team Explorer window to connect to source control // 3. Use the Output window to see build output and other messages // 4. Use the Error List window to view errors // 5. Go to Project > Add New Item to create new code files, or Project > Add Existing Item to add existing code files to the project // 6. In the future, to open this project again, go to File > Open > Project and select the .sln fileUnderstanding the code:
- The
#includestatement brings in code in other files. Sometimes, you may see a filename surrounded by angle brackets like<iostream>. The angle brackets instruct the compiler to look for theiostreamheader file first in the standard system directories, and if not found, to look in directories specific to the project. Other times, you may see a filename surrounded by quotes like"someHeader.h". The quotes instruct the compiler to skip looking in the standard system directories and instead only look in directories specific to the project. - The
using namespace std;tells the compiler to expect code from the C++ Standard Library to be used in this file. Without this line, each keyword from the library would have to be preceded withstd::to denote its scope. For instance, without that line, each reference tocoutwould be written asstd::cout. Theusingstatement is added to make it more convenient to access code in another namespace. - The
coutkeyword is used to print to standard output in C++. The<<operator tells the compiler to send whatever is to the right of it to the standard output. - The
endlkeyword is like the Enter key; it ends the line and moves the cursor to the next line. It's a better practice to put a\ninside the string (contained by"") to do the same thing becauseendlalways flushes the buffer which can hurt the performance of the program. But since this is a very small app,endlis used instead. - All C++ statements must end with semicolons and all C++ applications must contain a
main()function. This function is what the program runs at the start. All code must be accessible frommain()in order to be used.
- The
To save the file, press Ctrl+S, or select the floppy disk icon in the toolbar under the menu bar.
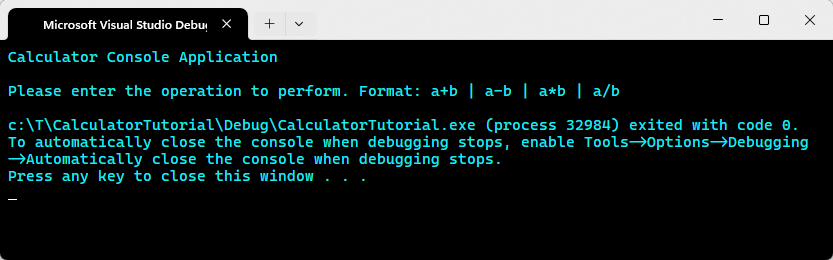
To run the application, press Ctrl+F5 or go to the Debug menu and select Start Without Debugging. You should see a console window appear that looks like this.
Close the console window when you're done.
Add code to do some math
A class is like a blueprint for an object that does something. In this case, we define a calculator class to contain the math logic.
Add a Calculator class
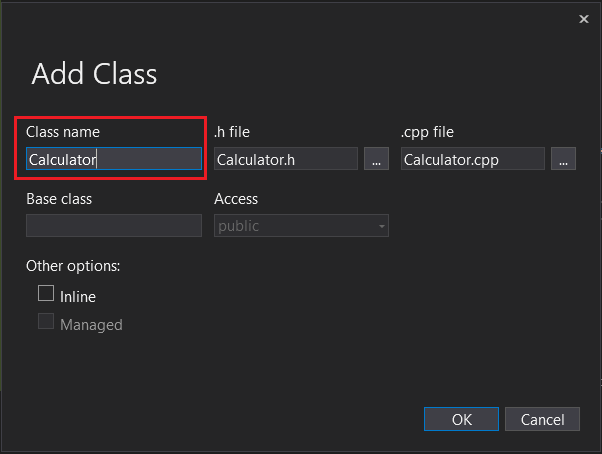
Go to the Project menu and select Add Class. In the Class Name edit box, enter Calculator. Select OK.
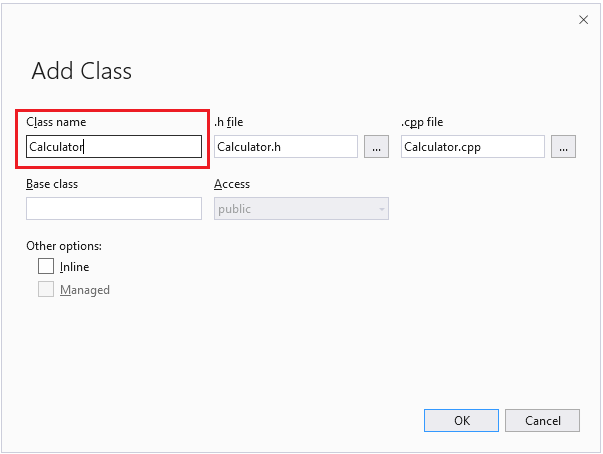
The class name field contains the text calculator. The .h file field contains Calculator.h. The .cpp file field contains Calculator.cpp. The base class field is empty. The options for inline, and Managed are unchecked.
Two new files get added to your project. To save all your changed files at once, press Ctrl+Shift+S. It's a keyboard shortcut for File > Save All. There's also a toolbar button for Save All, an icon of two floppy disks, found beside the Save button. In general, it's good practice to do Save All frequently, so you don't miss saving any changes.
The Add Class wizard creates
.hand.cppfiles that have the same name as the class. You can see a full list of your project files in the Solution Explorer window, visible on the side of the IDE. If the window isn't visible, open it from the menu bar via View > Solution Explorer.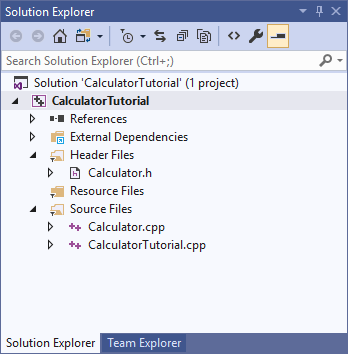
The calculator tutorial project has a header files node containing Calculator.h. A Source Files node contains Calculator.cpp and CalculatorTutorial.cpp. Nodes for references, external dependencies, and resource files are visible but closed.
You can open a file by double-clicking it in the Solution Explorer window. Double-click
Calculator.hto open it.Replace the contents of
Calculator.hwith the following code so that the file now looks like this:#pragma once class Calculator { public: double Calculate(double x, char oper, double y); };Understanding the code
- This code declares a new function called
Calculate, which handles math operations for addition, subtraction, multiplication, and division. - C++ code is organized into header (
.h) files and source (.cpp) files. Some other file extensions are supported by various compilers, but these are the main ones to know about. Functions and variables are normally declared, that is, given a name and a type, in header files, and implemented, or given a definition, in source files. To access code defined in another file, you can use#include "filename.h", wherefilename.his the name of the file that declares the variables or functions you want to use. - It's good practice to organize your code into different files based on what it does, so it's easy to find the code you need later. In our case, we define the
Calculatorclass separately from the file containing themain()function, but we plan to reference theCalculatorclass inmain().
- This code declares a new function called
A green squiggle appears under
Calculatebecause although theCalculatefunction is declared, it isn't defined. Hover overCalculate, click the down arrow on the screwdriver icon, and select Create definition of 'Calculate' inCalculator.cpp.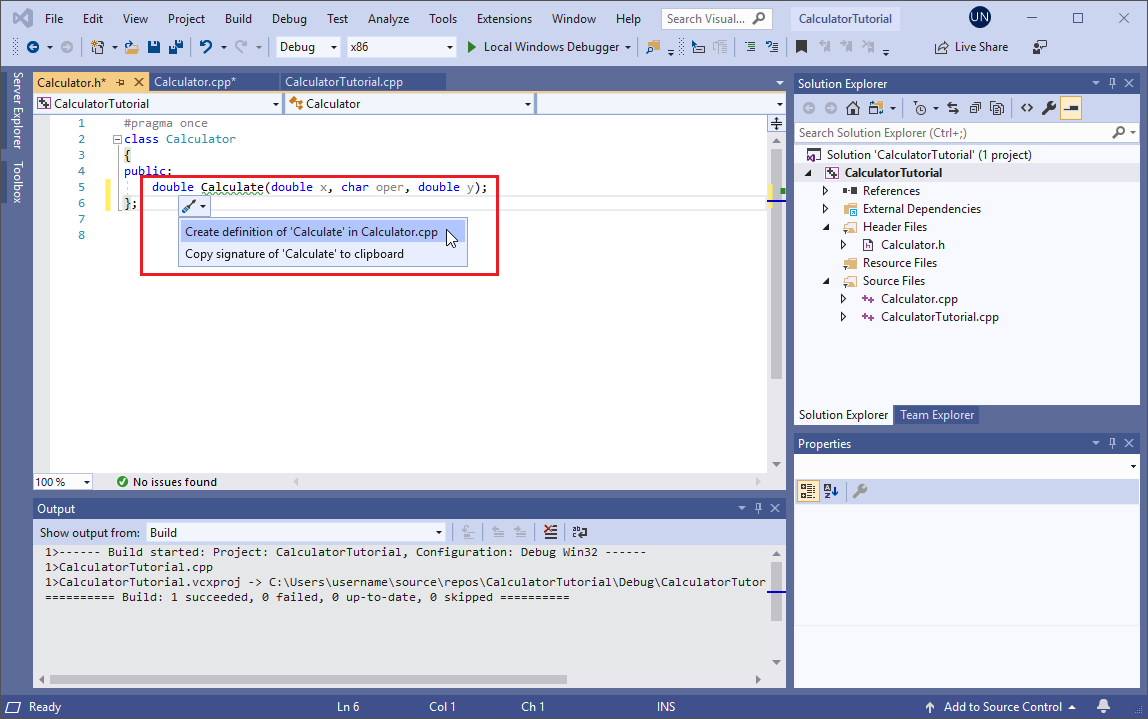
This code is added to
Calculator.cpp: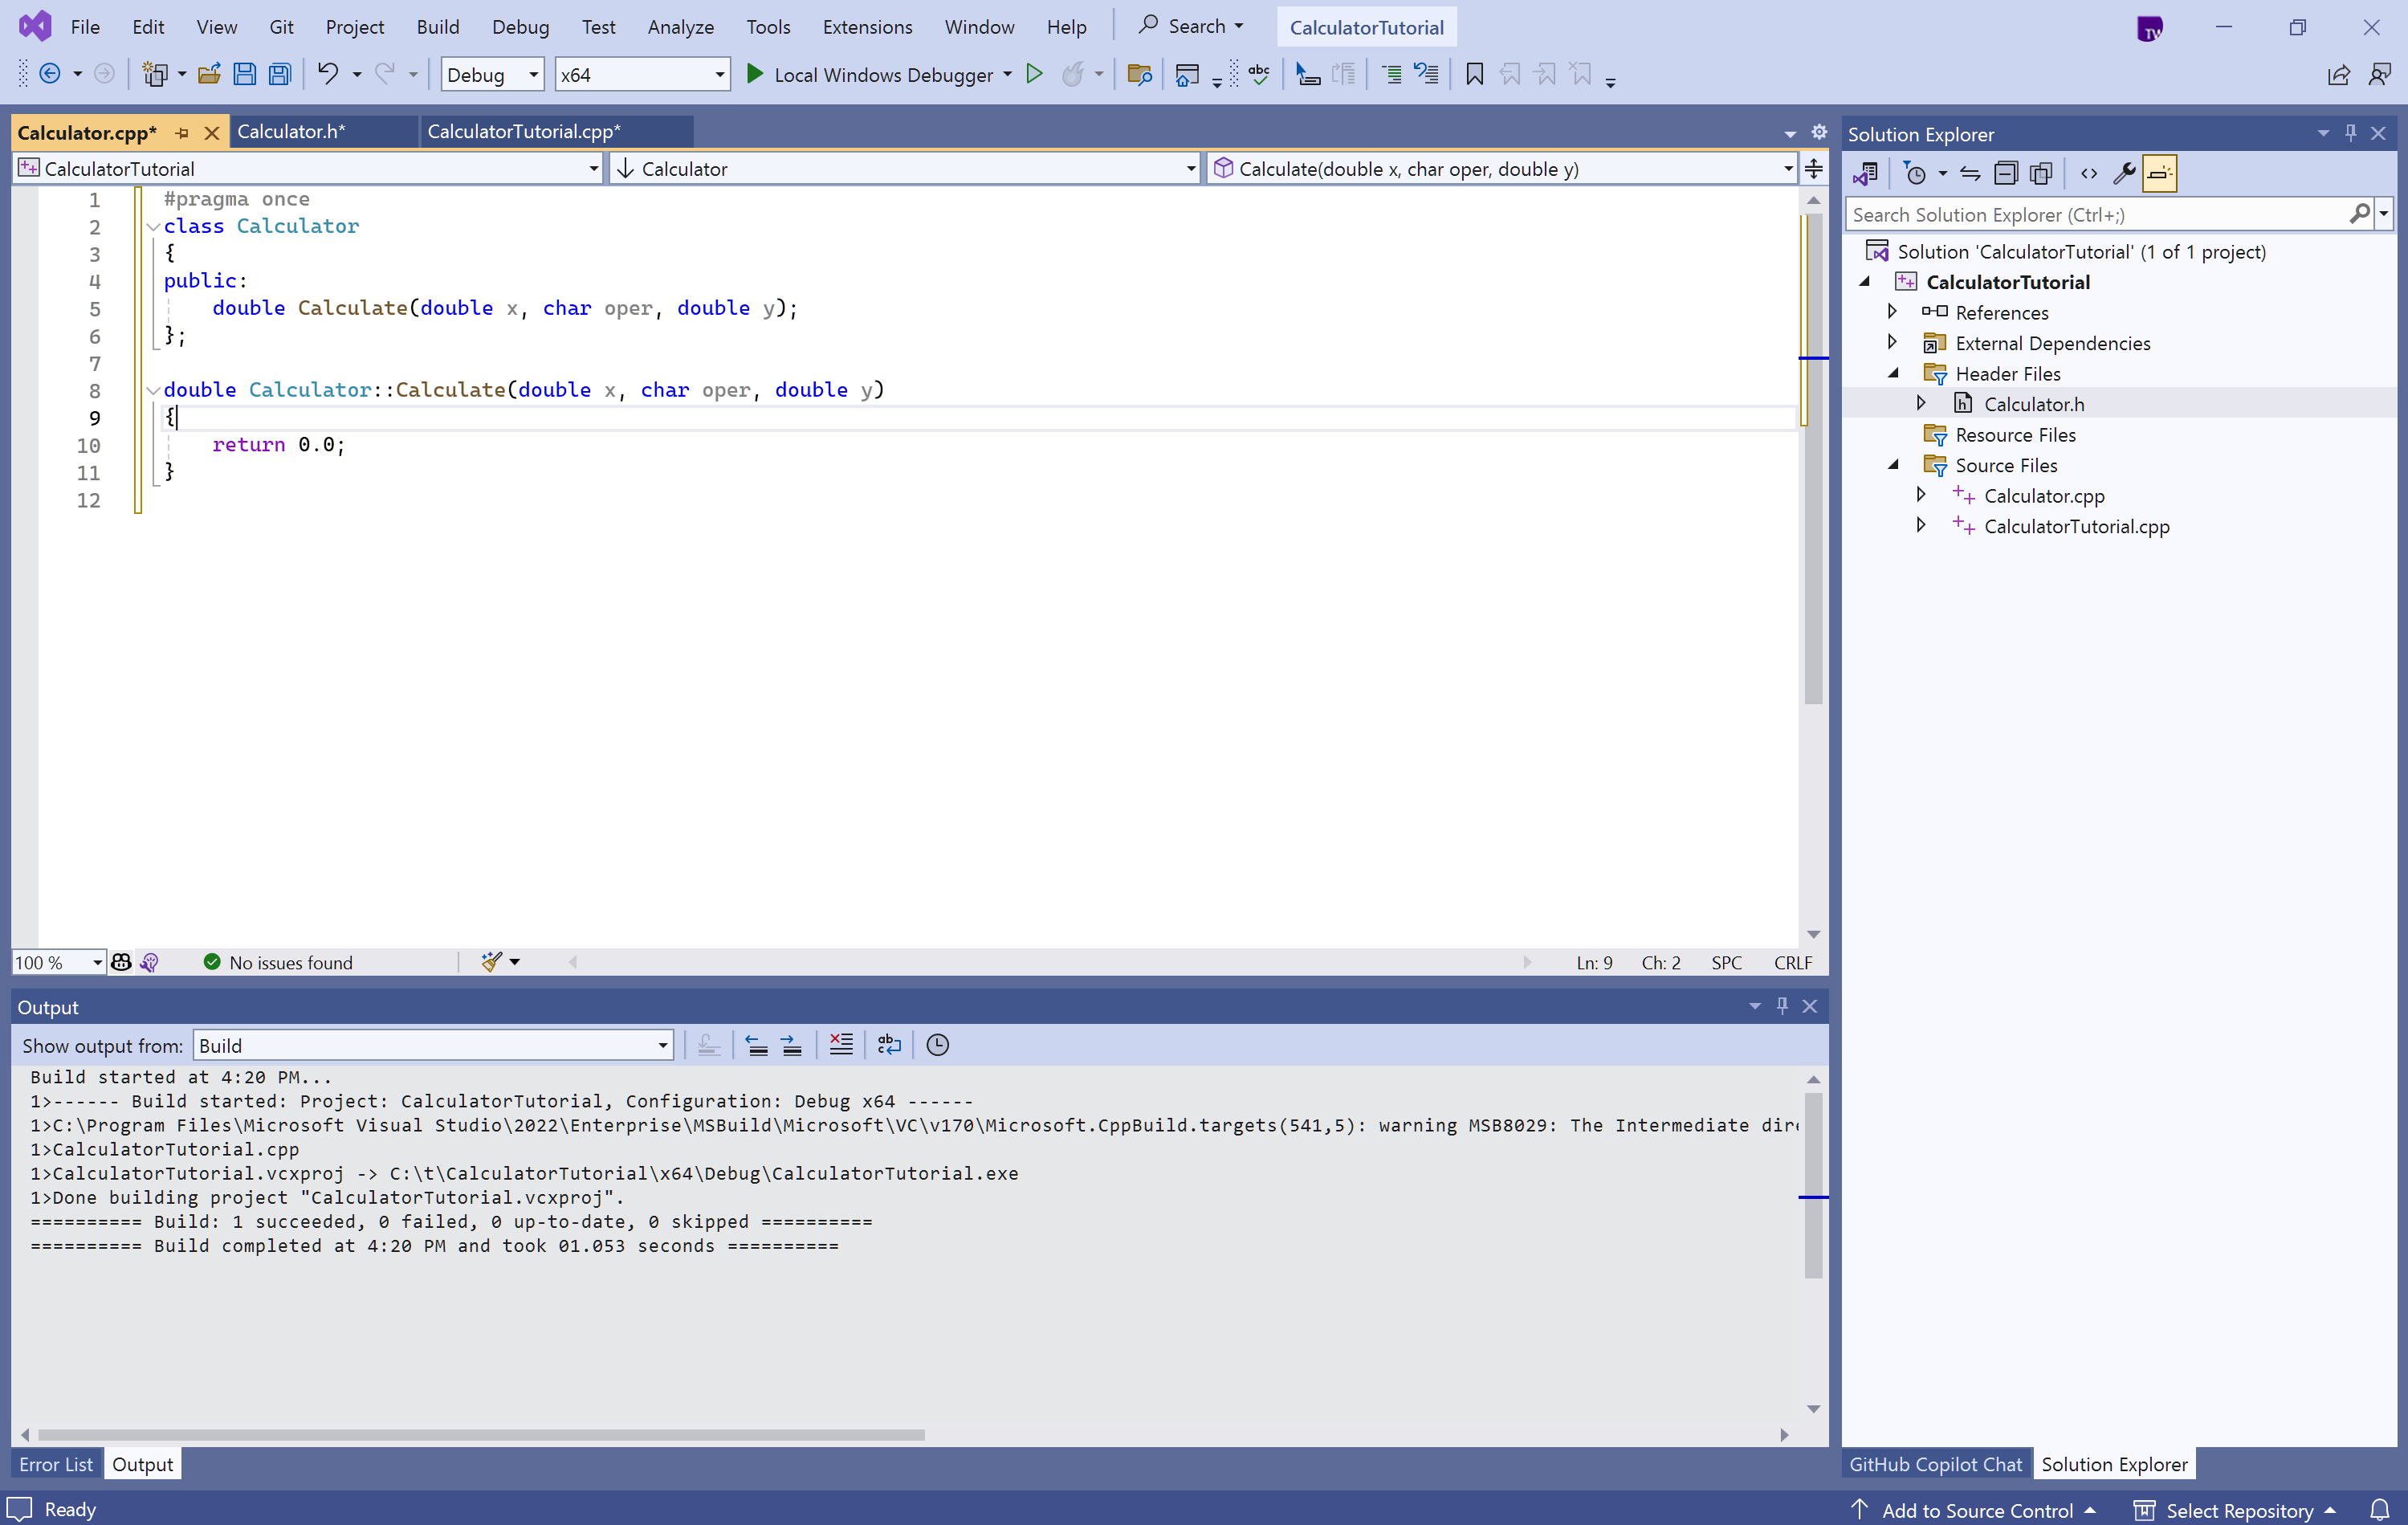
The definition of the function is: double Calculator::Calculate( double x, char oper, double y) { return 0.0; }
Currently, it just returns 0.0. Let's change that.
Switch to the
Calculator.cppfile in the editor window. Replace the contents ofCalculator::Calculate(double x, char oper, double y)with:double Calculator::Calculate(double x, char oper, double y) { switch(oper) { case '+': return x + y; case '-': return x - y; case '*': return x * y; case '/': return x / y; default: return 0.0; } }Understanding the code
- The function
Calculatetakes a number, an operator, and a second number. Then it performs the requested operation on the two numbers. - The
switchstatement checks which operator was provided, and executes the case corresponding to that operation. Thedefault:case is a fallback in case the user types an operator that isn't handled by any of the precedingcasestatements. It's best to handle invalid user input in a more elegant way, but this is beyond the scope of this tutorial. - The
doublekeyword denotes a type of number that supports decimals. This type of number is called a floating-point number, anddoublemeans a floating point number that has extra precision. This way, the calculator can handle both decimal math and integer math. TheCalculatefunction is required to always return a double-precision floating point number due to thedoubleat the start of the code (this denotes the function's return type), which is why we return 0.0 in the default case. - The
.hfile declares the function prototype, which tells the compiler upfront what parameters it requires, and what return type to expect from it. The.cppfile has all the implementation details of the function.
- The function
If you build and run the code again at this point, it immediately exits after asking which operation to perform. So, modify the main function to do multiple calculations.
Call the Calculator class member functions
Update the
mainfunction inCalculatorTutorial.cppas follows:// CalculatorTutorial.cpp : This file contains the 'main' function. Program execution begins and ends there. // #include <iostream> #include "Calculator.h" using namespace std; int main() { double x = 0.0; double y = 0.0; double result = 0.0; char oper = '+'; cout << "Calculator Console Application" << endl << endl; cout << "Please enter the operation to perform. Format: a+b | a-b | a*b | a/b" << endl; Calculator c; while (true) { cin >> x >> oper >> y; result = c.Calculate(x, oper, y); cout << "Result " << "of " << x << oper << y << " is: " << result << endl; } return 0; }Understanding the code
- Since C++ programs always start at the
main()function, we need to call our other code from there, so an#includestatement is needed to make that code visible to ourmain()function. - The variables
x,y,oper, andresultare declared to store the first number, second number, operator, and final result, respectively. It's always good practice to give them some initial values to avoid undefined behavior, which is what is done here. - The
Calculator c;line declares an object namedcas an instance of theCalculatorclass. The class itself is just a blueprint for how calculators work; the object is the specific calculator that does the math. - The
while (true)statement is a loop. The code inside the loop executes over and over again as long as the condition inside the()holds true. Since the condition is simply listed astrue, it's always true, so the loop runs forever. To close the program, the user must manually close the console window. Otherwise, the program always waits for new input. - The
cinkeyword accepts input from the user. The input stream is smart enough to process a line of text entered in the console window and place it inside each of the variables listed, in order. - The
c.Calculate(x, oper, y);expression calls theCalculatefunction defined earlier, and supplies the entered input values and the requested operation. The function then returns a number that is stored inresult. - Finally,
resultis printed to the console and the user sees the result of the calculation.
- Since C++ programs always start at the
Build and test the code again
Now test the program again to make sure everything works properly.
Press Ctrl+F5 to rebuild and start the app.
Enter
5+5, and press Enter. Verify that the result is 10.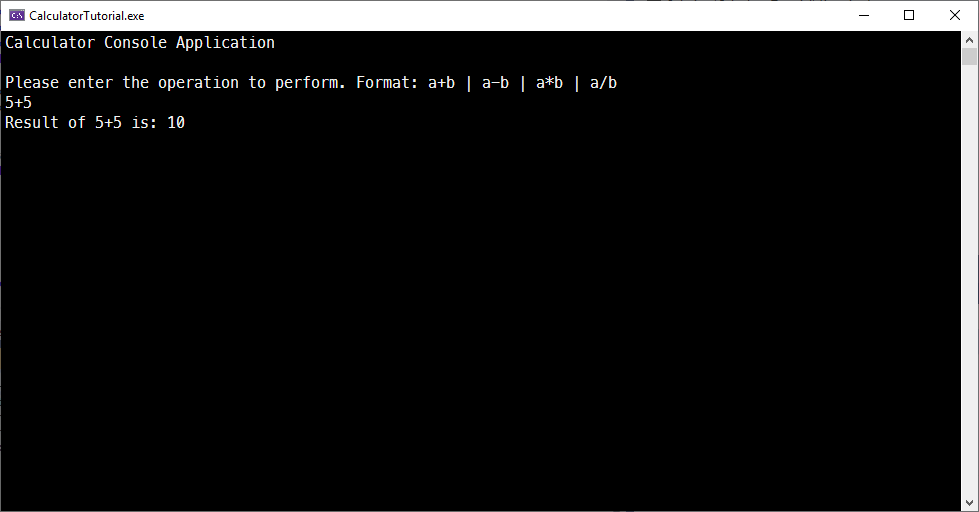
The app output the message: Please enter the operation to perform. Format: a+b | a-b | a*b | a/b. The user entered 5+5. The app output: Result of 5+5 is: 10
Stop the program by closing the console window.
Debug the app
Since the user is free to type anything into the console window, let's make sure the calculator handles unexpected input. Instead of running the program, let's debug it so we can inspect what it's doing step-by-step.
Run the app in the debugger
In
CalcuatorTutorial.cpp, set a breakpoint on the line:result = c.Calculate(x, oper, y);. To set the breakpoint, click next to the line in the gray vertical bar along the left edge of the editor window so that a red dot appears.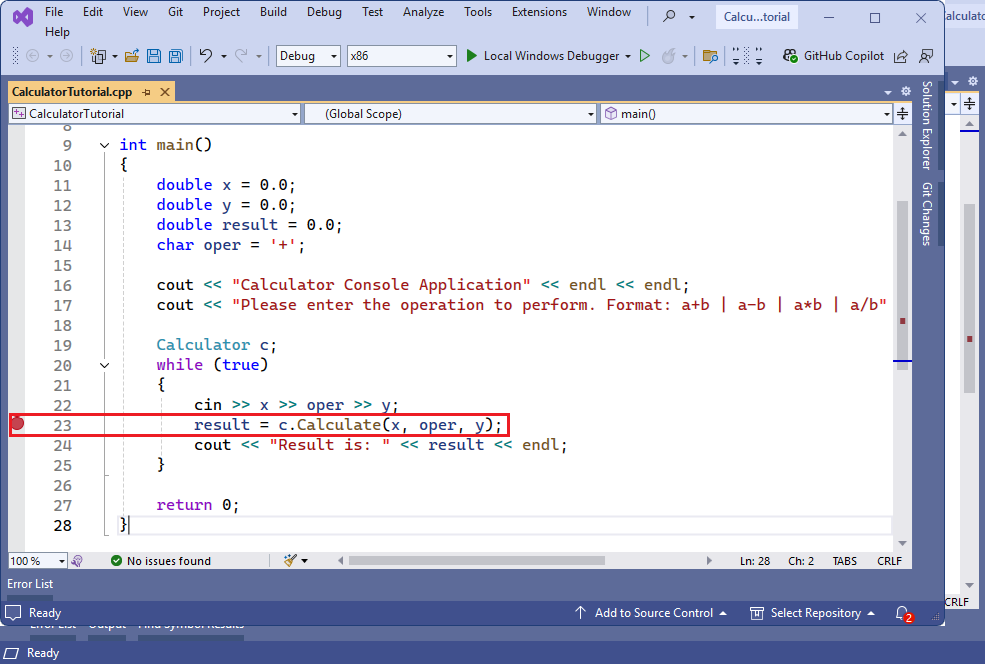
Now when we debug the program, execution pauses at that line. We already have a rough idea that the program works for simple cases. Since we don't want to pause execution every time we call
Calculate(), let's make the breakpoint conditional.Right-click the red dot that represents the breakpoint, and select Conditions. In the edit box for the condition, enter
(y == 0) && (oper == '/'). Select the Close button to save the breakpoint condition.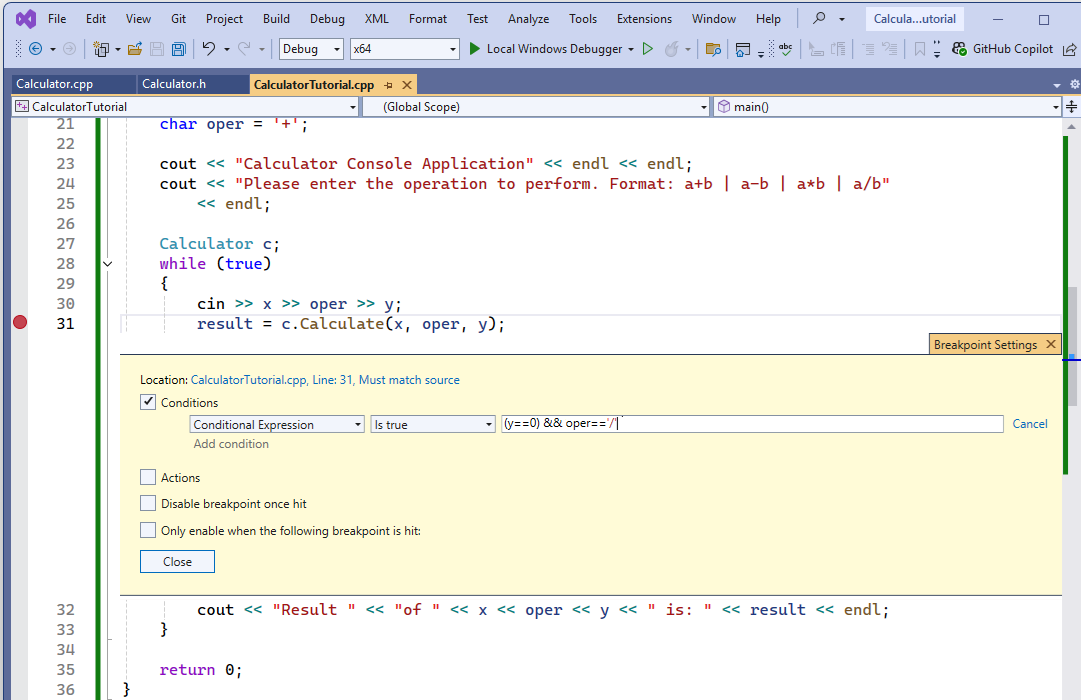
The breakpoint is on the line: result = c dot Calculate ( x, oper, y). 'Conditions...' The Condition option is checked. The Conditions dropdown is set to "Conditional Expression". The condition dropdown is set to "Is true". The condition is set to y == 0 && oper == '/'.
Now, execution pauses at the breakpoint when the app tries to divide by 0.
To debug the program, press F5, or select the Local Windows Debugger debugger toolbar button that has the green arrow icon. In your console app, if you enter something like "5 - 0", the program behaves normally and keeps running. However, if you type "10 / 0", it pauses at the breakpoint. You can put any number of spaces between the operator and numbers:
cinis smart enough to parse the input appropriately.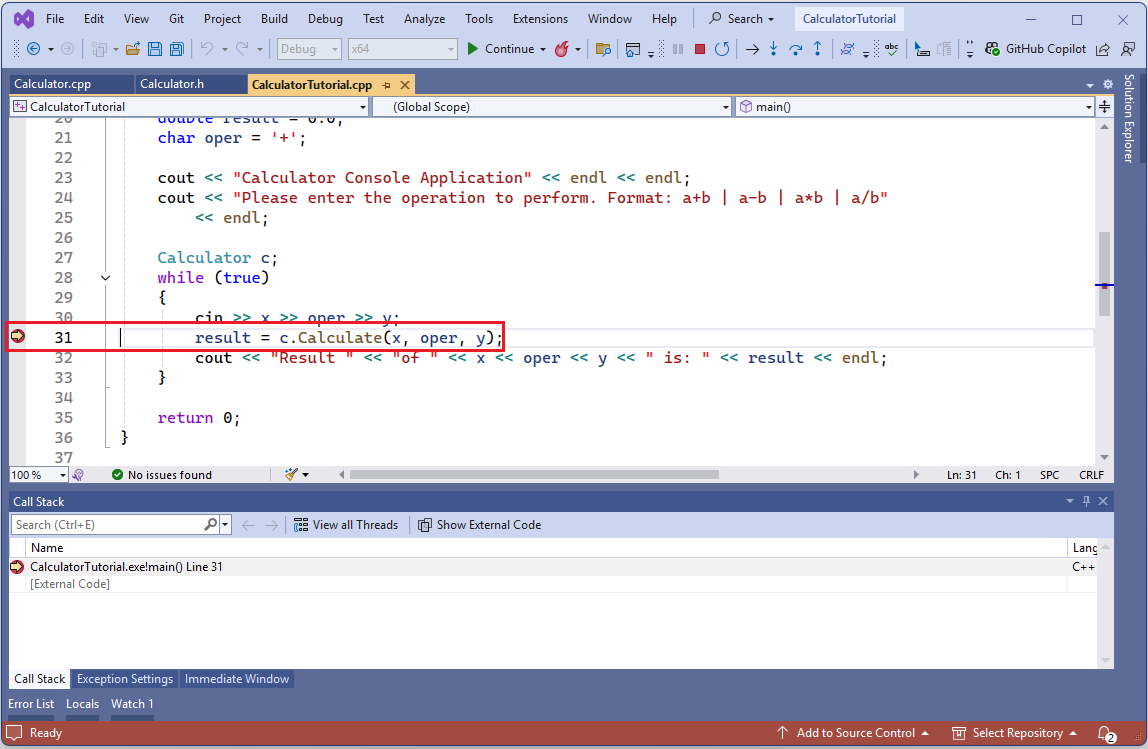
Useful windows in the debugger
When you debug your code, you may notice that some new windows appear. These windows can assist your debugging experience. Take a look at the Autos window. The Autos window shows you the current values of variables used at least three lines before and up to the current line. If you don't see the Autos window, from the main menu select Debug > Windows > Autos.
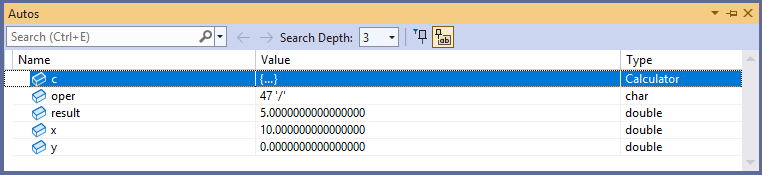
The value of oper is 47 '/', result is 5, x is 10, and y is 0.
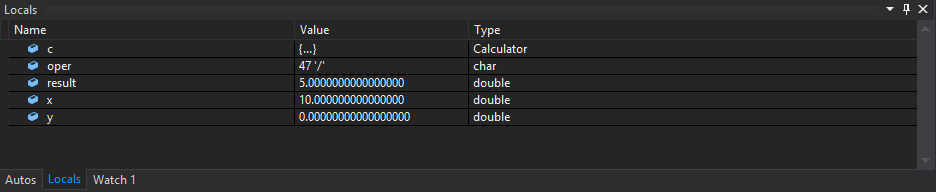
To see all of the variables from that function, switch to the Locals window. Because this is a small function, the Autos and Locals window show the same variables. But you can modify the values of these variables in the Locals window while debugging to see what effect they would have on the program. In this case, we leave them alone. Open the Locals window by selecting Locals at the bottom of the Autos window, or by selecting from the main menu Debug > Windows > Locals.
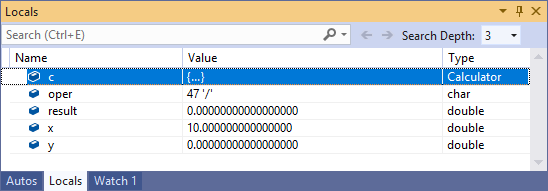
The value of oper is 47 '/', result is 0, x is 10, and y is 0.
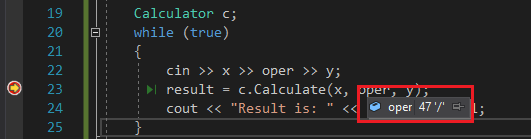
You can also hover over variables in the code to see their current values at the point where execution is currently paused. Make sure the editor window is in focus by clicking on it first.
Continue debugging
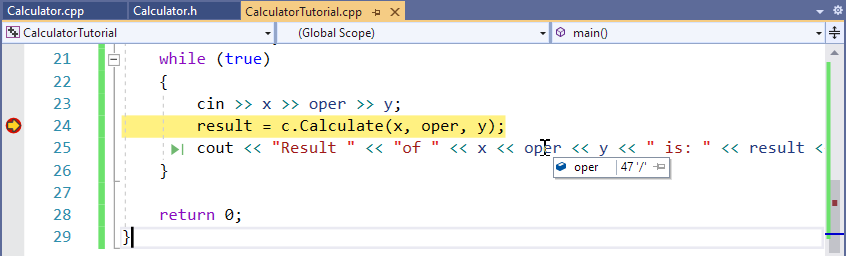
The yellow arrow on the left shows the current point of execution. The current line calls
Calculate, so press F11 to Step Into the function. Now you're executing code in the body of theCalculatefunction. Be careful with Step Into because it steps into any functions on the line you're on, including standard library functions. It's fine to step into the standard library, but you may be more interested in focusing on your code instead of library code.Now that the point of execution is at the start of the
Calculatefunction, press F10 to move to the next line in the program's execution. F10 is also known as Step Over. You can use Step Over to move from line to line, without delving into the details of what is occurring in each part of the line. In general, you should use Step Over instead of Step Into unless you want to dive more deeply into code that is being called from elsewhere (as you did to reach the body ofCalculate).Continue using F10 to Step Over each line until you get back to the
main()function in the other file, and stop on thecoutline.The program is doing what's expected: it takes the first number, and divides it by the second. On the
coutline, hover over theresultvariable or take a look atresultin the Autos window. Its value isinf, which doesn't look right.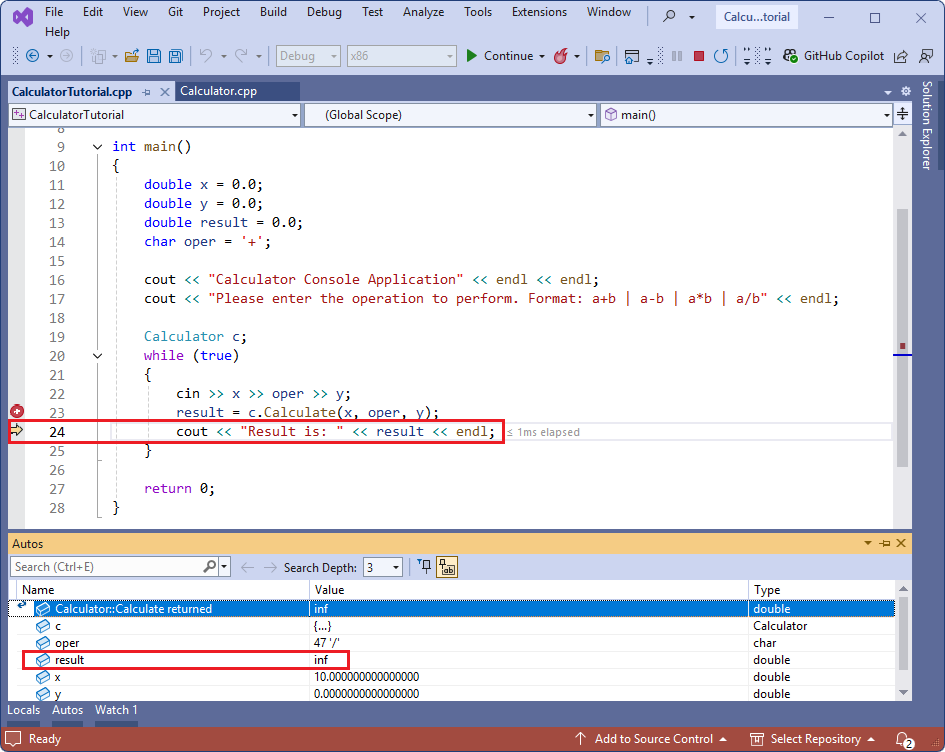
The current statement in the debugger is cout << "Result is: " << result << endl; In the autos window, result is inf.
Let's fix it. The
coutline outputs whatever value is stored inresult, so when you step one more line forward using F10, the console window displays:
The app outputs: Please enter the operation to perform. Format: a+b | a-b | a*b | a/b. The user entered 5-0. The app output: Result is: 5. The user entered 10/0. The app output: Result is: inf
This result is because division by zero is undefined, so the program doesn't have a numerical answer for the requested operation.
Fix the "divide by zero" error
Let's handle division by zero more gracefully so that it's easier for the user to understand the problem.
Make the following changes in
CalculatorTutorial.cpp. You can leave the program running as you edit, thanks to a debugger feature called Edit and Continue. Add anifstatement followingcin >> x >> oper >> y;to check for division by zero and output a message to the user if it happens. Otherwise, the result is printed.// CalculatorTutorial.cpp : This file contains the 'main' function. Program execution begins and ends there. // #include <iostream> #include "Calculator.h" using namespace std; int main() { double x = 0.0; double y = 0.0; double result = 0.0; char oper = '+'; cout << "Calculator Console Application" << endl << endl; cout << "Please enter the operation to perform. Format: a+b | a-b | a*b | a/b" << endl; Calculator c; while (true) { cin >> x >> oper >> y; if (oper == '/' && y == 0) { cout << "Math error: Attempted to divide by zero!" << endl; continue; } else { result = c.Calculate(x, oper, y); } cout << "Result " << "of " << x << oper << y << " is: " << result << endl; } return 0; }Press F5 once. Program execution continues until it has to pause to ask for user input. Enter
10 / 0again. Now, a more helpful message is printed. The user is asked for more input, and the program continues executing normally.
The console window displays two lines: 10 / 0 Result is: inf, followed by, 10 / 0 Math error: Attempted to divide by zero.
Note
When you edit code while in debugging mode, there's a risk of code becoming stale. This happens when the debugger is still running your old code, and has not yet updated it with your changes. The debugger displays a dialog to inform you when this happens. Sometimes, you may need to press F5 to refresh the code being executed. In particular, if you make a change inside a function while the point of execution is inside that function, you need to step out of the function, then back into it again to get the updated code. If that doesn't work and you see an error message, you can stop debugging by clicking on the red square in the toolbar under the menus at the top of the IDE, then start debugging again by entering F5 or by choosing the green "play" arrow beside the stop button on the toolbar.
Another reason edit and continue may fail is if you see a message that says "The Require source files to exactly match the original version setting under Debug->Options->General needs to be enabled..." To fix this, from the main menu select Tools > Options > Debugging > General and ensure that Require source files to exactly match the original version is checked.
Understanding the Run and Debug shortcuts
- F5, or Debug > Start Debugging, starts a debugging session, if one isn't already active, and runs the program until a breakpoint is hit or the program needs user input. If no user input is needed and no breakpoint is available to hit, the program terminates and the console window closes itself when the program finishes running. If your program outputs to the console, use Ctrl+F5 or set a breakpoint before you press F5 to keep the window open.
- Ctrl+F5, or Debug > Start Without Debugging, runs the application without going into debug mode. This is slightly faster than debugging, and the console window stays open after the program finishes executing.
- F10, known as Step Over, lets you iterate through code, line-by-line, and visualize how the code is run and what variable values are at each step of execution.
- F11, known as Step Into, works similarly to Step Over, except it steps into any functions called on the line of execution. For example, if the line being executed calls a function, pressing F11 moves the pointer into the body of the function, so you can follow the function's code being run before coming back to the line you started at. Pressing F10 steps over the function call and just moves to the next line; the function call still happens, but the program doesn't pause to show you what it's doing.
Close the app
- If it's still running, close the console window to stop the calculator app.
Add Git source control
Now that you've created an app, you might want to add it to a Git repository. We've got you covered. Visual Studio makes that process easy with Git tools you can use directly from the IDE.
Tip
Git is the most widely used modern version control system, so whether you're a professional developer or you're learning how to code, Git can be very useful. If you're new to Git, the https://git-scm.com/ website is a good place to start. There, you can find cheat sheets, a popular online book, and Git Basics videos.
To associate your code with Git, you start by creating a new Git repository where your code is located. Here's how:
In the status bar at the bottom-right corner of Visual Studio, select Add to Source Control, and then select Git.

In the Create a Git repository dialog box, sign in to GitHub.
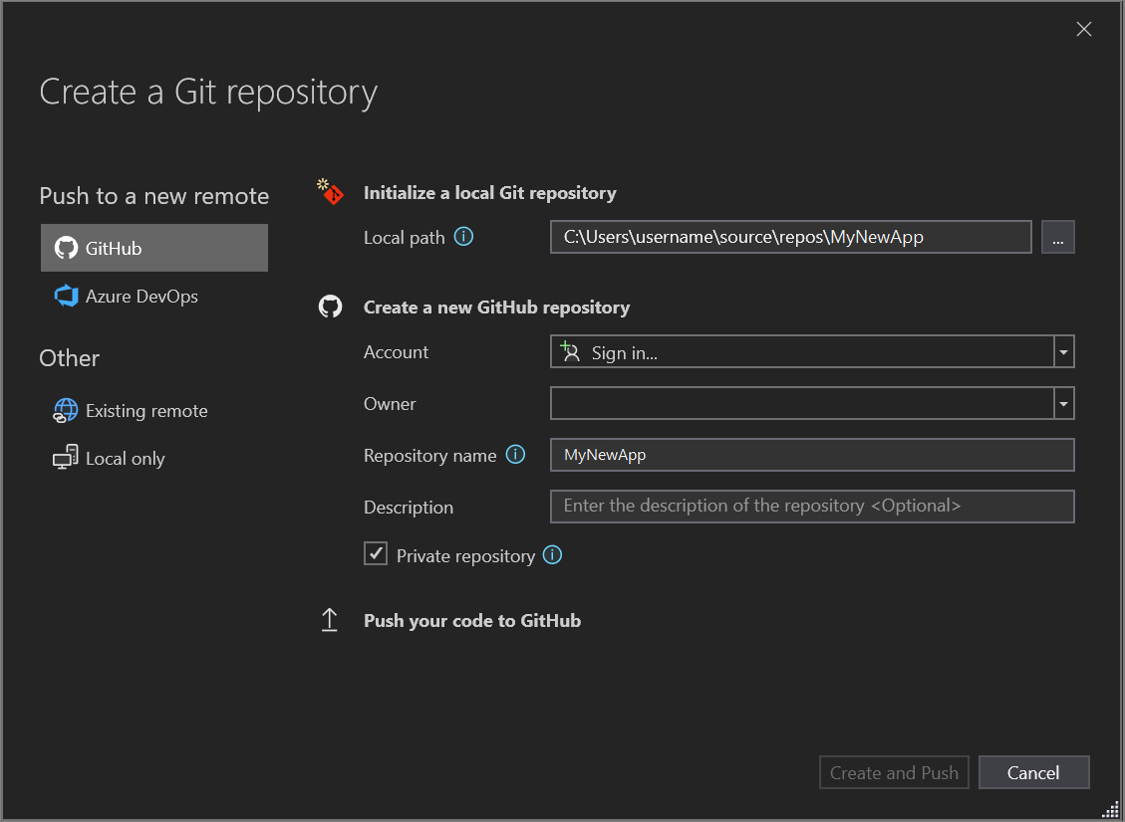
The repository name auto-populates based on your folder location. By default, your new repository is private, which means you're the only one who can access it.
Tip
Whether your repository is public or private, it's best to have a remote backup of your code stored securely on GitHub. Even if you aren't working with a team, a remote repository makes your code available to you from any computer.
Select Create and Push.
After you create your repository, status details appear in the status bar.

The first icon with the arrows shows how many outgoing/incoming commits are in your current branch. You can use this icon to pull any incoming commits or push any outgoing commits. You can also choose to view these commits first. To do so, select the icon, and then select View Outgoing/Incoming.
The second icon with the pencil shows the number of uncommitted changes to your code. You can select this icon to view those changes in the Git Changes window.
To learn more about how to use Git with your app, see the Visual Studio version control documentation.
The finished app
Congratulations! You completed the code for the calculator app, built and debugged it, and added it to a repo, all in Visual Studio.
Next steps
The usual starting point for a C++ programmer is a "Hello, world!" application that runs on the command line. You start with that in this article, and then move on to something more challenging: a calculator app.
Prerequisites
- Visual Studio with the Desktop development with C++ workload installed and running on your computer. To install it, see Install C++ support in Visual Studio.
Create your app project
Visual Studio uses projects to organize the code for an app, and solutions to organize one or more projects. A project contains all the options, configurations, and rules used to build an app. It also manages the relationship between all the project's files and any external files. To create your app, first, create a new project and solution.
On the menubar in Visual Studio, select File > New > Project. The New Project window opens.
On the left sidebar, ensure that Visual C++ is selected. In the center, select Console App.
In the Name textbox at the bottom, name the new project CalculatorTutorial, then select OK.
On the left, Other Languages > Visual C++ is selected. In the center, the Console App project type is selected. The Name text box contains CalculatorTutorial.
An empty C++ Windows console application 'Hello World' app is created. Console applications use a Windows console window to display output and accept user input. In Visual Studio, an editor window opens and shows the generated code:
// CalculatorTutorial.cpp : This file contains the 'main' function. Program execution begins and ends there.
//

#include <iostream>

int main()
{
    std::cout << "Hello World!\n";
}

// Run program: Ctrl + F5 or Debug > Start Without Debugging menu
// Debug program: F5 or Debug > Start Debugging menu

// Tips for Getting Started:
//   1. Use the Solution Explorer window to add/manage files
//   2. Use the Team Explorer window to connect to source control
//   3. Use the Output window to see build output and other messages
//   4. Use the Error List window to view errors
//   5. Go to Project > Add New Item to create new code files, or Project > Add Existing Item to add existing code files to the project
//   6. In the future, to open this project again, go to File > Open > Project and select the .sln file
Verify that your new app builds and runs
The template for a new windows console application creates a simple C++ "Hello World" app. At this point, you can see how Visual Studio builds and runs the apps you create right from the IDE.
To build your project, select Build Solution from the Build menu. The Output window shows the results of the build process.
To run the code, on the menu bar, select Debug, Start without debugging (Ctrl+F5).
A console window opens and your app runs within it.
When you start a console app in Visual Studio, it runs your code, then prints
Press any key to close this window . . .to give you a chance to see the output.Congratulations! You created your first "Hello, world!" console app in Visual Studio!
Press a key to dismiss the console window and return to Visual Studio.
You now have the tools to build and run your app after every change, to verify that the code still works as you expect. Later, we show you how to debug it if it doesn't.
Edit the code
Now let's turn the code in this template to be a calculator app.
Replace the contents of the
CalculatorTutorial.cppfile with the following code so that it matches this example:// CalculatorTutorial.cpp : This file contains the 'main' function. Program execution begins and ends there. // #include <iostream> using namespace std; int main() { cout << "Calculator Console Application" << endl << endl; cout << "Please enter the operation to perform. Format: a+b | a-b | a*b | a/b" << endl; return 0; } // Run program: Ctrl + F5 or Debug > Start Without Debugging menu // Debug program: F5 or Debug > Start Debugging menu // Tips for Getting Started: // 1. Use the Solution Explorer window to add/manage files // 2. Use the Team Explorer window to connect to source control // 3. Use the Output window to see build output and other messages // 4. Use the Error List window to view errors // 5. Go to Project > Add New Item to create new code files, or Project > Add Existing Item to add existing code files to the project // 6. In the future, to open this project again, go to File > Open > Project and select the .sln fileUnderstanding the code:
- The
#includestatement brings in code in other files. Sometimes, you may see a filename surrounded by angle brackets like<iostream>. The angle brackets instruct the compiler to look for theiostreamheader file first in the standard system directories, and if not found, to look in directories specific to the project. Other times, you may see a filename surrounded by quotes like"someHeader.h". The quotes instruct the compiler to skip looking in the standard system directories and instead only look in directories specific to the project. - The
using namespace std;tells the compiler to expect code from the C++ Standard Library to be used in this file. Without this line, each keyword from the library would have to be preceded withstd::to denote its scope. For instance, without that line, each reference tocoutwould be written asstd::cout. Theusingstatement is added to make it more convenient to access code in another namespace. - The
coutkeyword prints to standard output in C++. The<<operator tells the compiler to send whatever is to the right of it to the standard output. - The
endlkeyword is like the Enter key; it ends the line and moves the cursor to the next line. It's a better practice to put a\ninside the string (contained by"") to do the same thing becauseendlalways flushes the buffer and can hurt the performance of the program. But since this is a very small app,endlis used instead. - All C++ statements must end with semicolons and all C++ applications must contain a
main()function. This function is what the program runs at the start. All code must be accessible frommain()in order to be used.
- The
To save the file, press Ctrl+S, or select the floppy disk icon in the toolbar under the menu bar.
To run the application, press Ctrl+F5 or go to the Debug menu and select Start Without Debugging. If you get a pop-up that says This project is out of date, you may select Do not show this dialog again, and then select Yes to build your application. You should see a console window appear that looks like this:
The console app shows the output which is: Calculator Console Application. Please enter the operation to perform. Format: a+b | a-b | a*b | a/b. The process exited with code 0 and there's a message that to automatically close the console when debugging stops, enable Tools > Options > Debugging > Automatically close the console when debugging stops. Lastly, there's a message to press any key to close this window.
Close the console window when you're done.
Add code to do some math
A class is like a blueprint for an object that does something. In this case, we define a calculator class to contain the math logic.
Add a Calculator class
Go to the Project menu and select Add Class. In the Class Name edit box, enter Calculator. Select OK.
The class name field contains the text calculator. The .h file field contains Calculator.h. The .cpp file field contains Calculator.cpp. The base class field is empty. The options for inline, and Managed are unchecked.
A class is like a blueprint for an object that does something. In this case, we define a calculator and how it should work.
Two new files get added to your project. To save all your changed files at once, press Ctrl+Shift+S. It's a keyboard shortcut for File > Save All. There's also a toolbar button for Save All, an icon of two floppy disks, found beside the Save button. In general, it's good practice to do Save All frequently, so you don't miss any files when you save.
The Add Class wizard creates
.hand.cppfiles that have the same name as the class. You can see a full list of your project files in the Solution Explorer window, visible on the side of the IDE. If the Solution Explorer isn't visible, open it from the menu bar: select View > Solution Explorer.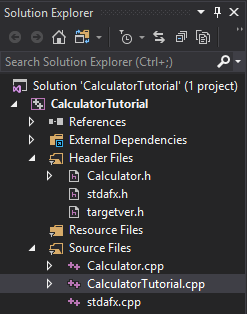
The calculator tutorial project has a header files node containing Calculator.h, stdafx.h, and targetver.h. A Source Files node contains Calculator.cpp, CalculatorTutorial.cpp, and stdafx.cpp. Nodes for references, external dependencies, and resource files are visible but closed.
You can open a file by double-clicking it in the Solution Explorer window. Double-click
Calculator.hto open it.Replace the contents of
Calculator.hwith the following code so that the file now looks like this:#pragma once class Calculator { public: double Calculate(double x, char oper, double y); };Understanding the code
- This code declares a new function called
Calculate, which handles math operations for addition, subtraction, multiplication, and division. - C++ code is organized into header (
.h) files and source (.cpp) files. Some other file extensions are supported by various compilers, but these are the main ones to know about. Functions and variables are normally declared, that is, given a name and a type, in header files, and implemented, or given a definition, in source files. To access code defined in another file, you can use#include "filename.h", wherefilename.his the name of the file that declares the variables or functions you want to use. - It's good practice to organize your code into different files based on what it does, so it's easy to find the code you need later. In our case, we define the
Calculatorclass separately from the file containing themain()function, but we plan to reference theCalculatorclass inmain().
- This code declares a new function called
A green squiggle appears under
Calculatebecause although theCalculatefunction is declared, it isn't defined. Hover overCalculate, click the down arrow on the light bulb, and select Create definition of 'Calculate' inCalculator.cpp. A pop-up appears that gives you a peek of the code change that was made in the other file. The code was added toCalculator.cpp.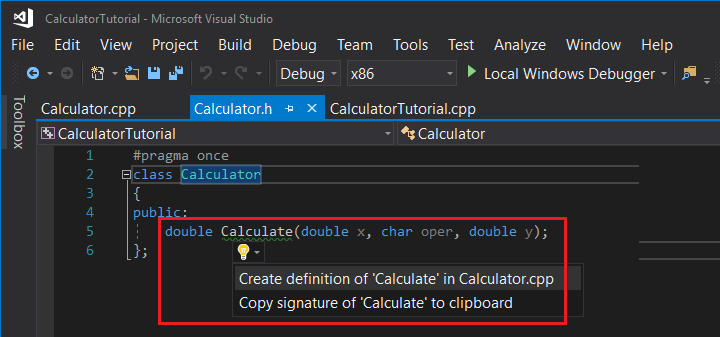
Currently, it just returns 0.0. Let's change that. Press Esc to close the pop-up and choose Yes to save the changes.
Switch to the
Calculator.cppfile in the editor window. Replace the contents of the file with the following code:#include "Calculator.h" double Calculator::Calculate(double x, char oper, double y) { switch(oper) { case '+': return x + y; case '-': return x - y; case '*': return x * y; case '/': return x / y; default: return 0.0; } }Understanding the code
- The function
Calculatetakes a number, an operator, and a second number. Then it performs the requested operation on the two numbers. - The
switchstatement checks which operator was provided, and executes the case corresponding to that operation. Thedefault:case is a fallback in case the user types an operator that isn't handled by any of the precedingcasestatements. It's best to handle invalid user input in a more elegant way, but this is beyond the scope of this tutorial. - The
doublekeyword denotes a type of number that supports decimals. This type of number is called a floating-point number, anddoublemeans a floating point number that has extra precision. This way, the calculator can handle both decimal math and integer math. TheCalculatefunction is required to always return a double-precision floating point number due to thedoubleat the start of the code (this denotes the function's return type), which is why we return 0.0 in the default case. - The
.hfile declares the function prototype, which tells the compiler upfront what parameters it requires, and what return type to expect from it. The.cppfile has all the implementation details of the function.
- The function
If you build and run the code again at this point, it still exits after asking which operation to perform. Next, modify the main function to do some calculations.
Call the Calculator class member functions
Update the
mainfunction inCalculatorTutorial.cppas follows:// CalculatorTutorial.cpp : This file contains the 'main' function. Program execution begins and ends there. // #include <iostream> #include "Calculator.h" using namespace std; int main() { double x = 0.0; double y = 0.0; double result = 0.0; char oper = '+'; cout << "Calculator Console Application" << endl << endl; cout << "Please enter the operation to perform. Format: a+b | a-b | a*b | a/b" << endl; Calculator c; while (true) { cin >> x >> oper >> y; result = c.Calculate(x, oper, y); cout << "Result is: " << result << endl; } return 0; }Understanding the code
- Since C++ programs always start at the
main()function, we need to call our other code from there, so an#includestatement is needed to make that code visible to ourmain()function. - The variables
x,y,oper, andresultare declared to store the first number, second number, operator, and final result, respectively. It's always good practice to give them some initial values to avoid undefined behavior, which is what is done here. - The
Calculator c;line declares an object namedcas an instance of theCalculatorclass. The class itself is just a blueprint for how calculators work; the object is the specific calculator that does the math. - The
while (true)statement is a loop. The code inside the loop execute over and over again as long as the condition inside the()holds true. Since the condition is simply listed astrue, it's always true, so the loop runs forever. To close the program, the user must manually close the console window. Otherwise, the program always waits for new input. - The
cinkeyword accepts input from the user. The input stream is smart enough to process a line of text entered in the console window and place it inside each of the variables listed, in order. - The
c.Calculate(x, oper, y);expression calls theCalculatefunction defined earlier, and supplies the entered input values and the requested operation. The function then returns a number that is stored inresult. - Finally,
resultis printed to the console and the user sees the result of the calculation.
- Since C++ programs always start at the
Build and test the code again
Test the program again to make sure everything works properly.
Press Ctrl+F5 to rebuild and start the app.
Enter
5+5, and press Enter. Verify that the result is 10.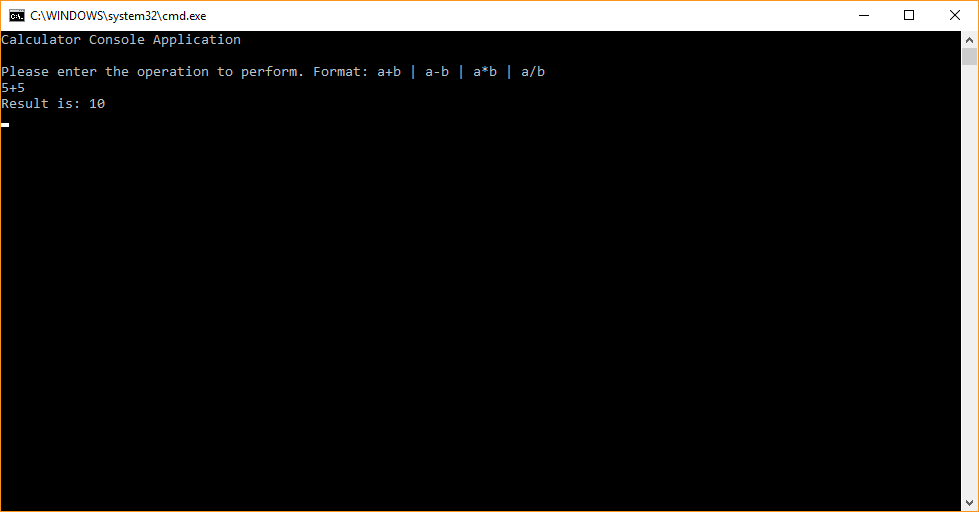
Stop the program by closing the console window.
Debug the app
Since the user is free to type anything into the console window, let's make sure the calculator handles unexpected input. Instead of running the program, let's debug it instead, so we can inspect what it's doing step-by-step.
Run the app in the debugger
In
CalcuatorTutorial.cpp, set a breakpoint on theresult = c.Calculate(x, oper, y);line. To set the breakpoint, click next to the line in the gray vertical bar along the left edge of the editor window so that a red dot appears.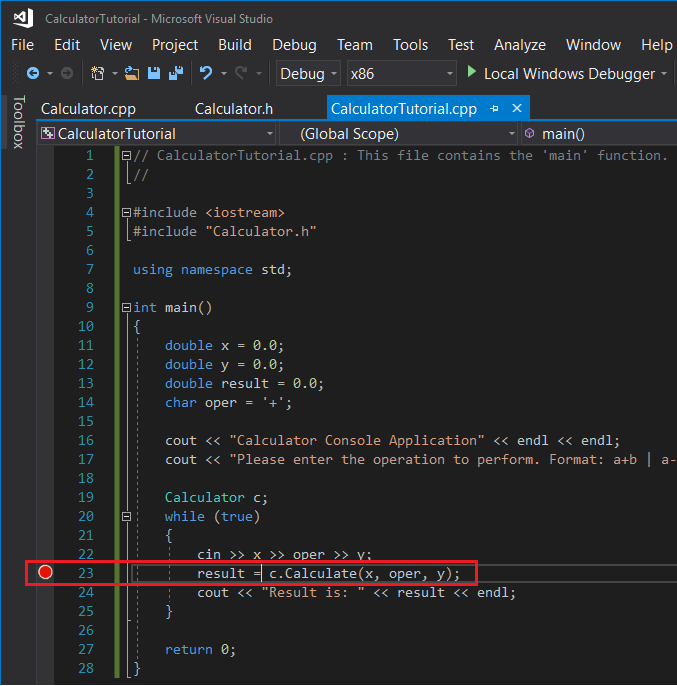
Now when you debug the program, it always pauses execution at that line. We already have a rough idea that the program works for simple cases. Since we don't want to pause execution every time, let's make the breakpoint conditional.
Right-click the red dot that represents the breakpoint, and select Conditions. In the edit box for the condition, enter
(y == 0) && (oper == '/'). Select the Close button when you're done to save the breakpoint condition.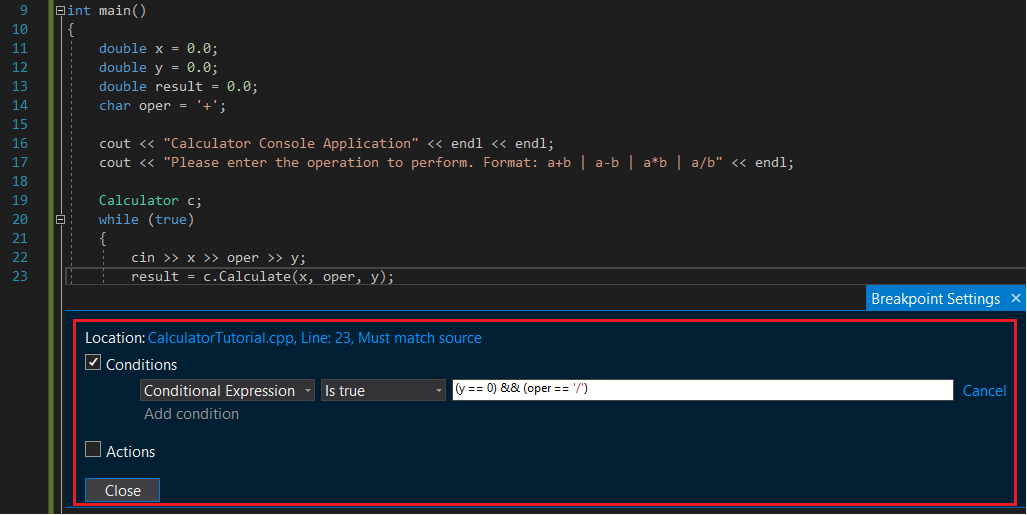
The breakpoint is on the line: result = c dot Calculate ( x, oper, y). 'Conditions...' The Condition option is checked. The Conditions dropdown is set to "Conditional Expression". The condition dropdown is set to "Is true". The condition is set to y == 0 && oper == '/'.
Execution will pause at the breakpoint if a division by 0 is attempted.
To debug the program, press F5, or select the Local Windows Debugger toolbar button that has the green arrow icon. In your console app, if you enter something like "5 - 0", the program behaves normally and keeps running. However, if you type "10 / 0", it pauses at the breakpoint. You can even put any number of spaces between the operator and numbers;
cinis smart enough to parse the input appropriately.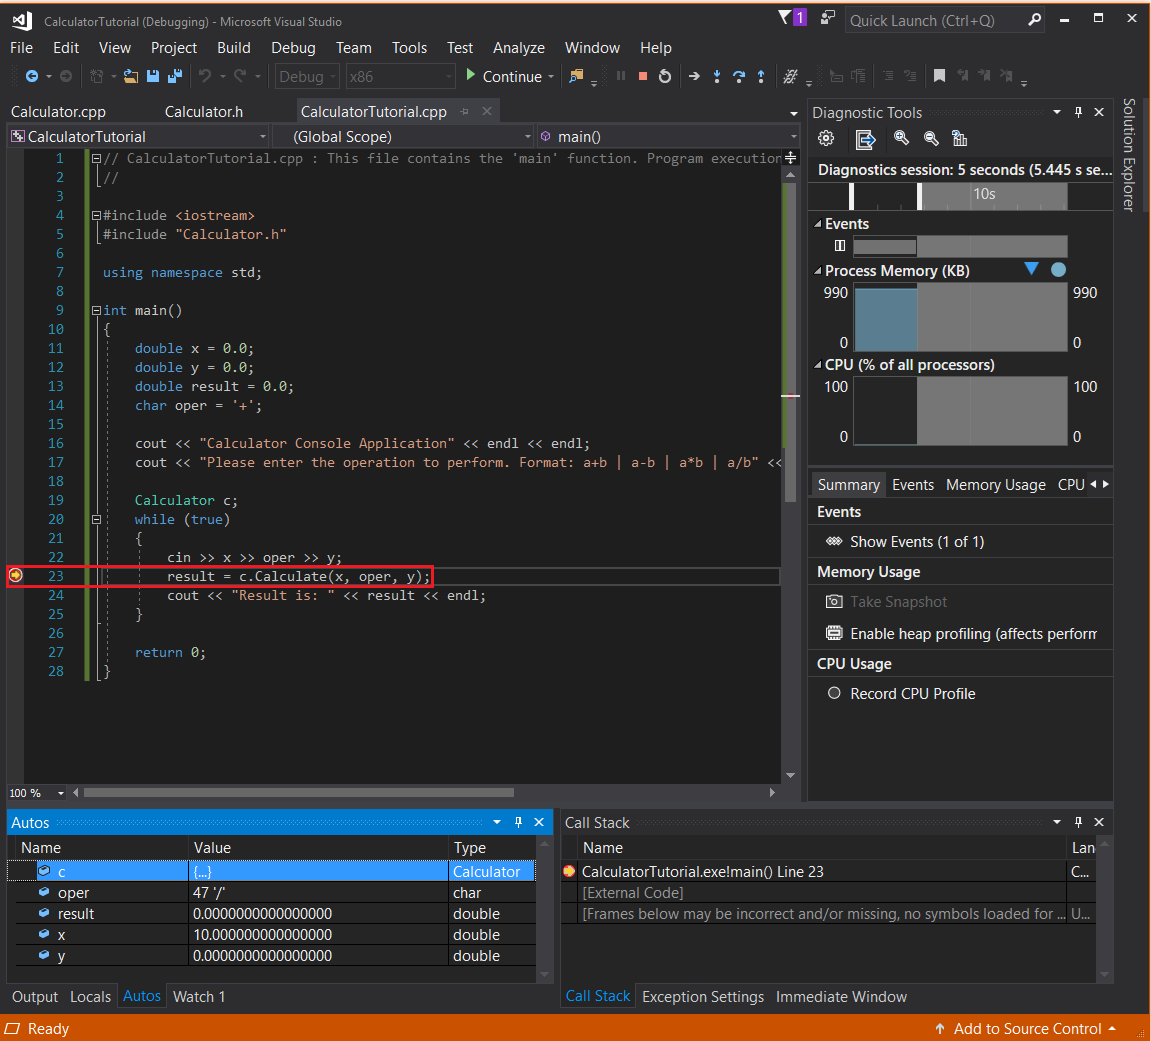
The user enters 5 - 0. The app outputs: Result is 5. The user then enters 10/0 and because the condition for the conditional breakpoint is met, execution stops on the line: result = c.Calculate(x, oper, y);
Useful windows in the debugger
When you debug your code, you may notice that some new windows appear. These windows can assist your debugging experience. Take a look at the Autos window. The Autos window shows you the current values of variables used at least three lines before and up to the current line. If you don't see the Autos window, from the main menu select Debug > Windows > Autos.

The value of oper is 47 '/', result is 5, x is 10, and y is 0.
To see all of the variables from that function, switch to the Locals window. Because this is a small function, the Autos and Locals window show the same variables. But you can modify the values of these variables while debugging, to see what effect they would have on the program. In this case, we leave them alone. Open the Locals window by selecting Locals at the bottom of the Autos window, or by selecting from the main menu Debug > Windows > Locals.
The value of oper is 47 '/', result is 0, x is 10, and y is 0.
You can also hover over variables in the code itself to see their current values where the execution is currently paused. Make sure the editor window is in focus by clicking on it first.
Continue debugging
The yellow arrow on the left shows the current point of execution. The current line calls
Calculate, so press F11 to Step Into the function, which takes you into the body of theCalculatefunction. Be careful with Step Into because it steps into any functions on the line you're on, including standard library functions. It's fine to step into the standard library, but you may be more interested in focusing on your code instead of library code.Now that the point of execution is at the start of the
Calculatefunction, press F10 to move to the next line in the program's execution. F10 is also known as Step Over. You can use Step Over to move from line to line, without delving into the details of what is occurring in each part of the line. In general you should use Step Over instead of Step Into, unless you want to dive more deeply into code that is being called from elsewhere (as you did to reach the body ofCalculate).Continue using F10 to Step Over each line until you get back to the
main()function in the other file, and stop on thecoutline.The program is doing what's expected: it takes the first number, and divides it by the second. On the
coutline, hover over theresultvariable or take a look atresultin the Autos window. Its value isinf, which doesn't look right.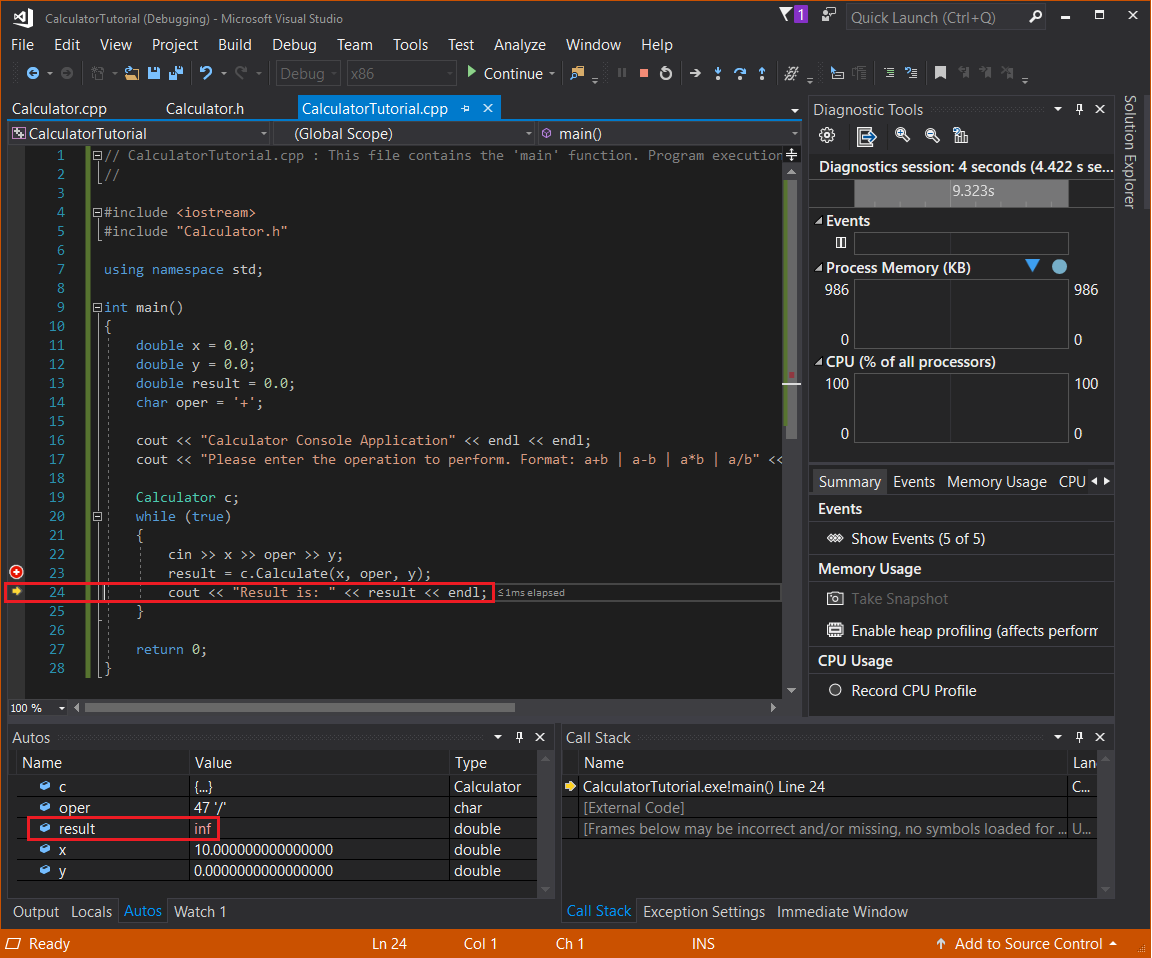
The current statement in the debugger is cout << "Result is: " << result << endl; In the autos window, result is inf.
Let's fix it. The
coutline outputs whatever value is stored inresult, so when you step one more line forward using F10, the console window displays:
The app outputs: Please enter the operation to perform. Format: a+b | a-b | a*b | a/b. The user entered 5-0. The app output: Result is: 5. The user entered 10/0. The app output: Result is: inf
This result is because division by zero is undefined, so the program doesn't have a numerical answer for the requested operation.
Fix the "divide by zero" error
Let's handle division by zero more gracefully so that it's easier for the user to understand the problem.
Make the following changes in
CalculatorTutorial.cpp. (You can leave the program running as you edit, thanks to a debugger feature called Edit and Continue). The change is to add anifstatement followingcin >> x >> oper >> y;to check for division by zero and output a message to the user if it happens. Otherwise, the result is printed:// CalculatorTutorial.cpp : This file contains the 'main' function. Program execution begins and ends there. // #include <iostream> #include "Calculator.h" using namespace std; int main() { double x = 0.0; double y = 0.0; double result = 0.0; char oper = '+'; cout << "Calculator Console Application" << endl << endl; cout << "Please enter the operation to perform. Format: a+b | a-b | a*b | a/b" << endl; Calculator c; while (true) { cin >> x >> oper >> y; if (oper == '/' && y == 0) { cout << "Division by 0 exception" << endl; continue; } else { result = c.Calculate(x, oper, y); } cout << "Result is: " << result << endl; } return 0; }Press F5 once. Program execution continues until it has to pause to ask for user input. Enter
10 / 0again. Now, a more helpful message is printed. The user is asked for more input, and the program continues executing normally.
Note
When you edit code while in debugging mode, there's a risk of code becoming stale. This happens when the debugger is still running your old code, and has not yet updated it with your changes. The debugger pops up a dialog to inform you when this happens. Sometimes, you may need to press F5 to refresh the code being executed. In particular, if you make a change inside a function while the point of execution is inside that function, step out of the function, then back into it again to get the updated code. If that doesn't work for some reason and you see an error message, you can stop debugging by clicking on the red square in the toolbar under the menus at the top of the IDE, then start debugging again by entering F5 or by choosing the green "play" arrow beside the stop button on the toolbar.
Another reason edit and continue may fail is that you need to go to the main menu and select Tools > Options > Debugging > General and ensure that Require source files to exactly match the original version is checked.
Understanding the Run and Debug shortcuts
- F5, or Debug > Start Debugging, starts a debugging session, if one isn't already active, and runs the program until a breakpoint is hit or the program needs user input. If no user input is needed and no breakpoint is available to hit, the program terminates and the console window closes itself when the program finishes running. If your program outputs to the console, use Ctrl+F5 or set a breakpoint before you press F5 to keep the window open.
- Ctrl+F5, or Debug > Start Without Debugging, runs the application without going into debug mode. This is slightly faster than debugging, and the console window stays open after the program finishes executing.
- F10, known as Step Over, lets you iterate through code, line-by-line, and visualize how the code is run and what variable values are at each step of execution.
- F11, known as Step Into, works similarly to Step Over, except it steps into any functions called on the line of execution. For example, if the line being executed calls a function, pressing F11 moves the pointer into the body of the function, so you can follow the function's code being run before coming back to the line you started at. Pressing F10 steps over the function call and just moves to the next line; the function call still happens, but the program doesn't pause to show you what it's doing.
Close the app
- If it's still running, close the console window to stop the calculator app.
The finished app
Congratulations! You completed the code for the calculator app, and built and debugged it in Visual Studio.