Note
Access to this page requires authorization. You can try signing in or changing directories.
Access to this page requires authorization. You can try changing directories.
The Defender deployment tool provides an efficient, user-friendly onboarding process for Microsoft Defender for Endpoint on Linux devices. It allows users to install and onboard Microsoft Defender for Endpoint using a single package that can be downloaded from the Microsoft Defender portal. This eliminates the need to install Defender using installer script/cli commands and then, separately, to onboard the device using the onboarding package from the portal.
The defender-deployment tool supports both manual and bulk onboarding through third-party tools such as Chef, Ansible, Puppet, and SaltStack. The tool supports several parameters you can use to customize large scale deployments, making it possible to have tailored installations across diverse environments.
Prerequisites and system requirements
Before you get started, see Prerequisites for Microsoft Defender for Endpoint on Linux for a description of prerequisites and system requirements. Additionally, the following requirements also need to be met:
- Allow connection to the URL:
msdefender.download.prss.microsoft.com. Before you begin deployment, make sure to run the connectivity test, which checks if the URLs Defender for Endpoint uses are accessible or not. - The endpoint must have either wget or curl installed.
The deployment tool enforces the following set of prerequisites checks, which if not met will abort the deployment process:
- Device memory: Greater than 1 GB
- Available disk space on the device: Greater than 2GB
- Glibc library version on the device: Newer than 2.17
- Defender build version: Must be supported and not expired. To check the product expiration date, run the command
-mdatp health.
Tip
Before running the deployment tool to onboard Defender onto your Linux server, it's recommended to run the tool with the --pre-req option to help identify and fix any potential issues that might impact the deployment.
Deployment: Step-by-step guide
Download the Defender deployment tool from the Defender portal using the following steps.
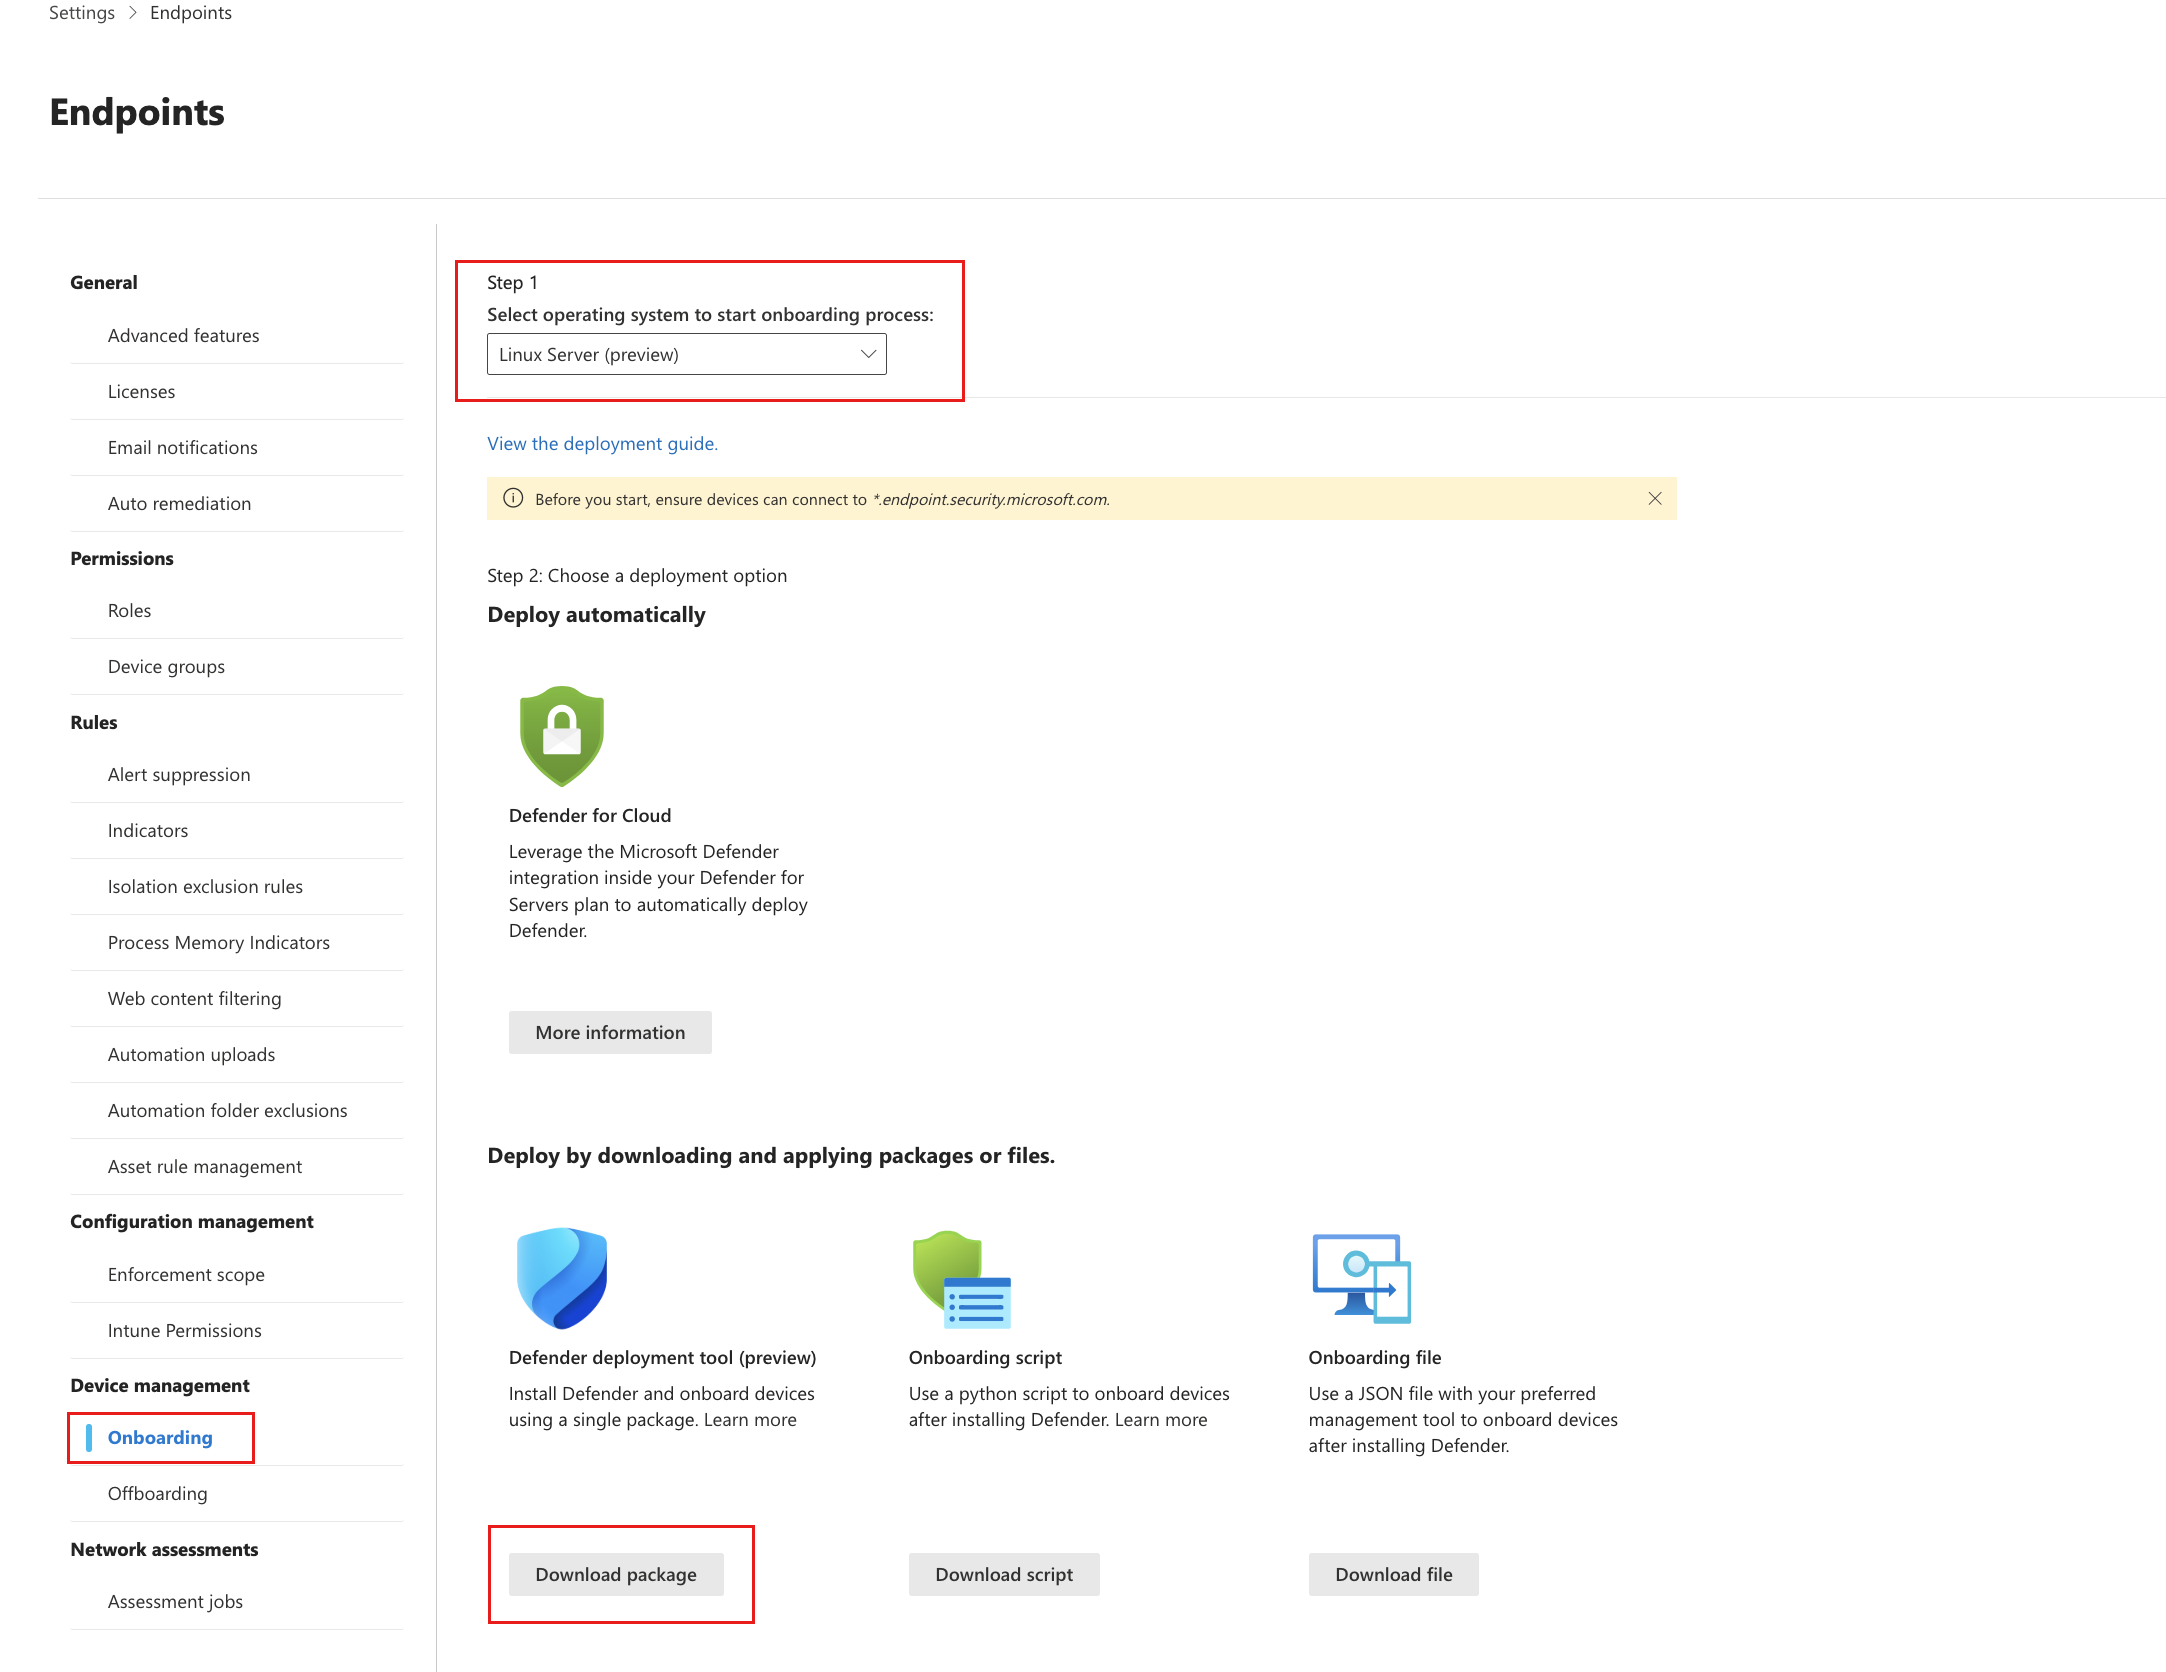
Go to Settings > Endpoints > Device management > Onboarding.
In the Step 1 drop-down menu, select Linux as the operating system.
Under Download and apply onboarding packages or files, select the Download package button under Defender deployment tool.
Note
Since this package installs and onboards the agent, it's a tenant specific package and must not be used across tenants.
From a command prompt, extract the contents of the archive:
unzip GatewayLinuxDefenderDeploymentTool.zipArchive: GatewayLinuxDefenderDeploymentTool.zip inflating: defender_deployment_tool.shGrant executable permissions to the script.
chmod +x defender_deployment_tool.shRun the script using the following command to install and onboard Microsoft Defender for Endpoint on your endpoint.
sudo bash defender_deployment_tool.shThis command installs the latest agent version from the production channel and onboards the device to Defender portal. It might take 5-20 minutes for the device to show up in the Device Inventory.
Note
If you have set up a system-wide proxy to redirect Defender for Endpoint traffic, make sure you configure the proxy using the Defender deployment tool as well. Refer to the command-line help (--help) for available proxy options.
You can further customize deployment by passing parameters to the tool based on your requirements. Use the option
--helpto see all the available options:./defender_deployment_tool.sh --help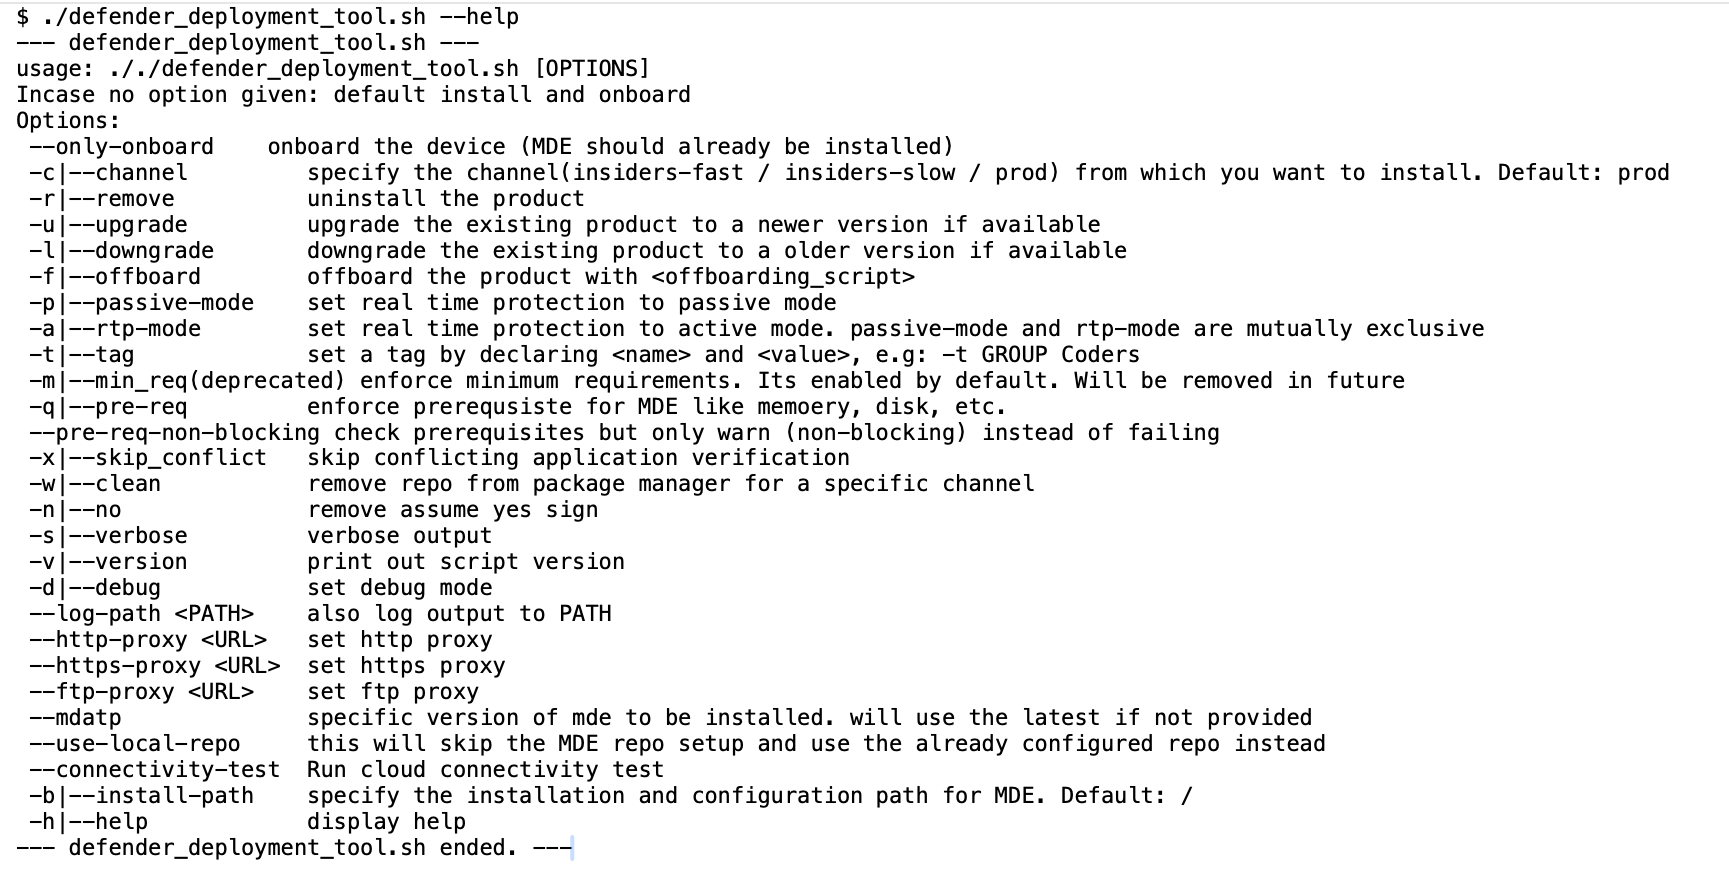
The following table provides examples of commands for useful scenarios.
Scenario Command Check for unmet prerequisites sudo ./defender_deployment_tool.sh --pre-reqRun the connectivity test sudo ./defender_deployment_tool.sh --connectivity-testDeploy to a custom location sudo ./defender_deployment_tool.sh --install-path /usr/microsoft/Deploy from a locally configured package repository sudo ./defender_deployment_tool.sh --use-local-repo
This option can't be combined with--channelor--clean.Deploy from a specific channel sudo ./defender_deployment_tool.sh --channel insiders-slowDeploy using a proxy sudo ./defender_deployment_tool.sh --http-proxy <http://username:password@proxy_host:proxy_port>Deploy a specific agent version sudo ./defender_deployment_tool.sh --mdatp 101.25042.0003 --channel prodUpgrade to a specific agent version sudo ./defender_deployment_tool.sh --upgrade --mdatp 101.24082.0004Downgrade to a specific agent version sudo ./defender_deployment_tool.sh --downgrade --mdatp 101.24082.0004Uninstall Defender sudo ./defender_deployment_tool.sh --removeFor more information, see Offboard or uninstall Microsoft Defender for Endpoint on LinuxOnly onboard if Defender is already installed sudo ./defender_deployment_tool.sh --only-onboardOffboard Defender sudo ./defender_deployment_tool.sh --offboard MicrosoftDefenderATPOffboardingLinuxServer.py
(Note: Before using the --offboard option, you must first download the latest offboarding script from the Defender portal at System > Settings > Endpoints > Offboarding). For other methods of offboarding, see Offboard or uninstall Microsoft Defender for Endpoint on Linux.
Monitor deployment progress in the Microsoft Defender portal
As the Defender deployment tool runs, it sends a progress event to the Defender portal at the start and end of each deployment step. These events let you track deployment status for all your devices without signing in to each one, and pinpoint the step where a failed deployment stopped.
Check the onboarding status for a device in Device inventory. To check fleet-wide onboarding status, use an advanced hunting query. To see the stepwise progress, see the device timeline. Go to Device inventory, select the device, and then select Timeline.
To filter deployment events on the timeline, enter DefenderDeployment in the timeline search box. Each event reads Defender deployment tool: <step> succeeded or Defender deployment tool: <step> failed, and includes any extra details the tool reports for that step. The following screenshot shows a successful install run.
Deployment timeline
A successful install-and-onboard run produces the following sequence of events:
| Order | Step (ActionName) |
Description |
|---|---|---|
| 1 | Start | The deployment tool starts. The event includes the tool version and the operation: install, upgrade, downgrade, remove, or offboard. |
| 2 | Download | The tool downloads the installer script from Microsoft. This step is skipped if you supply a pre-staged script with the --script option. |
| 3 | Prerequisite check | The tool validates the system requirements, such as memory, disk space, glibc, and kernel features. |
| 4 | Installation | The tool installs the Microsoft Defender for Endpoint package. The event includes the installed agent version. |
| 5 | Sensor initialization | The agent finishes onboarding, and the sensor is licensed and active. |
| 6 | Sequence completion | The full deployment sequence finishes. This step is always the last event for a run. |
A remove, upgrade, or offboard run includes only the steps that apply to it. If a step fails, the tool sends a failure event for that step, along with an exit code and an error description that explains what went wrong.
Query deployment status with advanced hunting
To inspect the events for a specific device, run the following query in advanced hunting. Replace <DeviceId> with the target device ID. To find the device ID, go to Device inventory, or run mdatp health --field edr_device_id on the device.
DeviceEvents
| where Timestamp > ago(1d)
| where ActionType == "DefenderDeploymentToolEvent"
| where DeviceId == "<DeviceId>"
| extend Details = parse_json(AdditionalFields)
| project
    Timestamp,
    DeviceName,
    Step = tostring(Details.ActionName),
    Succeeded = tobool(Details.IsSuccess),
    ExitCode = toint(Details.ExitCode),
    Data = tostring(Details.Data),
    ErrorDescription = tostring(Details.ErrorDescription)
| sort by Timestamp asc
To get a deployment status summary for all your devices, run the following query. It returns the most recent step that each device reported in the last 30 days, and classifies each device as Onboarded, Onboarding Failed, or still onboarding:
DeviceEvents
| where Timestamp > ago(30d)
| where ActionType == "DefenderDeploymentToolEvent"
| extend Details = parse_json(AdditionalFields)
| extend Step = tostring(Details.ActionName), Succeeded = tobool(Details.IsSuccess)
| summarize arg_max(Timestamp, DeviceName, Step, Succeeded) by DeviceId
| extend Status = case(
    Step == "Sequence completion" and Succeeded, "Onboarded",
    Step == "Sequence completion" and not(Succeeded), "Onboarding Failed",
    not(Succeeded), strcat("Failed at: ", Step),
    "Onboarding")
| project DeviceId, DeviceName, LastEvent = Timestamp, LastStep = Step, Status
Verify AV/EDR functioning
In the Microsoft Defender portal, open the device inventory. It might take 5-20 minutes for the device to show up in the portal.
Run an antivirus detection test to verify that the device is properly onboarded and reporting to the service. Perform the following steps on the newly onboarded device:
Ensure that real-time protection is enabled (denoted by a result of true from running the following command):
mdatp health --field real_time_protection_enabledIf it isn't enabled, execute the following command:
mdatp config real-time-protection --value enabledOpen a Terminal window and execute the following command to run a detection test:
curl -o /tmp/eicar.com.txt https://secure.eicar.org/eicar.com.txtYou can run more detection tests on zip files using either of the following commands:
curl -o /tmp/eicar_com.zip https://secure.eicar.org/eicar_com.zip
curl -o /tmp/eicarcom2.zip https://secure.eicar.org/eicarcom2.zip
The files should be quarantined by Defender for Endpoint on Linux. Use the following command to list all the detected threats:
mdatp threat list
Run an EDR detection test and simulate a detection to verify that the device is properly onboarded and reporting to the service. Perform the following steps on the newly onboarded device:
Download and extract the script file to an onboarded Linux server.
Grant executable permissions to the script:
chmod +x mde_linux_edr_diy.shRun the following command:
./mde_linux_edr_diy.shAfter a few minutes, a detection should be raised in Microsoft Defender XDR.
Check the alert details, machine timeline, and perform your typical investigation steps.
Troubleshoot deployment issues
Check deployment error logs:
/tmp/defender_deployment_tool.logrecords the deployment tool's activity./tmp/defender_deployment_tool_telemetry.logrecords the progress events that the tool sends to the Microsoft Defender portal.
If you're experiencing any connectivity issues, run this command to perform a connectivity test:
sudo ./defender_deployment_tool.sh --connectivity-testIt might take some time to run as it performs checks for every URL needed by Defender and finds issues, if any.
Run the advanced hunting query for the device and look for the most recent event where
Succeededisfalse. TheStepfield identifies the failed step, and theErrorDescriptionandExitCodefields explain why:If the deployment fails at the Download step, the installer script couldn't be downloaded. Verify that the device has
curlorwgetinstalled and that it allows outbound HTTPS connectivity to Microsoft download endpoints.If the deployment fails at the Prerequisite check step, the device doesn't meet the minimum system requirements. The
ErrorDescriptionfield lists the failed checks, separated by|. Non-blocking failures have a(non_blocking)prefix and don't stop the deployment.If the deployment fails at the Installation step, the package manager couldn't install the agent. Common causes include a misconfigured package repository, a missing dependency, or a requested
mdatpversion that isn't available in the selected channel.If the deployment fails at the Sensor initialization step, the agent installed but didn't finish onboarding within the expected time. Run
mdatp healthon the device, and check thelicensed,healthy, andorg_idfields.If deployment events don't appear in the portal for a device, check
/tmp/defender_deployment_tool_telemetry.logon that device to confirm whether the tool sent them.
If that doesn't help you resolve the issue, try checking the following steps:
How to switch between channels after you have deployed from a channel
Defender for Endpoint on Linux can be deployed from one of the following channels:
- insiders-fast
- insiders-slow
- prod (production)
Each of these channels corresponds to a Linux software repository. The channel determines the type and frequency of updates that are offered to your device. Devices in insiders-fast are the first to receive updates and new features, followed later by insiders-slow and lastly by prod.
By default, the deployment tool configures your device to use the prod channel. You can use the configuration options described in this document to deploy from a different channel.
To preview new features and provide early feedback, it's recommended that you configure some devices in your enterprise to use either insiders-fast or insiders-slow. If you've already deployed Defender for Endpoint on Linux from a channel and want to switch to a different channel (from prod to insiders-fast, for example), you must first remove the current channel, then delete the current channel repo, and then finally install Defender from the new channel, as illustrated in the following example, where the channel is changed from insiders-fast to prod:
Remove the insiders-fast channel version of Defender for Endpoint on Linux..
sudo ./defender_deployment_tool.sh --remove --channel insiders-fastDelete the Defender for Endpoint on the Linux insiders-fast repo.
sudo ./defender_deployment_tool.sh --clean --channel insiders-fastInstall Microsoft Defender for Endpoint on Linux using the production channel.
sudo ./defender_deployment_tool.sh --channel prod
Related content
- Prerequisites for Microsoft Defender for Endpoint on Linux
- Enable deployment of Microsoft Defender for Endpoint to a custom location
- Use installer script based deployment to deploy Microsoft Defender for Endpoint on Linux
- Deploy Microsoft Defender for Endpoint on Linux with Ansible
- Deploy Defender for Endpoint on Linux with Chef
- Deploy Microsoft Defender for Endpoint on Linux with Puppet
- Deploy Microsoft Defender for Endpoint on Linux with Saltstack
- Deploy Microsoft Defender for Endpoint on Linux manually
- Deploy Microsoft Defender for Endpoint on Linux using golden images
- Connect your non-Azure machines to Microsoft Defender for Cloud with Defender for Endpoint (direct onboarding using Defender for Cloud)
- Deployment guidance for Microsoft Defender for Endpoint on Linux for SAP