Note
Access to this page requires authorization. You can try signing in or changing directories.
Access to this page requires authorization. You can try changing directories.
After you install the ZoomInfo app, you can use it as a standalone app. Every time sellers need to view the required information, they must return to the app selection area and choose ZoomInfo.
As an administrator, you can customize the ZoomInfo app in the following ways:
- Add ZoomInfo entry to the site map: Add the ZoomInfo entry to your Dynamics 365 Sales app on the left navigation site map. Provide easy access to ZoomInfo, including the Admin Portal and ZoomInfo Knowledge Center. For more information, see Add ZoomInfo entry to site map.
- Add ZoomInfo form to table entities: Add the ZoomInfo form to standard or custom Account, Contacts, and Leads table entities. Provide sellers with inline access to ZoomInfo data. For more information, see Add ZoomInfo form to entities.
Prerequisites
Before you start, make sure you meet the following prerequisites:
- You're assigned the system administrator role. For more information, see Assign a security role to a user.
- The ZoomInfo app is installed on your Dynamics 365 Sales organization. For more information, see Install ZoomInfo app.
Add ZoomInfo entry to site map
When you add the ZoomInfo entry to the left navigation site map of your Dynamics 365 Sales app, sales teams can perform searches, and administrators can access the Admin Portal to configure export preferences, custom mapping, and other settings. You can also add a site map entry to the ZoomInfo Knowledge Center.
To add the entry to the site map:
Sign in to the Power Apps portal and choose the organization where you installed the ZoomInfo app.
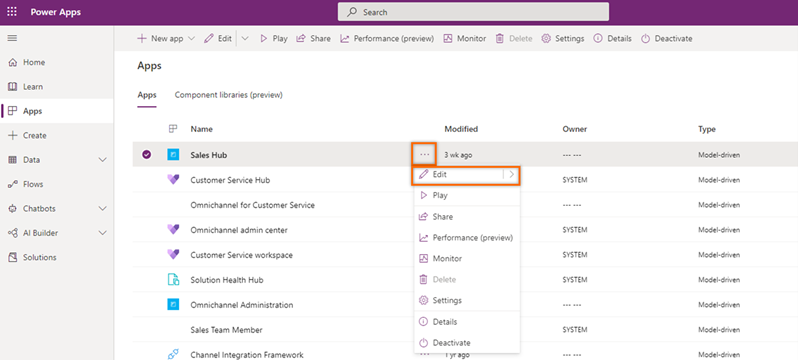
On the left navigation pane, select Apps. You see a list of apps that are available in the environment.
Select the Sales Hub app, and then select More options (…) > Edit.
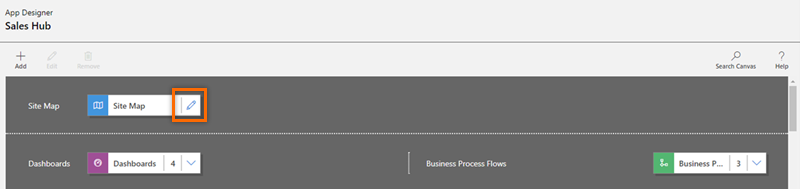
On the App Designer page, under Site Map, select the pencil icon.
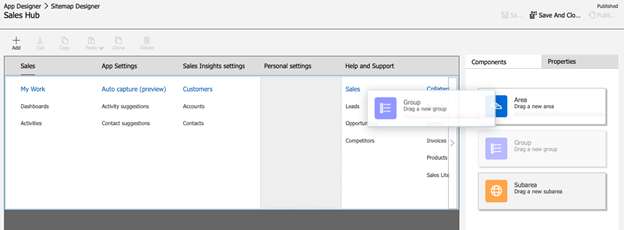
Choose an existing area or add a new area to the site map. Then, from the Components tab, drag and drop Group.
On the Properties tab, under the General section, add the following group information:
Field Description Title Specifies the name of the group. Enter ZoomInfo as the title. ID Specifies the unique identification number for the group. Use the default value. 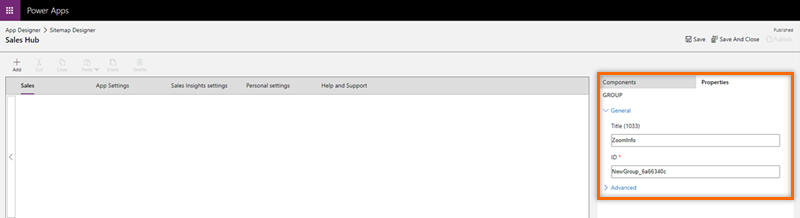
Select the added ZoomInfo group. Then, on the right pane under the Components tab, drag and drop the Subarea.
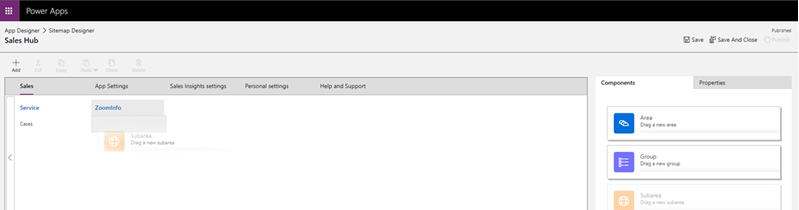
Select the added subarea. Then, on the right pane under the Properties tab, enter the following information to add the ZoomInfo site map entry:
Field Description Type Web Resource URL ZoomInfo Title ZoomInfo 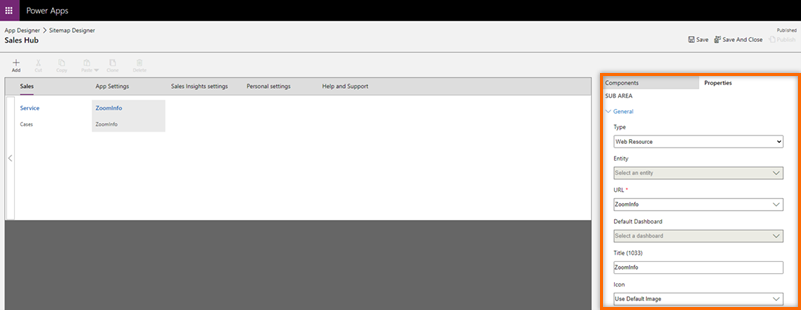
To add a site map entry to the ZoomInfo Knowledge Center, repeat steps 7 and 8. Enter the following information for the subarea:
Field Description Type URL URL https://university.zoominfo.com/pages/knowledge-center-zoominfo-for-sales-homeTitle Knowledge Center Save and publish the changes.
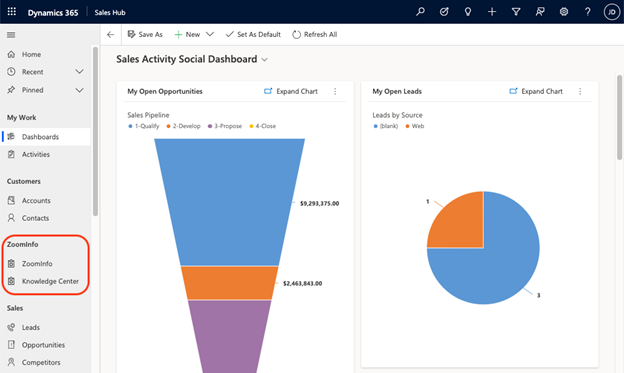
(Optional) To verify the successful addition of the ZoomInfo site map, open the Dynamics 365 Sales Hub app. The ZoomInfo Group you added appears in the left navigation pane.
Add ZoomInfo form to table entities
You can add the ZoomInfo form to standard or custom Account, Contacts, and Leads table entities. When you add the form, sellers can access the ZoomInfo data without moving away from records.
To add the form, follow these steps:
- Create a solution
- Add solution components to table entity
- Add form to table entity
- Customize form components
Create a solution
Create a solution to locate and work with the components you customize. Then, apply them to the Power Platform environment that hosts your Dynamics 365 apps. This process makes it easier to return to your custom solution to make future changes.
To create a solution:
Sign in to the Power Apps portal and choose the organization where you installed the ZoomInfo app.
On the left navigation pane, select Solutions.
Select New solution. On the New solution pane, enter the information as described in the following table:
Field Description Display Name The name shown in the list of solutions. You can change this later. Name The unique name of the solution. This name is generated from the value you enter in the Display Name column. You can edit this name before you save the solution, but you can't change it once it's saved. Publisher Select the default publisher or create a new publisher. Create a publisher for your organization to use consistently across the Power Platform environments where you use the solution. Version Enter a number for the version of your solution. This number is only important if you export your solution, as the version number is included in the file name. 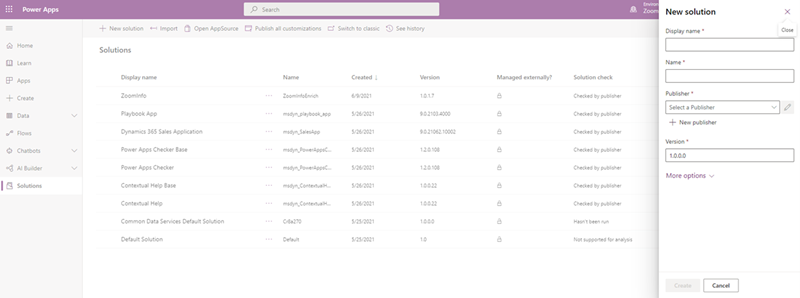
Select Create.
The new solution is created and listed in the solutions.
Add solution components to table entity
You can now add components that aren't available in the solution. In this example, you add a table component to Account, Contacts, and Leads entities.
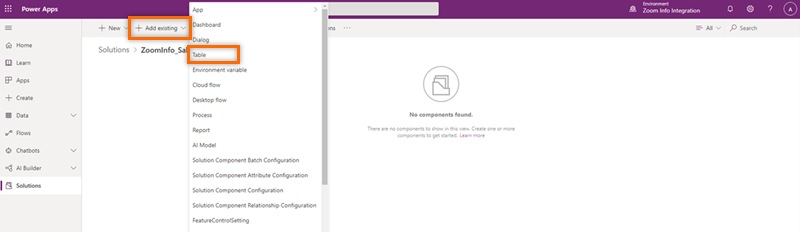
Open the solution you created and select Add existing > Table.
On the Add existing tables pane, add the tables Account, Contacts, and Leads.
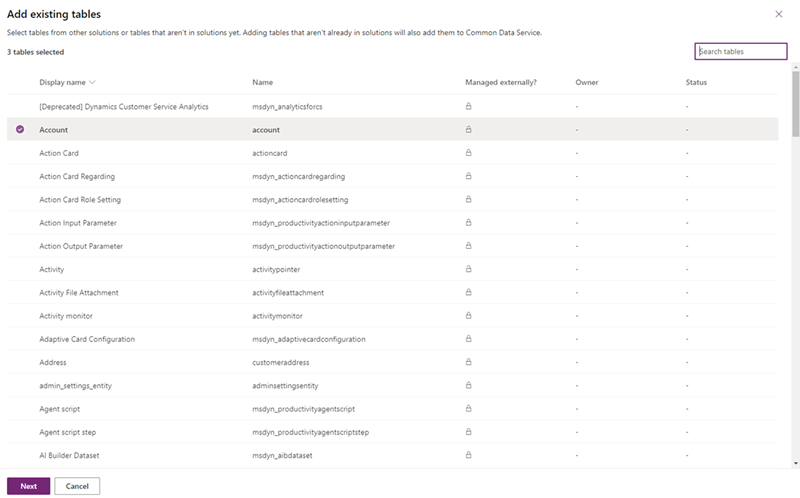
Select Next.
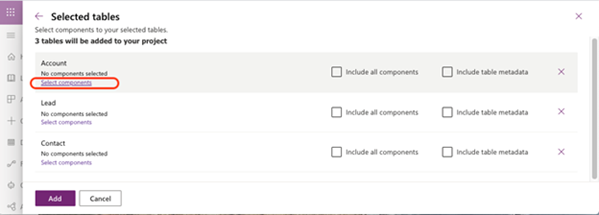
The three tables you selected are displayed.
Add form to table entity
After you add the Account, Contacts, and Leads table entities to the solution component, add the form component for each table entity.
Under the Account section, select Select components.
On the Account pane, select the Forms tab, and then select Account.
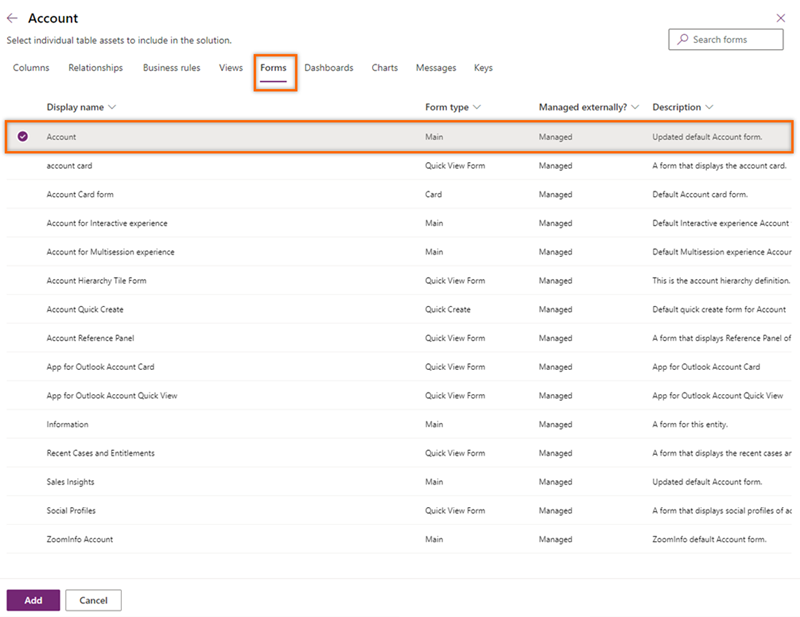
Select Add.
Under the Account section, you see the message 1 form selected, which indicates that you added the account form to the Account table.
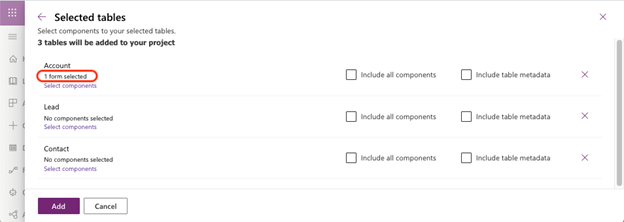
Repeat steps 1 through 3 for the Contact and Lead table entities to add the corresponding contact and lead form to each.
Select Add.
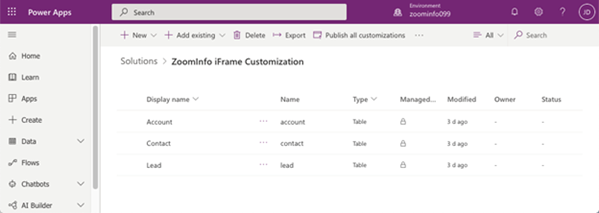
Customize form components
After you add the forms to the table entities, customize how the ZoomInfo inline pages display within the standard form component used with your Account, Leads, and Contacts pages. Perform the customization in classic mode.
From the form page of the Account form, select Switch to classic.
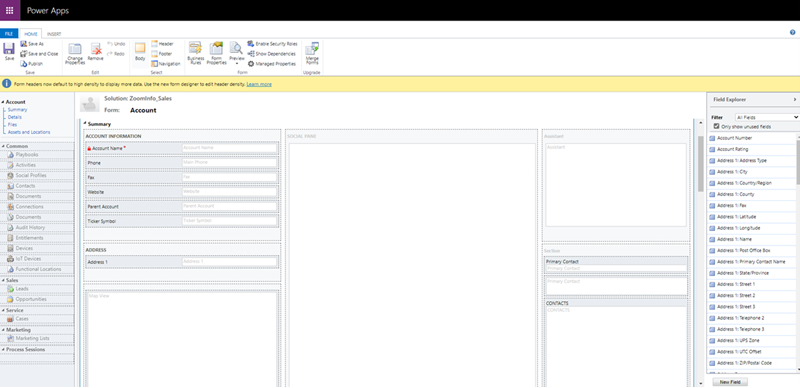
Select the Insert tab and then select One column.
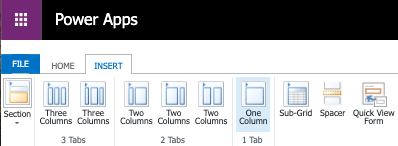
A new column is added as a Tab.
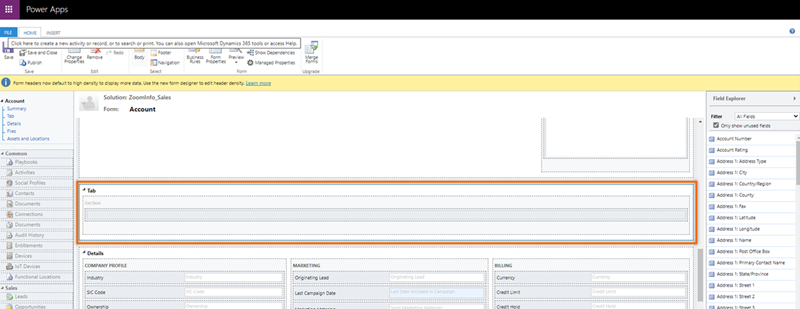
Select the Tab and then select Change Properties. The Tab Properties dialog opens.
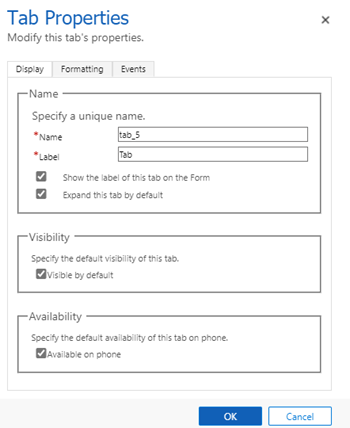
Enter the values for Name and Label as ZoomInfo, and then select OK. The tab is then renamed as ZoomInfo.
Go to the INSERT tab in the ZoomInfo tab. Select the Section area and then select Web Resource. The Add Web Resource dialog opens.
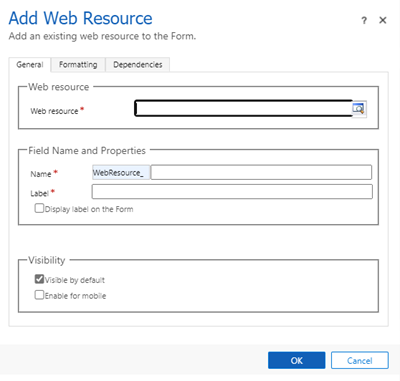
Under the General tab, enter the following information:
- In the Web resource section, search for and add the
zi_InlineIframe.htmlfile that is built into the ZoomInfo for Dynamics 365 app. - In the Field Name and Properties section, enter the Name and Label as ZoomInfo.
- In the Web Resource Properties section, select the Pass record object-type code and unique identifier as parameters option. This option helps ZoomInfo with the object type passed to perform data matches.
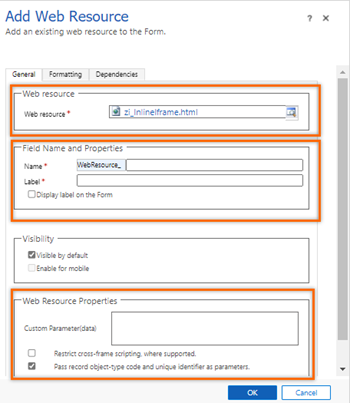
- In the Web resource section, search for and add the
Under the Formatting tab, in the Row Layout section, change the Number of Rows value to 16 to accommodate the ZoomInfo data.
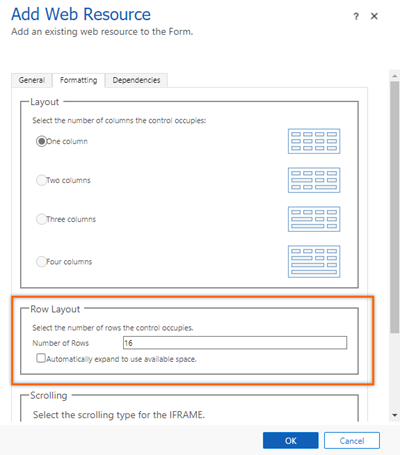
Select OK.
Save and publish the form.
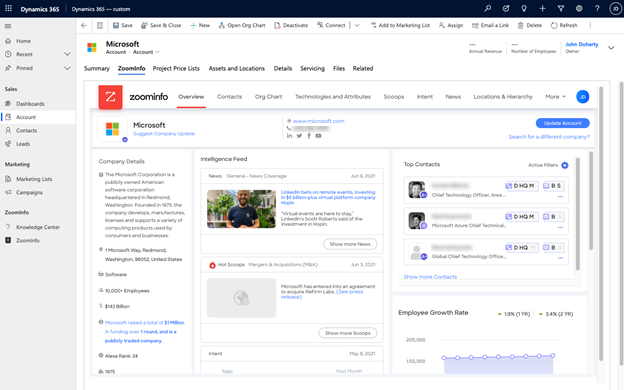
The ZoomInfo tab is added to the Accounts form. To verify, go to Dynamics 365 Sales Hub app and open the standard account page for a company. The ZoomInfo tab is added to the account.
Repeat steps 1 through 9 for the Contact and Leads forms.
Can't find the feature in your app?
There are a few possibilities:
- You don't have the necessary license to use this feature. Check out the comparison table and the licensing guide to see which features are available with your license.
- You don't have the necessary security role to use this feature.
- To configure or setup a feature, you need to have the Administration and customization roles
- To use sales-related features, you need to have the Primary sales roles
- Some tasks require specific Functional roles.
- Your administrator hasn't turned on the feature.
- Your organization is using a custom app. Check with your administrator for exact steps. The steps described in this article are specific to the out-of-the-box Sales Hub and Sales Professional apps.