Tutorial: Create and activate a Data Activator rule
In this tutorial, you use sample data included with Data Activator. You use the sample data to complete these tasks:
- Review a sample reflex
- Explore the data
- Explore a rule
- Start the rule
- Create an object
- Create a rule
Important
Data Activator is currently in preview.
Prerequisites
- Before you begin, you need a workspace with a Fabric capacity. You can learn about Fabric workspaces in the Workspaces article. If yo don't have Fabric, you're prompted to start a trial.
Create a sample Data Activator reflex
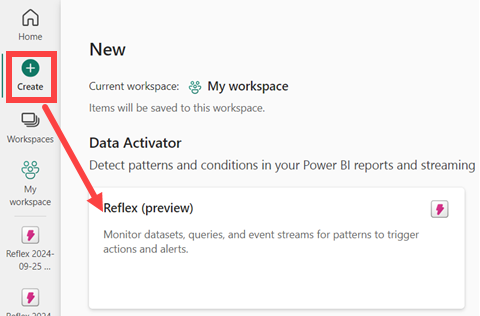
Start by opening a workspace that has a Fabric capacity.
From the Fabric homepage, select a workspace with a Fabric capacity and select Create > Reflex.
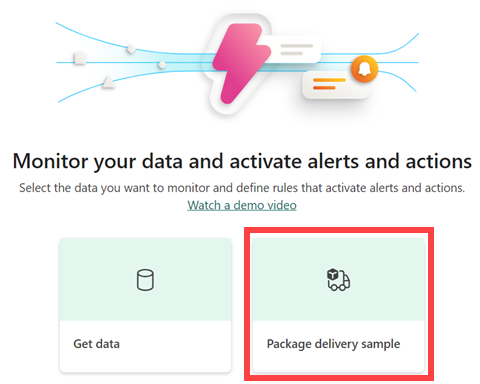
Select the sample to create a reflex that is prepopulated with sample events and objects.
Explore the data
In this step, we explore the event stream data this sample is built on.
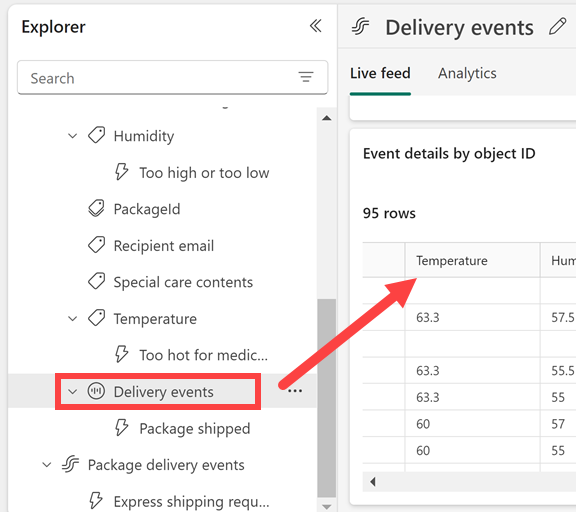
The new reflex has an Explorer section. Scroll down and select the Package delivery events stream.
These events show the real-time status of packages that are in the process of being delivered.
Look at the incoming events and hover over the event data in the live table. Each data point contains information about the event. You might have to scroll to see it all.
Explore a rule
Use a rule to specify the event values you want to monitor, the conditions you want to detect, and the actions you want Data Activator to take.
The Explorer pane displays objects, like event streams, for this reflex. Delivery events is one of the objects.
In the Explorer pane, select the object called Delivery events. You can create rules about objects that use data from the Package delivery events event stream. For example, a rule that checks packages for temperature.
Notice that the Events by object ID section is organized by Package ID. Package ID is the column ID that uniquely identifies each package. We use this unique ID to assign the Package events to Package objects.

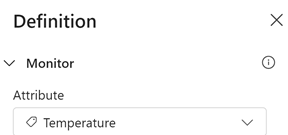
Select the Temperature rule called Too hot for medicine. Scroll through the Definition pane to see how the rule works.
In the Monitor section, select Temperature. The temperature values come from the Temperature column in the Delivery events table. (You can see the Temperature column in an earlier screenshot.
Scroll down to Condition. Our rule is monitoring temperatures that become greater than 50.
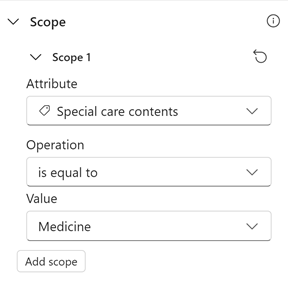
Scroll further down to Scope. Our rule applies only to packages containing medicine. In the Delivery events table, the rule looks at the column named SpecialCare. In the SpecialCare column, some of the packages have a value of Medicine.
Lastly, scroll down to Action. Our rule sends a Teams message if the condition is met.

We created a Data Activator rule. The rule is running against the Package delivery events event stream. The rule looks for packages that have medicine and checks to see if the temperature has become greater than 50 degrees. When the temperature becomes greater than 50 degrees, a Teams message is sent.
Look at the other rules to learn how they work.
Start the rule
Now you're familiar with the events and objects used to create a rule. The next step is to start the rule.
Select Too hot for medicine.
Optionally, send a test message by selecting Test. First check that you're the Recipient. Make sure that you receive the message and that it looks the way you expect.
Select Start. This causes the rule to become active. You receive a Teams message whenever a medicine package is too hot. The rule should trigger several times every hour.
Later, you can turn off the rule using the Stop button.
Create an object
Now it's time to create an object of your own. In this section, delete the Package object. Then, recreate it to track the status of packages in transit where the hours in delivery become greater than 100.
- Select and delete the Package object.
- Select the Package delivery events stream.
- In the ribbon, select New object.
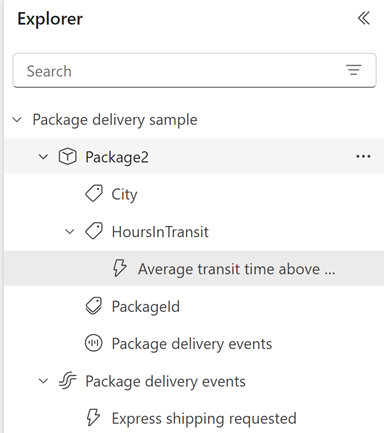
- Name your new object Package2 and choose Package ID as the unique ID.
- Add HoursInTransit and City as properties of the object.
- Select Create.
Create a new rule
Create a rule that alerts you if the transit time in delivery exceeds a threshold.
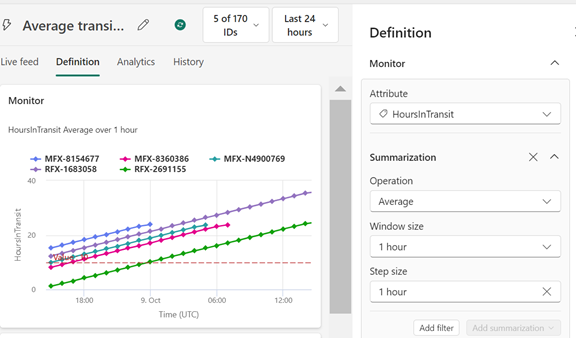
Select your new HoursInTransit property. From the ribbon, select New rule. From the header, select the pencil icon to edit the name of the rule. Name it Average transit time above target. Your Package2 object looks like this.
In the Definition pane, select HoursInTransit. Then select Show options > Add summarization > Average. Set an aggregation Window size of 1 hour and a Step size of 1 hour. The Monitor chart updates to reflect the summarization, and your rule looks like this.
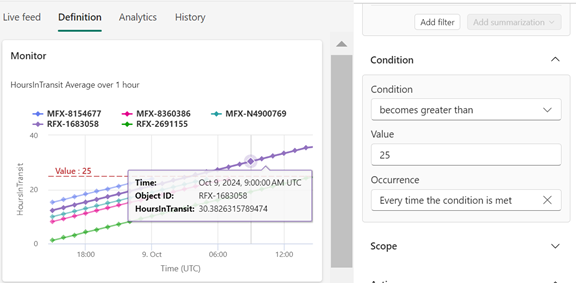
In the Condition step, detect when the average transit time becomes greater than 25. Set the rule to alert you every time the condition is met. After you complete this step, the Condition chart updates, and the rule looks like this.
Specify an action for your rule. You can choose to send a Teams message or Email. Customize your action according to how you would like it to appear.
Test your rule by selecting the Test action button. Make sure you get an alert. If using email, it might take a minute or two to arrive.
Start your rule by selecting Save and start.
You created your first object and rule. As next steps, you might try setting up some other rules on the Package2 object. When you're ready to try using Data Activator on your own data, follow the steps in the Get data for Data Activator article.
Clean up resources
Once you finish with the rules you created as part of the tutorial, be sure to stop them. If you don't stop the rules, you will continue to receive the rule notifications. You also might incur charges for background processing. Select each rule in turn and select the Stop button from the ribbon.

Related content
You can also learn more about Microsoft Fabric: