Operations and maintenance for reporting in Configuration Manager
Applies to: Configuration Manager (current branch)
After the infrastructure is in place for reporting in Configuration Manager, there are many operations that you typically do to manage reports and subscriptions.
Note
This article focuses on reports in SQL Server Reporting Services. Starting in version 2002, you can integrate reporting with Power BI Report Server. For more information, see Integrate with Power BI Report Server.
Run a report from Reporting Services
Configuration Manager stores its reports in SQL Server Reporting Services. The report retrieves data from the Configuration Manager site database. You can access reports in the Configuration Manager console or by using Report Manager via a web browser. Open reports from a web browser on any computer that can access the reporting services point, and the user has sufficient rights to view the reports. To run reports, you need Read rights for the Site permission and the Run Report permission for specific objects.
When you run a report, it displays the report title, description, and category in the language of the local OS. For more information, see Languages for reports.
Note
Report Manager is a web-based report access and management tool. You can use it to administer a single report server instance over an HTTPS connection. Use Report Manager for operational tasks: view reports, modify report properties, and manage associated report subscriptions. This article provides the steps to view a report and modify report properties in Report Manager. For more information about other options in Report Manager, see What is Report Manager?
Use the following procedures to run a Configuration Manager report.
Run a report in the Configuration Manager console
In the Configuration Manager console, go to the Monitoring workspace. Expand Reporting, and then select Reports. This node lists the available reports.
Tip
If this node doesn't list any reports, verify that the reporting services point is installed and configured. For more information, see Configure reporting.
Select the report that you want to run. On the Home tab of the ribbon, in the Report Group section, select Run to open the report.
If there are required parameters, specify them and then select View Report.
Run a report in a web browser
In your web browser, go to the Report Manager URL, for example,
https://Server1/Reports. Find this address on the Report Manager URL page in Reporting Services Configuration Manager.In Report Manager, select the report folder for Configuration Manager, for example, ConfigMgr_CAS.
Tip
If Report Manager doesn't list any reports, verify that the reporting services point is installed and configured. For more information, see Configure reporting.
Select the report category for the report that you want to run, and then select the specific report. The report opens in Report Manager.
If there are required parameters, specify them and then select View Report.
Modify the properties of a report
Report properties include the report name and description. You can view the properties for a report n the Configuration Manager console.
To change the properties, use Report Manager:
In your web browser, go to the Report Manager URL, for example,
https://Server1/Reports.In Report Manager, select the report folder for Configuration Manager, for example, ConfigMgr_CAS.
Select the report category, and then select the specific report. The report opens in Report Manager.
Select the Properties tab. Modify the report name and description, and then select Apply.
Report Manager saves the report properties on the report server. The Configuration Manager console shows the updated report properties for the report.
Edit a report
When an existing Configuration Manager report doesn't retrieve the information that you want, edit it in Report Builder. You can also use Report Builder to change the layout or design of the report. While you can directly edit a default report, it's best to clone it. Open the report to edit, and then select Save As.
To edit a report, you need Site Modify permission and Modify Report permissions on the specific objects in the report.
Important
Site updates preserve built-in reports. If you modify a standard report, when the site updates, it renames the report with an underscore prefix (_). This behavior makes sure that the site update doesn't overwrite the modified report by the standard report.
If you modify predefined reports, before you install a site update, back up your custom reports. After the update, restore the report in Reporting Services. If make significant changes to a predefined report, create a new report instead. New reports that you create before you upgrade a site are not overwritten.
Use the following procedure to edit the properties for a Configuration Manager report.
In the Configuration Manager console, go to the Monitoring workspace. Expand Reporting, and then select the Reports node.
Select the report that you want to modify. On the Home tab of the ribbon, in the Report Group section, select Edit. It may prompt you to enter credentials. If Report Builder isn't installed on the computer, Configuration Manager prompts you to install it. Report Builder is required to modify and create reports.
In Report Builder, modify the appropriate report settings. Select Save to save the report to the report server.
Create reports
There are two types of reports that you can create:
A model-based report lets you interactively select the items you want to include in your report. For more information about creating custom report models, see Create custom report models for Configuration Manager in SQL Server Reporting Services.
A SQL-based report lets you retrieve data that's based on a report SQL statement.
Important
To create a new report, your account needs Site Modify permission. You can only create a report in folders for which you have Modify Report permissions.
Create a model-based report
Use the following procedure to create a model-based Configuration Manager report.
In the Configuration Manager console, go to the Monitoring workspace, expand Reporting, and select the Reports node.
On the Home tab of the ribbon, in the Create section, select Create Report. This action opens the Create Report Wizard.
On the Information page, configure the following settings:
Type: Select Model-based Report.
Name: Specify a name for the report.
Description: Specify a description for the report.
Server: Displays the name of the report server where you create this report.
Path: Select Browse to specify a folder in which to store the report.
On the Model Selection page, select an available model in the list to create this report. The Preview section displays the SQL Server views and entities that are available in this report model.
Complete the Create Report Wizard.
Open Report Builder to configure the report settings. For more information, see Edit a Configuration Manager report.
In Report Builder, create the report layout, select data in the available SQL Server views, and add parameters to the report.
Select Run to run your report. Verify that the report provides the information that you expect. If needed, select Design to modify the report further.
Select Save to save the report to the report server.
Create a SQL-based report
When you create an SQL statement for a custom report, don't directly reference SQL Server tables. Always reference supported reporting SQL Server views from the site database. These views have names that start with v_. For more information, see Creating custom reports by using SQL Server views in Configuration Manager.
You can also reference public stored procedures from the site database. These stored procedures have names that start with sp_.
Use the following procedure to create a SQL-based Configuration Manager report.
In the Configuration Manager console, go to the Monitoring workspace, expand Reporting, and select the Reports node.
On the Home tab of the ribbon, in the Create section, select Create Report. This action opens the Create Report Wizard.
On the Information page, configure the following settings:
Type: Select SQL-based Report.
Name: Specify a name for the report.
Description: Specify a description for the report.
Server: Displays the name of the report server where you create this report.
Path: Select Browse to specify a folder in which to store the report.
Complete the Create Report Wizard.
Open Report Builder to configure the report settings. For more information, see Edit a Configuration Manager report.
In Report Builder, provide the SQL statement for the report. You can also build the SQL statement by using columns in available views. If needed, add parameters to the report.
Select Run to run your report. Verify that the report provides the information that you expect. If needed, select Design to modify the report further.
Select Save to save the report to the report server.
Manage report subscriptions
Report subscriptions in SQL Server Reporting Services let you configure the automatic delivery of specified reports by email or to a file share at scheduled intervals. To configure report subscriptions, use the Create Subscription Wizard in Configuration Manager.
Create a report subscription to deliver a report to a file share
When you create a report subscription to deliver a report to a file share, Reporting Services copies the report in the specified format to the file share that you specify. You can subscribe to and request delivery for only one report at a time.
When you create a subscription that uses a file share, specify an existing shared folder as the destination. The report server doesn't create the folder or network share. When you specify the destination folder in a subscription, use a UNC path and don't include trailing backslashes (\) in the folder path. The following example is a valid UNC path for the destination folder: \\server\reportfiles\operations\2001.
Note
When you create the subscription, you specify a user name and password. This account needs access to this share with Write permissions to the destination folder.
Reporting Services can render reports in different file formats. For example, MHTML or Excel. You select the format when you create the subscription. Although you can select any supported rendering format, some formats work better than others when rendering to a file.
Limitations for report subscriptions to a file share
The following list includes the limitations of report subscriptions to a file share:
Unlike reports that you host and manage on a report server, Reporting Services delivers reports to a shared folder as static files.
Interactive features of the report don't work for reports stored as files. The report represents any interactive features as static elements.
If the report includes charts, it uses the default presentation.
If the report links through to another report, it renders the link as static text.
If you want to keep interactive features in a delivered report, use email delivery. For more information, see Create a report subscription to deliver a report by email.
Process to create a report subscription for a file share
Use the following procedure to create a report subscription to deliver a report to a file share.
In the Configuration Manager console, go to the Monitoring workspace, expand Reporting, and select the Reports node.
Select a report folder, then select the report to which you want to subscribe. On the Home tab of the ribbon, in the Report Group section, select Create Subscription. This action opens the Create Subscription Wizard.
On the Subscription Delivery page, configure the following settings:
Report delivered by: Select Windows File Share.
File Name: Specify the file name for the report. By default, the report file doesn't include a file name extension. Select Add file extension when created to automatically add a file name extension based on the format.
Path: Specify a UNC path to an existing folder where you want to deliver this report. For example,
\\server\reportfiles\operations.Render Format: Select one of the following formats for the report file:
- XML file with report data
- CSV (comma delimited)
- TIFF file
- Acrobat (PDF) file
- HTML 4.0
Note
If your report has images, the HTML 4.0 format doesn't include them.
- MHTML (web archive)
- RPL Renderer (Report Page Layout)
- Excel
- Word
User Name: Specify a Windows user account with write permissions to the specified Path.
Password: Specify the password for the above Windows user account.
Overwrite option: Select one of the following options to configure the behavior when a file of the same name exists in the destination folder:
- Overwrite an existing file with a newer version
- Do not overwrite an existing file
- Increment file names as newer versions are added: This option appends a number to the new report's file name to distinguish it from earlier versions.
Description: Optionally, specify additional information about this report subscription.
On the Subscription Schedule page, select one of the following delivery schedule options for the report subscription:
Use shared schedule: A shared schedule is a previously defined schedule that can be used by other report subscriptions. When you select this option, also select a shared schedule. If there are no shared schedules, select the option to create a new schedule.
Create new schedule: Configure the schedule on which this report runs. The schedule includes the interval, start time and date, and the end date for this subscription. By default, a new subscription creates a new schedule to run every hour starting at the current date and time.
On the Subscription Parameters page, specify any parameters that this report requires to run unattended. If the report has no parameters, the wizard doesn't display this page.
Complete the wizard.
Verify that Configuration Manager successfully created the report subscription. Select the Subscriptions node to view and modify report subscriptions.
Create a report subscription to deliver a report by email
When you create a report subscription to deliver a report by email, Reporting Services sends an email to the recipients that you configure. The email includes the report as an attachment. The report server doesn't validate email addresses or get them from an email server. You can email reports to any valid email account within or outside of your organization.
Note
To enable the Email subscription option, you need to configure the email settings in Reporting Services. For more information, see Email delivery in reporting services.
You can select one or both of the following email delivery options:
Send a notification with a link to the generated report.
Send an embedded or attached report. The rendering format and browser determine whether it embeds or attaches the report.
- If your browser supports HTML 4.0 and MHTML, and you select the MHTML (web archive) format, the email embeds the report in the message.
- All other formats deliver reports as attachments.
- Reporting Services doesn't check the size of the attachment or message before it sends the report. If the attachment or message exceeds the maximum limit allowed by your mail server, the report isn't delivered.
Use the following procedure to create a report subscription to deliver a report by using email.
In the Configuration Manager console, go to the Monitoring workspace, expand Reporting, and select the Reports node.
Select a report folder, then select the report to which you want to subscribe. On the Home tab of the ribbon, in the Report Group section, select Create Subscription. This action opens the Create Subscription Wizard.
On the Subscription Delivery page, configure the following settings:
Report delivered by: Select E-mail.
To: Specify a valid email address as the recipient.
Note
To enter multiple recipients, separate each email address with a semicolon (
;).Cc: Optionally, specify an email address to receive a copy of this report.
Bcc: Optionally, specify an email address to receive a blind copy of this report.
Reply To: Specify the reply address. If the recipient replies to the email message, the reply goes to this address.
Subject: Specify a subject line for the subscription email message.
Priority: Select the priority flag for this email message: Low, Normal, or High. Microsoft Exchange uses this flag to indicate the importance of the email message.
Comment: Specify text for the body of the subscription email message.
Description: Optionally, specify additional information about this report subscription.
Include Link: Include the URL for this report in the body of the email message.
Include Report: Attach the report to the email message. Use the Render Format option to specify the report format to attach.
Render Format: Select one of the following formats for the attached report file:
- XML file with report data
- CSV (comma delimited)
- TIFF file
- Acrobat (PDF) file
- MHTML (web archive)
- Excel
- Word
On the Subscription Schedule page, select one of the following delivery schedule options for the report subscription:
Use shared schedule: A shared schedule is a previously defined schedule that can be used by other report subscriptions. When you select this option, also select a shared schedule. If there are no shared schedules, select the option to create a new schedule.
Create new schedule: Configure the schedule on which this report runs. The schedule includes the interval, start time and date, and the end date for this subscription. By default, a new subscription creates a new schedule to run every hour starting at the current date and time.
On the Subscription Parameters page, specify any parameters that this report requires to run unattended. If the report has no parameters, the wizard doesn't display this page.
Complete the wizard.
Verify that Configuration Manager successfully created the report subscription. Select the Subscriptions node to view and modify report subscriptions.
Favorites
Configuration Manager ships with several hundred reports by default, and you may have added more to that list. Instead of continually searching for reports you commonly use, starting in version 2103, you can make a report a favorite. This action allows you to quickly access it from the new Favorites node.
The list of favorites is per user, not per site or hierarchy.
Prerequisites for report favorites
The version of SQL Server Reporting Services on the site's reporting service point needs to be SQL Server 2017 or later.
Note
All instances of SQL Server Reporting Services on the server need to be version 2017 or later.
Add a favorite
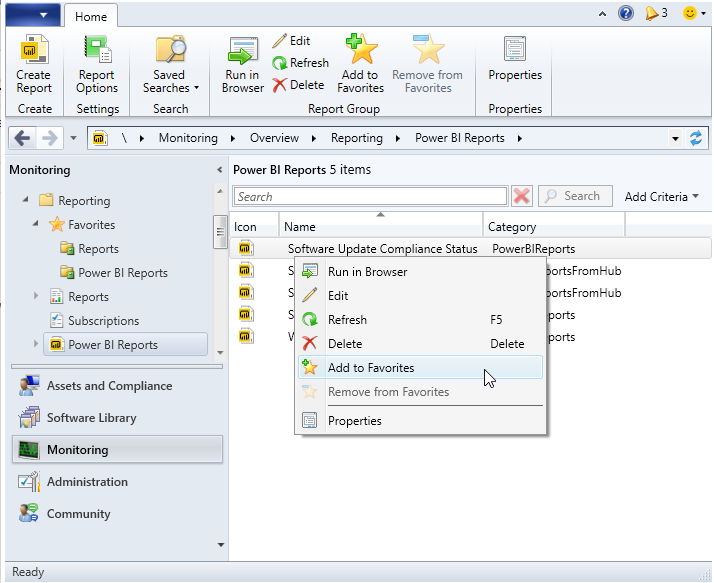
In the Configuration Manager console, go to the Monitoring workspace. Expand the Reporting node, and select either the Reports or Power BI Reports node.
Select a report that you frequently use. Then in the ribbon, select Add to Favorites. The report's icon changes to a yellow star, which indicates that it's a favorite.
Tip
You can select more than one report to add them all as favorites.
To remove a report from the list of favorites, select it, and then select Remove from Favorites. When you remove a favorite, Configuration Manager doesn't delete the report.
Under the Reporting node, expand the new Favorites node. To view your list of favorites, select either the Reports or Power BI Reports node.
Tip
You can directly connect to your favorite reports in your browser. For example,
https://rsp.contoso.com/Reports/favorites.You can manage the reports the same from the list of favorites.
Feedback
Coming soon: Throughout 2024 we will be phasing out GitHub Issues as the feedback mechanism for content and replacing it with a new feedback system. For more information see: https://aka.ms/ContentUserFeedback.
Submit and view feedback for